Network Installation Guide
Page 2
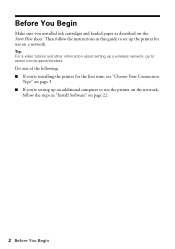
Do one of the following: ■ If you're installing the printer for use the printer on the network, follow the steps in this guide to set up the printer for the first time, see "Choose Your Connection Type" on page 3. ■ If you installed ink cartridges and loaded paper as described on page 22... you 're setting up an additional computer to use on a network. Tip: For a video tutorial and other information about setting up a wireless network, go to: epson.com/support/wireless. Then follow the instructions in "Install Software" on the Start Here sheet.
Do one of the following: ■ If you're installing the printer for use the printer on the network, follow the steps in this guide to set up the printer for the first time, see "Choose Your Connection Type" on page 3. ■ If you installed ink cartridges and loaded paper as described on page 22... you 're setting up an additional computer to use on a network. Tip: For a video tutorial and other information about setting up a wireless network, go to: epson.com/support/wireless. Then follow the instructions in "Install Software" on the Start Here sheet.
Network Installation Guide
Page 7
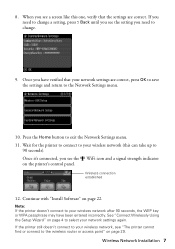
Continue with "Install Software" on the printer's control panel. Wireless Network Installation 7 If you need to change a setting, press ... connected, you see the setting you have been entered incorrectly. Note: If the printer doesn't connect to your wireless network, see the WiFi icon and a signal strength indicator on page 22. If the... When you see "The printer cannot find or connect to the wireless router or access point" on page 4 to select your wireless network (this one, verify that your network settings are correct. 8. Wait for the printer to connect to the Network ...
Continue with "Install Software" on the printer's control panel. Wireless Network Installation 7 If you need to change a setting, press ... connected, you see the setting you have been entered incorrectly. Note: If the printer doesn't connect to your wireless network, see the WiFi icon and a signal strength indicator on page 22. If the... When you see "The printer cannot find or connect to the wireless router or access point" on page 4 to select your wireless network (this one, verify that your network settings are correct. 8. Wait for the printer to connect to the Network ...
Network Installation Guide
Page 14
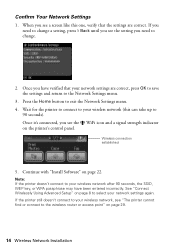
Confirm Your Network Settings 1. Wait for the printer to connect to your wireless network (this one, verify that your wireless network, see a screen like this can take up to the Network Settings menu. 3. When you see "The printer cannot find or connect to change a setting, press y Back until ... 2. Continue with "Install Software" on page 8 to select your wireless network after 90 seconds, the SSID, WEP key, or WPA passphrase may have verified that the settings are correct, press OK to save the settings and return to 90 seconds). If the printer still doesn't connect to ...
Confirm Your Network Settings 1. Wait for the printer to connect to your wireless network (this one, verify that your wireless network, see a screen like this can take up to the Network Settings menu. 3. When you see "The printer cannot find or connect to change a setting, press y Back until ... 2. Continue with "Install Software" on page 8 to select your wireless network after 90 seconds, the SSID, WEP key, or WPA passphrase may have verified that the settings are correct, press OK to save the settings and return to 90 seconds). If the printer still doesn't connect to ...
Network Installation Guide
Page 15
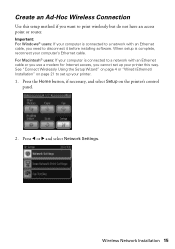
...you cannot set up your computer's Ethernet cable. Create an Ad-Hoc Wireless Connection Use this way. When setup is complete, reconnect your printer. 1. Press l or r and select Network Settings. See "Connect Wirelessly Using the Setup Wizard" on page 4 or "Wired (Ethernet) Installation" on the...: For Windows® users: If your computer is connected to a network with an Ethernet cable, you want to disconnect it before installing software. For Macintosh® users: If your printer this setup method if you need to print wirelessly but do not have an access point or router.
...you cannot set up your computer's Ethernet cable. Create an Ad-Hoc Wireless Connection Use this way. When setup is complete, reconnect your printer. 1. Press l or r and select Network Settings. See "Connect Wirelessly Using the Setup Wizard" on page 4 or "Wired (Ethernet) Installation" on the...: For Windows® users: If your computer is connected to a network with an Ethernet cable, you want to disconnect it before installing software. For Macintosh® users: If your printer this setup method if you need to print wirelessly but do not have an access point or router.
Network Installation Guide
Page 21
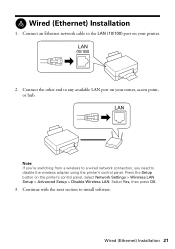
...section to any available LAN port on your printer. 2. Wired (Ethernet) Installation 1. Press the Setup button on your router, access point, or hub. Wired (Ethernet) Installation 21 Select Yes, then press OK. 3. Connect the other end to install software. Note: If you're switching from a... wireless to a wired network connection, you need to the LAN (10/100) port on the printer's control panel, select Network Settings > Wireless LAN Setup > Advanced Setup > Disable...
...section to any available LAN port on your printer. 2. Wired (Ethernet) Installation 1. Press the Setup button on your router, access point, or hub. Wired (Ethernet) Installation 21 Select Yes, then press OK. 3. Connect the other end to install software. Note: If you're switching from a... wireless to a wired network connection, you need to the LAN (10/100) port on the printer's control panel, select Network Settings > Wireless LAN Setup > Advanced Setup > Disable...
Network Installation Guide
Page 22
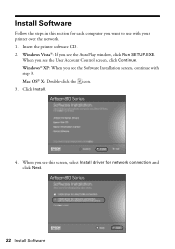
Windows Vista®: If you see the AutoPlay window, click Run SETUP.EXE. Windows® XP: When you see the Software Installation screen, continue with your printer over the network. 1. Insert the printer software CD. 2. Mac OS® X: Double-click the icon. 3. When you see this section for network connection and click Next. 22 Install Software When you see the User Account Control screen, click Continue. Install Software Follow the steps in this screen, select Install driver for each computer you want to use with step 3. Click Install. 4.
Windows Vista®: If you see the AutoPlay window, click Run SETUP.EXE. Windows® XP: When you see the Software Installation screen, continue with your printer over the network. 1. Insert the printer software CD. 2. Mac OS® X: Double-click the icon. 3. When you see this section for network connection and click Next. 22 Install Software When you see the User Account Control screen, click Continue. Install Software Follow the steps in this screen, select Install driver for each computer you want to use with step 3. Click Install. 4.
Network Installation Guide
Page 23
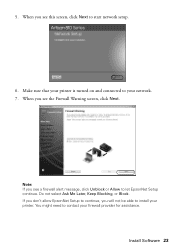
5. If you don't allow EpsonNet Setup to continue, you see a firewall alert message, click Unblock or Allow to let EpsonNet Setup continue. Install Software 23 Do not select Ask Me Later, Keep Blocking, or Block. When you see this screen, click Next to your printer. Make sure that your printer is turned on and connected to start network setup. 6. When you see the Firewall Warning screen, click Next. Note: If you will not be able to contact your firewall provider for assistance. You might need to install your network. 7.
5. If you don't allow EpsonNet Setup to continue, you see a firewall alert message, click Unblock or Allow to let EpsonNet Setup continue. Install Software 23 Do not select Ask Me Later, Keep Blocking, or Block. When you see this screen, click Next to your printer. Make sure that your printer is turned on and connected to start network setup. 6. When you see the Firewall Warning screen, click Next. Note: If you will not be able to contact your firewall provider for assistance. You might need to install your network. 7.
Network Installation Guide
Page 24
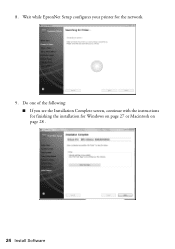
Do one of the following: ■ If you see the Installation Complete screen, continue with the instructions for finishing the installation for the network. 9. Wait while EpsonNet Setup configures your printer for Windows on page 27 or Macintosh on page 28 . 24 Install Software 8.
Do one of the following: ■ If you see the Installation Complete screen, continue with the instructions for finishing the installation for the network. 9. Wait while EpsonNet Setup configures your printer for Windows on page 27 or Macintosh on page 28 . 24 Install Software 8.
Network Installation Guide
Page 25
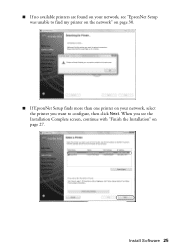
■ If no available printers are found on your network, see "EpsonNet Setup was unable to find my printer on the network" on page 30. ■ If EpsonNet Setup finds more than one printer on your network, select the printer you see the Installation Complete screen, continue with "Finish the Installation" on page 27. When you want to configure, then click Next. Install Software 25
■ If no available printers are found on your network, see "EpsonNet Setup was unable to find my printer on the network" on page 30. ■ If EpsonNet Setup finds more than one printer on your network, select the printer you see the Installation Complete screen, continue with "Finish the Installation" on page 27. When you want to configure, then click Next. Install Software 25
Network Installation Guide
Page 26
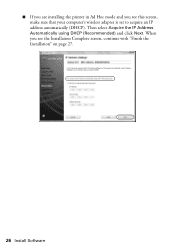
■ If you are installing the printer in Ad Hoc mode and you see this screen, make sure that your computer's wireless adapter is set to acquire an IP address automatically (DHCP). When you see the Installation Complete screen, continue with "Finish the Installation" on page 27. 26 Install Software Then select Acquire the IP Address Automatically using DHCP (Recommended) and click Next.
■ If you are installing the printer in Ad Hoc mode and you see this screen, make sure that your computer's wireless adapter is set to acquire an IP address automatically (DHCP). When you see the Installation Complete screen, continue with "Finish the Installation" on page 27. 26 Install Software Then select Acquire the IP Address Automatically using DHCP (Recommended) and click Next.
Network Installation Guide
Page 29
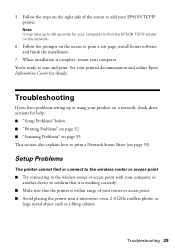
...Network Status Sheet (see page 33). Follow the prompts on page 33 This section also explains how to print a test page, install bonus software, and finish the installation. 7. Troubleshooting 29 Follow the steps on the network. 6. Note: It may take up or using your computer.... it is working correctly. ■ Make sure that the printer is complete, restart your product on a network, check these sections for details. Setup Problems The printer cannot find the EPSON TCPIP printer on the right side of your EPSON TCPIP printer. See your computer or another device to scan and print...
...Network Status Sheet (see page 33). Follow the prompts on page 33 This section also explains how to print a test page, install bonus software, and finish the installation. 7. Troubleshooting 29 Follow the steps on the network. 6. Note: It may take up or using your computer.... it is working correctly. ■ Make sure that the printer is complete, restart your product on a network, check these sections for details. Setup Problems The printer cannot find the EPSON TCPIP printer on the right side of your EPSON TCPIP printer. See your computer or another device to scan and print...
Network Installation Guide
Page 30
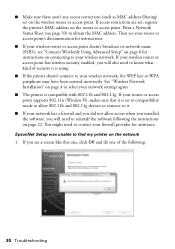
... to select your wireless network. Print a Network Status Sheet (see a screen like this one, click OK and do one of security it . ■ If your firewall provider for instructions on connecting to find my printer on the network 1. You might need to contact your network has a firewall and you ...did not allow 802.11b and 802.11g devices to connect to it is using. ■ If the printer doesn't connect to reinstall the software following : 30 Troubleshooting If your router or access point supports 802.11n (Wireless N), makes sure that it is compatible with 802...
... to select your wireless network. Print a Network Status Sheet (see a screen like this one, click OK and do one of security it . ■ If your firewall provider for instructions on connecting to find my printer on the network 1. You might need to contact your network has a firewall and you ...did not allow 802.11b and 802.11g devices to connect to it is using. ■ If the printer doesn't connect to reinstall the software following : 30 Troubleshooting If your router or access point supports 802.11n (Wireless N), makes sure that it is compatible with 802...
Network Installation Guide
Page 31
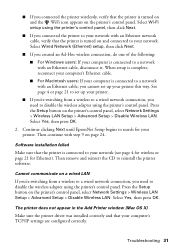
... cable, you created an Ad-Hoc wireless connection, do one of the following: ■ For Windows users: If your printer. ■ If you're switching from a wireless to a wired network connection, you need to reinstall the printer software. Troubleshooting 31 Press the Setup button on the printer's control panel. Select Wired Network (Ethernet) setup, then...
... cable, you created an Ad-Hoc wireless connection, do one of the following: ■ For Windows users: If your printer. ■ If you're switching from a wireless to a wired network connection, you need to reinstall the printer software. Troubleshooting 31 Press the Setup button on the printer's control panel. Select Wired Network (Ethernet) setup, then...
Network Installation Guide
Page 33
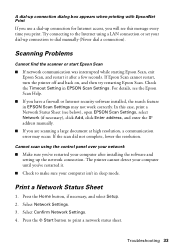
... connection to make sure your computer until you've restarted it after installing the software and setting up the network connection. Select Network Settings. 3. If Epson Scan cannot restart, turn the printer off and back on, and then try restarting Epson Scan. A dial-up connection dialog box appears when printing with EpsonNet Print If...
... connection to make sure your computer until you've restarted it after installing the software and setting up the network connection. Select Network Settings. 3. If Epson Scan cannot restart, turn the printer off and back on, and then try restarting Epson Scan. A dial-up connection dialog box appears when printing with EpsonNet Print If...
Network Installation Guide
Page 34
..., without notice. © 2009 Epson America, Inc. 5/09 34 Copyright Notice General Notice: Other product names used herein are for use of Seiko Epson Corporation. See the "Software Notices" section in any form or by Seiko Epson Corporation. Artisan is a registered logomark of this ... product or unauthorized modifications, repairs, or alterations to this printer. Neither Seiko Epson Corporation nor its affiliates shall be trademarks of Seiko Epson Corporation. The information contained herein is subject to software program rights owned by purchaser or third parties as a ...
..., without notice. © 2009 Epson America, Inc. 5/09 34 Copyright Notice General Notice: Other product names used herein are for use of Seiko Epson Corporation. See the "Software Notices" section in any form or by Seiko Epson Corporation. Artisan is a registered logomark of this ... product or unauthorized modifications, repairs, or alterations to this printer. Neither Seiko Epson Corporation nor its affiliates shall be trademarks of Seiko Epson Corporation. The information contained herein is subject to software program rights owned by purchaser or third parties as a ...
Product Brochure
Page 2
...USB devices that comply with USB 2.0 standards, rated 500 mA or less. 4 One-year limited warranty to be recycled7 • ENERGY STAR® qualified • RoHS... Leopard, please visit www.epson.com/support/snowleopard Software Included Epson printer driver, Epson Print CD, Web to Page, Epson Scan, ArcSoft® Print Creations™, Epson scanner drivers, Presto®...adapter What's In The Box Artisan 810 photo all -in length) Borderless Photo Sizes 3.5" x 5", 4" x 6", 5" x 7", 8" x 10", 8.5" x 11", 16:9 wide Paper Types Supports plain paper, Epson Bright White Paper, Photo ...
...USB devices that comply with USB 2.0 standards, rated 500 mA or less. 4 One-year limited warranty to be recycled7 • ENERGY STAR® qualified • RoHS... Leopard, please visit www.epson.com/support/snowleopard Software Included Epson printer driver, Epson Print CD, Web to Page, Epson Scan, ArcSoft® Print Creations™, Epson scanner drivers, Presto®...adapter What's In The Box Artisan 810 photo all -in length) Borderless Photo Sizes 3.5" x 5", 4" x 6", 5" x 7", 8" x 10", 8.5" x 11", 16:9 wide Paper Types Supports plain paper, Epson Bright White Paper, Photo ...
Quick Guide
Page 31
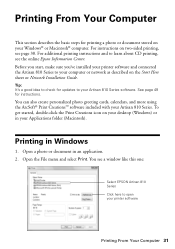
Before you start, make sure you've installed your printer software and connected the Artisan 810 Series to your Windows® or Macintosh® computer. To get started, double-click the Print Creations icon on your desktop ... on your Artisan 810 Series software. For instructions on two-sided printing, see the online Epson Information Center. Tip: It's a good idea to check for instructions. For additional printing instructions and to open your Artisan 810 Series. Open a photo or document in Windows 1. You see a window like this one: Select EPSON Artisan 810 Series Click ...
Before you start, make sure you've installed your printer software and connected the Artisan 810 Series to your Windows® or Macintosh® computer. To get started, double-click the Print Creations icon on your desktop ... on your Artisan 810 Series software. For instructions on two-sided printing, see the online Epson Information Center. Tip: It's a good idea to check for instructions. For additional printing instructions and to open your Artisan 810 Series. Open a photo or document in Windows 1. You see a window like this one: Select EPSON Artisan 810 Series Click ...
Quick Guide
Page 37
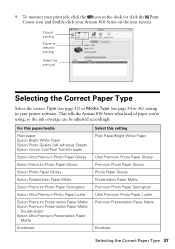
... the icon in your Artisan 810 Series on Cool Peel Transfer paper Epson Ultra Premium Photo Paper Glossy Epson Premium Photo Paper Glossy Epson Photo Paper Glossy Epson Presentation Paper Matte Epson Premium Photo Paper Semi-gloss Epson Ultra Premium Photo Paper Luster Epson Premium Presentation Paper Matte Epson Premium Presentation Paper Matte Double-sided Epson Ultra Premium Presentation Paper Matte... (see page 32) or Media Type (see page 34 or 36) setting in the dock (or click the Print Center icon and double-click your printer software.
... the icon in your Artisan 810 Series on Cool Peel Transfer paper Epson Ultra Premium Photo Paper Glossy Epson Premium Photo Paper Glossy Epson Photo Paper Glossy Epson Presentation Paper Matte Epson Premium Photo Paper Semi-gloss Epson Ultra Premium Photo Paper Luster Epson Premium Presentation Paper Matte Epson Premium Presentation Paper Matte Double-sided Epson Ultra Premium Presentation Paper Matte... (see page 32) or Media Type (see page 34 or 36) setting in the dock (or click the Print Center icon and double-click your printer software.
Quick Guide
Page 38
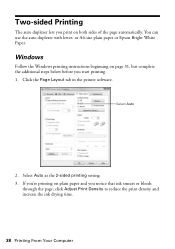
Select Auto 2. or A4-size plain paper or Epson Bright White Paper. Windows Follow the Windows printing instructions beginning on page 31, but complete the additional steps below before you notice that ink smears ... From Your Computer Select Auto as the 2-sided printing setting. 3. You can use the auto duplexer with letter- Click the Page Layout tab in the printer software. If you're printing on both sides of the page automatically. Two-sided Printing The auto duplexer lets you print on plain paper and you...
Select Auto 2. or A4-size plain paper or Epson Bright White Paper. Windows Follow the Windows printing instructions beginning on page 31, but complete the additional steps below before you notice that ink smears ... From Your Computer Select Auto as the 2-sided printing setting. 3. You can use the auto duplexer with letter- Click the Page Layout tab in the printer software. If you're printing on both sides of the page automatically. Two-sided Printing The auto duplexer lets you print on plain paper and you...
Quick Guide
Page 50
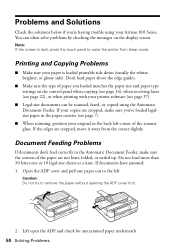
... solutions below if you're having trouble using the Automatic Document Feeder. If your Artisan 810 Series. If the edges are cropped, move it away from sleep mode. Caution: Do not try to wake the printer from the corner slightly. You can often solve problems by checking the messages on... the control panel when copying (see page 14), when receiving faxes (see page 22), or when printing with your printer software (see page 7). ■ When scanning, position your paper is dark, press the touch panel to remove the paper without opening the ADF cover ...
... solutions below if you're having trouble using the Automatic Document Feeder. If your Artisan 810 Series. If the edges are cropped, move it away from sleep mode. Caution: Do not try to wake the printer from the corner slightly. You can often solve problems by checking the messages on... the control panel when copying (see page 14), when receiving faxes (see page 22), or when printing with your printer software (see page 7). ■ When scanning, position your paper is dark, press the touch panel to remove the paper without opening the ADF cover ...


