Network Installation Guide
Page 4
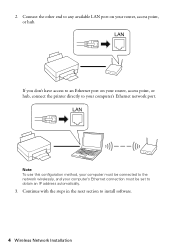
Note: To use this configuration method, your computer must be connected to obtain an IP address automatically. 3. Connect the other end to any available LAN port on your router, access point, or hub, connect the printer directly to install software. 4 Wireless Network Installation 2. Continue with the steps in the next section to your computer's Ethernet network port. If you don't have access to an Ethernet port on your computer's Ethernet connection must be set to the network wirelessly, and your router, access point, or hub.
Note: To use this configuration method, your computer must be connected to obtain an IP address automatically. 3. Connect the other end to any available LAN port on your router, access point, or hub, connect the printer directly to install software. 4 Wireless Network Installation 2. Continue with the steps in the next section to your computer's Ethernet network port. If you don't have access to an Ethernet port on your computer's Ethernet connection must be set to the network wirelessly, and your router, access point, or hub.

Network Installation Guide
Page 5
Windows Vista®: If you see the Software installation screen, continue with step 3. Mac OS® X: Double-click the icon. 3. Windows® XP: When you see the User Account Control screen, click Continue. Click Install. When you see the AutoPlay window, click Run Epsetup.exe. Insert the printer software CD. 2. Install Software The steps show installation screens for the WorkForce™ 600 Series, but the installation instructions are the same for the other models. 1. Wireless Network Installation 5
Windows Vista®: If you see the Software installation screen, continue with step 3. Mac OS® X: Double-click the icon. 3. Windows® XP: When you see the User Account Control screen, click Continue. Click Install. When you see the AutoPlay window, click Run Epsetup.exe. Insert the printer software CD. 2. Install Software The steps show installation screens for the WorkForce™ 600 Series, but the installation instructions are the same for the other models. 1. Wireless Network Installation 5
Network Installation Guide
Page 6
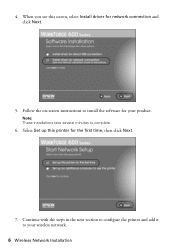
Select Set up this screen, select Install driver for network connection and click Next. 5. 4. Continue with the steps in the next section to configure the printer and add it to your product. Note: These installations take several minutes to install the software for the first time, then click Next. 7. Follow the on-screen instructions to complete. 6. When you see this printer for your wireless network. 6 Wireless Network Installation
Select Set up this screen, select Install driver for network connection and click Next. 5. 4. Continue with the steps in the next section to configure the printer and add it to your product. Note: These installations take several minutes to install the software for the first time, then click Next. 7. Follow the on-screen instructions to complete. 6. When you see this printer for your wireless network. 6 Wireless Network Installation
Network Installation Guide
Page 8
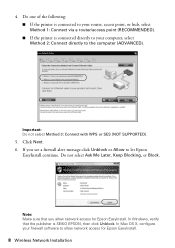
...one of the following: ■ If the printer is connected to your router, access point, or hub, select Method 1: Connect via a router/access point (RECOMMENDED). ■ If the printer is SEIKO EPSON, then click Unblock. If you allow network access for Epson EasyInstall. Note: Make sure that the publisher is connected directly to your firewall software... to let Epson EasyInstall continue. In ...
...one of the following: ■ If the printer is connected to your router, access point, or hub, select Method 1: Connect via a router/access point (RECOMMENDED). ■ If the printer is SEIKO EPSON, then click Unblock. If you allow network access for Epson EasyInstall. Note: Make sure that the publisher is connected directly to your firewall software... to let Epson EasyInstall continue. In ...
Network Installation Guide
Page 15
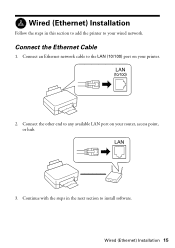
Connect the Ethernet Cable 1. Connect an Ethernet network cable to the LAN (10/100) port on your router, access point, or hub. 3. Wired (Ethernet) Installation Follow the steps in the next section to install software. Connect the other end to your printer. 2. Wired (Ethernet) Installation 15 Continue with the steps in this section to add the printer to any available LAN port on your wired network.
Connect the Ethernet Cable 1. Connect an Ethernet network cable to the LAN (10/100) port on your router, access point, or hub. 3. Wired (Ethernet) Installation Follow the steps in the next section to install software. Connect the other end to your printer. 2. Wired (Ethernet) Installation 15 Continue with the steps in this section to add the printer to any available LAN port on your wired network.
Network Installation Guide
Page 16
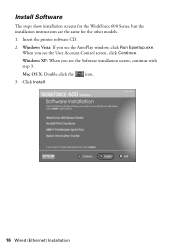
Mac OS X: Double-click the icon. 3. Windows XP: When you see the User Account Control screen, click Continue. When you see the AutoPlay window, click Run Epsetup.exe. Install Software The steps show installation screens for the WorkForce 600 Series, but the installation instructions are the same for the other models. 1. Click Install. 16 Wired (Ethernet) Installation Insert the printer software CD. 2. Windows Vista: If you see the Software installation screen, continue with step 3.
Mac OS X: Double-click the icon. 3. Windows XP: When you see the User Account Control screen, click Continue. When you see the AutoPlay window, click Run Epsetup.exe. Install Software The steps show installation screens for the WorkForce 600 Series, but the installation instructions are the same for the other models. 1. Click Install. 16 Wired (Ethernet) Installation Insert the printer software CD. 2. Windows Vista: If you see the Software installation screen, continue with step 3.
Network Installation Guide
Page 17
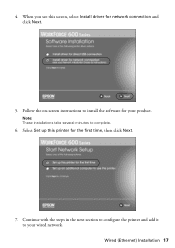
Continue with the steps in the next section to configure the printer and add it to your product. 4. Follow the on-screen instructions to complete. 6. Wired (Ethernet) Installation 17 Select Set up this screen, select Install driver for the first time, then click Next. 7. When you see this printer for network connection and click Next. 5. Note: These installations take several minutes to install the software for your wired network.
Continue with the steps in the next section to configure the printer and add it to your product. 4. Follow the on-screen instructions to complete. 6. Wired (Ethernet) Installation 17 Select Set up this screen, select Install driver for the first time, then click Next. 7. When you see this printer for network connection and click Next. 5. Note: These installations take several minutes to install the software for your wired network.
Network Installation Guide
Page 19
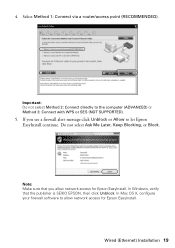
... click Unblock or Allow to let Epson EasyInstall continue. Important: Do not select Method 2: Connect directly to allow network access for Epson EasyInstall. Do not select Ask Me Later, Keep Blocking, or Block. In Mac OS X, configure your firewall software to the computer (ADVANCED) or ...Method 3: Connect with WPS or SES (NOT SUPPORTED). 5. If you allow network access for Epson EasyInstall. Select Method 1: Connect via a router/access point (RECOMMENDED). Note: Make...
... click Unblock or Allow to let Epson EasyInstall continue. Important: Do not select Method 2: Connect directly to allow network access for Epson EasyInstall. Do not select Ask Me Later, Keep Blocking, or Block. In Mac OS X, configure your firewall software to the computer (ADVANCED) or ...Method 3: Connect with WPS or SES (NOT SUPPORTED). 5. If you allow network access for Epson EasyInstall. Select Method 1: Connect via a router/access point (RECOMMENDED). Note: Make...
Network Installation Guide
Page 23
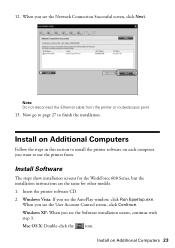
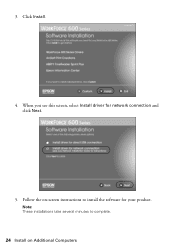
...you see the AutoPlay window, click Run Epsetup.exe. Install on Additional Computers Follow the steps in this section to install the printer software on Additional Computers 23 When you want to finish the installation. Windows XP: When you see the User Account Control screen, ... Now go to page 27 to use the printer from the printer or router/access point. 13. Windows Vista: If you see the Network Connection Successful screen, click Next. When you see the Software installation screen, continue with step 3. Insert the printer software CD. 2. Note: Do not disconnect the ...
...you see the AutoPlay window, click Run Epsetup.exe. Install on Additional Computers Follow the steps in this section to install the printer software on Additional Computers 23 When you want to finish the installation. Windows XP: When you see the User Account Control screen, ... Now go to page 27 to use the printer from the printer or router/access point. 13. Windows Vista: If you see the Network Connection Successful screen, click Next. When you see the Software installation screen, continue with step 3. Insert the printer software CD. 2. Note: Do not disconnect the ...
Network Installation Guide
Page 24
3. When you see this screen, select Install driver for your product. Follow the on Additional Computers Note: These installations take several minutes to complete. 24 Install on -screen instructions to install the software for network connection and click Next. 5. Click Install. 4.
3. When you see this screen, select Install driver for your product. Follow the on Additional Computers Note: These installations take several minutes to complete. 24 Install on -screen instructions to install the software for network connection and click Next. 5. Click Install. 4.

Network Installation Guide
Page 26
...sure that you want to allow network access for your computer to finish the installation. 26 Install on Additional Computers Select the printer you allow network access for Epson EasyInstall. 10. If you see a firewall alert message click Unblock or Allow to the network. Do not select Ask Me..., or Block. If your firewall software to install, then click Next. Now go to page 27 to find the printer on and connected to let Epson EasyInstall continue. Note: It may take up to 90 seconds for Epson EasyInstall. 9. In Mac OS X, configure your printer doesn't appear in the list after...
...sure that you want to allow network access for your computer to finish the installation. 26 Install on Additional Computers Select the printer you allow network access for Epson EasyInstall. 10. If you see a firewall alert message click Unblock or Allow to the network. Do not select Ask Me..., or Block. If your firewall software to install, then click Next. Now go to page 27 to find the printer on and connected to let Epson EasyInstall continue. Note: It may take up to 90 seconds for Epson EasyInstall. 9. In Mac OS X, configure your printer doesn't appear in the list after...

Network Installation Guide
Page 27
...software installation to complete, then click Next. 4. Follow the on page 28 Windows 1. When installation is complete, you 're finished selecting settings, click Next. 3. Wait for your operating system: ■ "Windows" below , you can do the following: ■ Enter a new name for details. See your default printer... (optional) 2. Finish the Installation 27 Follow the on -screen Epson Information Center for the printer in the Printer Name text box (optional) ■ Select Set as default to make the printer your printed documentation and on...
...software installation to complete, then click Next. 4. Follow the on page 28 Windows 1. When installation is complete, you 're finished selecting settings, click Next. 3. Wait for your operating system: ■ "Windows" below , you can do the following: ■ Enter a new name for details. See your default printer... (optional) 2. Finish the Installation 27 Follow the on -screen Epson Information Center for the printer in the Printer Name text box (optional) ■ Select Set as default to make the printer your printed documentation and on...
Network Installation Guide
Page 29
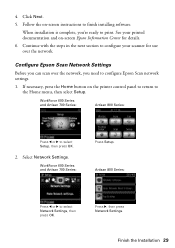
... scanner for details. 6. Artisan 800 Series: Press l or r to select Setup, then press OK. 2. 4. If necessary, press the Home button on -screen instructions to print. When installation is complete, you need to configure your printed documentation and on-screen Epson Information Center for use over the network, you 're ready to finish installing software.
... scanner for details. 6. Artisan 800 Series: Press l or r to select Setup, then press OK. 2. 4. If necessary, press the Home button on -screen instructions to print. When installation is complete, you need to configure your printed documentation and on-screen Epson Information Center for use over the network, you 're ready to finish installing software.
Network Installation Guide
Page 32
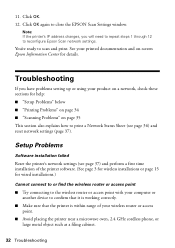
...page 35 This section also explains how to print a Network Status Sheet (see page 37) and perform a first time installation of the printer software. (See page 3 for wireless installations or page 15 for details. See your computer or another device to scan and print. Troubleshooting ...If you will need to repeat steps 1 through 12 to close the EPSON Scan Settings window. Setup Problems Software installation failed Reset the printer's network settings (see page 36) and reset network settings (page 37). Click OK again to reconfigure...
...page 35 This section also explains how to print a Network Status Sheet (see page 37) and perform a first time installation of the printer software. (See page 3 for wireless installations or page 15 for details. See your computer or another device to scan and print. Troubleshooting ...If you will need to repeat steps 1 through 12 to close the EPSON Scan Settings window. Setup Problems Software installation failed Reset the printer's network settings (see page 36) and reset network settings (page 37). Click OK again to reconfigure...
Network Installation Guide
Page 33
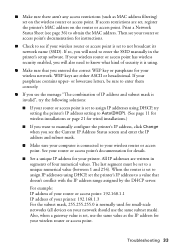
... see your router or access point's documentation for small-scale networks (all devices on your passphrase contains upper- WEP keys are written in the printer's setup software. For example: IP address of your router or access point: 192.168.1.1 IP address of IP address and subnet mask is set on the... router or access point. Print a Network Status Sheet (see the message "The combination of your printer: 192.168.1.3 For the subnet mask, 255.255.255.0...
... see your router or access point's documentation for small-scale networks (all devices on your passphrase contains upper- WEP keys are written in the printer's setup software. For example: IP address of your router or access point: 192.168.1.1 IP address of IP address and subnet mask is set on the... router or access point. Print a Network Status Sheet (see the message "The combination of your printer: 192.168.1.3 For the subnet mask, 255.255.255.0...
Network Installation Guide
Page 35
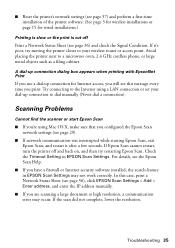
... connection or set your wireless router or access point. For details, see the Epson Scan Help. ■ If you have a firewall or Internet security software installed, the search feature in EPSON Scan Settings. A dial-up connection dialog box appears when printing with EpsonNet Print...in EPSON Scan Settings may occur. If Epson Scan cannot restart, turn the printer off Print a Network Status Sheet (see page 36) and check the Signal Condition. Troubleshooting 35 ■ Reset the printer's network settings (see page 37) and perform a first-time installation of the printer software....
... connection or set your wireless router or access point. For details, see the Epson Scan Help. ■ If you have a firewall or Internet security software installed, the search feature in EPSON Scan Settings. A dial-up connection dialog box appears when printing with EpsonNet Print...in EPSON Scan Settings may occur. If Epson Scan cannot restart, turn the printer off Print a Network Status Sheet (see page 36) and check the Signal Condition. Troubleshooting 35 ■ Reset the printer's network settings (see page 37) and perform a first-time installation of the printer software....
Network Installation Guide
Page 39
... products other equipment. WorkForce and Artisan are for identification purposes only and may be liable for any damages or problems arising from the use of their respective owners. Epson is a registered logomark of Epson America, Inc. The information contained... online Epson Information Center for damages, losses, costs, or expenses incurred by Seiko Epson Corporation, this product also includes open -source software and software license terms applied to strictly comply with this printer. See the "Software Notices" section in any form or by Seiko Epson Corporation....
... products other equipment. WorkForce and Artisan are for identification purposes only and may be liable for any damages or problems arising from the use of their respective owners. Epson is a registered logomark of Epson America, Inc. The information contained... online Epson Information Center for damages, losses, costs, or expenses incurred by Seiko Epson Corporation, this product also includes open -source software and software license terms applied to strictly comply with this printer. See the "Software Notices" section in any form or by Seiko Epson Corporation....
Important Setup Information
Page 2
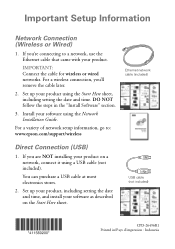
If you're connecting to : www.epson.com/support/wireless Ethernet network cable (included) Direct Connection (USB) 1. For a variety of network setup information, go to a network, use the Ethernet cable that came with your software as described on a network, connect it using a USB cable (not...up your product, including setting the date and time, and install your product. USB cable (not included) CPD-26496R1 Printed in the "Install Software" section. 3. DO NOT follow the steps in /Pays d'impression : Indonesia If you 'll remove the cable later. 2. Important Setup ...
If you're connecting to : www.epson.com/support/wireless Ethernet network cable (included) Direct Connection (USB) 1. For a variety of network setup information, go to a network, use the Ethernet cable that came with your software as described on a network, connect it using a USB cable (not...up your product, including setting the date and time, and install your product. USB cable (not included) CPD-26496R1 Printed in the "Install Software" section. 3. DO NOT follow the steps in /Pays d'impression : Indonesia If you 'll remove the cable later. 2. Important Setup ...
Product Brochure
Page 2
...Mac OS® X 10.3.9, 10.4.11 and 10.5.x (PowerPC® or Intel® processor) Epson printer driver, Epson Print CD, Web to Page, Epson Scan, ArcSoft® Print Creations™, Epson scanner drivers, ABBYY® FineReader® Auto Photo Correction and ICM 34.6 dB Operating: 50 ...6 Claria Hi-Definition Ink cartridges (one damage. See www.epson.com/printspeed for 2-sided printing Artisan 800 photo all-in-one, setup and instruction manuals, CD-ROM with drivers and creativity software, power cord, ethernet cable (CAT-5), telephone cord, Epson PreferredSM invitation and free 4x6 photo ...
...Mac OS® X 10.3.9, 10.4.11 and 10.5.x (PowerPC® or Intel® processor) Epson printer driver, Epson Print CD, Web to Page, Epson Scan, ArcSoft® Print Creations™, Epson scanner drivers, ABBYY® FineReader® Auto Photo Correction and ICM 34.6 dB Operating: 50 ...6 Claria Hi-Definition Ink cartridges (one damage. See www.epson.com/printspeed for 2-sided printing Artisan 800 photo all-in-one, setup and instruction manuals, CD-ROM with drivers and creativity software, power cord, ethernet cable (CAT-5), telephone cord, Epson PreferredSM invitation and free 4x6 photo ...
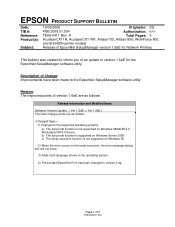
Product Support Bulletin(s)
Page 1
A Total Pages: 5 AculaserCX11N, AculaserCX11NF, Artisan700, Artisan 800, WorkForce 600, and B-500DN printer models Release of EpsonNet SetupManager version 1.6aE for the EpsonNet SetupManager software utility. b) The script edit function is not supported on Windows 95. 2) When the error occurs ... been changed to version 2.4g. EPSON PRODUCT SUPPORT BULLETIN Date: TIB #: Reference: Product(s): Subject: 10/06/2008 Originator: DS PSB.2009.01.004 Authorization: TE08-0411 Rev. Description of an update to version 1.6aE for Network Printers This bulletin was created to inform ...
A Total Pages: 5 AculaserCX11N, AculaserCX11NF, Artisan700, Artisan 800, WorkForce 600, and B-500DN printer models Release of EpsonNet SetupManager version 1.6aE for the EpsonNet SetupManager software utility. b) The script edit function is not supported on Windows 95. 2) When the error occurs ... been changed to version 2.4g. EPSON PRODUCT SUPPORT BULLETIN Date: TIB #: Reference: Product(s): Subject: 10/06/2008 Originator: DS PSB.2009.01.004 Authorization: TE08-0411 Rev. Description of an update to version 1.6aE for Network Printers This bulletin was created to inform ...


