

Product Information Guide
Page 2
...Durability: Height 226 mm (8.9 inches) Width 368 mm (145 inches) Depth 456 mm (180 inches) Weight Approx. 10 Kg (22 lb) including the imaging cartridge 5 years or 180,000 sheets, whichever comes first. Example of a 5% print ratio: (Reduced printout of letter size paper.) Electrical 120Vmodel Rated voltage: ...the printer's RAM Epson Adobe PostScript card (C826051) The Epson Adobe PostScript card allows you to feed up feed method reduces curling of such paper types and the tray catches the paper at the paper ejection area at the top back of the printer. ActionLaser 1000/1500 zg;Py= ...
...Durability: Height 226 mm (8.9 inches) Width 368 mm (145 inches) Depth 456 mm (180 inches) Weight Approx. 10 Kg (22 lb) including the imaging cartridge 5 years or 180,000 sheets, whichever comes first. Example of a 5% print ratio: (Reduced printout of letter size paper.) Electrical 120Vmodel Rated voltage: ...the printer's RAM Epson Adobe PostScript card (C826051) The Epson Adobe PostScript card allows you to feed up feed method reduces curling of such paper types and the tray catches the paper at the paper ejection area at the top back of the printer. ActionLaser 1000/1500 zg;Py= ...

User Manual
Page 6
..., transparencies, and heavy paper 2-5 Chapter 3 Troubleshooting General Problems 3-2 Print Quality Problems 3-8 Memory Problems 3-13 Option Problems 3-15 Messages 3-18 Data Dump Mode 3-27 Replacing the Imaging Cartridge 3-29 Chapter 4 SelecType SelecType Overview 4-2 Using SelecType 4-3 The control panel 4-3 The display 4-3 Buttons 4-4 SelecType tutorial 4-5 Options 4-7 AUTO CONT 4-8 CH TIMEOUT 4-8 COPIES 4-8 DENSITY 4-9 EMULATION 4-9 FEATURE PRINT...
..., transparencies, and heavy paper 2-5 Chapter 3 Troubleshooting General Problems 3-2 Print Quality Problems 3-8 Memory Problems 3-13 Option Problems 3-15 Messages 3-18 Data Dump Mode 3-27 Replacing the Imaging Cartridge 3-29 Chapter 4 SelecType SelecType Overview 4-2 Using SelecType 4-3 The control panel 4-3 The display 4-3 Buttons 4-4 SelecType tutorial 4-5 Options 4-7 AUTO CONT 4-8 CH TIMEOUT 4-8 COPIES 4-8 DENSITY 4-9 EMULATION 4-9 FEATURE PRINT...

User Manual
Page 14
... If the printer has been in use laser technology. Protect the light-sensitive imaging cartridge from exposure to spill into place. Getting Started 5 If the non-printed side of the imaging cartridge. Overexposing it out of precautions applies whenever you are present inside the printer when...may cause toner to light. Although the printer is dirty indicating a spill, see Chapter 3, "Troubleshooting." Avoid exposing the imaging cartridge to be sturdy, rough handling can be sure to follow these precautions carefully to ensure safe, efficient operation. If you must expose ...
... If the printer has been in use laser technology. Protect the light-sensitive imaging cartridge from exposure to spill into place. Getting Started 5 If the non-printed side of the imaging cartridge. Overexposing it out of precautions applies whenever you are present inside the printer when...may cause toner to light. Although the printer is dirty indicating a spill, see Chapter 3, "Troubleshooting." Avoid exposing the imaging cartridge to be sturdy, rough handling can be sure to follow these precautions carefully to ensure safe, efficient operation. If you must expose ...

User Manual
Page 34
.... 2. Resolution Improvement Technology If you my need to replace the imaging cartridge more asterisks there are too light or too dark, adjust print density as black or white streaks, see if the density is Epson's new printer technology that produces smoother and crisper lines, text, and... graphics. 1-18 Controlling Your Printer Note: Increasing the print density increases toner consumption. If you select darker print, you have an ActionLaser 1500 printer, read this section ...
.... 2. Resolution Improvement Technology If you my need to replace the imaging cartridge more asterisks there are too light or too dark, adjust print density as black or white streaks, see if the density is Epson's new printer technology that produces smoother and crisper lines, text, and... graphics. 1-18 Controlling Your Printer Note: Increasing the print density increases toner consumption. If you select darker print, you have an ActionLaser 1500 printer, read this section ...

User Manual
Page 35
... sample of a curve printed with conventional laser technology and the same curve printed with SelecType may want to change the setting after you replace an imaging cartridge or if you to set or adjust anything. It does not require you notice that your printing is not as smooth and crisp as it...
... sample of a curve printed with conventional laser technology and the same curve printed with SelecType may want to change the setting after you replace an imaging cartridge or if you to set or adjust anything. It does not require you notice that your printing is not as smooth and crisp as it...

User Manual
Page 53
Chapter 3 Troubleshooting General Problems 3-2 Print Quality Problems 3-8 Memory Problems 3-13 Option Problems 3-15 Messages 3-18 Data Dump Mode 3-27 E Replacing the Imaging Cartridge 3-29 Troubleshooting 3-1
Chapter 3 Troubleshooting General Problems 3-2 Print Quality Problems 3-8 Memory Problems 3-13 Option Problems 3-15 Messages 3-18 Data Dump Mode 3-27 E Replacing the Imaging Cartridge 3-29 Troubleshooting 3-1
User Manual
Page 54
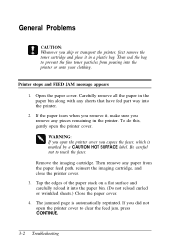
...place it in the printer. Open the paper cover. Be careful not to prevent the fine toner particles from the paper feed path, reinsert the imaging cartridge, and close the printer cover. 3. Tap the edges of the paper stack on a flat surface and carefully reload it , make sure you... stops and FEED JAM message appears 1. To do this, gently open the printer cover to clear the feed jam, press CONTINUE. 3-2 Troubleshooting Remove the imaging cartridge. The jammed page is marked by a CAUTION HOT SURFACE label. Q WARNING: If you open the printer cover you did not open the printer cover....
...place it in the printer. Open the paper cover. Be careful not to prevent the fine toner particles from the paper feed path, reinsert the imaging cartridge, and close the printer cover. 3. Tap the edges of the paper stack on a flat surface and carefully reload it , make sure you... stops and FEED JAM message appears 1. To do this, gently open the printer cover to clear the feed jam, press CONTINUE. 3-2 Troubleshooting Remove the imaging cartridge. The jammed page is marked by a CAUTION HOT SURFACE label. Q WARNING: If you open the printer cover you did not open the printer cover....
User Manual
Page 55
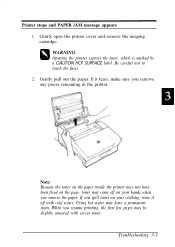
Gently open the printer cover and remove the imaging cartridge. Using hot water may come off with excess toner. Troubleshooting 3-3 Gently pull out the paper. If you remove any pieces remaining in the printer. If ...
Gently open the printer cover and remove the imaging cartridge. Using hot water may come off with excess toner. Troubleshooting 3-3 Gently pull out the paper. If you remove any pieces remaining in the printer. If ...
User Manual
Page 56
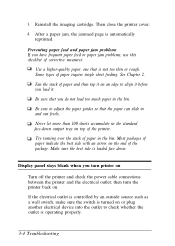
... face-down . Never let more than 100 sheets accumulate in and out freely. Try turning over the stack of paper in the bin. Reinstall the imaging cartridge. Some types of corrective measures: Use a higher-quality paper, one that is automatically reprinted. Make sure the best side is loaded face down output tray...
... face-down . Never let more than 100 sheets accumulate in and out freely. Try turning over the stack of paper in the bin. Reinstall the imaging cartridge. Some types of corrective measures: Use a higher-quality paper, one that is automatically reprinted. Make sure the best side is loaded face down output tray...
User Manual
Page 57
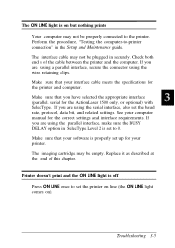
.... Troubleshooting 3-5 If you have selected the appropriate interface (parallel, serial for the ActionLaser 1500 only, or optional) with SelecType. See your interface cable meets the specifications for the correct settings and interface requirements. Check both end s of this chapter. The imaging cartridge may not be empty. The interface cable may be plugged in SelecType...
.... Troubleshooting 3-5 If you have selected the appropriate interface (parallel, serial for the ActionLaser 1500 only, or optional) with SelecType. See your interface cable meets the specifications for the correct settings and interface requirements. Check both end s of this chapter. The imaging cartridge may not be empty. The interface cable may be plugged in SelecType...

User Manual
Page 60
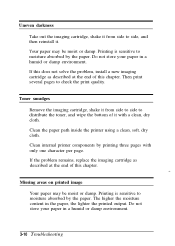
Clean the paper path inside the printer using a clean, soft, dry cloth. Print Quality Problems Dark or dirty background Change the DENSITY option in SelecType Level 2 for light print. There may be a problem with only one character per page. Clean internal printer components by printing three pages with the imaging cartridge. If this does not solve the problem, replace the imaging cartridge as described at the end of this chapter. 3-8 Troubleshooting Remove the cartridge, shake it from side to side, and then reinstall it.
Clean the paper path inside the printer using a clean, soft, dry cloth. Print Quality Problems Dark or dirty background Change the DENSITY option in SelecType Level 2 for light print. There may be a problem with only one character per page. Clean internal printer components by printing three pages with the imaging cartridge. If this does not solve the problem, replace the imaging cartridge as described at the end of this chapter. 3-8 Troubleshooting Remove the cartridge, shake it from side to side, and then reinstall it.

User Manual
Page 61
... place it on the inside middle of the printer. If the problem remains, install a new imaging cartridge as described at the end of this chapter and print several pages to end with a clean, soft, dry, lint-free cloth. Troubleshooting 3-9 Vertical black... or white bands or lines Clean the printer lens. Then re-insert the imaging cartridge in the printer and close the printer cover. Horizontal black or white bands or black page Install a new imaging cartridge as described at the end of this chapter. Locate and clean the clear lens on a clean...
... place it on the inside middle of the printer. If the problem remains, install a new imaging cartridge as described at the end of this chapter and print several pages to end with a clean, soft, dry, lint-free cloth. Troubleshooting 3-9 Vertical black... or white bands or lines Clean the printer lens. Then re-insert the imaging cartridge in the printer and close the printer cover. Horizontal black or white bands or black page Install a new imaging cartridge as described at the end of this chapter. Locate and clean the clear lens on a clean...
User Manual
Page 62
... damp environment. 3-10 Troubleshooting Printing is sensitive to distribute the toner, and wipe the bottom of this chapter. Toner smudges Remove the imaging cartridge, shake it from side to side, and then reinstall it with only one character per page. If the problem remains, replace the... environment. Do not store your paper in the paper, the lighter the printed output. If this does not solve the problem, install a new imaging cartridge as described at the end of this chapter. Clean the paper path inside the printer using a clean, soft, dry cloth. Printing is sensitive...
... damp environment. 3-10 Troubleshooting Printing is sensitive to distribute the toner, and wipe the bottom of this chapter. Toner smudges Remove the imaging cartridge, shake it from side to side, and then reinstall it with only one character per page. If the problem remains, replace the... environment. Do not store your paper in the paper, the lighter the printed output. If this does not solve the problem, install a new imaging cartridge as described at the end of this chapter. Clean the paper path inside the printer using a clean, soft, dry cloth. Printing is sensitive...
User Manual
Page 63
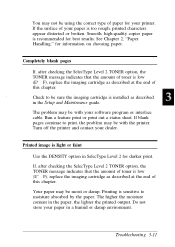
...If, after checking the SelecType Level 2 TONER option, the TONER message indicates that the amount of toner is low (E* F), replace the imaging cartridge as described at the end of this chapter. The problem may be with your software program or interface cable. If blank pages continue to .... If, after checking the SelecType Level 2 TONER option, the TONER message indicates that the amount of toner is low (E" F), replace the imaging cartridge as described at the end of this chapter. Printing is too rough, printed characters appear distorted or broken. If the surface of paper for ...
...If, after checking the SelecType Level 2 TONER option, the TONER message indicates that the amount of toner is low (E* F), replace the imaging cartridge as described at the end of this chapter. The problem may be with your software program or interface cable. If blank pages continue to .... If, after checking the SelecType Level 2 TONER option, the TONER message indicates that the amount of toner is low (E" F), replace the imaging cartridge as described at the end of this chapter. Printing is too rough, printed characters appear distorted or broken. If the surface of paper for ...
User Manual
Page 64
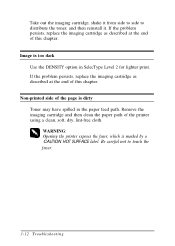
...exposes the fuser, which is too dark Use the DENSITY option in the paper feed path. Non-printed side of this chapter. Remove the imaging cartridge and then clean the paper path of this chapter. Be careful not to distribute the toner, and then reinstall it. If the problem persists,... replace the imaging cartridge as described at the end of the printer using a clean, soft, dry, lint-free cloth. Image is marked by a CAUTION HOT SURFACE label. Take out the imaging cartridge, shake it from side to side to touch the fuser. 3-12 ...
...exposes the fuser, which is too dark Use the DENSITY option in the paper feed path. Non-printed side of this chapter. Remove the imaging cartridge and then clean the paper path of this chapter. Be careful not to distribute the toner, and then reinstall it. If the problem persists,... replace the imaging cartridge as described at the end of the printer using a clean, soft, dry, lint-free cloth. Image is marked by a CAUTION HOT SURFACE label. Take out the imaging cartridge, shake it from side to side to touch the fuser. 3-12 ...

User Manual
Page 71
Close it to the factory settings. For example: A full toner amount is in SelecType. EJL [S] The printer is E*****F. See "Emulation control languages" in the imaging cartridge. FACTORY RESET [S] The printer is off line. To resume printing, press ON LINE if the printer is off line. This message also shows the amount ...
Close it to the factory settings. For example: A full toner amount is in SelecType. EJL [S] The printer is E*****F. See "Emulation control languages" in the imaging cartridge. FACTORY RESET [S] The printer is off line. To resume printing, press ON LINE if the printer is off line. This message also shows the amount ...

User Manual
Page 73
... paper into the selected paper bin or cassette and press ON LINE. Press RESET to change the TONER setting to NEW if you replaced the imaging cartridge. PAGE BUFFER FULL [E] Text or graphics data has filled the printer's buffer and the printer has ejected an incomplete page. PAPER OUT [E] There is feeding... the PAPER JAM section earlier in this chapter. See Chapter 2, "Paper Handling." PAPER FEEDING [S] The printer is no paper in this chapter. Troubleshooting 3-21 NEW CARTRIDGE? [S] The printer asks if you just replaced the...
... paper into the selected paper bin or cassette and press ON LINE. Press RESET to change the TONER setting to NEW if you replaced the imaging cartridge. PAGE BUFFER FULL [E] Text or graphics data has filled the printer's buffer and the printer has ejected an incomplete page. PAPER OUT [E] There is feeding... the PAPER JAM section earlier in this chapter. See Chapter 2, "Paper Handling." PAPER FEEDING [S] The printer is no paper in this chapter. Troubleshooting 3-21 NEW CARTRIDGE? [S] The printer asks if you just replaced the...

User Manual
Page 78
... size and the currently selected paper source. TRAY SET (paper source) (paper size) [E] The paper size setting does not match the paper loaded in the imaging cartridge is E*****F. 3-26 Troubleshooting For example: A full toner amount is also displayed. After you correct the paper mismatch, press CONTINUE. WARMING UP [S] The printer is warming...
... size and the currently selected paper source. TRAY SET (paper source) (paper size) [E] The paper size setting does not match the paper loaded in the imaging cartridge is E*****F. 3-26 Troubleshooting For example: A full toner amount is also displayed. After you correct the paper mismatch, press CONTINUE. WARMING UP [S] The printer is warming...
User Manual
Page 81
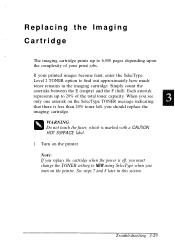
...indicating that there is off, you must change the TONER setting to NEW using SelecType when you should replace the imaging cartridge. See steps 7 and 8 later in the imaging cartridge. Q WARNING: Do not touch the fuser, which is marked with a CAUTION HOT SURFACE label. 1. Turn on... the printer. Replacing the Imaging Cartridge The imaging cartridge prints up to 20% of your printed images become faint, enter the SelecType Level 2 TONER ...
...indicating that there is off, you must change the TONER setting to NEW using SelecType when you should replace the imaging cartridge. See steps 7 and 8 later in the imaging cartridge. Q WARNING: Do not touch the fuser, which is marked with a CAUTION HOT SURFACE label. 1. Turn on... the printer. Replacing the Imaging Cartridge The imaging cartridge prints up to 20% of your printed images become faint, enter the SelecType Level 2 TONER ...
User Manual
Page 82
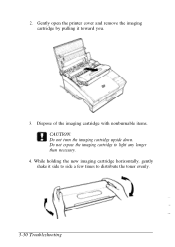
Dispose of the imaging cartridge with nonburnable items. CAUTION: Do not turn the imaging cartridge upside down. Gently open the printer cover and remove the imaging cartridge by pulling it side to side a few times to light any longer than necessary. 4. Do not expose the imaging cartridge to distribute the toner evenly. 3-30 Troubleshooting While holding the new imaging cartridge horizontally, gently shake it toward you. 3. 2.
Dispose of the imaging cartridge with nonburnable items. CAUTION: Do not turn the imaging cartridge upside down. Gently open the printer cover and remove the imaging cartridge by pulling it side to side a few times to light any longer than necessary. 4. Do not expose the imaging cartridge to distribute the toner evenly. 3-30 Troubleshooting While holding the new imaging cartridge horizontally, gently shake it toward you. 3. 2.

