
Network Guide
Page 4
... the network interface or cannot print from the network 39 Cannot print even if you have assigned the IP address to the computer and the printer 39 Unable to start EpsonNet Config 39 The message "EpsonNet Config cannot be used because no network is installed" appears when you start EpsonNet Config... to set the IP address using the arp/ping commands 40 The Model Name and IP Address do not appear in the EpsonNet Config dialog box. 40 Chapter 5 Tips for Administrator 41 Network Setup Menu 41 Setting an IP Address Using the arp/ping Command 41 Checking the LAN 42 Setting...
... the network interface or cannot print from the network 39 Cannot print even if you have assigned the IP address to the computer and the printer 39 Unable to start EpsonNet Config 39 The message "EpsonNet Config cannot be used because no network is installed" appears when you start EpsonNet Config... to set the IP address using the arp/ping commands 40 The Model Name and IP Address do not appear in the EpsonNet Config dialog box. 40 Chapter 5 Tips for Administrator 41 Network Setup Menu 41 Setting an IP Address Using the arp/ping Command 41 Checking the LAN 42 Setting...

Network Guide
Page 12
... TCP/IP or IPP for Network Printing Go to the section "Connecting the Network Interface to the Network" on the Local Area Connection Properties dialog box to install them. 5. Click Start, highlight Control Panel, and then click Network and Internet Connections. Windows XP For Windows XP, use the following necessary .... and then click OK. 6. If the necessary components are in the list, click Install to open the Internet Protocols Version 4 (TCP/IPv4) Properties dialog box. The necessary components are now installed. Under Network Tasks, click Change settings of the computer. 1.
... TCP/IP or IPP for Network Printing Go to the section "Connecting the Network Interface to the Network" on the Local Area Connection Properties dialog box to install them. 5. Click Start, highlight Control Panel, and then click Network and Internet Connections. Windows XP For Windows XP, use the following necessary .... and then click OK. 6. If the necessary components are in the list, click Install to open the Internet Protocols Version 4 (TCP/IPv4) Properties dialog box. The necessary components are now installed. Under Network Tasks, click Change settings of the computer. 1.
Network Guide
Page 13
... for network printing. Go to the section "Connecting the Network Interface to the Network" on the Local Area Connection Properties dialog box to open the Internet Protocols (TCP/IP) Properties dialog box. Open the Network control panel. Assign an IP address and other settings if necessary. 5. The following table lists the components...
... for network printing. Go to the section "Connecting the Network Interface to the Network" on the Local Area Connection Properties dialog box to open the Internet Protocols (TCP/IP) Properties dialog box. Open the Network control panel. Assign an IP address and other settings if necessary. 5. The following table lists the components...
Network Guide
Page 18
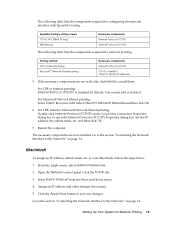
6. Click Next. 7. Click Finish. Select the Standard radio button and then select EPSON Network Printer. Follow the on-screen instructions to finish installing the printer driver. 18 Setting Up Your System for the printer, then click OK. 5. If an error occurs, the following dialog box appears. When you created for Network Printing Select the port you see a screen like this one, click the Manual button. 4. Follow the instructions to install the printer driver. 3. Insert the printer software CD-ROM in your CD-ROM or DVD drive. 2. Installing the printer driver 1.
6. Click Next. 7. Click Finish. Select the Standard radio button and then select EPSON Network Printer. Follow the on-screen instructions to finish installing the printer driver. 18 Setting Up Your System for the printer, then click OK. 5. If an error occurs, the following dialog box appears. When you created for Network Printing Select the port you see a screen like this one, click the Manual button. 4. Follow the instructions to install the printer driver. 3. Insert the printer software CD-ROM in your CD-ROM or DVD drive. 2. Installing the printer driver 1.
Network Guide
Page 21
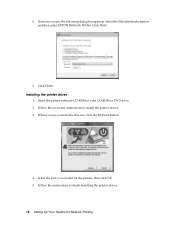
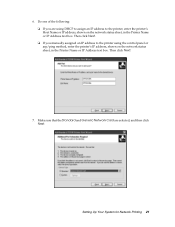
... Do one of the following: ❏ If you manually assigned an IP address to the printer, enter the printer's Host Name or IP address, shown on the network status sheet, in the Printer Name or IP Address text box. Make sure that the Standard and Generic Network Card are using DHCP to assign an... IP address to the printer using the control panel or arp/ping method, enter the printer's IP address, shown on the network status sheet, in the Printer Name or IP Address text box. Setting Up Your System for Network Printing 21 Then click Next. ...
... Do one of the following: ❏ If you manually assigned an IP address to the printer, enter the printer's Host Name or IP address, shown on the network status sheet, in the Printer Name or IP Address text box. Make sure that the Standard and Generic Network Card are using DHCP to assign an... IP address to the printer using the control panel or arp/ping method, enter the printer's IP address, shown on the network status sheet, in the Printer Name or IP Address text box. Setting Up Your System for Network Printing 21 Then click Next. ...
Network Guide
Page 29
... between 169.254.1.1 and 169.254.254.254 automatically when an IP address cannot be obtained by enabling this prevents any other devices on the printer so that support the Universal Plug and Play function. 13. Select Enable or Disable for Use Bonjour. If there is a server or a router functioning as... to the DNS server through the DHCP server that you want to specify manually, enter the host name and the domain name in the text boxes. 10. To assign an IP address manually, enter the IP address, the subnet mask, and the default gateway. otherwise, select Disable. 7. If you want ...
... between 169.254.1.1 and 169.254.254.254 automatically when an IP address cannot be obtained by enabling this prevents any other devices on the printer so that support the Universal Plug and Play function. 13. Select Enable or Disable for Use Bonjour. If there is a server or a router functioning as... to the DNS server through the DHCP server that you want to specify manually, enter the host name and the domain name in the text boxes. 10. To assign an IP address manually, enter the IP address, the subnet mask, and the default gateway. otherwise, select Disable. 7. If you want ...

Network Guide
Page 31
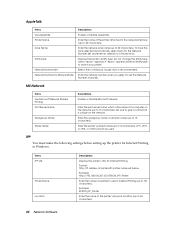
... Type Printer Status Current Time Refresh button Descriptions Administrator name of the printer Location of the printer Model of the network interface Unique hardware address of the text box indicates the printer's status. Green indicates that the printer is not updated automatically. The printer status is..., either Auto, MDI, or MDI-X The background color of the network interface. Displays the current time. Network Ethernet Configure the applicable settings for SNMP. Optional Administrator Type the name of the printer attached to the network interface Displays the current Ethernet...
... Type Printer Status Current Time Refresh button Descriptions Administrator name of the printer Location of the printer Model of the network interface Unique hardware address of the text box indicates the printer's status. Green indicates that the printer is not updated automatically. The printer status is..., either Auto, MDI, or MDI-X The background color of the network interface. Displays the current time. Network Ethernet Configure the applicable settings for SNMP. Optional Administrator Type the name of the printer attached to the network interface Displays the current Ethernet...
Network Guide
Page 34
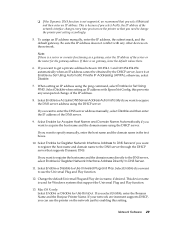
... name or domain name (up the printer for Internet Printing in this text box. Items IPP URL Printer Name Location Descriptions Displays the printer's URL for Manual Mode Descriptions Enable or Disable AppleTalk. Do not change the entity type unless "epson" appears. MS Network Items Use Microsoft... network (up to 12 characters). Format: http://IP address of the printer attached to the network interface (up to 32 characters). Enter the name of printer:631/printer name set the Network Number manually. If "epson" appears, enter an entity type to give a name that is recommended...
... name or domain name (up the printer for Internet Printing in this text box. Items IPP URL Printer Name Location Descriptions Displays the printer's URL for Manual Mode Descriptions Enable or Disable AppleTalk. Do not change the entity type unless "epson" appears. MS Network Items Use Microsoft... network (up to 12 characters). Format: http://IP address of the printer attached to the network interface (up to 32 characters). Enter the name of printer:631/printer name set the Network Number manually. If "epson" appears, enter an entity type to give a name that is recommended...

Network Guide
Page 40
... following command: Format: >ROUTE_ADD_the IP address of the network interface_ the IP address of time before a timeout. The printer and the computer must be in the dialog box mentioned above may happen when using EpsonNet Config for the network interface using a dial-up router. Cause If the valid... IP address is located beyond the router. The printer is not set, the items indicated in the same segment. The...
... following command: Format: >ROUTE_ADD_the IP address of the network interface_ the IP address of time before a timeout. The printer and the computer must be in the dialog box mentioned above may happen when using EpsonNet Config for the network interface using a dial-up router. Cause If the valid... IP address is located beyond the router. The printer is not set, the items indicated in the same segment. The...
Network Guide
Page 44
Click the Continue button. 3. Follow the on-screen instructions to the Trash. 44 Tips for Administrator Select Uninstall from the pull down menu. 5. Note: You can also uninstall the software by dragging the target folder to complete uninstallation. Double-click the EpsonNet Config Installer icon. 2. Click the Uninstall button. 6. In the License dialog box, read the License Agreement, and then click the Accept button. 4. Macintosh 1.
Click the Continue button. 3. Follow the on-screen instructions to the Trash. 44 Tips for Administrator Select Uninstall from the pull down menu. 5. Note: You can also uninstall the software by dragging the target folder to complete uninstallation. Double-click the EpsonNet Config Installer icon. 2. Click the Uninstall button. 6. In the License dialog box, read the License Agreement, and then click the Accept button. 4. Macintosh 1.

Printer Guide
Page 20
Use the small hex wrench to fasten the 10 hex screws with washers. 6. Unpacking the Printer 1. Open the box and remove the roll paper, spindle, polystyrene foam, and cardboard cushions. 22 Make sure each part of the stand is tightened securely. Attach the top horizontal strut as shown. 22 | Setting Up the Printer 5.
Use the small hex wrench to fasten the 10 hex screws with washers. 6. Unpacking the Printer 1. Open the box and remove the roll paper, spindle, polystyrene foam, and cardboard cushions. 22 Make sure each part of the stand is tightened securely. Attach the top horizontal strut as shown. 22 | Setting Up the Printer 5.
Printer Guide
Page 21
... a Photo Black cartridge. Setting Up the Printer | 23 2. Lift the box up and away from the sides of the box as shown below , in addition to use Matte Black, the Matte Black cartridge can be purchased separately. See page 144. Make sure you prefer to the printer: Power cord Roll paper and spindle Spindle...
... a Photo Black cartridge. Setting Up the Printer | 23 2. Lift the box up and away from the sides of the box as shown below , in addition to use Matte Black, the Matte Black cartridge can be purchased separately. See page 144. Make sure you prefer to the printer: Power cord Roll paper and spindle Spindle...
Printer Guide
Page 27
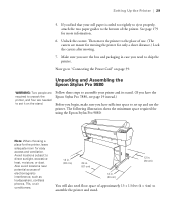
...Epson Stylus Pro 9880 WARNING: Two people are required to unpack the printer, and four are meant for moving the printer for only a short distance.) Lock the casters after moving. 7. Then move the printer to the place of approximately 13 × 13 feet (4 × 4 m) to ship the printer. Make sure you save the box... the Power Cord" on the stand. The following illustration shows the minimum space required for using the Epson Stylus Pro 9880: Note: When choosing a place for the printer, leave adequate room for more information. 6. Avoid locations subject to set it on page 39. Now...
...Epson Stylus Pro 9880 WARNING: Two people are required to unpack the printer, and four are meant for moving the printer for only a short distance.) Lock the casters after moving. 7. Then move the printer to the place of approximately 13 × 13 feet (4 × 4 m) to ship the printer. Make sure you save the box... the Power Cord" on the stand. The following illustration shows the minimum space required for using the Epson Stylus Pro 9880: Note: When choosing a place for the printer, leave adequate room for more information. 6. Avoid locations subject to set it on page 39. Now...

Printer Guide
Page 28
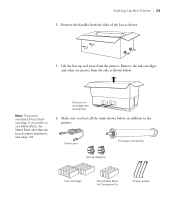
Open the box and remove the handles from the sides of the box. 2. 30 | Setting Up the Printer Unpacking and Assembling the Stand 1. Lift the box up, then set it aside. 3. Unpack the stand and make sure you have all these items: Parts: Support bar Base sections Basket hooks Paper basket Tools and Accessories: Hex wrench 4 Bolts 2 Wing nuts with spring washers and plain washers 5 Paper supports 30
Open the box and remove the handles from the sides of the box. 2. 30 | Setting Up the Printer Unpacking and Assembling the Stand 1. Lift the box up, then set it aside. 3. Unpack the stand and make sure you have all these items: Parts: Support bar Base sections Basket hooks Paper basket Tools and Accessories: Hex wrench 4 Bolts 2 Wing nuts with spring washers and plain washers 5 Paper supports 30
Printer Guide
Page 29
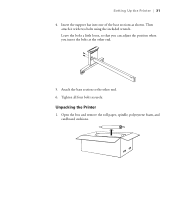
Insert the support bar into one of the base sections as shown. Then attach it with two bolts using the included wrench. Unpacking the Printer 1. Open the box and remove the roll paper, spindle, polystyrene foam, and cardboard cushions. 31 Attach the base section to the other end. 5. Tighten all four bolts securely. Leave the bolts a little loose, so that you can adjust the position when you insert the bolts at the other end. 6. Setting Up the Printer | 31 4.
Insert the support bar into one of the base sections as shown. Then attach it with two bolts using the included wrench. Unpacking the Printer 1. Open the box and remove the roll paper, spindle, polystyrene foam, and cardboard cushions. 31 Attach the base section to the other end. 5. Tighten all four bolts securely. Leave the bolts a little loose, so that you can adjust the position when you insert the bolts at the other end. 6. Setting Up the Printer | 31 4.
Printer Guide
Page 30
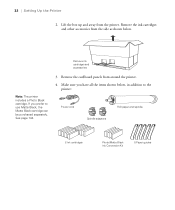
If you have all the items shown below . Make sure you prefer to the printer: Power cord Spindle adapters Roll paper and spindle 8 Ink cartridges Photo/Matte Black Ink Conversion Kit 5 Paper guides 32 Remove the ink cartridges and ...side as shown below , in addition to use Matte Black, the Matte Black cartridge can be purchased separately. Remove the cardboard panels from the printer. See page 144. 3. Remove ink cartridges and accessories # " Note: The printer includes a Photo Black cartridge. Lift the box up and away from around the printer. 4. 32 | Setting Up the...
If you have all the items shown below . Make sure you prefer to the printer: Power cord Spindle adapters Roll paper and spindle 8 Ink cartridges Photo/Matte Black Ink Conversion Kit 5 Paper guides 32 Remove the ink cartridges and ...side as shown below , in addition to use Matte Black, the Matte Black cartridge can be purchased separately. Remove the cardboard panels from the printer. See page 144. 3. Remove ink cartridges and accessories # " Note: The printer includes a Photo Black cartridge. Lift the box up and away from around the printer. 4. 32 | Setting Up the...
Printer Guide
Page 48
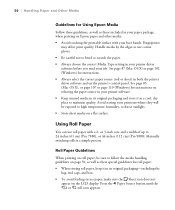
...including the bag, end caps, and box. • To avoid feeding excess paper, make sure the Sheet icon does not appear on the LCD display. Roll Paper Guidelines When printing on roll paper, be exposed to 24 inches (61 cm) [Pro 7880], or 44 inches (112 cm) [Pro 9880]. See page 87 (Mac OS...and on the printer's control panel. or 3-inch core and a width of up to high temperature, humidity, or direct sunlight. • Store sheet media on a flat surface. Press the l Paper Source button until the or roll icon appears. 50 50 | Handling Paper and Other Media Guidelines for Using Epson Media Follow ...
...including the bag, end caps, and box. • To avoid feeding excess paper, make sure the Sheet icon does not appear on the LCD display. Roll Paper Guidelines When printing on roll paper, be exposed to 24 inches (61 cm) [Pro 7880], or 44 inches (112 cm) [Pro 9880]. See page 87 (Mac OS...and on the printer's control panel. or 3-inch core and a width of up to high temperature, humidity, or direct sunlight. • Store sheet media on a flat surface. Press the l Paper Source button until the or roll icon appears. 50 50 | Handling Paper and Other Media Guidelines for Using Epson Media Follow ...
Printer Guide
Page 91
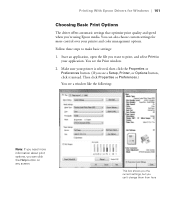
...an application, open the file you 're using Epson media. You see a Setup, Printer, or Options button, click it instead. Then click Properties or Preferences.) You see a window like the following: Note: If you need more control over your printer is selected, then click the Properties or Preferences...offers automatic settings that optimize print quality and speed when you want to make basic settings: 1. Make sure your printer and color management options. Printing With Epson Drivers for more information about print options, you can click the Help button on any screen. 101 This...
...an application, open the file you 're using Epson media. You see a Setup, Printer, or Options button, click it instead. Then click Properties or Preferences.) You see a window like the following: Note: If you need more control over your printer is selected, then click the Properties or Preferences...offers automatic settings that optimize print quality and speed when you want to make basic settings: 1. Make sure your printer and color management options. Printing With Epson Drivers for more information about print options, you can click the Help button on any screen. 101 This...

Printer Guide
Page 108
118 | Printing With Epson Drivers for details.) 118 On the Main tab, select any other necessary setting for your paper in the Media Settings box. (See page 101 through page 107 for Windows 4.
118 | Printing With Epson Drivers for details.) 118 On the Main tab, select any other necessary setting for your paper in the Media Settings box. (See page 101 through page 107 for Windows 4.

Printer Guide
Page 142
... use a toothpick or similar tool to prepare the printer for shipment. Then clean away any dust or dirt around the leg assembly using the original box and packing materials. Keep the ink cartridge compartments closed to prevent water from Epson. See page 13 for example, in the same ...building), you can roll it . 6. If the outer case is dirty, clean it using a soft brush. 7. To ship the printer a longer distance,...
... use a toothpick or similar tool to prepare the printer for shipment. Then clean away any dust or dirt around the leg assembly using the original box and packing materials. Keep the ink cartridge compartments closed to prevent water from Epson. See page 13 for example, in the same ...building), you can roll it . 6. If the outer case is dirty, clean it using a soft brush. 7. To ship the printer a longer distance,...


