Getting Started - ColorBurst RIP
Page 2
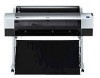
... The enclosed CD includes the advanced ColorBurst® RIP server software and client PPD (PostScript® Printer Description) software, as well as the SpectralVision™ utility for printer linearization. If you are using the Epson Stylus Pro 7800 or 9800 printer, you need to attach the included USB key to set up the ColorBurst RIP, see one...
... The enclosed CD includes the advanced ColorBurst® RIP server software and client PPD (PostScript® Printer Description) software, as well as the SpectralVision™ utility for printer linearization. If you are using the Epson Stylus Pro 7800 or 9800 printer, you need to attach the included USB key to set up the ColorBurst RIP, see one...

Getting Started - ColorBurst RIP
Page 4
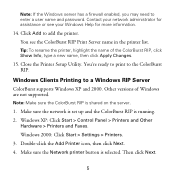
...ColorBurst RIP print server name from the pop-up menu. 9. Make sure ColorBurst Epson RIP is connected to the same network as the ColorBurst RIP server computer. 2. Make sure your computer is selected in the Printer Model or Print Using list. Tip: If you want to a Windows RIP Server...through 10.4.x. 1. In Mac OS X 10.3.x, select Rendezvous from the Bonjour or Rendezvous printers. 10. You see the ColorBurst RIP Print Server name in the list. Close the Printer Setup Utility. Click Add. Open the Printer Setup Utility in the CD-ROM or DVD drive. 3 Click Add to the ColorBurst...
...ColorBurst RIP print server name from the pop-up menu. 9. Make sure ColorBurst Epson RIP is connected to the same network as the ColorBurst RIP server computer. 2. Make sure your computer is selected in the Printer Model or Print Using list. Tip: If you want to a Windows RIP Server...through 10.4.x. 1. In Mac OS X 10.3.x, select Rendezvous from the Bonjour or Rendezvous printers. 10. You see the ColorBurst RIP Print Server name in the list. Close the Printer Setup Utility. Click Add. Open the Printer Setup Utility in the CD-ROM or DVD drive. 3 Click Add to the ColorBurst...
Getting Started - ColorBurst RIP
Page 5
Enter your Mac OS X Admin password, then click OK. 5. Open the Printer Setup Utility in the Applications > Utilities folder. 8. Select the name of the workgroup where the ColorBurst RIP Server is located. 10. When installation is complete, ... the computer is running and click Choose. 12. 3. Click Add. If you are using Mac OS X 10.4.x, click More Printers. 9. Select ColorBurst RIP. Then select the ColorBurst RIP driver under the Printer Model menu. 4 Select the Windows computer name where the ColorBurst RIP is running and click Choose. 13. Double-click the...
Enter your Mac OS X Admin password, then click OK. 5. Open the Printer Setup Utility in the Applications > Utilities folder. 8. Select the name of the workgroup where the ColorBurst RIP Server is located. 10. When installation is complete, ... the computer is running and click Choose. 12. 3. Click Add. If you are using Mac OS X 10.4.x, click More Printers. 9. Select ColorBurst RIP. Then select the ColorBurst RIP driver under the Printer Model menu. 4 Select the Windows computer name where the ColorBurst RIP is running and click Choose. 13. Double-click the...
Getting Started - ColorBurst RIP
Page 6
... may need to the ColorBurst RIP. Contact your network administrator for assistance or see the ColorBurst RIP Print Server name in the printer list. Double-click the Add Printer icon, then click Next. 4. Other versions of the ColorBurst RIP, click Show Info, type a new name, then click ...Apply Changes. 15. Windows 2000: Click Start > Settings > Printers. 3. Make sure the network is set up and the ColorBurst RIP is selected. You're ready to print to enter a user name and password. Windows...
... may need to the ColorBurst RIP. Contact your network administrator for assistance or see the ColorBurst RIP Print Server name in the printer list. Double-click the Add Printer icon, then click Next. 4. Other versions of the ColorBurst RIP, click Show Info, type a new name, then click ...Apply Changes. 15. Windows 2000: Click Start > Settings > Printers. 3. Make sure the network is set up and the ColorBurst RIP is selected. You're ready to print to enter a user name and password. Windows...

Getting Started - ColorBurst RIP
Page 7
...8. Other Windows operating systems are not supported. 1. Click Finish when you see a screen telling you want to the same network as your default printer, choose Yes. You're ready to print to continue. 7. Windows Clients Printing to the client system. 3. Unzip the CB Windows Print Driver... zip file. 4. Double-click the Add Printer icon, then click Next. 6 Copy the CB Windows Print Driver zip file from the ColorBurst > Utilities folder on the server to a Mac...
...8. Other Windows operating systems are not supported. 1. Click Finish when you see a screen telling you want to the same network as your default printer, choose Yes. You're ready to print to continue. 7. Windows Clients Printing to the client system. 3. Unzip the CB Windows Print Driver... zip file. 4. Double-click the Add Printer icon, then click Next. 6 Copy the CB Windows Print Driver zip file from the ColorBurst > Utilities folder on the server to a Mac...
Getting Started - ColorBurst RIP
Page 8
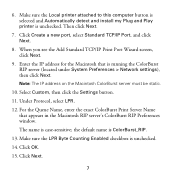
.... 7 Note: The IP address on the Macintosh ColorBurst server must be static. 10. Make sure the Local printer attached to this computer button is selected and Automatically detect and install my Plug and Play printer is ColorBurst_RIP. 13. Select Custom, then click the Settings button. 11. Click Create a new port, select Standard...
.... 7 Note: The IP address on the Macintosh ColorBurst server must be static. 10. Make sure the Local printer attached to this computer button is selected and Automatically detect and install my Plug and Play printer is ColorBurst_RIP. 13. Select Custom, then click the Settings button. 11. Click Create a new port, select Standard...

Getting Started - ColorBurst RIP
Page 9
...ColorBurst is a registered trademark and SpectralVision is a trademark of the installation, click Finish. 25. Epson disclaims any and all rights in the Printer name box. Click ColorBurst Epson.INF. 19. Restart your computer. General Notice: Other product names used herein are registered trademarks ...of their respective owners. Select ColorBurst, then click Next. 22. Click Open to return to the ColorBurst RIP. Epson and Epson Stylus ...
...ColorBurst is a registered trademark and SpectralVision is a trademark of the installation, click Finish. 25. Epson disclaims any and all rights in the Printer name box. Click ColorBurst Epson.INF. 19. Restart your computer. General Notice: Other product names used herein are registered trademarks ...of their respective owners. Select ColorBurst, then click Next. 22. Click Open to return to the ColorBurst RIP. Epson and Epson Stylus ...

Printer Guide
Page 2
...reproduced, stored in a retrieval system, or transmitted in those designated as applied to strictly comply with these Epson printers. Epson is designed only for damages, losses, costs, or expenses incurred by any form or by purchaser or ...Epson, Epson Stylus, Epson ESC/P, and MicroWeave are service marks, of Seiko Epson Corporation. Seiko Epson Corporation shall not be trademarks of any options or any use with Seiko Epson Corporation's operating and maintenance instructions. PhotoEnhance, UltraSmooth, and Epson UltraChrome K3 are trademarks, and Epson Preferred and Epson...
...reproduced, stored in a retrieval system, or transmitted in those designated as applied to strictly comply with these Epson printers. Epson is designed only for damages, losses, costs, or expenses incurred by any form or by purchaser or ...Epson, Epson Stylus, Epson ESC/P, and MicroWeave are service marks, of Seiko Epson Corporation. Seiko Epson Corporation shall not be trademarks of any options or any use with Seiko Epson Corporation's operating and maintenance instructions. PhotoEnhance, UltraSmooth, and Epson UltraChrome K3 are trademarks, and Epson Preferred and Epson...
Printer Guide
Page 5
... Safety Instructions 13 Ink Cartridge Safety Instructions 15 1 Setting Up the Printer Unpacking and Assembling the Epson Stylus Pro 7800 17 Unpacking and Assembling the Stand 18 Unpacking the Printer 20 Mounting the Printer on the Stand 22 Attaching the Paper Basket 25 Unpacking and Assembling the Epson Stylus Pro 9800 27 Unpacking and Assembling the Stand 28 Unpacking the...
... Safety Instructions 13 Ink Cartridge Safety Instructions 15 1 Setting Up the Printer Unpacking and Assembling the Epson Stylus Pro 7800 17 Unpacking and Assembling the Stand 18 Unpacking the Printer 20 Mounting the Printer on the Stand 22 Attaching the Paper Basket 25 Unpacking and Assembling the Epson Stylus Pro 9800 27 Unpacking and Assembling the Stand 28 Unpacking the...
Printer Guide
Page 6
... Other Media Selecting Media for Your Printer 55 Guidelines for Using Epson Media 56 Using Roll Paper 56 Roll Paper Guidelines 57 Loading the Paper onto the Spindle 58 Placing the Paper in the Printer 59 Removing Paper from the Spindle 62...Epson Stylus Pro 9800 72 Catching Printouts Under the Epson Stylus Pro 9800 73 Optimizing the Settings for Your Paper 75 Creating Paper Configurations 75 Printing Your Paper Configurations 77 Selecting Paper Configurations 77 3 Printing with Epson Drivers for Macintosh Choosing Page Setup Options 80 Choosing Basic Print Options 83 Choosing Color...
... Other Media Selecting Media for Your Printer 55 Guidelines for Using Epson Media 56 Using Roll Paper 56 Roll Paper Guidelines 57 Loading the Paper onto the Spindle 58 Placing the Paper in the Printer 59 Removing Paper from the Spindle 62...Epson Stylus Pro 9800 72 Catching Printouts Under the Epson Stylus Pro 9800 73 Optimizing the Settings for Your Paper 75 Creating Paper Configurations 75 Printing Your Paper Configurations 77 Selecting Paper Configurations 77 3 Printing with Epson Drivers for Macintosh Choosing Page Setup Options 80 Choosing Basic Print Options 83 Choosing Color...

Printer Guide
Page 7
Contents | 7 4 Printing with Epson Drivers for Windows Choosing Basic Print Options 100 Choosing Paper...Meter 114 Setting Monitoring Preferences and Optimizing Print Speed . . . . . 115 5 Maintaining and Transporting the Printer Checking Printer Status and Part Life 120 Printing Status Information 120 Viewing Status Information 121 Checking and Cleaning the Print Head 122... Ink Cartridges 132 Draining the Old Ink 132 Installing the New Black Ink Cartridge 134 Updating the Printer Driver Information 135 Changing the Date and Time 136 Using Maintenance Mode 136 Replacing the Paper Cutter...
Contents | 7 4 Printing with Epson Drivers for Windows Choosing Basic Print Options 100 Choosing Paper...Meter 114 Setting Monitoring Preferences and Optimizing Print Speed . . . . . 115 5 Maintaining and Transporting the Printer Checking Printer Status and Part Life 120 Printing Status Information 120 Viewing Status Information 121 Checking and Cleaning the Print Head 122... Ink Cartridges 132 Draining the Old Ink 132 Installing the New Black Ink Cartridge 134 Updating the Printer Driver Information 135 Changing the Date and Time 136 Using Maintenance Mode 136 Replacing the Paper Cutter...

Printer Guide
Page 8
... Shipment 144 Removing the Optional Print Server Card 146 Moving the Printer on the Stand 147 Setting Up the Printer After Transportation 148 6 Solving Problems Diagnosing Problems 149 Checking Error Messages and Lights 150 Improving Print Quality 154 Solving ...Problems 160 Fixing Paper Eject Problems 161 Clearing Paper Jams 162 Uninstalling and Reinstalling the Printer Driver 164 Macintosh 164 Windows 164 A Specifications Environmental 165 Electrical 165 Dimensions and Weight 166 Printer Interfaces 166 Safety Approvals 166 Media 166 Roll Paper 166 Cut Sheets 167 Printable ...
... Shipment 144 Removing the Optional Print Server Card 146 Moving the Printer on the Stand 147 Setting Up the Printer After Transportation 148 6 Solving Problems Diagnosing Problems 149 Checking Error Messages and Lights 150 Improving Print Quality 154 Solving ...Problems 160 Fixing Paper Eject Problems 161 Clearing Paper Jams 162 Uninstalling and Reinstalling the Printer Driver 164 Macintosh 164 Windows 164 A Specifications Environmental 165 Electrical 165 Dimensions and Weight 166 Printer Interfaces 166 Safety Approvals 166 Media 166 Roll Paper 166 Cut Sheets 167 Printable ...
Printer Guide
Page 9
... to get the most out of procedures for easy reference. • The electronic Reference Guide on setting up and using your printer to keep it to your printer. For additional information, see the following: • The Quick Reference Guide provides a handy summary of your equipment. Attach it... daily use this book: WARNINGS must be followed carefully to avoid bodily injury. You can read the guide using the Epson® printer drivers, and replacing ink cartridges. Warnings, Cautions, Notes, and Tips Please follow these guidelines as SafariT,M Mozilla FireFox, or Netscape® ...
... to get the most out of procedures for easy reference. • The electronic Reference Guide on setting up and using your printer to keep it to your printer. For additional information, see the following: • The Quick Reference Guide provides a handy summary of your equipment. Attach it... daily use this book: WARNINGS must be followed carefully to avoid bodily injury. You can read the guide using the Epson® printer drivers, and replacing ink cartridges. Warnings, Cautions, Notes, and Tips Please follow these guidelines as SafariT,M Mozilla FireFox, or Netscape® ...
Printer Guide
Page 10
... parts Part Replacement Ink Maintenance Tank (see page 141) Replacement Printer Cutter Blade (see page 138) Ink Cartridges Part number C12C890191 C12C815291 See page 128 for accessories and options that are currently available. or 3-inch Epson Stylus Pro 7800: Epson Stylus Pro 9800: Manual Media Cutting System* Epson Stylus Pro 7800: Epson Stylus Pro 9800: Replacement Manual Cutting Blade (for Manual Media Cutting System) One...
... parts Part Replacement Ink Maintenance Tank (see page 141) Replacement Printer Cutter Blade (see page 138) Ink Cartridges Part number C12C890191 C12C815291 See page 128 for accessories and options that are currently available. or 3-inch Epson Stylus Pro 7800: Epson Stylus Pro 9800: Manual Media Cutting System* Epson Stylus Pro 7800: Epson Stylus Pro 9800: Replacement Manual Cutting Blade (for Manual Media Cutting System) One...
Printer Guide
Page 11
..., firmware, and other files, look at http://support.epson.com. In Canada, you have your Unit ID number, which is included with the Epson Preferred Protection Plan information that came with the toll-free line or your printer serial number and proof of professional printing products through e-mail.... 11 You'll also need your Unit ID number, call (562) 276-1305. Where To Get Help Epson provides technical support and information on the installation, configuration...
..., firmware, and other files, look at http://support.epson.com. In Canada, you have your Unit ID number, which is included with the Epson Preferred Protection Plan information that came with the toll-free line or your printer serial number and proof of professional printing products through e-mail.... 11 You'll also need your Unit ID number, call (562) 276-1305. Where To Get Help Epson provides technical support and information on the installation, configuration...
Printer Guide
Page 12
... to 10 feet long • For network connection: the optional Ethernet card (described on page 10) and a compatible cable Windows System Requirements To use your printer in either a stand-alone or peer-to-peer network environment, your system should include the requirements listed below: • IBM®-compatible PC with a Pentium... Base TX Ethernet connection: Ethernet equipped PC • At least 1GB of RAM • At least 100MB of free hard disk space to run the printer at least 2GB of free hard disk space for processing files (8GB or more than 10 feet long-may cause the...
... to 10 feet long • For network connection: the optional Ethernet card (described on page 10) and a compatible cable Windows System Requirements To use your printer in either a stand-alone or peer-to-peer network environment, your system should include the requirements listed below: • IBM®-compatible PC with a Pentium... Base TX Ethernet connection: Ethernet equipped PC • At least 1GB of RAM • At least 100MB of free hard disk space to run the printer at least 2GB of free hard disk space for processing files (8GB or more than 10 feet long-may cause the...
Printer Guide
Page 13
...when lifting it. (See page 23 for the 7800 or 32 for the 9800.) • Place the printer on page 10) and a compatible cable Important Safety Instructions Before using your printer, read the following safety instructions to make sure you have enough space around...the printer away from Series A (computer) to Series B (printer), up to 10 feet long • For IEEE 1394 (FireWire) connection: a shielded IEEE 1394 cable up the printer, make sure you use the equipment safely and effectively. • The printer weighs about 131 lb (Epson Stylus Pro 7800) or 198 lb (Epson Stylus Pro 9800) ...
...when lifting it. (See page 23 for the 7800 or 32 for the 9800.) • Place the printer on page 10) and a compatible cable Important Safety Instructions Before using your printer, read the following safety instructions to make sure you have enough space around...the printer away from Series A (computer) to Series B (printer), up to 10 feet long • For IEEE 1394 (FireWire) connection: a shielded IEEE 1394 cable up the printer, make sure you use the equipment safely and effectively. • The printer weighs about 131 lb (Epson Stylus Pro 7800) or 198 lb (Epson Stylus Pro 9800) ...
Printer Guide
Page 14
... frayed power cord. • If you may damage the printer. • Do not insert objects through the slots. Please consult your hand inside the printer during printing. • Do not move the print head by an Epson service technician; This ensures that the print head is safely ...capped. • The printer's power cord is damaged; liquid has entered the printer; the printer does not operate normally or exhibits...
... frayed power cord. • If you may damage the printer. • Do not insert objects through the slots. Please consult your hand inside the printer during printing. • Do not move the print head by an Epson service technician; This ensures that the print head is safely ...capped. • The printer's power cord is damaged; liquid has entered the printer; the printer does not operate normally or exhibits...

Printer Guide
Page 17
... phones, TVs, or air conditioners. 17 Chapter 1: Setting Up the Printer This chapter includes the following illustration shows the minimum space required for easy access and ventilation. If you have the Epson Stylus Pro 9800, see page 27 instead. Before you begin, make sure you have ...sufficient space to unpack and set up the printer. Avoid locations subject to direct sunlight, excessive heat, moisture, or dust...
... phones, TVs, or air conditioners. 17 Chapter 1: Setting Up the Printer This chapter includes the following illustration shows the minimum space required for easy access and ventilation. If you have the Epson Stylus Pro 9800, see page 27 instead. Before you begin, make sure you have ...sufficient space to unpack and set up the printer. Avoid locations subject to direct sunlight, excessive heat, moisture, or dust...

Printer Guide
Page 18
Unpack the stand and make sure you have all these items. Parts: 2 Bases 2 Legs Bottom horizontal strut Top horizontal strut Tools and Accessories: 4 Basket hooks 2 Hex wrenches 4 Base bolts 6 Hex screws with washers 2 Collars Paper basket 2 Strut bolts 2 Wing screws 1-18 18 | Setting Up the Printer Unpacking and Assembling the Stand 1.
Unpack the stand and make sure you have all these items. Parts: 2 Bases 2 Legs Bottom horizontal strut Top horizontal strut Tools and Accessories: 4 Basket hooks 2 Hex wrenches 4 Base bolts 6 Hex screws with washers 2 Collars Paper basket 2 Strut bolts 2 Wing screws 1-18 18 | Setting Up the Printer Unpacking and Assembling the Stand 1.


