Printer Guide
Page 119
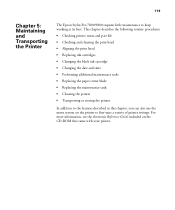
...; Performing additional maintenance tasks • Replacing the paper cutter blade • Replacing the maintenance tank • Cleaning the printer • Transporting or storing the printer In addition to the features described in this chapter, you can also use the menu system on the CD...-ROM that came with your printer. 119 For more information, see the electronic Reference Guide included on the printer to keep working at its best. 119 Chapter 5: Maintaining and Transporting the Printer The Epson Stylus Pro 7800/9800 requires little maintenance to fine-tune a variety ...
...; Performing additional maintenance tasks • Replacing the paper cutter blade • Replacing the maintenance tank • Cleaning the printer • Transporting or storing the printer In addition to the features described in this chapter, you can also use the menu system on the CD...-ROM that came with your printer. 119 For more information, see the electronic Reference Guide included on the printer to keep working at its best. 119 Chapter 5: Maintaining and Transporting the Printer The Epson Stylus Pro 7800/9800 requires little maintenance to fine-tune a variety ...

Printer Guide
Page 174
... Windows, 114 to 117 Storing printer, 144 to 146 Stylus Pro 7800 mounting on stand, 22 to 24 paper basket, 71 to 72 paper basket, attaching, 25 to 26 removing shipping bracket, 24 setting up, 17 to 26 stand, unpacking and assembling, 18 to 20 unpacking, 20 to 22 Stylus Pro 9800 mounting on stand, 31 to... 34 paper basket, 34 to 36, 72 to 74 removing shipping bracket, 33 setting up, 27 to 36 stand, unpacking and assembling, 28 to 29 unpacking, 29 to 30 Suction, 76, 89, 111 Support, Epson, 11 System requirements, 12 to...
... Windows, 114 to 117 Storing printer, 144 to 146 Stylus Pro 7800 mounting on stand, 22 to 24 paper basket, 71 to 72 paper basket, attaching, 25 to 26 removing shipping bracket, 24 setting up, 17 to 26 stand, unpacking and assembling, 18 to 20 unpacking, 20 to 22 Stylus Pro 9800 mounting on stand, 31 to... 34 paper basket, 34 to 36, 72 to 74 removing shipping bracket, 33 setting up, 27 to 36 stand, unpacking and assembling, 28 to 29 unpacking, 29 to 30 Suction, 76, 89, 111 Support, Epson, 11 System requirements, 12 to...
Product Information Guide
Page 3
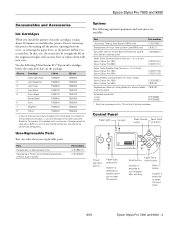
...performed infrequently. Do not interrrupt this process by turning off the printer, opening the front cover, or releasing the paper lever, or the printer will have to clean the print head. 8/05 Epson Stylus Pro 7800 and 9800 - 3 Use the following optional equipment and warranties are available: ...Part Part number Automatic Take-up Reel System (9800 only) C12C815251 Replacement 44-inch Take-up...
...performed infrequently. Do not interrrupt this process by turning off the printer, opening the front cover, or releasing the paper lever, or the printer will have to clean the print head. 8/05 Epson Stylus Pro 7800 and 9800 - 3 Use the following optional equipment and warranties are available: ...Part Part number Automatic Take-up Reel System (9800 only) C12C815251 Replacement 44-inch Take-up...
Product Information Guide
Page 4
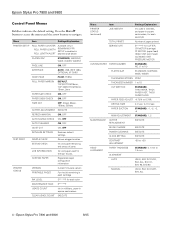
... POWER CLEANING EXECUTE CLOCK SETTING EXECUTE CONTRAST ADJUSTMENT -20 to +20 HEAD ALIGNMENT PAPER THICKNESS STANDARD, 0.1 mm to navigate. Epson Stylus Pro 7800 and 9800 8/05 Press the Menu r button to access the menus and the arrow buttons to 1.5 mm ALIGNMENT AUTO UNI-D, BI-D 2-COLOR, BI-D ALL, BI-D #1, BI-D #2, BI-D #3 MANUAL UNI-D, BI-D 2-COLOR, BI-D ALL 4 - Epson Stylus Pro 7800 and 9800 Control...
... POWER CLEANING EXECUTE CLOCK SETTING EXECUTE CONTRAST ADJUSTMENT -20 to +20 HEAD ALIGNMENT PAPER THICKNESS STANDARD, 0.1 mm to navigate. Epson Stylus Pro 7800 and 9800 8/05 Press the Menu r button to access the menus and the arrow buttons to 1.5 mm ALIGNMENT AUTO UNI-D, BI-D 2-COLOR, BI-D ALL, BI-D #1, BI-D #2, BI-D #3 MANUAL UNI-D, BI-D 2-COLOR, BI-D ALL 4 - Epson Stylus Pro 7800 and 9800 Control...
Product Information Guide
Page 6
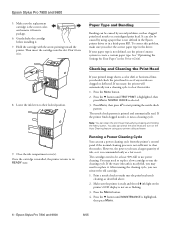
... correct color, and remove it runs a cleaning cycle. Then insert the cartridge into the slot. To correct this problem, make sure the print head needs cleaning, as described above. 2. You may need to replace a low cartridge to clear the nozzles. 1. Epson Stylus Pro 7800 and 9800 5. It can run the cleaning cycle. NOZZLE CHECK is not defined in the Epson printer...
... correct color, and remove it runs a cleaning cycle. Then insert the cartridge into the slot. To correct this problem, make sure the print head needs cleaning, as described above. 2. You may need to replace a low cartridge to clear the nozzles. 1. Epson Stylus Pro 7800 and 9800 5. It can run the cleaning cycle. NOZZLE CHECK is not defined in the Epson printer...
Product Information Guide
Page 7
... Pause light stops flashing, print the nozzle check again to ensure the best print quality. Press the d button until BI-D 2-COLOR is highlighted, then press Menu. Press Menu. Press the Menu button to start the bi-directional black alignment process. 10. Then... power cleaning. 6. Make sure you still see page 6). If you can align the print head using the control panel: 1. Press the Menu button. 2. Open the front cover. 8/05 Epson Stylus Pro 7800 and 9800 - 7 Epson Stylus Pro 7800 and 9800 5. If you don't open the front cover or turn the printer off the printer during this...
... Pause light stops flashing, print the nozzle check again to ensure the best print quality. Press the d button until BI-D 2-COLOR is highlighted, then press Menu. Press Menu. Press the Menu button to start the bi-directional black alignment process. 10. Then... power cleaning. 6. Make sure you still see page 6). If you can align the print head using the control panel: 1. Press the Menu button. 2. Open the front cover. 8/05 Epson Stylus Pro 7800 and 9800 - 7 Epson Stylus Pro 7800 and 9800 5. If you don't open the front cover or turn the printer off the printer during this...

Product Information Guide
Page 9
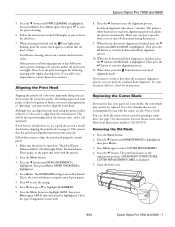
...cleaning. Choose your printer's firmware ROM version and update it upright at the bottom of the tank (on either side). Check back regularly to spill ink from the maintenance tank when removing it carefully. 4. Epson Stylus Pro 7800 and 9800 Replacing the Maintenance Tank The maintenance tank stores ink that you have the Epson Stylus Pro 9800... Reference Guide 8/05 Epson Stylus Pro 7800 and 9800 - 9 Place the used more than the left or right). On the Epson Stylus Pro 9800, the right tank is not printing or performing any updates posted. Make sure the printer is used tank in...
...cleaning. Choose your printer's firmware ROM version and update it upright at the bottom of the tank (on either side). Check back regularly to spill ink from the maintenance tank when removing it carefully. 4. Epson Stylus Pro 7800 and 9800 Replacing the Maintenance Tank The maintenance tank stores ink that you have the Epson Stylus Pro 9800... Reference Guide 8/05 Epson Stylus Pro 7800 and 9800 - 9 Place the used more than the left or right). On the Epson Stylus Pro 9800, the right tank is not printing or performing any updates posted. Make sure the printer is used tank in...


