Getting Started - ColorBurst RIP
Page 2
If you are using the Epson Stylus Pro 7800 or 9800 printer, you need to attach the included USB key to set up the Stylus Pro printer on the computer that is running the RIP server. 1 To set up the RIP server, double-click the installer icon and follow the on your Epson Stylus® Pro manual to the computer that will...
If you are using the Epson Stylus Pro 7800 or 9800 printer, you need to attach the included USB key to set up the Stylus Pro printer on the computer that is running the RIP server. 1 To set up the RIP server, double-click the installer icon and follow the on your Epson Stylus® Pro manual to the computer that will...

Getting Started - ColorBurst RIP
Page 3
... running. 2 When installation is complete, check the ColorBurst RIP server computer to make sure client computers are on -screen instructions to install the ColorBurst client software. 6. Insert the ColorBurst RIP CD-ROM in the CD-ROM or DVD drive. 3. Follow the on the same subnet as the ColorBurst RIP server computer...
... running. 2 When installation is complete, check the ColorBurst RIP server computer to make sure client computers are on -screen instructions to install the ColorBurst client software. 6. Insert the ColorBurst RIP CD-ROM in the CD-ROM or DVD drive. 3. Follow the on the same subnet as the ColorBurst RIP server computer...
Getting Started - ColorBurst RIP
Page 5
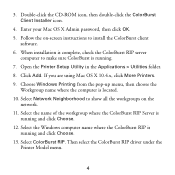
... When installation is complete, check the ColorBurst RIP server computer to install the ColorBurst client software. 6. Select the name of the workgroup where the ColorBurst RIP Server is running. 7. Open the Printer Setup Utility in the Applications > Utilities folder. 8. Select the Windows computer name where ...Installer icon. 4. Enter your Mac OS X Admin password, then click OK. 5. If you are using Mac OS X 10.4.x, click More Printers. 9. Choose Windows Printing from the pop-up menu, then choose the Workgroup name where the computer is running and click Choose. 12. Click ...
... When installation is complete, check the ColorBurst RIP server computer to install the ColorBurst client software. 6. Select the name of the workgroup where the ColorBurst RIP Server is running. 7. Open the Printer Setup Utility in the Applications > Utilities folder. 8. Select the Windows computer name where ...Installer icon. 4. Enter your Mac OS X Admin password, then click OK. 5. If you are using Mac OS X 10.4.x, click More Printers. 9. Choose Windows Printing from the pop-up menu, then choose the Workgroup name where the computer is running and click Choose. 12. Click ...

Getting Started - ColorBurst RIP
Page 9
Epson and Epson Stylus are for identification purposes only and may be trademarks of Seiko Epson Corporation. Click ColorBurst Epson.INF. 19. Select ColorBurst, then click Next. 22. At the end of CSE Systems, Inc. ColorBurst is a registered trademark and SpectralVision ...: Other product names used herein are registered trademarks of their respective owners. Printed on -screen instructions to install the software. 24. Epson disclaims any and all rights in the Printer name box. You're ready to print to the Install from Disk window. 20. Leave the default name or ...
Epson and Epson Stylus are for identification purposes only and may be trademarks of Seiko Epson Corporation. Click ColorBurst Epson.INF. 19. Select ColorBurst, then click Next. 22. At the end of CSE Systems, Inc. ColorBurst is a registered trademark and SpectralVision ...: Other product names used herein are registered trademarks of their respective owners. Printed on -screen instructions to install the software. 24. Epson disclaims any and all rights in the Printer name box. You're ready to print to the Install from Disk window. 20. Leave the default name or ...
Printer Guide
Page 5
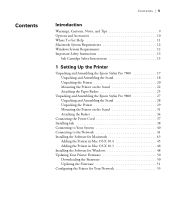
...Safety Instructions 15 1 Setting Up the Printer Unpacking and Assembling the Epson Stylus Pro 7800 17 Unpacking and Assembling the Stand 18 Unpacking the Printer 20 Mounting the Printer on the Stand 22 Attaching the Paper Basket 25 Unpacking and Assembling the Epson Stylus Pro 9800 27 Unpacking and Assembling the ... 40 Connecting to the Network 41 Installing the Software for Macintosh 43 Adding the Printer in Mac OS X 10.4 45 Adding the Printer in Mac OS X 10.3 46 Installing the Software for Windows 48 Updating Your Printer Firmware 50 Downloading the Firmware 50 Updating the ...
...Safety Instructions 15 1 Setting Up the Printer Unpacking and Assembling the Epson Stylus Pro 7800 17 Unpacking and Assembling the Stand 18 Unpacking the Printer 20 Mounting the Printer on the Stand 22 Attaching the Paper Basket 25 Unpacking and Assembling the Epson Stylus Pro 9800 27 Unpacking and Assembling the ... 40 Connecting to the Network 41 Installing the Software for Macintosh 43 Adding the Printer in Mac OS X 10.4 45 Adding the Printer in Mac OS X 10.3 46 Installing the Software for Windows 48 Updating Your Printer Firmware 50 Downloading the Firmware 50 Updating the ...
Printer Guide
Page 9
...important information about the printer, drivers, and utility software. You can read the guide using a web browser, such as you use this book: WARNINGS must be followed carefully to keep it to your printer for daily use and printer maintenance-loading paper, replacing...cleaning and aligning the print head, and using the printer's menu system. 9 Introduction This Printer Guide provides important information on the CD-ROM provides additional information about your printer, loading paper, using the Epson® printer drivers, and replacing ink cartridges. Warnings, Cautions, ...
...important information about the printer, drivers, and utility software. You can read the guide using a web browser, such as you use this book: WARNINGS must be followed carefully to keep it to your printer for daily use and printer maintenance-loading paper, replacing...cleaning and aligning the print head, and using the printer's menu system. 9 Introduction This Printer Guide provides important information on the CD-ROM provides additional information about your printer, loading paper, using the Epson® printer drivers, and replacing ink cartridges. Warnings, Cautions, ...
Printer Guide
Page 12
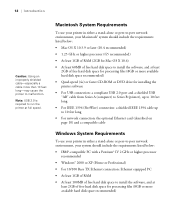
...) • Quad-speed (4×) or faster CD-ROM or DVD drive for installing the printer software • For USB connection: a compliant USB 2.0 port and a shielded USB "AB" cable from Series A (computer) to Series B (printer), up to 10 feet long • For IEEE 1394 (FireWire) connection: a shielded IEEE...1GB of RAM • At least 100MB of free hard disk space to install the software, and at full speed. Note: USB 2.0 is required to malfunction. Macintosh System Requirements To use your printer in either a stand-alone or peer-to-peer network environment, your system should include...
...) • Quad-speed (4×) or faster CD-ROM or DVD drive for installing the printer software • For USB connection: a compliant USB 2.0 port and a shielded USB "AB" cable from Series A (computer) to Series B (printer), up to 10 feet long • For IEEE 1394 (FireWire) connection: a shielded IEEE...1GB of RAM • At least 100MB of free hard disk space to install the software, and at full speed. Note: USB 2.0 is required to malfunction. Macintosh System Requirements To use your printer in either a stand-alone or peer-to-peer network environment, your system should include...
Printer Guide
Page 13
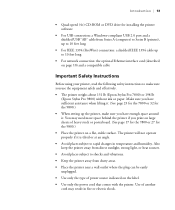
... printer software • For USB connection: a Windows-compliant USB 2.0 port and a shielded USB "AB" cable from Series A (computer) to Series B (printer), up to 10 feet long • For IEEE 1394 (FireWire) connection: a shielded IEEE 1394 cable up the printer, make sure you use the equipment safely and effectively. • The printer weighs about 131 lb (Epson Stylus Pro 7800...
... printer software • For USB connection: a Windows-compliant USB 2.0 port and a shielded USB "AB" cable from Series A (computer) to Series B (printer), up to 10 feet long • For IEEE 1394 (FireWire) connection: a shielded IEEE 1394 cable up the printer, make sure you use the equipment safely and effectively. • The printer weighs about 131 lb (Epson Stylus Pro 7800...

Printer Guide
Page 17
... cord • Installing ink • Connecting to your printer and its stand. Avoid locations subject to assemble the printer and stand. 17 Unpacking and Assembling the Epson Stylus Pro 7800 Follow these steps to assemble your system • Connecting to the network • Installing the printer software • Updating the printer firmware Caution: Two people are required to set...
... cord • Installing ink • Connecting to your printer and its stand. Avoid locations subject to assemble the printer and stand. 17 Unpacking and Assembling the Epson Stylus Pro 7800 Follow these steps to assemble your system • Connecting to the network • Installing the printer software • Updating the printer firmware Caution: Two people are required to set...

Printer Guide
Page 42
... next section to your network as described on page 53. 1-42 Then connect the other end to your network hub or to install your printer software, then configure the printer for your computer's Ethernet port. 8. Slide the card along the slots inside the compartment. Connect one end of the appropriate cable to remove...
... next section to your network as described on page 53. 1-42 Then connect the other end to your network hub or to install your printer software, then configure the printer for your computer's Ethernet port. 8. Slide the card along the slots inside the compartment. Connect one end of the appropriate cable to remove...
Printer Guide
Page 43
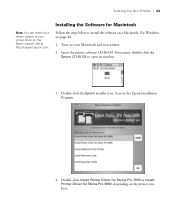
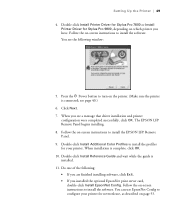
You see page 48. 1. If necessary, double-click the Epson CD-ROM to install the software on a Macintosh. Double-click Install Printer Driver for Stylus Pro 7800 or Install Printer Driver for Stylus Pro 9800, depending on the Epson support site at http://support.epson.com. Double-click the Epson installer icon. Setting Up the Printer | 43 Note: You can check for a newer version...
You see page 48. 1. If necessary, double-click the Epson CD-ROM to install the software on a Macintosh. Double-click Install Printer Driver for Stylus Pro 7800 or Install Printer Driver for Stylus Pro 9800, depending on the Epson support site at http://support.epson.com. Double-click the Epson installer icon. Setting Up the Printer | 43 Note: You can check for a newer version...

Printer Guide
Page 44
... on page 53. When you installed the optional EpsonNet print server card, double-click Install EpsonNet Config. Double-click Install Additional Color Profiles to configure your printer for Mac OS X 10.3. 1-44 Double-click Install Reference Guide and wait while the guide is installed. 9. Enter your ...password and follow the on -screen instructions to install the EPSON LFP Remote Panel. 7. Enter your password and follow the on -screen instructions. Remove the printer software CD-ROM and follow the on page 45 for Mac OS X 10.4 or page 46 ...
... on page 53. When you installed the optional EpsonNet print server card, double-click Install EpsonNet Config. Double-click Install Additional Color Profiles to configure your printer for Mac OS X 10.3. 1-44 Double-click Install Reference Guide and wait while the guide is installed. 9. Enter your ...password and follow the on -screen instructions to install the EPSON LFP Remote Panel. 7. Enter your password and follow the on -screen instructions. Remove the printer software CD-ROM and follow the on page 45 for Mac OS X 10.4 or page 46 ...

Printer Guide
Page 48
Go to page 50 to install the software for Windows. 1. Turn on your printer firmware, if necessary. Make sure your CD-ROM icon. 1-48 The installer starts automatically. Then double-click your printer is turned off. 2. Installing the Software for Windows Follow these steps to update your computer. 3. If it doesn't start, double-click My Computer or click Start > My Computer. Insert the printer software CD-ROM in the Printer List. 6. 48 | Setting Up the Printer You see your printer in your computer.
Go to page 50 to install the software for Windows. 1. Turn on your printer firmware, if necessary. Make sure your CD-ROM icon. 1-48 The installer starts automatically. Then double-click your printer is turned off. 2. Installing the Software for Windows Follow these steps to update your computer. 3. If it doesn't start, double-click My Computer or click Start > My Computer. Insert the printer software CD-ROM in the Printer List. 6. 48 | Setting Up the Printer You see your printer in your computer.
Printer Guide
Page 49
Double-click Install Additional Color Profiles to install the profiles for your printer for Stylus Pro 9800, depending on page 53. 1-49 Follow the on the printer. (Make sure the printer is connected; Double-click Install Reference Guide and wait while the guide is ...Config. The EPSON LFP Remote Panel begins installing. 8. When installation is installed. 11. Double-click Install Printer Driver for Stylus Pro 7800 or Install Printer Driver for network use EpsonNet Config to install the software. see a message that driver installation and printer configuration were completed...
Double-click Install Additional Color Profiles to install the profiles for your printer for Stylus Pro 9800, depending on page 53. 1-49 Follow the on the printer. (Make sure the printer is connected; Double-click Install Reference Guide and wait while the guide is ...Config. The EPSON LFP Remote Panel begins installing. 8. When installation is installed. 11. Double-click Install Printer Driver for Stylus Pro 7800 or Install Printer Driver for network use EpsonNet Config to install the software. see a message that driver installation and printer configuration were completed...
Printer Guide
Page 52
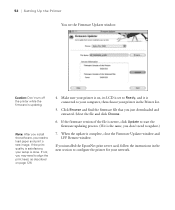
... next section to load paper and print a test image. If the print quality is connected to update.) 7. Make sure your printer is the same, you may need to configure the printer for your network. 1-52 When the update is updating. Select the file and click Choose. 6. Caution: Don't turn off...and extracted. Click Browse and find the firmware file that you installed the EpsonNet print server card, follow the instructions in the Printer list. 5. Note: After you install the software, you need to align the print head, as described on , its LCD is set to Ready, and it is on page...
... next section to load paper and print a test image. If the print quality is connected to update.) 7. Make sure your printer is the same, you may need to configure the printer for your network. 1-52 When the update is updating. Select the file and click Choose. 6. Caution: Don't turn off...and extracted. Click Browse and find the firmware file that you installed the EpsonNet print server card, follow the instructions in the Printer list. 5. Note: After you install the software, you need to align the print head, as described on , its LCD is set to Ready, and it is on page...
Printer Guide
Page 53
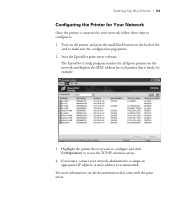
...make sure the configuration page prints. 2. For more information, see the documentation that it : 1. The EpsonNet Config program searches for all Epson printers on the back of the card to access the TCP/IP selection screen. 4. A static address is connected to your network administrator to ...assign an appropriate IP address. Start the EpsonNet print server software. If necessary, contact your network, follow these steps to configure it finds, for Your Network Once the printer is recommended. Turn on the printer and press the small black button on the network and displays...
...make sure the configuration page prints. 2. For more information, see the documentation that it : 1. The EpsonNet Config program searches for all Epson printers on the back of the card to access the TCP/IP selection screen. 4. A static address is connected to your network administrator to ...assign an appropriate IP address. Start the EpsonNet print server software. If necessary, contact your network, follow these steps to configure it finds, for Your Network Once the printer is recommended. Turn on the printer and press the small black button on the network and displays...

Printer Guide
Page 56
... for instructions on selecting the paper source in your printer software. • Keep unused media in its original packaging and store it in a cool, dry place to maintain quality. Check the Epson Pro Graphics web site (http://prographics.epson.com) or your printouts where they will be exposed... to 24 inches wide (7800) or 44 inches wide (9800). Avoid storing your authorized Epson dealer for available media. 2-56 Manually switching rolls ...
... for instructions on selecting the paper source in your printer software. • Keep unused media in its original packaging and store it in a cool, dry place to maintain quality. Check the Epson Pro Graphics web site (http://prographics.epson.com) or your printouts where they will be exposed... to 24 inches wide (7800) or 44 inches wide (9800). Avoid storing your authorized Epson dealer for available media. 2-56 Manually switching rolls ...
Printer Guide
Page 64
...Press the d button to exit the menu. Press the Pause button to highlight PAGE LINE. 4. The printer accepts sheets ranging from letter size to highlight ON. 6. If you're loading small sheets or fine... page 90 (Mac OS X) or page 105 (Windows). Press the d button to 24 inches wide (7800) or 44 inches wide (9800). For instructions, see page 66. 2-64 make sure it as described... 19 mil (0.5 mm), load it is removed from your printer driver software. Follow these steps: 1. Press the Menu button again to select the Printer Setup menu and highlight PLATEN GAP. 3. You can leave ...
...Press the d button to exit the menu. Press the Pause button to highlight PAGE LINE. 4. The printer accepts sheets ranging from letter size to highlight ON. 6. If you're loading small sheets or fine... page 90 (Mac OS X) or page 105 (Windows). Press the d button to 24 inches wide (7800) or 44 inches wide (9800). For instructions, see page 66. 2-64 make sure it as described... 19 mil (0.5 mm), load it is removed from your printer driver software. Follow these steps: 1. Press the Menu button again to select the Printer Setup menu and highlight PLATEN GAP. 3. You can leave ...
Printer Guide
Page 75
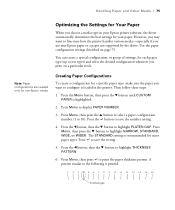
...group of settings, for each paper type (up to 10). Note: Paper configurations are needed only for your Epson printer software, the driver automatically determines the best settings for non-Epson media. Press Menu, then press the u button to select a paper configuration number (1 to ten types) and... to highlight PLATEN GAP. Handling Paper and Other Media | 75 Optimizing the Settings for Your Paper When you choose a media type in the printer. Then follow these steps: 1. Press the l button, then the d button to highlight NARROW, STANDARD, WIDE, or WIDER. Press Menu to...
...group of settings, for each paper type (up to 10). Note: Paper configurations are needed only for your Epson printer software, the driver automatically determines the best settings for non-Epson media. Press Menu, then press the u button to select a paper configuration number (1 to ten types) and... to highlight PLATEN GAP. Handling Paper and Other Media | 75 Optimizing the Settings for Your Paper When you choose a media type in the printer. Then follow these steps: 1. Press the l button, then the d button to highlight NARROW, STANDARD, WIDE, or WIDER. Press Menu to...
Printer Guide
Page 76
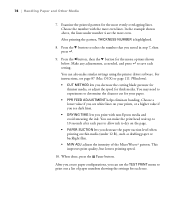
... paper suction level when printing on the page. • PAPER SUCTION lets you noted in step 7, then press . 9. You can make similar settings using the printer driver software. Choose the number with non-Epson media and avoid smearing the ink.
... paper suction level when printing on the page. • PAPER SUCTION lets you noted in step 7, then press . 9. You can make similar settings using the printer driver software. Choose the number with non-Epson media and avoid smearing the ink.


