Printer Guide
Page 5
... System Requirements 12 Important Safety Instructions 13 Ink Cartridge Safety Instructions 15 1 Setting Up the Printer Unpacking and Assembling the Epson Stylus Pro 7800 17 Unpacking and Assembling the Stand 18 Unpacking the Printer 20 Mounting the Printer on the Stand 22 Attaching the Paper Basket 25 Unpacking and Assembling the Epson Stylus Pro 9800 27 Unpacking and Assembling the Stand...
... System Requirements 12 Important Safety Instructions 13 Ink Cartridge Safety Instructions 15 1 Setting Up the Printer Unpacking and Assembling the Epson Stylus Pro 7800 17 Unpacking and Assembling the Stand 18 Unpacking the Printer 20 Mounting the Printer on the Stand 22 Attaching the Paper Basket 25 Unpacking and Assembling the Epson Stylus Pro 9800 27 Unpacking and Assembling the Stand...
Printer Guide
Page 6
... Using the Paper Basket 70 Catching Printouts From the Epson Stylus Pro 7800 71 Catching Printouts in Front of the Epson Stylus Pro 9800 72 Catching Printouts Under the Epson Stylus Pro 9800 73 Optimizing the Settings for Your Paper 75 ...Epson Drivers for Macintosh Choosing Page Setup Options 80 Choosing Basic Print Options 83 Choosing Color Management Options 87 Choosing Paper Configuration Options 88 Choosing Roll Paper Options 89 Borderless Printing 90 Creating a Custom Preset and Printing 93 Choosing Advanced Black and White Photo Settings 94 Managing Print Jobs 96 Checking Ink...
... Using the Paper Basket 70 Catching Printouts From the Epson Stylus Pro 7800 71 Catching Printouts in Front of the Epson Stylus Pro 9800 72 Catching Printouts Under the Epson Stylus Pro 9800 73 Optimizing the Settings for Your Paper 75 ...Epson Drivers for Macintosh Choosing Page Setup Options 80 Choosing Basic Print Options 83 Choosing Color Management Options 87 Choosing Paper Configuration Options 88 Choosing Roll Paper Options 89 Borderless Printing 90 Creating a Custom Preset and Printing 93 Choosing Advanced Black and White Photo Settings 94 Managing Print Jobs 96 Checking Ink...

Printer Guide
Page 7
Contents | 7 4 Printing with Epson Drivers for Windows Choosing Basic Print Options 100 ...114 Setting Monitoring Preferences and Optimizing Print Speed . . . . . 115 5 Maintaining and Transporting the Printer Checking Printer Status and Part Life 120 Printing Status Information 120 Viewing Status Information 121 Checking and Cleaning the Print Head... Cycle 125 Aligning the Print Head 126 Replacing Ink Cartridges 127 Switching Black Ink Cartridges 132 Draining the Old Ink 132 Installing the New Black Ink Cartridge 134 Updating the Printer Driver Information 135 Changing the Date and Time...
Contents | 7 4 Printing with Epson Drivers for Windows Choosing Basic Print Options 100 ...114 Setting Monitoring Preferences and Optimizing Print Speed . . . . . 115 5 Maintaining and Transporting the Printer Checking Printer Status and Part Life 120 Printing Status Information 120 Viewing Status Information 121 Checking and Cleaning the Print Head... Cycle 125 Aligning the Print Head 126 Replacing Ink Cartridges 127 Switching Black Ink Cartridges 132 Draining the Old Ink 132 Installing the New Black Ink Cartridge 134 Updating the Printer Driver Information 135 Changing the Date and Time...

Printer Guide
Page 8
... Shipment 144 Removing the Optional Print Server Card 146 Moving the Printer on the Stand 147 Setting Up the Printer After Transportation 148 6 Solving Problems Diagnosing Problems 149 Checking Error Messages and Lights 150 Improving Print Quality 154 Solving ...Problems 160 Fixing Paper Eject Problems 161 Clearing Paper Jams 162 Uninstalling and Reinstalling the Printer Driver 164 Macintosh 164 Windows 164 A Specifications Environmental 165 Electrical 165 Dimensions and Weight 166 Printer Interfaces 166 Safety Approvals 166 Media 166 Roll Paper 166 Cut Sheets 167 Printable ...
... Shipment 144 Removing the Optional Print Server Card 146 Moving the Printer on the Stand 147 Setting Up the Printer After Transportation 148 6 Solving Problems Diagnosing Problems 149 Checking Error Messages and Lights 150 Improving Print Quality 154 Solving ...Problems 160 Fixing Paper Eject Problems 161 Clearing Paper Jams 162 Uninstalling and Reinstalling the Printer Driver 164 Macintosh 164 Windows 164 A Specifications Environmental 165 Electrical 165 Dimensions and Weight 166 Printer Interfaces 166 Safety Approvals 166 Media 166 Roll Paper 166 Cut Sheets 167 Printable ...
Printer Guide
Page 9
.... Tips contain additional hints on setting up and using your printer, loading paper, using the Epson® printer drivers, and replacing ink cartridges. You can read the guide using the printer's menu system. It also tells you how to maintain your printer to keep it to your printer for daily use this book: WARNINGS must be followed...
.... Tips contain additional hints on setting up and using your printer, loading paper, using the Epson® printer drivers, and replacing ink cartridges. You can read the guide using the printer's menu system. It also tells you how to maintain your printer to keep it to your printer for daily use this book: WARNINGS must be followed...
Printer Guide
Page 10
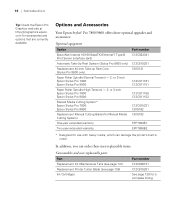
...://prographics.epson. Options and Accessories Your Epson Stylus® Pro 7800/9800 offers these user-replaceable items: Consumables and user-replaceable parts Part Replacement Ink Maintenance Tank (see page 141) Replacement Printer Cutter Blade (see page 138) Ink Cartridges Part number C12C890191 C12C815291 See page 128 for a complete listing. 10 or 3-inch Epson Stylus Pro 7800: Epson Stylus Pro 9800: Manual Media Cutting System* Epson Stylus Pro 7800: Epson Stylus Pro 9800...
...://prographics.epson. Options and Accessories Your Epson Stylus® Pro 7800/9800 offers these user-replaceable items: Consumables and user-replaceable parts Part Replacement Ink Maintenance Tank (see page 141) Replacement Printer Cutter Blade (see page 138) Ink Cartridges Part number C12C890191 C12C815291 See page 128 for a complete listing. 10 or 3-inch Epson Stylus Pro 7800: Epson Stylus Pro 9800: Manual Media Cutting System* Epson Stylus Pro 7800: Epson Stylus Pro 9800...
Printer Guide
Page 11
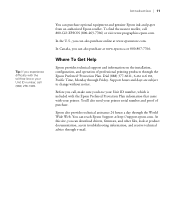
.... At this site, you can purchase optional equipment and genuine Epson ink and paper from an authorized Epson reseller. Introduction | 11 Tip: If you experience difficulty with your printer. Epson also provides technical assistance 24 hours a day through the Epson PreferredSM Protection Plan. Where To Get Help Epson provides technical support and information on the installation, configuration...
.... At this site, you can purchase optional equipment and genuine Epson ink and paper from an authorized Epson reseller. Introduction | 11 Tip: If you experience difficulty with your printer. Epson also provides technical assistance 24 hours a day through the Epson PreferredSM Protection Plan. Where To Get Help Epson provides technical support and information on the installation, configuration...
Printer Guide
Page 13
Use of another cord may need more space behind the printer if you use the equipment safely and effectively. • The printer weighs about 131 lb (Epson Stylus Pro 7800) or 198 lb (Epson Stylus Pro 9800) without ink or paper. The printer will not operate properly if it . Also keep the printer away from direct sunlight, strong light, or heat sources. •...
Use of another cord may need more space behind the printer if you use the equipment safely and effectively. • The printer weighs about 131 lb (Epson Stylus Pro 7800) or 198 lb (Epson Stylus Pro 9800) without ink or paper. The printer will not operate properly if it . Also keep the printer away from direct sunlight, strong light, or heat sources. •...

Printer Guide
Page 17
... using the Epson Stylus Pro 7800: 8 in. 6 in. 24 in. 12 in. If you have the Epson Stylus Pro 9800, see page 27 instead. Unpacking and Assembling the Epson Stylus Pro 7800 Follow these steps to set up and use the printer. The following information: • Unpacking and assembly • Connecting the power cord • Installing ink • Connecting to your printer and its...
... using the Epson Stylus Pro 7800: 8 in. 6 in. 24 in. 12 in. If you have the Epson Stylus Pro 9800, see page 27 instead. Unpacking and Assembling the Epson Stylus Pro 7800 Follow these steps to set up and use the printer. The following information: • Unpacking and assembly • Connecting the power cord • Installing ink • Connecting to your printer and its...
Printer Guide
Page 21
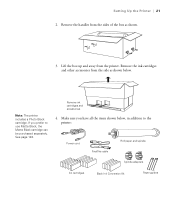
... a Photo Black cartridge. If you have all the items shown below . Make sure you prefer to the printer: Power cord FireWire cable Roll paper and spindle Spindle adapters Ink cartridges Black Ink Conversion Kit Paper guides 1-21 Lift the box up and away from the sides of the box as shown ...below , in addition to use Matte Black, the Matte Black cartridge can be purchased separately. Setting Up the Printer | 21 2. See page 128...
... a Photo Black cartridge. If you have all the items shown below . Make sure you prefer to the printer: Power cord FireWire cable Roll paper and spindle Spindle adapters Ink cartridges Black Ink Conversion Kit Paper guides 1-21 Lift the box up and away from the sides of the box as shown ...below , in addition to use Matte Black, the Matte Black cartridge can be purchased separately. Setting Up the Printer | 21 2. See page 128...
Printer Guide
Page 24
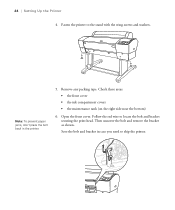
Check these areas: • the front cover • the ink compartment covers • the maintenance tank (on the right side near the bottom) 6. Follow the red wire to the stand with the wing screws and washers. Note: To prevent paper jams, don't place the bolt back in case you need to ship the printer. 1-24 Open the front cover. Then unscrew the bolt and remove the bracket as shown. Remove any packing tape. Fasten the printer to locate the bolt and bracket securing the print head. Save the bolt and bracket in the printer. 5. 24 | Setting Up the Printer 4.
Check these areas: • the front cover • the ink compartment covers • the maintenance tank (on the right side near the bottom) 6. Follow the red wire to the stand with the wing screws and washers. Note: To prevent paper jams, don't place the bolt back in case you need to ship the printer. 1-24 Open the front cover. Then unscrew the bolt and remove the bracket as shown. Remove any packing tape. Fasten the printer to locate the bolt and bracket securing the print head. Save the bolt and bracket in the printer. 5. 24 | Setting Up the Printer 4.
Printer Guide
Page 30
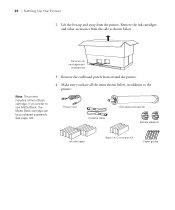
Remove the cardboard panels from the printer. Make sure you prefer to the printer: Power cord FireWire cable Roll paper and spindle Spindle adapters Ink cartridges Black Ink Conversion Kit Paper guides 1-30 Lift the box up and away from around the printer. 4. If you have all the items ...shown below . See page 128. 3. Remove the ink cartridges and other accessories from the ...
Remove the cardboard panels from the printer. Make sure you prefer to the printer: Power cord FireWire cable Roll paper and spindle Spindle adapters Ink cartridges Black Ink Conversion Kit Paper guides 1-30 Lift the box up and away from around the printer. 4. If you have all the items ...shown below . See page 128. 3. Remove the ink cartridges and other accessories from the ...
Printer Guide
Page 33
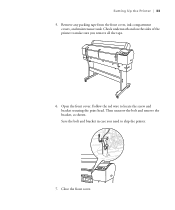
Follow the red wire to ship the printer. 7. Close the front cover. 1-33 Save the bolt and bracket in case you remove all the tape. 6. Check underneath and on the sides of the printer to make sure you need to locate the screw and bracket securing the print head. Then unscrew the bolt and remove the bracket, as shown. Remove any packing tape from the front cover, ink compartment covers, and maintenance tank. Open the front cover. Setting Up the Printer | 33 5.
Follow the red wire to ship the printer. 7. Close the front cover. 1-33 Save the bolt and bracket in case you remove all the tape. 6. Check underneath and on the sides of the printer to make sure you need to locate the screw and bracket securing the print head. Then unscrew the bolt and remove the bracket, as shown. Remove any packing tape from the front cover, ink compartment covers, and maintenance tank. Open the front cover. Setting Up the Printer | 33 5.
Printer Guide
Page 38
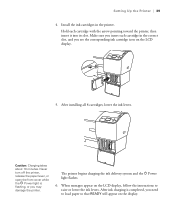
In a moment, INSTALL INK CARTRIDGES appears on the printer. 38 | Setting Up the Printer Note: The default black ink cartridge is normal for initial ink charging. see page 128), you prefer to charge the ink system. 1. Do not leave the printer unattended. 2. Ink lever 3. Installing Ink Use the ink cartridges that came with your printer for up to one-third of installing...
In a moment, INSTALL INK CARTRIDGES appears on the printer. 38 | Setting Up the Printer Note: The default black ink cartridge is normal for initial ink charging. see page 128), you prefer to charge the ink system. 1. Do not leave the printer unattended. 2. Ink lever 3. Installing Ink Use the ink cartridges that came with your printer for up to one-third of installing...
Printer Guide
Page 39
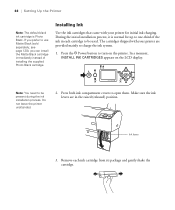
...39 Make sure you insert each cartridge with the arrow pointing toward the printer, then insert it into its slot. The printer begins charging the ink delivery system and the P Power light flashes. 6. Setting Up the Printer | 39 4. Install the ink cartridges in the correct slot, and you need to load paper so ...that READY will appear on the LCD display, follow the instructions to raise or lower the ink levers. Hold each cartridge in the printer. Never turn off the printer, release the paper lever, or open the front cover while the P Power light is completed, you see ...
...39 Make sure you insert each cartridge with the arrow pointing toward the printer, then insert it into its slot. The printer begins charging the ink delivery system and the P Power light flashes. 6. Setting Up the Printer | 39 4. Install the ink cartridges in the correct slot, and you need to load paper so ...that READY will appear on the LCD display, follow the instructions to raise or lower the ink levers. Hold each cartridge in the printer. Never turn off the printer, release the paper lever, or open the front cover while the P Power light is completed, you see ...
Printer Guide
Page 76
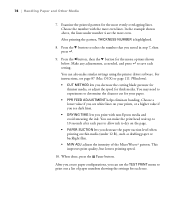
... the printed pattern for the most even. Choose the number with non-Epson media and avoid smearing the ink. In the example shown above, the lines under 12 lb), such ...lines on thin media (under number 4 are the most evenly overlapping lines. You can make similar settings using the printer driver software. When done, press the Pause button. You may need to experiment to print out a list of.... 2-76 76 | Handling Paper and Other Media 7. Press the d button to save each pass to allow ink to dry on the page. • PAPER SUCTION lets you print with the most even lines. Choose a lower...
... the printed pattern for the most even. Choose the number with non-Epson media and avoid smearing the ink. In the example shown above, the lines under 12 lb), such ...lines on thin media (under number 4 are the most evenly overlapping lines. You can make similar settings using the printer driver software. When done, press the Pause button. You may need to experiment to print out a list of.... 2-76 76 | Handling Paper and Other Media 7. Press the d button to save each pass to allow ink to dry on the page. • PAPER SUCTION lets you print with the most even lines. Choose a lower...
Printer Guide
Page 87
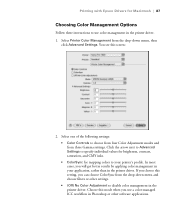
...inks. • ColorSync for Macintosh | 87 Choosing Color Management Options Follow these instructions to use a color-managed ICC workflow in Photoshop or other settings. • (Off) No Color Adjustment to disable color management in the printer driver. In most cases, you use color management in the printer... this mode when you will get better results by applying color management in your printer's profile. Choose this screen: 2. Select Printer Color Management from three Gamma settings. Printing with Epson Drivers for mapping colors to your application, rather than in the...
...inks. • ColorSync for Macintosh | 87 Choosing Color Management Options Follow these instructions to use a color-managed ICC workflow in Photoshop or other settings. • (Off) No Color Adjustment to disable color management in the printer driver. In most cases, you use color management in the printer... this mode when you will get better results by applying color management in your printer's profile. Choose this screen: 2. Select Printer Color Management from three Gamma settings. Printing with Epson Drivers for mapping colors to your application, rather than in the...

Printer Guide
Page 88
... you need to change the Color Density setting if your prints, or a higher value if you print with Epson Drivers for Macintosh Note: You may need to fine-tune its performance. 1. 88 | Printing with non-Epson media and avoid smearing the ink. You see this screen:... 2. Select the correct settings to dry on unusually thick or thin paper. 3-88 Choosing Paper Configuration Options Follow these instructions if you are using the printer's control panel. • Color Density lets you control the ink saturation ...
... you need to change the Color Density setting if your prints, or a higher value if you print with Epson Drivers for Macintosh Note: You may need to fine-tune its performance. 1. 88 | Printing with non-Epson media and avoid smearing the ink. You see this screen:... 2. Select the correct settings to dry on unusually thick or thin paper. 3-88 Choosing Paper Configuration Options Follow these instructions if you are using the printer's control panel. • Color Density lets you control the ink saturation ...

Printer Guide
Page 93
... See page 96 for instructions on each screen in the drop-down menu. 2. Avoid cycling through them repeatedly, or you use the same profile/printer/ink/media combination for future print jobs. 1. When you check the settings on monitoring your settings are correct, select Save As from top to print,... click the Print button. After verifying that your print job. 3-93 Printing with Epson Drivers for Macintosh | 93 Note: If you 're ready to bottom. Creating a Custom Preset and Printing Once you will save you time ...
... See page 96 for instructions on each screen in the drop-down menu. 2. Avoid cycling through them repeatedly, or you use the same profile/printer/ink/media combination for future print jobs. 1. When you check the settings on monitoring your settings are correct, select Save As from top to print,... click the Print button. After verifying that your print job. 3-93 Printing with Epson Drivers for Macintosh | 93 Note: If you 're ready to bottom. Creating a Custom Preset and Printing Once you will save you time ...
Quick Reference Guide
Page 11
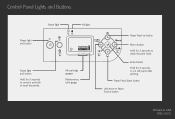
Paper Feed down button Left arrow or Paper Source button Printed in USA CPD-20272 Control Panel Lights and Buttons Power light and button Paper light Ink light Pause light and button Hold for 3 seconds to cut roll paper after printing. Enter button Hold for 3 seconds to clean the print head. Ink cartridge gauges Maintenance tank gauge Paper Feed up button Menu button Hold for 3 seconds to cancel a print job or reset the printer.
Paper Feed down button Left arrow or Paper Source button Printed in USA CPD-20272 Control Panel Lights and Buttons Power light and button Paper light Ink light Pause light and button Hold for 3 seconds to cut roll paper after printing. Enter button Hold for 3 seconds to clean the print head. Ink cartridge gauges Maintenance tank gauge Paper Feed up button Menu button Hold for 3 seconds to cancel a print job or reset the printer.


