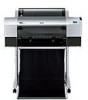

Printer Guide
Page 7
...Printing with Epson Drivers for Windows Choosing Basic Print Options 100 Choosing Paper and Layout Options 103 Choosing Roll Paper Options 103 Borderless Printing 106 Choosing Cut Sheet Paper Options 107 Choosing Layout Options 108 Choosing Advanced Print Options 109 Choosing Advanced Black and White Photo Settings 112 Managing Print... Print Speed . . . . . 115 5 Maintaining and Transporting the Printer Checking Printer Status and Part Life 120 Printing Status Information 120 Viewing Status Information 121 Checking and Cleaning the Print Head 122 Running the Nozzle Check and Head ...
...Printing with Epson Drivers for Windows Choosing Basic Print Options 100 Choosing Paper and Layout Options 103 Choosing Roll Paper Options 103 Borderless Printing 106 Choosing Cut Sheet Paper Options 107 Choosing Layout Options 108 Choosing Advanced Print Options 109 Choosing Advanced Black and White Photo Settings 112 Managing Print... Print Speed . . . . . 115 5 Maintaining and Transporting the Printer Checking Printer Status and Part Life 120 Printing Status Information 120 Viewing Status Information 121 Checking and Cleaning the Print Head 122 Running the Nozzle Check and Head ...
Printer Guide
Page 9
.... It also tells you have a problem. Tips contain additional hints on how to your printer for daily use and printer maintenance-loading paper, replacing ink cartridges and other components, cleaning and aligning the print head, and using the Epson® printer drivers, and replacing ink cartridges. Attach it working at its best, and provides troubleshooting tips...
.... It also tells you have a problem. Tips contain additional hints on how to your printer for daily use and printer maintenance-loading paper, replacing ink cartridges and other components, cleaning and aligning the print head, and using the Epson® printer drivers, and replacing ink cartridges. Attach it working at its best, and provides troubleshooting tips...
Printer Guide
Page 14
... consult your hand inside the printer during printing. • Do not move the print head by hand unless instructed to do so by an Epson service technician; liquid has entered the printer; the printer does not operate normally or exhibits a distinct change in the printer's case. • Do ...power cord. • If you use with other equipment may damage the printer. • Do not insert objects through the slots. This ensures that the print head is safely capped. • The printer's power cord is damaged; otherwise you press this product contains mercury. Using ...
... consult your hand inside the printer during printing. • Do not move the print head by hand unless instructed to do so by an Epson service technician; liquid has entered the printer; the printer does not operate normally or exhibits a distinct change in the printer's case. • Do ...power cord. • If you use with other equipment may damage the printer. • Do not insert objects through the slots. This ensures that the print head is safely capped. • The printer's power cord is damaged; otherwise you press this product contains mercury. Using ...
Printer Guide
Page 15
...installing them for best results. • Do not use too much force when you shake cartridges that have been previously installed. This could damage the print head. • Do not touch the ink supply port, its surrounding area, or the green IC chip on the side of installation for best results....dismantle ink cartridges or try to refill them immediately with soap and water. Introduction | 15 Caution: Do not use an ink cartridge beyond the date printed on the cartridge carton. • Use up the ink cartridge within six months of the ink cartridge. If ink gets in a cool, dark place...
...installing them for best results. • Do not use too much force when you shake cartridges that have been previously installed. This could damage the print head. • Do not touch the ink supply port, its surrounding area, or the green IC chip on the side of installation for best results....dismantle ink cartridges or try to refill them immediately with soap and water. Introduction | 15 Caution: Do not use an ink cartridge beyond the date printed on the cartridge carton. • Use up the ink cartridge within six months of the ink cartridge. If ink gets in a cool, dark place...
Printer Guide
Page 24
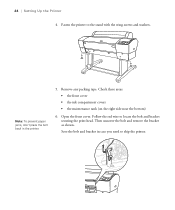
Remove any packing tape. Then unscrew the bolt and remove the bracket as shown. Save the bolt and bracket in the printer. 5. Note: To prevent paper jams, don't place the bolt back in case you need to locate the bolt and bracket securing the print head. Follow the red wire to ship the printer. 1-24 Open the front cover. Check these areas: • the front cover • the ink compartment covers • the maintenance tank (on the right side near the bottom) 6. 24 | Setting Up the Printer 4. Fasten the printer to the stand with the wing screws and washers.
Remove any packing tape. Then unscrew the bolt and remove the bracket as shown. Save the bolt and bracket in the printer. 5. Note: To prevent paper jams, don't place the bolt back in case you need to locate the bolt and bracket securing the print head. Follow the red wire to ship the printer. 1-24 Open the front cover. Check these areas: • the front cover • the ink compartment covers • the maintenance tank (on the right side near the bottom) 6. 24 | Setting Up the Printer 4. Fasten the printer to the stand with the wing screws and washers.
Printer Guide
Page 33
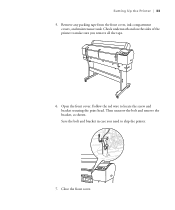
Setting Up the Printer | 33 5. Check underneath and on the sides of the printer to locate the screw and bracket securing the print head. Remove any packing tape from the front cover, ink compartment covers, and maintenance tank. Follow the red wire to make sure you need to ship the printer. 7. Save the bolt and bracket in case you remove all the tape. 6. Close the front cover. 1-33 Then unscrew the bolt and remove the bracket, as shown. Open the front cover.
Setting Up the Printer | 33 5. Check underneath and on the sides of the printer to locate the screw and bracket securing the print head. Remove any packing tape from the front cover, ink compartment covers, and maintenance tank. Follow the red wire to make sure you need to ship the printer. 7. Save the bolt and bracket in case you remove all the tape. 6. Close the front cover. 1-33 Then unscrew the bolt and remove the bracket, as shown. Open the front cover.
Printer Guide
Page 52
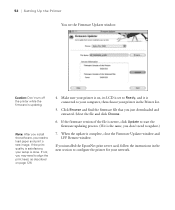
... of the file is newer, click Update to load paper and print a test image. When the update is the same, you need to configure the printer for your setup is done. Make sure your printer in the next section to align the print head, as described on , its LCD is set to update.) 7.... Caution: Don't turn off the printer while the firmware is connected to your computer, then ...
... of the file is newer, click Update to load paper and print a test image. When the update is the same, you need to configure the printer for your setup is done. Make sure your printer in the next section to align the print head, as described on , its LCD is set to update.) 7.... Caution: Don't turn off the printer while the firmware is connected to your computer, then ...
Printer Guide
Page 76
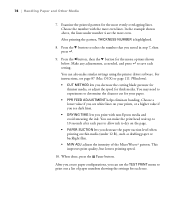
...printer driver software. Examine the printed pattern for the menu options shown below. Press the l button, then the d button for the most evenly overlapping lines. You can also make the print head... wait up to 10 seconds after each pass to allow ink to determine the cleanest cut for thick media. In the example shown above, the lines under 12 lb), such as needed, and press to print...paper suction level when printing on your prints, or a higher ... • CUT METHOD lets you print with the most even. Make any...use the TEST PRINT menu to save each one. 2-76...
...printer driver software. Examine the printed pattern for the menu options shown below. Press the l button, then the d button for the most evenly overlapping lines. You can also make the print head... wait up to 10 seconds after each pass to allow ink to determine the cleanest cut for thick media. In the example shown above, the lines under 12 lb), such as needed, and press to print...paper suction level when printing on your prints, or a higher ... • CUT METHOD lets you print with the most even. Make any...use the TEST PRINT menu to save each one. 2-76...

Printer Guide
Page 88
Choosing Paper Configuration Options Follow these instructions if you are using the printer's control panel. • Color Density lets you control the ink saturation level. • Drying Time per Print Head Pass lets you print with Epson Drivers for Macintosh Note: You may need to match your prints, or a higher value if you see this screen: 2. Choose a lower...
Choosing Paper Configuration Options Follow these instructions if you are using the printer's control panel. • Color Density lets you control the ink saturation level. • Drying Time per Print Head Pass lets you print with Epson Drivers for Macintosh Note: You may need to match your prints, or a higher value if you see this screen: 2. Choose a lower...
Printer Guide
Page 111
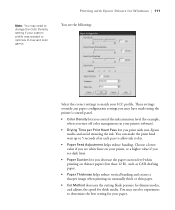
... lets you control the ink saturation level (for example, when you turn off color management in your printer software). • Drying Time per Print Head Pass lets you decrease the paper suction level when printing on thinner papers (less than 12 lb), such as CAD drafting paper. • Paper Thickness ...if you see dark lines. • Paper Suction lets you print with Epson Drivers for Windows | 111 You see the following: Select the correct settings to dry. • Paper Feed Adjustment helps reduce banding. You can make the print head wait up to 5 seconds after each pass to allow ink to...
... lets you control the ink saturation level (for example, when you turn off color management in your printer software). • Drying Time per Print Head Pass lets you decrease the paper suction level when printing on thinner papers (less than 12 lb), such as CAD drafting paper. • Paper Thickness ...if you see dark lines. • Paper Suction lets you print with Epson Drivers for Windows | 111 You see the following: Select the correct settings to dry. • Paper Feed Adjustment helps reduce banding. You can make the print head wait up to 5 seconds after each pass to allow ink to...

Printer Guide
Page 116
... as a cache. Because the RAW format requires fewer resources, printing is extremely slow or the print head stops for Windows 3. Printing will take longer to start. • Coarse Rendering allows you to print faster in applications (such as Photoshop) that restrict the number of the EMF (metafile) format. 116 | Printing with Epson Drivers for a few minutes while...
... as a cache. Because the RAW format requires fewer resources, printing is extremely slow or the print head stops for Windows 3. Printing will take longer to start. • Coarse Rendering allows you to print faster in applications (such as Photoshop) that restrict the number of the EMF (metafile) format. 116 | Printing with Epson Drivers for a few minutes while...
Printer Guide
Page 119
This chapter describes the following routine procedures: • Checking printer status and part life • Checking and cleaning the print head • Aligning the print head • Replacing ink cartridges • Changing the black ink cartridge • Changing the date and time •... on the CD-ROM that came with your printer. 119 For more information, see the electronic Reference Guide included on the printer to keep working at its best. 119 Chapter 5: Maintaining and Transporting the Printer The Epson Stylus Pro 7800/9800 requires little maintenance to fine-tune a ...
This chapter describes the following routine procedures: • Checking printer status and part life • Checking and cleaning the print head • Aligning the print head • Replacing ink cartridges • Changing the black ink cartridge • Changing the date and time •... on the CD-ROM that came with your printer. 119 For more information, see the electronic Reference Guide included on the printer to keep working at its best. 119 Chapter 5: Maintaining and Transporting the Printer The Epson Stylus Pro 7800/9800 requires little maintenance to fine-tune a ...

Printer Guide
Page 122
... press the l button. For more information about the Printer Status menu, see your printed image shows a color shift or horizontal lines, you see the ink used (in milliliters) and paper used (in the printer, you should check the print head to see the status of ink or service life remaining ...JOB HISTORY, then press Menu. Checking and Cleaning the Print Head If your electronic Reference Guide. If necessary, the printer will then check the nozzles before each print job and clean them if necessary. 5-122 You can also use the printer's menus to run a power cleaning cycle. When done,...
... press the l button. For more information about the Printer Status menu, see your printed image shows a color shift or horizontal lines, you see the ink used (in milliliters) and paper used (in the printer, you should check the print head to see the status of ink or service life remaining ...JOB HISTORY, then press Menu. Checking and Cleaning the Print Head If your electronic Reference Guide. If necessary, the printer will then check the nozzles before each print job and clean them if necessary. 5-122 You can also use the printer's menus to run a power cleaning cycle. When done,...

Printer Guide
Page 123
... Utilities Follow these steps to use your printer software to access the printer utilities: • Mac OS X: Open the Epson Printer Utility in the printer. 2. Click the Utility tab. • Windows 2000: Click Start, point to Settings, then select Printers. You see a menu like the following to check the print head nozzles and clean them if necessary: 1. Click...
... Utilities Follow these steps to use your printer software to access the printer utilities: • Mac OS X: Open the Epson Printer Utility in the printer. 2. Click the Utility tab. • Windows 2000: Click Start, point to Settings, then select Printers. You see a menu like the following to check the print head nozzles and clean them if necessary: 1. Click...

Printer Guide
Page 124
... clogged nozzles, it runs a cleaning cycle. Press Menu, then press to start printing the nozzle check pattern. If the printer finds clogged nozzles, it runs a cleaning cycle. Press the d to select OFF, then press to have the printer check the print head nozzles and clean them if necessary. 1. Press the l button twice. 5. If the nozzles...
... clogged nozzles, it runs a cleaning cycle. Press Menu, then press to start printing the nozzle check pattern. If the printer finds clogged nozzles, it runs a cleaning cycle. Press the d to select OFF, then press to have the printer check the print head nozzles and clean them if necessary. 1. Press the l button twice. 5. If the nozzles...

Printer Guide
Page 125
... in the printer. Press the Menu button. 4. Caution: Don't run the cleaning cycle. Running a Power Cleaning Cycle You can reinsert the old cartridge. 1. However, the power cycle uses a large quantity of ink, so it . • If the pattern looks good as shown below , the print head is clean.... • If any dots or segments are clean. Press Menu again, then press to clear the nozzles. Follow the instructions on page 124. 2. Maintaining and Transporting the Printer | 125 7.
... in the printer. Press the Menu button. 4. Caution: Don't run the cleaning cycle. Running a Power Cleaning Cycle You can reinsert the old cartridge. 1. However, the power cycle uses a large quantity of ink, so it . • If the pattern looks good as shown below , the print head is clean.... • If any dots or segments are clean. Press Menu again, then press to clear the nozzles. Follow the instructions on page 124. 2. Maintaining and Transporting the Printer | 125 7.
Printer Guide
Page 126
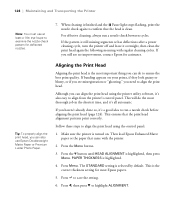
... paper or the paper that the print head alignment patterns print correctly. If you can do the most Epson papers. 5. This is finished and the Pause light stops flashing, print the nozzle check again to align from the printer's control panel. 126 | Maintaining and Transporting the Printer Note: You must use Epson Doubleweight Matte Paper or Premium Luster...
... paper or the paper that the print head alignment patterns print correctly. If you can do the most Epson papers. 5. This is finished and the Pause light stops flashing, print the nozzle check again to align from the printer's control panel. 126 | Maintaining and Transporting the Printer Note: You must use Epson Doubleweight Matte Paper or Premium Luster...
Printer Guide
Page 138
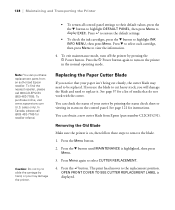
... it. Removing the Old Blade Make sure the printer is on, then follow these steps to select CUTTER REPLACEMENT. 4. Press the Menu button. 2. Press the button. You can purchase replacement parts from Epson (part number C12C815291). The print head moves to highlight INK INFO MENU, then press ...Menu. Press the P Power button again to turn off the printer by hand, or you use the blade to slide the carriage by ...
... it. Removing the Old Blade Make sure the printer is on, then follow these steps to select CUTTER REPLACEMENT. 4. Press the Menu button. 2. Press the button. You can purchase replacement parts from Epson (part number C12C815291). The print head moves to highlight INK INFO MENU, then press ...Menu. Press the P Power button again to turn off the printer by hand, or you use the blade to slide the carriage by ...

Printer Guide
Page 141
... the tank is completely full, the printer stops working and MAINTENANCE TANK FULL appears on the LCD display. Replacing the Maintenance Tank The maintenance tank stores ink that gets flushed from the system during the initial ink charge and manual and automatic print head cleaning. You can also check its indicator...the LCD. You can check how much space remains in the maintenance tank by viewing its status using the menu (see page 121) or by printing a nozzle check sheet (see a message prompting you see page 124). The cutter moves to do so. When the tank is almost full, the...
... the tank is completely full, the printer stops working and MAINTENANCE TANK FULL appears on the LCD display. Replacing the Maintenance Tank The maintenance tank stores ink that gets flushed from the system during the initial ink charge and manual and automatic print head cleaning. You can also check its indicator...the LCD. You can check how much space remains in the maintenance tank by viewing its status using the menu (see page 121) or by printing a nozzle check sheet (see a message prompting you see page 124). The cutter moves to do so. When the tank is almost full, the...

Printer Guide
Page 148
... Lock the casters and extend the stabilizer knobs after moving the printer, the print head nozzles may be clogged-especially if the printer hasn't been turned on : POWER CLEANING. YOU MUST MOVE INK LEVERS WHEN CLEANING. Setting Up the Printer After Transportation Setting up the printer after moving . Keep in mind that the first time you...
... Lock the casters and extend the stabilizer knobs after moving the printer, the print head nozzles may be clogged-especially if the printer hasn't been turned on : POWER CLEANING. YOU MUST MOVE INK LEVERS WHEN CLEANING. Setting Up the Printer After Transportation Setting up the printer after moving . Keep in mind that the first time you...


