Printer Guide
Page 5
... Windows System Requirements 12 Important Safety Instructions 13 Ink Cartridge Safety Instructions 15 1 Setting Up the Printer Unpacking and Assembling the Epson Stylus Pro 7800 17 Unpacking and Assembling the Stand 18 Unpacking the Printer 20 Mounting the Printer on the Stand 22 Attaching the Paper Basket 25 Unpacking and Assembling the Epson Stylus Pro 9800 27 Unpacking and Assembling the Stand...
... Windows System Requirements 12 Important Safety Instructions 13 Ink Cartridge Safety Instructions 15 1 Setting Up the Printer Unpacking and Assembling the Epson Stylus Pro 7800 17 Unpacking and Assembling the Stand 18 Unpacking the Printer 20 Mounting the Printer on the Stand 22 Attaching the Paper Basket 25 Unpacking and Assembling the Epson Stylus Pro 9800 27 Unpacking and Assembling the Stand...
Printer Guide
Page 6
... Basket 70 Catching Printouts From the Epson Stylus Pro 7800 71 Catching Printouts in Front of the Epson Stylus Pro 9800 72 Catching Printouts Under the Epson Stylus Pro 9800 73 Optimizing the Settings for Your Paper 75 Creating Paper ...Epson Drivers for Macintosh Choosing Page Setup Options 80 Choosing Basic Print Options 83 Choosing Color Management Options 87 Choosing Paper Configuration Options 88 Choosing Roll Paper Options 89 Borderless Printing 90 Creating a Custom Preset and Printing 93 Choosing Advanced Black and White Photo Settings 94 Managing Print Jobs 96 Checking Ink...
... Basket 70 Catching Printouts From the Epson Stylus Pro 7800 71 Catching Printouts in Front of the Epson Stylus Pro 9800 72 Catching Printouts Under the Epson Stylus Pro 9800 73 Optimizing the Settings for Your Paper 75 Creating Paper ...Epson Drivers for Macintosh Choosing Page Setup Options 80 Choosing Basic Print Options 83 Choosing Color Management Options 87 Choosing Paper Configuration Options 88 Choosing Roll Paper Options 89 Borderless Printing 90 Creating a Custom Preset and Printing 93 Choosing Advanced Black and White Photo Settings 94 Managing Print Jobs 96 Checking Ink...

Printer Guide
Page 7
...Epson Drivers for Windows Choosing Basic Print Options 100 Choosing Paper and Layout Options 103 Choosing Roll Paper Options 103 Borderless Printing 106 Choosing Cut Sheet Paper Options 107 Choosing Layout Options 108 Choosing Advanced Print Options 109 Choosing Advanced Black and White Photo Settings ... a Power Cleaning Cycle 125 Aligning the Print Head 126 Replacing Ink Cartridges 127 Switching Black Ink Cartridges 132 Draining the Old Ink 132 Installing the New Black Ink Cartridge 134 Updating the Printer Driver Information 135 Changing the Date and Time 136 Using Maintenance ...
...Epson Drivers for Windows Choosing Basic Print Options 100 Choosing Paper and Layout Options 103 Choosing Roll Paper Options 103 Borderless Printing 106 Choosing Cut Sheet Paper Options 107 Choosing Layout Options 108 Choosing Advanced Print Options 109 Choosing Advanced Black and White Photo Settings ... a Power Cleaning Cycle 125 Aligning the Print Head 126 Replacing Ink Cartridges 127 Switching Black Ink Cartridges 132 Draining the Old Ink 132 Installing the New Black Ink Cartridge 134 Updating the Printer Driver Information 135 Changing the Date and Time 136 Using Maintenance ...

Printer Guide
Page 8
... Moving the Printer on the Stand 147 Setting Up the Printer After Transportation ...148 6 Solving Problems Diagnosing Problems 149 Checking Error Messages and Lights 150 Improving Print Quality 154 Solving Operational Problems 158 Solving Miscellaneous Printing Problems 159 Solving Paper Problems 160 Fixing Paper Eject Problems 161 Clearing Paper Jams 162 Uninstalling and Reinstalling the Printer... Driver 164 Macintosh 164 Windows 164 A Specifications Environmental 165 Electrical 165 Dimensions and Weight 166 Printer Interfaces...
... Moving the Printer on the Stand 147 Setting Up the Printer After Transportation ...148 6 Solving Problems Diagnosing Problems 149 Checking Error Messages and Lights 150 Improving Print Quality 154 Solving Operational Problems 158 Solving Miscellaneous Printing Problems 159 Solving Paper Problems 160 Fixing Paper Eject Problems 161 Clearing Paper Jams 162 Uninstalling and Reinstalling the Printer... Driver 164 Macintosh 164 Windows 164 A Specifications Environmental 165 Electrical 165 Dimensions and Weight 166 Printer Interfaces...
Printer Guide
Page 9
... best, and provides troubleshooting tips in case you use and printer maintenance-loading paper, replacing ink cartridges and other components, cleaning and aligning the print head, and using the Epson® printer drivers, and replacing ink cartridges. You can read the guide using your equipment. Tips... contain additional hints on how to get the most out of procedures for easy reference. • The electronic Reference Guide on setting up and using a ...
... best, and provides troubleshooting tips in case you use and printer maintenance-loading paper, replacing ink cartridges and other components, cleaning and aligning the print head, and using the Epson® printer drivers, and replacing ink cartridges. You can read the guide using your equipment. Tips... contain additional hints on how to get the most out of procedures for easy reference. • The electronic Reference Guide on setting up and using a ...
Printer Guide
Page 13
...Use only the type of another cord may need more space behind the printer if you print on large sheets of heavy stock or posterboard. (See page 17 for the 7800 or 27 for the 9800.) • When setting up to 10 feet long • For network connection: the optional ...it. (See page 23 for the 7800 or 32 for the 9800.) • Place the printer on a flat, stable surface. Make sure you use the equipment safely and effectively. • The printer weighs about 131 lb (Epson Stylus Pro 7800) or 198 lb (Epson Stylus Pro 9800) without ink or paper. The printer will not operate properly if it ....
...Use only the type of another cord may need more space behind the printer if you print on large sheets of heavy stock or posterboard. (See page 17 for the 7800 or 27 for the 9800.) • When setting up to 10 feet long • For network connection: the optional ...it. (See page 23 for the 7800 or 32 for the 9800.) • Place the printer on a flat, stable surface. Make sure you use the equipment safely and effectively. • The printer weighs about 131 lb (Epson Stylus Pro 7800) or 198 lb (Epson Stylus Pro 9800) without ink or paper. The printer will not operate properly if it ....

Printer Guide
Page 17
...a place for the printer, leave adequate room for using the Epson Stylus Pro 7800: 8 in. 6 in. 24 in. 12 in. Also avoid locations near potential sources of approximately 8 × 8 feet to set up and use the printer. If you have the Epson Stylus Pro 9800, see page... 27 instead. You will also need floor space of interference, such as loud speakers, cordless phones, TVs, or air conditioners. The following information: • Unpacking and assembly • Connecting the power cord • Installing ink...
...a place for the printer, leave adequate room for using the Epson Stylus Pro 7800: 8 in. 6 in. 24 in. 12 in. Also avoid locations near potential sources of approximately 8 × 8 feet to set up and use the printer. If you have the Epson Stylus Pro 9800, see page... 27 instead. You will also need floor space of interference, such as loud speakers, cordless phones, TVs, or air conditioners. The following information: • Unpacking and assembly • Connecting the power cord • Installing ink...
Printer Guide
Page 21
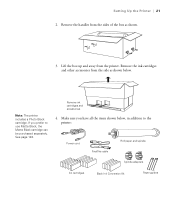
... cord FireWire cable Roll paper and spindle Spindle adapters Ink cartridges Black Ink Conversion Kit Paper guides 1-21 Remove ink cartridges and accessories # " 4. If you have all the items shown below . Setting Up the Printer | 21 2. See page 128. Remove the handles from the printer. Lift the box up and away from the sides of the...
... cord FireWire cable Roll paper and spindle Spindle adapters Ink cartridges Black Ink Conversion Kit Paper guides 1-21 Remove ink cartridges and accessories # " 4. If you have all the items shown below . Setting Up the Printer | 21 2. See page 128. Remove the handles from the printer. Lift the box up and away from the sides of the...
Printer Guide
Page 24
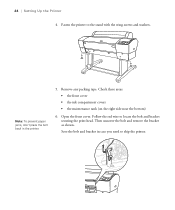
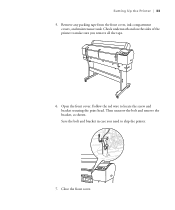
Fasten the printer to locate the bolt and bracket securing the print head. Remove any packing tape. Follow the red wire to the stand with the wing screws and washers. Then unscrew the bolt and remove the bracket as shown. Open the front cover. Save the bolt and bracket in the printer. 5. Check these areas: • the front cover • the ink compartment covers • the maintenance tank (on the right side near the bottom) 6. Note: To prevent paper jams, don't place the bolt back in case you need to ship the printer. 1-24 24 | Setting Up the Printer 4.
Fasten the printer to locate the bolt and bracket securing the print head. Remove any packing tape. Follow the red wire to the stand with the wing screws and washers. Then unscrew the bolt and remove the bracket as shown. Open the front cover. Save the bolt and bracket in the printer. 5. Check these areas: • the front cover • the ink compartment covers • the maintenance tank (on the right side near the bottom) 6. Note: To prevent paper jams, don't place the bolt back in case you need to ship the printer. 1-24 24 | Setting Up the Printer 4.
Printer Guide
Page 30
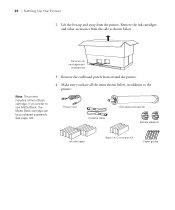
... Black cartridge can be purchased separately. See page 128. 3. 30 | Setting Up the Printer 2. Remove the ink cartridges and other accessories from around the printer. 4. Make sure you prefer to the printer: Power cord FireWire cable Roll paper and spindle Spindle adapters Ink cartridges Black Ink Conversion Kit Paper guides 1-30 Lift the box up and away...
... Black cartridge can be purchased separately. See page 128. 3. 30 | Setting Up the Printer 2. Remove the ink cartridges and other accessories from around the printer. 4. Make sure you prefer to the printer: Power cord FireWire cable Roll paper and spindle Spindle adapters Ink cartridges Black Ink Conversion Kit Paper guides 1-30 Lift the box up and away...
Printer Guide
Page 33
Close the front cover. 1-33 Remove any packing tape from the front cover, ink compartment covers, and maintenance tank. Check underneath and on the sides of the printer to make sure you need to locate the screw and bracket securing the print head. Then unscrew the bolt and remove the bracket, as shown. Open the front cover. Save the bolt and bracket in case you remove all the tape. 6. Follow the red wire to ship the printer. 7. Setting Up the Printer | 33 5.
Close the front cover. 1-33 Remove any packing tape from the front cover, ink compartment covers, and maintenance tank. Check underneath and on the sides of the printer to make sure you need to locate the screw and bracket securing the print head. Then unscrew the bolt and remove the bracket, as shown. Open the front cover. Save the bolt and bracket in case you remove all the tape. 6. Follow the red wire to ship the printer. 7. Setting Up the Printer | 33 5.
Printer Guide
Page 38
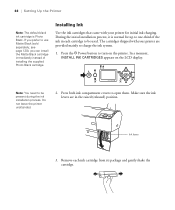
... Note: You need to turn on the LCD display. Ink lever 3. In a moment, INSTALL INK CARTRIDGES appears on the printer. Press both ink compartment covers to be present during the ink installation process. Make sure the ink levers are provided mainly to one-third of installing the ...supplied Photo Black cartridge. 38 | Setting Up the Printer Note: The default black ink cartridge is normal for initial ink charging. During the initial installation process, it is Photo Black. Remove each cartridge to open them...
... Note: You need to turn on the LCD display. Ink lever 3. In a moment, INSTALL INK CARTRIDGES appears on the printer. Press both ink compartment covers to be present during the ink installation process. Make sure the ink levers are provided mainly to one-third of installing the ...supplied Photo Black cartridge. 38 | Setting Up the Printer Note: The default black ink cartridge is normal for initial ink charging. During the initial installation process, it is Photo Black. Remove each cartridge to open them...
Printer Guide
Page 39
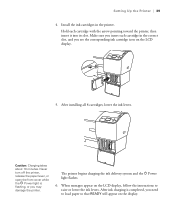
... insert it into its slot. Make sure you see the corresponding ink cartridge icon on the display. 1-39 Hold each cartridge in the printer. After ink charging is flashing, or you need to raise or lower the ink levers. Setting Up the Printer | 39 4. When messages appear on the LCD display, follow the instructions to load...
... insert it into its slot. Make sure you see the corresponding ink cartridge icon on the display. 1-39 Hold each cartridge in the printer. After ink charging is flashing, or you need to raise or lower the ink levers. Setting Up the Printer | 39 4. When messages appear on the LCD display, follow the instructions to load...
Printer Guide
Page 76
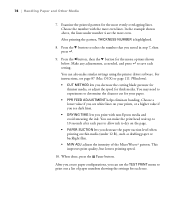
..., or a higher value if you see page 87 (Mac OS X) or page 111 (Windows). • CUT METHOD lets you can make similar settings using the printer driver software. Press the l button, then the d button for thick media. When done, press the Pause button. After printing the pattern, THICKNESS ... on your paper. • PPR FEED ADJUSTMENT helps eliminate banding. 76 | Handling Paper and Other Media 7. Choose the number with non-Epson media and avoid smearing the ink. Press the d button to dry on the page. • PAPER SUCTION lets you noted in step 7, then press . 9.
..., or a higher value if you see page 87 (Mac OS X) or page 111 (Windows). • CUT METHOD lets you can make similar settings using the printer driver software. Press the l button, then the d button for thick media. When done, press the Pause button. After printing the pattern, THICKNESS ... on your paper. • PPR FEED ADJUSTMENT helps eliminate banding. 76 | Handling Paper and Other Media 7. Choose the number with non-Epson media and avoid smearing the ink. Press the d button to dry on the page. • PAPER SUCTION lets you noted in step 7, then press . 9.
Printer Guide
Page 87
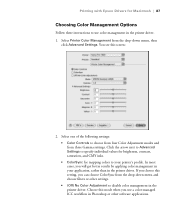
... individual values for brightness, contrast, saturation, and CMY inks. • ColorSync for Macintosh | 87 Choosing Color Management Options Follow these instructions to choose from four Color Adjustment modes and from three Gamma settings. Printing with Epson Drivers for mapping colors to disable color management in the printer driver. Select Printer Color Management from the drop-down menu, then click Advanced...
... individual values for brightness, contrast, saturation, and CMY inks. • ColorSync for Macintosh | 87 Choosing Color Management Options Follow these instructions to choose from four Color Adjustment modes and from three Gamma settings. Printing with Epson Drivers for mapping colors to disable color management in the printer driver. Select Printer Color Management from the drop-down menu, then click Advanced...

Printer Guide
Page 88
... instructions if you are using non-Epson media and you print with Epson Drivers for Macintosh Note: You may have made using the printer's control panel. • Color Density lets you control the ink saturation level. • Drying Time per Print Head Pass lets you need to change the Color Density setting if your prints, or a higher...
... instructions if you are using non-Epson media and you print with Epson Drivers for Macintosh Note: You may have made using the printer's control panel. • Color Density lets you control the ink saturation level. • Drying Time per Print Head Pass lets you need to change the Color Density setting if your prints, or a higher...

Printer Guide
Page 93
... When you will save you time when you 've made the correct settings for future print jobs. 1. Select Summary from the Presets drop-down menu. Creating a Custom Preset and Printing Once you use the same profile/printer/ink/media combination for your print job, create a custom preset. You see...93 After verifying that your settings are correct, select Save As from the drop-down menu, go through them carefully from top to print, click the Print button. See page 96 for Macintosh | 93 Note: If you may lose your settings. Printing with Epson Drivers for instructions on each...
... When you will save you time when you 've made the correct settings for future print jobs. 1. Select Summary from the Presets drop-down menu. Creating a Custom Preset and Printing Once you use the same profile/printer/ink/media combination for your print job, create a custom preset. You see...93 After verifying that your settings are correct, select Save As from the drop-down menu, go through them carefully from top to print, click the Print button. See page 96 for Macintosh | 93 Note: If you may lose your settings. Printing with Epson Drivers for instructions on each...
Printer Guide
Page 94
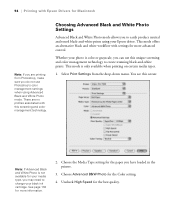
.... 2. Uncheck High Speed for the paper you have loaded in the printer. 3. There are printing from the drop-down menu. Choose the Media Type setting for the best quality. 3-94 Select Print Settings from Photoshop, make sure you do not use this screen: Note: ... mode. Choose Advanced B&W Photo for the Color setting. 4. 94 | Printing with Epson Drivers for Macintosh Note: If you are no profiles associated with settings for more advanced control. Whether your black ink cartridge. Choosing Advanced Black and White Photo Settings Advanced Black and White Photo mode allows you...
.... 2. Uncheck High Speed for the paper you have loaded in the printer. 3. There are printing from the drop-down menu. Choose the Media Type setting for the best quality. 3-94 Select Print Settings from Photoshop, make sure you do not use this screen: Note: ... mode. Choose Advanced B&W Photo for the Color setting. 4. 94 | Printing with Epson Drivers for Macintosh Note: If you are no profiles associated with settings for more advanced control. Whether your black ink cartridge. Choosing Advanced Black and White Photo Settings Advanced Black and White Photo mode allows you...
Printer Guide
Page 151
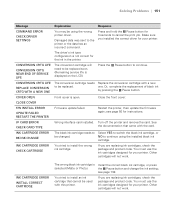
...ERROR CHECK DRIVER SETTINGS You may be replaced. Damaged data was sent to install the wrong ink cartridge. The driver's ink type configuration is displayed on the LCD) Press the Pause button to continue using the wrong printer driver. CONVERSION CRTG...printer. INK CARTRIDGE ERROR BK INK CHANGE The black ink cartridge needs to Select YES to be using the installed black ink cartridge. If you are replacing ink cartridges, check the package and product code. You must use the ink cartridges designed for the ink in the printer. the Pause button and change the ink setting...
...ERROR CHECK DRIVER SETTINGS You may be replaced. Damaged data was sent to install the wrong ink cartridge. The driver's ink type configuration is displayed on the LCD) Press the Pause button to continue using the wrong printer driver. CONVERSION CRTG...printer. INK CARTRIDGE ERROR BK INK CHANGE The black ink cartridge needs to Select YES to be using the installed black ink cartridge. If you are replacing ink cartridges, check the package and product code. You must use the ink cartridges designed for the ink in the printer. the Pause button and change the ink setting...

Product Brochure
Page 2
©2005 Greg Gorman New Advanced Black-and-white Printing Technology n Unique driver technology taking full advantage of our three-level black system to produce professional black-and-white prints from color or grayscale image files n Proprietary Epson screening technology developed specifically for black-and-white printing n Produces a truly consistent image with no color crossover or color cast n Produces sellable quality neutral and toned black-and-white prints from a single ink set 44"
©2005 Greg Gorman New Advanced Black-and-white Printing Technology n Unique driver technology taking full advantage of our three-level black system to produce professional black-and-white prints from color or grayscale image files n Proprietary Epson screening technology developed specifically for black-and-white printing n Produces a truly consistent image with no color crossover or color cast n Produces sellable quality neutral and toned black-and-white prints from a single ink set 44"


