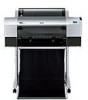
Printer Guide
Page 5
... System Requirements 12 Important Safety Instructions 13 Ink Cartridge Safety Instructions 15 1 Setting Up the Printer Unpacking and Assembling the Epson Stylus Pro 7800 17 Unpacking and Assembling the Stand 18 Unpacking the Printer 20 Mounting the Printer on the Stand 22 Attaching the Paper Basket 25 Unpacking and Assembling the Epson Stylus Pro 9800 27 Unpacking and Assembling the Stand...
... System Requirements 12 Important Safety Instructions 13 Ink Cartridge Safety Instructions 15 1 Setting Up the Printer Unpacking and Assembling the Epson Stylus Pro 7800 17 Unpacking and Assembling the Stand 18 Unpacking the Printer 20 Mounting the Printer on the Stand 22 Attaching the Paper Basket 25 Unpacking and Assembling the Epson Stylus Pro 9800 27 Unpacking and Assembling the Stand...

Printer Guide
Page 7
Contents | 7 4 Printing with Epson Drivers for Windows Choosing Basic Print Options 100 ... 114 Setting Monitoring Preferences and Optimizing Print Speed . . . . . 115 5 Maintaining and Transporting the Printer Checking Printer Status and Part Life 120 Printing Status Information 120 Viewing Status Information 121 Checking and Cleaning the Print Head... 125 Aligning the Print Head 126 Replacing Ink Cartridges 127 Switching Black Ink Cartridges 132 Draining the Old Ink 132 Installing the New Black Ink Cartridge 134 Updating the Printer Driver Information 135 Changing the Date and Time ...
Contents | 7 4 Printing with Epson Drivers for Windows Choosing Basic Print Options 100 ... 114 Setting Monitoring Preferences and Optimizing Print Speed . . . . . 115 5 Maintaining and Transporting the Printer Checking Printer Status and Part Life 120 Printing Status Information 120 Viewing Status Information 121 Checking and Cleaning the Print Head... 125 Aligning the Print Head 126 Replacing Ink Cartridges 127 Switching Black Ink Cartridges 132 Draining the Old Ink 132 Installing the New Black Ink Cartridge 134 Updating the Printer Driver Information 135 Changing the Date and Time ...

Printer Guide
Page 8
... Shipment 144 Removing the Optional Print Server Card 146 Moving the Printer on the Stand 147 Setting Up the Printer After Transportation 148 6 Solving Problems Diagnosing Problems 149 Checking Error Messages and Lights 150 Improving Print Quality 154 Solving ...Problems 160 Fixing Paper Eject Problems 161 Clearing Paper Jams 162 Uninstalling and Reinstalling the Printer Driver 164 Macintosh 164 Windows 164 A Specifications Environmental 165 Electrical 165 Dimensions and Weight 166 Printer Interfaces 166 Safety Approvals 166 Media 166 Roll Paper 166 Cut Sheets 167 Printable ...
... Shipment 144 Removing the Optional Print Server Card 146 Moving the Printer on the Stand 147 Setting Up the Printer After Transportation 148 6 Solving Problems Diagnosing Problems 149 Checking Error Messages and Lights 150 Improving Print Quality 154 Solving ...Problems 160 Fixing Paper Eject Problems 161 Clearing Paper Jams 162 Uninstalling and Reinstalling the Printer Driver 164 Macintosh 164 Windows 164 A Specifications Environmental 165 Electrical 165 Dimensions and Weight 166 Printer Interfaces 166 Safety Approvals 166 Media 166 Roll Paper 166 Cut Sheets 167 Printable ...
Printer Guide
Page 9
...easy reference. • The electronic Reference Guide on setting up and using your printer. 9 For additional information, see the following: • The Quick Reference Guide provides a handy summary of your printer, loading paper, using a web browser, such as you have a problem. ... in case you use and printer maintenance-loading paper, replacing ink cartridges and other components, cleaning and aligning the print head, and using the printer's menu system. You can read the guide using the Epson® printer drivers, and replacing ink cartridges. Warnings, Cautions, Notes, ...
...easy reference. • The electronic Reference Guide on setting up and using your printer. 9 For additional information, see the following: • The Quick Reference Guide provides a handy summary of your printer, loading paper, using a web browser, such as you have a problem. ... in case you use and printer maintenance-loading paper, replacing ink cartridges and other components, cleaning and aligning the print head, and using the printer's menu system. You can read the guide using the Epson® printer drivers, and replacing ink cartridges. Warnings, Cautions, Notes, ...
Printer Guide
Page 10
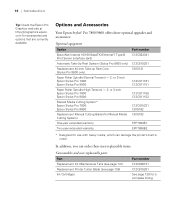
... 138) Ink Cartridges Part number C12C890191 C12C815291 See page 128 for a complete listing. 10 In addition, you can damage the printer's built-in cutter. 10 | Introduction Tip: Check the Epson Pro Graphics web site at http://prographics.epson. or 3-inch Epson Stylus Pro 7800: Epson Stylus Pro 9800: Paper Roller Spindle (High Tension) - 2- or 3-inch Epson Stylus Pro 7800: Epson Stylus Pro 9800: Manual Media Cutting System* Epson Stylus Pro 7800: Epson Stylus Pro 9800: Replacement...
... 138) Ink Cartridges Part number C12C890191 C12C815291 See page 128 for a complete listing. 10 In addition, you can damage the printer's built-in cutter. 10 | Introduction Tip: Check the Epson Pro Graphics web site at http://prographics.epson. or 3-inch Epson Stylus Pro 7800: Epson Stylus Pro 9800: Paper Roller Spindle (High Tension) - 2- or 3-inch Epson Stylus Pro 7800: Epson Stylus Pro 9800: Manual Media Cutting System* Epson Stylus Pro 7800: Epson Stylus Pro 9800: Replacement...
Printer Guide
Page 15
... before installing them for best results. • Do not use too much force when you shake cartridges that have been previously installed. Doing so may affect normal operation and printing. 15 This could damage the print head. • Do not touch the ... your eyes, flush them . Introduction | 15 Caution: Do not use an ink cartridge beyond the date printed on the cartridge carton. • Use up the ink cartridge within six months of installation for best results. • Do not dismantle ink cartridges or try to refill them immediately with soap and water. If ink gets...
... before installing them for best results. • Do not use too much force when you shake cartridges that have been previously installed. Doing so may affect normal operation and printing. 15 This could damage the print head. • Do not touch the ... your eyes, flush them . Introduction | 15 Caution: Do not use an ink cartridge beyond the date printed on the cartridge carton. • Use up the ink cartridge within six months of installation for best results. • Do not dismantle ink cartridges or try to refill them immediately with soap and water. If ink gets...
Printer Guide
Page 21
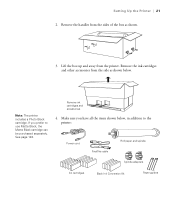
Note: The printer includes a Photo Black cartridge. Remove ink cartridges and accessories # " 4. Remove the ink cartridges and other accessories from the printer. If you have all the items shown below . Lift the box up and away from the side as shown. 3. Remove the ... as shown below , in addition to use Matte Black, the Matte Black cartridge can be purchased separately. Make sure you prefer to the printer: Power cord FireWire cable Roll paper and spindle Spindle adapters Ink cartridges Black Ink Conversion Kit Paper guides 1-21 See page 128. Setting Up the...
Note: The printer includes a Photo Black cartridge. Remove ink cartridges and accessories # " 4. Remove the ink cartridges and other accessories from the printer. If you have all the items shown below . Lift the box up and away from the side as shown. 3. Remove the ... as shown below , in addition to use Matte Black, the Matte Black cartridge can be purchased separately. Make sure you prefer to the printer: Power cord FireWire cable Roll paper and spindle Spindle adapters Ink cartridges Black Ink Conversion Kit Paper guides 1-21 See page 128. Setting Up the...
Printer Guide
Page 30
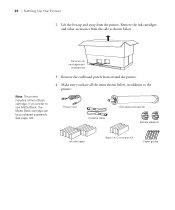
...Matte Black, the Matte Black cartridge can be purchased separately. Lift the box up and away from around the printer. 4. See page 128. 3. If you have all the items shown below . 30 | Setting Up the Printer 2. Make sure you prefer to the printer: Power cord FireWire cable Roll... paper and spindle Spindle adapters Ink cartridges Black Ink Conversion Kit Paper guides ...
...Matte Black, the Matte Black cartridge can be purchased separately. Lift the box up and away from around the printer. 4. See page 128. 3. If you have all the items shown below . 30 | Setting Up the Printer 2. Make sure you prefer to the printer: Power cord FireWire cable Roll... paper and spindle Spindle adapters Ink cartridges Black Ink Conversion Kit Paper guides ...
Printer Guide
Page 38
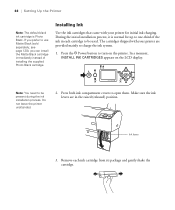
see page 128), you prefer to turn on the LCD display. The cartridges shipped with your printer are in each ink cartridge from its package and gently shake the cartridge. 1-38 In a moment, INSTALL INK CARTRIDGES appears on the printer. Press both ink compartment covers to charge the ink system. 1. Ink lever 3. During the initial installation process...
see page 128), you prefer to turn on the LCD display. The cartridges shipped with your printer are in each ink cartridge from its package and gently shake the cartridge. 1-38 In a moment, INSTALL INK CARTRIDGES appears on the printer. Press both ink compartment covers to charge the ink system. 1. Ink lever 3. During the initial installation process...
Printer Guide
Page 39
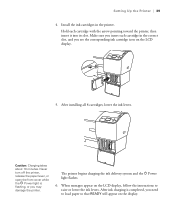
...ink delivery system and the P Power light flashes. 6. When messages appear on the LCD display. 5. Setting Up the Printer | 39 4. Make sure you see the corresponding ink cartridge icon on the LCD display, follow the instructions to load paper so that READY will appear on the display. 1-39... After installing all 8 cartridges, lower the ink levers. Install the ink cartridges in the correct slot, and you insert each cartridge with the arrow pointing toward the printer, then insert it into its slot. After ink charging is flashing, or ...
...ink delivery system and the P Power light flashes. 6. When messages appear on the LCD display. 5. Setting Up the Printer | 39 4. Make sure you see the corresponding ink cartridge icon on the LCD display, follow the instructions to load paper so that READY will appear on the display. 1-39... After installing all 8 cartridges, lower the ink levers. Install the ink cartridges in the correct slot, and you insert each cartridge with the arrow pointing toward the printer, then insert it into its slot. After ink charging is flashing, or ...
Printer Guide
Page 94
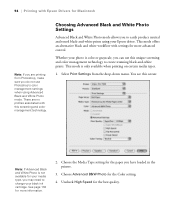
...: If Advanced Black and White Photo is not available for your black ink cartridge. Choose the Media Type setting for the paper you may need to change your media type, you have loaded in the printer. 3. There are printing from the drop-down menu. Choose Advanced B&W Photo... White Photo Settings Advanced Black and White Photo mode allows you can use Photoshop's color management settings when using your photo is only available when printing on certain media types. 1. 94 | Printing with Epson Drivers for Macintosh Note: If you are no profiles associated with settings for more...
...: If Advanced Black and White Photo is not available for your black ink cartridge. Choose the Media Type setting for the paper you may need to change your media type, you have loaded in the printer. 3. There are printing from the drop-down menu. Choose Advanced B&W Photo... White Photo Settings Advanced Black and White Photo mode allows you can use Photoshop's color management settings when using your photo is only available when printing on certain media types. 1. 94 | Printing with Epson Drivers for Macintosh Note: If you are no profiles associated with settings for more...

Printer Guide
Page 113
...advanced black and white photo settings: • Color Toning allows you to easily change your black and white output. Note that the presets will provide you may need to your black ink cartridge. Printing with a neutral tonal scale print. ...You see better results if you choose Dark. • Brightness adjusts the overall lightness and darkness of your image. • Contrast adjusts the difference between the light and dark areas of your black and white output. The default is the default setting, you with Epson...
...advanced black and white photo settings: • Color Toning allows you to easily change your black and white output. Note that the presets will provide you may need to your black ink cartridge. Printing with a neutral tonal scale print. ...You see better results if you choose Dark. • Brightness adjusts the overall lightness and darkness of your image. • Contrast adjusts the difference between the light and dark areas of your black and white output. The default is the default setting, you with Epson...
Printer Guide
Page 119
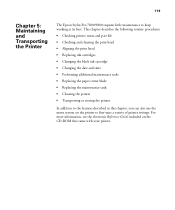
.... 119 Chapter 5: Maintaining and Transporting the Printer The Epson Stylus Pro 7800/9800 requires little maintenance to fine-tune a variety of printer settings. This chapter describes the following routine procedures: • Checking printer status and part life • Checking and cleaning the print head • Aligning the print head • Replacing ink cartridges • Changing the black ink...
.... 119 Chapter 5: Maintaining and Transporting the Printer The Epson Stylus Pro 7800/9800 requires little maintenance to fine-tune a variety of printer settings. This chapter describes the following routine procedures: • Checking printer status and part life • Checking and cleaning the print head • Aligning the print head • Replacing ink cartridges • Changing the black ink...
Printer Guide
Page 120
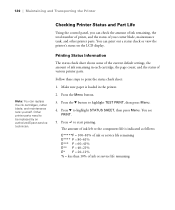
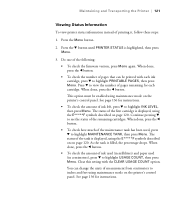
...Press the Menu button. 3. The amount of ink left or the component life is loaded in each cartridge, the page count, and the status of various printer parts. Checking Printer Status and Part Life Using the control panel, you can check the amount of ink remaining, the total... amount of ink remaining in the printer. 2. Press the d button to start printing. Press to highlight TEST PRINT, then press Menu. 4. Other printer parts need to be replaced by an authorized Epson service technician. You see PRINT. 5. 120 | Maintaining and Transporting the Printer Note: You can print out ...
...Press the Menu button. 3. The amount of ink left or the component life is loaded in each cartridge, the page count, and the status of various printer parts. Checking Printer Status and Part Life Using the control panel, you can check the amount of ink remaining, the total... amount of ink remaining in the printer. 2. Press the d button to start printing. Press to highlight TEST PRINT, then press Menu. 4. Other printer parts need to be replaced by an authorized Epson service technician. You see PRINT. 5. 120 | Maintaining and Transporting the Printer Note: You can print out ...
Printer Guide
Page 121
...highlight MAINTENANCE TANK, then press Menu. You can be enabled using maintenance mode on the printer's control panel. When done, press the l button. • To check the number of the remaining cartridges. Continue pressing d to see the status of pages that can change the units of ...printed with the CLEAR USAGE COUNT option. When done, press the l button. Press the d button until PRINTER STATUS is filled, the percentage drops. Do one of pages remaining for each ink cartridge, press d to highlight USAGE COUNT, then press Menu. Press d to highlight INK LEVEL, then press ...
...highlight MAINTENANCE TANK, then press Menu. You can be enabled using maintenance mode on the printer's control panel. When done, press the l button. • To check the number of the remaining cartridges. Continue pressing d to see the status of pages that can change the units of ...printed with the CLEAR USAGE COUNT option. When done, press the l button. Press the d button until PRINTER STATUS is filled, the percentage drops. Do one of pages remaining for each ink cartridge, press d to highlight USAGE COUNT, then press Menu. Press d to highlight INK LEVEL, then press ...

Printer Guide
Page 125
...panel if the normal cleaning process is printed, use power cleaning. The cartridges need to replace a low cartridge to clear the nozzles. Print a nozzle check to make sure the print head needs cleaning, as described on the printer's LCD display is clean. • If any dots or segments are...nozzles are missing or deflected as a last resort. Caution: Don't run the cleaning cycle. Running a Power Cleaning Cycle You can reinsert the old cartridge. 1. After cleaning, you can run a cleaning cycle by pressing and holding the Menu button for at least 50% full to use at least ...
...panel if the normal cleaning process is printed, use power cleaning. The cartridges need to replace a low cartridge to clear the nozzles. Print a nozzle check to make sure the print head needs cleaning, as described on the printer's LCD display is clean. • If any dots or segments are...nozzles are missing or deflected as a last resort. Caution: Don't run the cleaning cycle. Running a Power Cleaning Cycle You can reinsert the old cartridge. 1. After cleaning, you can run a cleaning cycle by pressing and holding the Menu button for at least 50% full to use at least ...
Printer Guide
Page 127
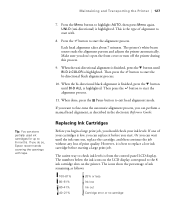
... or less Ink low Ink out Cartridge error or no cartridge 5-127 Replacing Ink Cartridges Before you begin a large print job, you don't open the front cover or turn off the printer during this process. 9. UNI-D (uni-directional) is low, you do so, Epson recommends covering the openings with . ...8. Press the button to start with tape. 7. When the uni-directional alignment is finished, press the d button until BI-D 2-COLOR is highlighted. When the...
... or less Ink low Ink out Cartridge error or no cartridge 5-127 Replacing Ink Cartridges Before you begin a large print job, you don't open the front cover or turn off the printer during this process. 9. UNI-D (uni-directional) is low, you do so, Epson recommends covering the openings with . ...8. Press the button to start with tape. 7. When the uni-directional alignment is finished, press the d button until BI-D 2-COLOR is highlighted. When the...

Printer Guide
Page 128
...products may cause damage not covered by Epson's warranty. Caution: Leave the empty cartridge in the printer until you start, make sure the printer is the cartridge you have a replacement cartridge. Use the following UltraChrome K3 Epson ink cartridges: Slot no. 1 2 3 4 5 6 7 8 Cartridge Light Light Black Light Magenta Light Cyan...of ink. Note the color of the cartridge that is almost out of 110 ml and 220 ml cartridges. To prevent ink reporting errors, never replace the ink cartridges with the printer turned off. To find the nearest reseller, call 800-GO-EPSON (800-463-7766)....
...products may cause damage not covered by Epson's warranty. Caution: Leave the empty cartridge in the printer until you start, make sure the printer is the cartridge you have a replacement cartridge. Use the following UltraChrome K3 Epson ink cartridges: Slot no. 1 2 3 4 5 6 7 8 Cartridge Light Light Black Light Magenta Light Cyan...of ink. Note the color of the cartridge that is almost out of 110 ml and 220 ml cartridges. To prevent ink reporting errors, never replace the ink cartridges with the printer turned off. To find the nearest reseller, call 800-GO-EPSON (800-463-7766)....
Printer Guide
Page 129
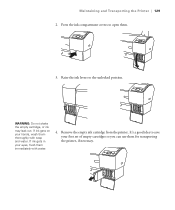
Raise the ink levers to save your first set of empty cartridges so you can use them immediately with soap and water. If ink gets on your eyes, flush them for transporting the printer, if necessary. 5-129 Remove the empty ink cartridge from the printer. It's a good idea to the unlocked position. WARNING: Do not shake the empty cartridge, or ink may leak out. If ink gets in your hands, wash them . 3. Press the ink compartment covers to open them thoroughly with water. 4. Maintaining and Transporting the Printer | 129 2.
Raise the ink levers to save your first set of empty cartridges so you can use them immediately with soap and water. If ink gets on your eyes, flush them for transporting the printer, if necessary. 5-129 Remove the empty ink cartridge from the printer. It's a good idea to the unlocked position. WARNING: Do not shake the empty cartridge, or ink may leak out. If ink gets in your hands, wash them . 3. Press the ink compartment covers to open them thoroughly with water. 4. Maintaining and Transporting the Printer | 129 2.

Printer Guide
Page 130
Check the package and product code. If the B ink light remains on after installing the cartridge, it from its package. 6. Hold the cartridge with the arrow pointing toward the printer. Note: If you can't insert the cartridge smoothly, you may not be inserted fully. 7. 130 | Maintaining and Transporting the Printer 5. Gently shake the cartridge before installing it in. 5-130 Don't force it . Then insert the cartridge into the slot. Make sure the replacement cartridge is the correct color and remove it may have the wrong cartridge.
Check the package and product code. If the B ink light remains on after installing the cartridge, it from its package. 6. Hold the cartridge with the arrow pointing toward the printer. Note: If you can't insert the cartridge smoothly, you may not be inserted fully. 7. 130 | Maintaining and Transporting the Printer 5. Gently shake the cartridge before installing it in. 5-130 Don't force it . Then insert the cartridge into the slot. Make sure the replacement cartridge is the correct color and remove it may have the wrong cartridge.


