ESC/VP Level 21 Communication Manual
Page 1
...AGREE Downloading the User's Guide indicates your own risk. Copyright of "ESC/VP21 Command User's Guide" (hereafter referred to as EPSON). EPSON shall not be downloaded until you could use only 1 set of the user's guide only for any damage such as direct... due to as user's guide) is at your acceptance of the whole of the agreement. EPSON grants you do not agree to the "LICENSE AGREEMENT", please do not utilize this user's guide without the prior...of the "LICENSE AGREEMENT". Please read carefully the following "LICENSE AGREEMENT" before using the EPSON projector.
...AGREE Downloading the User's Guide indicates your own risk. Copyright of "ESC/VP21 Command User's Guide" (hereafter referred to as EPSON). EPSON shall not be downloaded until you could use only 1 set of the user's guide only for any damage such as direct... due to as user's guide) is at your acceptance of the whole of the agreement. EPSON grants you do not agree to the "LICENSE AGREEMENT", please do not utilize this user's guide without the prior...of the "LICENSE AGREEMENT". Please read carefully the following "LICENSE AGREEMENT" before using the EPSON projector.

Installation Guide - ELPMBUNI Universal Mount Assembly
Page 2
... Mounts ...- 3 Warning Statements ...- 4 Parts List ...- 5 Installation Tools ...- 5 ELPMBUNI Universal Mount Assembly ...- 6 Projector Preparation ...- 7 Securing the Bracket to the Projector ...- 9 Leveling the Mounting bracket ...- 14 Securing the Upper Assembly Ceiling Plate...- 15 Low-Profile Installation ...- 16 Securing the... Projector to mounts, adapters, display equipment or personal injury. Premier ...
... Mounts ...- 3 Warning Statements ...- 4 Parts List ...- 5 Installation Tools ...- 5 ELPMBUNI Universal Mount Assembly ...- 6 Projector Preparation ...- 7 Securing the Bracket to the Projector ...- 9 Leveling the Mounting bracket ...- 14 Securing the Upper Assembly Ceiling Plate...- 15 Low-Profile Installation ...- 16 Securing the... Projector to mounts, adapters, display equipment or personal injury. Premier ...

Installation Guide - ELPMBUNI Universal Mount Assembly
Page 3
... AND PROPERTY DAMAGE. A secure structure must be confirmed prior to be installed on a structure that contains wooden studs, dead center of the projector. WARNING: PRIOR TO THE INSTALLATION OF THIS PRODUCT, THE INSTALLATION INSTRUCTIONS SHOULD BE READ AND COMPLETELY UNDERSTOOD. Page - 4 - Indicates that ...chance of fire. WARNING: THE CEILING STRUCTURE MUST BE CAPABLE OF SUPPORTING A MAX WEIGHT OF 25 LBS., THE WEIGHT OF THE PROJECTOR. USE PROPER SAFETY GEAR AND TOOLS FOR THE INSTALLATION PROCEDURE TO PREVENT PERSONAL INJURY. At least two qualified people should perform the ...
... AND PROPERTY DAMAGE. A secure structure must be confirmed prior to be installed on a structure that contains wooden studs, dead center of the projector. WARNING: PRIOR TO THE INSTALLATION OF THIS PRODUCT, THE INSTALLATION INSTRUCTIONS SHOULD BE READ AND COMPLETELY UNDERSTOOD. Page - 4 - Indicates that ...chance of fire. WARNING: THE CEILING STRUCTURE MUST BE CAPABLE OF SUPPORTING A MAX WEIGHT OF 25 LBS., THE WEIGHT OF THE PROJECTOR. USE PROPER SAFETY GEAR AND TOOLS FOR THE INSTALLATION PROCEDURE TO PREVENT PERSONAL INJURY. At least two qualified people should perform the ...

Installation Guide - ELPMBUNI Universal Mount Assembly
Page 4
... (Qty 4) M6 x 12mm Security Head Screws (Qty 4) Portable Drill Pencil Level (Supplied) Stud Finder (Commercially Available) M5 Allen Wrench NOTE: Mounting screws will vary by projector. Upper Assembly (Qty 1) Mounting Bracket (Qty 1) Plastic Barrel Caps (Qty 4) M3 Flat Washers (Qty 4) Note: Must be used with all proper installation hardware and components...
... (Qty 4) M6 x 12mm Security Head Screws (Qty 4) Portable Drill Pencil Level (Supplied) Stud Finder (Commercially Available) M5 Allen Wrench NOTE: Mounting screws will vary by projector. Upper Assembly (Qty 1) Mounting Bracket (Qty 1) Plastic Barrel Caps (Qty 4) M3 Flat Washers (Qty 4) Note: Must be used with all proper installation hardware and components...

Installation Guide - ELPMBUNI Universal Mount Assembly
Page 5
ELPMBUNI A NOTE: The four (2-piece) leg assemblies can be used as single leg or any combination C of your projector for your G projector. K M J L J L Installation Manual The number of legs E may vary depending on the number of mounting ...C Ceiling Plate D Allen Wrench E Height Adjustment Screws F Tension Knobs G Safety Knob H Security Screws I Leveling Barrels J Universal Mounting Bracket K Leg Assembly L Projector (Not Supplied) M Tri-Lock Opening Option 1 H B D F Combination I Leg Single Leg D Option 2 M NOTE: See the best configuration for filter and lamp access. ...
ELPMBUNI A NOTE: The four (2-piece) leg assemblies can be used as single leg or any combination C of your projector for your G projector. K M J L J L Installation Manual The number of legs E may vary depending on the number of mounting ...C Ceiling Plate D Allen Wrench E Height Adjustment Screws F Tension Knobs G Safety Knob H Security Screws I Leveling Barrels J Universal Mounting Bracket K Leg Assembly L Projector (Not Supplied) M Tri-Lock Opening Option 1 H B D F Combination I Leg Single Leg D Option 2 M NOTE: See the best configuration for filter and lamp access. ...

Installation Guide - ELPMBUNI Universal Mount Assembly
Page 6
...instructions must be adhered to the ceiling installation instruction. Adherence to the top screen etc. Carefully invert the projector and place it on the screen. 1. Mounting Points Inverted Projector Blanket, soft cloth etc Figure 1 Flat surface Installation Manual Page - 7 - Here you will enhance... the quality of mounting points and screw thread (pitch) size. 3. Most projectors have either three or four mounting points and are M4 in serious personal injury and possible damage to do so could result in thread...
...instructions must be adhered to the ceiling installation instruction. Adherence to the top screen etc. Carefully invert the projector and place it on the screen. 1. Mounting Points Inverted Projector Blanket, soft cloth etc Figure 1 Flat surface Installation Manual Page - 7 - Here you will enhance... the quality of mounting points and screw thread (pitch) size. 3. Most projectors have either three or four mounting points and are M4 in serious personal injury and possible damage to do so could result in thread...

Installation Guide - ELPMBUNI Universal Mount Assembly
Page 7
Figure 2 Tri-Lock Opening Rotate 180° To Unlock Tension Knobs Upper Assembly Safety Knob Figure 3 Figure 4 Page - 8 - Separate the upper assembly from the projector mounting bracket by slightly loosening the two tension knurl knobs to be rotated 180° apart and separate. Installation Manual Next loosen the safety screw knurl knob far enough to allow the two parts to create free play between the bracket tri-lock assembly and the upper section tri-lock assembly points. 5. ELPMBUNI 4.
Figure 2 Tri-Lock Opening Rotate 180° To Unlock Tension Knobs Upper Assembly Safety Knob Figure 3 Figure 4 Page - 8 - Separate the upper assembly from the projector mounting bracket by slightly loosening the two tension knurl knobs to be rotated 180° apart and separate. Installation Manual Next loosen the safety screw knurl knob far enough to allow the two parts to create free play between the bracket tri-lock assembly and the upper section tri-lock assembly points. 5. ELPMBUNI 4.

Installation Guide - ELPMBUNI Universal Mount Assembly
Page 8
...(supplied). Select the mounting hardware that your projector requires and loosely install the universal mount to your projector requires M3 mounting hardware. NOTE: If your projector. FIGURE 6 Two-Piece Leg FIGURE 7 One-Piece Leg Allen Wrench Mounting Hardware Inverted Projector Leveling Barrels FIGURE A Installation Manual Figure ...points. NOTE: The levelers and leg assembly screws must be loose in order to adjust the height of the projector as shown for a better overall fit to the projector. 1. Page - 9 - You may also reduce the two-piece leg to a one-piece leg as shown...
...(supplied). Select the mounting hardware that your projector requires and loosely install the universal mount to your projector requires M3 mounting hardware. NOTE: If your projector. FIGURE 6 Two-Piece Leg FIGURE 7 One-Piece Leg Allen Wrench Mounting Hardware Inverted Projector Leveling Barrels FIGURE A Installation Manual Figure ...points. NOTE: The levelers and leg assembly screws must be loose in order to adjust the height of the projector as shown for a better overall fit to the projector. 1. Page - 9 - You may also reduce the two-piece leg to a one-piece leg as shown...

Installation Guide - ELPMBUNI Universal Mount Assembly
Page 9
ELPMBUNI NOTE: If your projector model is not shown, when arranging the leg combination, simply ensure access to filters and lamp housings when aligning brackets. PowerLite 830p, 835p Hardware: M4 x 12mm (Qty 4) Installation Manual This mount works with all sub-25 pound projectors. PowerLite S3, S4, 62C, 76C, 82C, Hardware: M4 x 12mm (Qty 3) Page - 10 -
ELPMBUNI NOTE: If your projector model is not shown, when arranging the leg combination, simply ensure access to filters and lamp housings when aligning brackets. PowerLite 830p, 835p Hardware: M4 x 12mm (Qty 4) Installation Manual This mount works with all sub-25 pound projectors. PowerLite S3, S4, 62C, 76C, 82C, Hardware: M4 x 12mm (Qty 3) Page - 10 -

Installation Guide - ELPMBUNI Universal Mount Assembly
Page 13
...not over-tighten the mounting hardware. Installation Manual CAUTION: Secure but do so will result in damaging the threads in the projector. Failure to the projector then tighten the hex head leg screws with the Allen wrench (supplied) (Figure 8 and Figure 9). ELPMBUNI Leveling the Mounting... bracket 1. Allen Wrench Level Inverted Projector DOWN UP Adjusting the Mount Figure 8 Leveling Barrels Page - 14 - Rotate the leveling barrels to level the mounting bracket next, ...
...not over-tighten the mounting hardware. Installation Manual CAUTION: Secure but do so will result in damaging the threads in the projector. Failure to the projector then tighten the hex head leg screws with the Allen wrench (supplied) (Figure 8 and Figure 9). ELPMBUNI Leveling the Mounting... bracket 1. Allen Wrench Level Inverted Projector DOWN UP Adjusting the Mount Figure 8 Leveling Barrels Page - 14 - Rotate the leveling barrels to level the mounting bracket next, ...

Installation Guide - ELPMBUNI Universal Mount Assembly
Page 14
...kit (ELPMBSEC), please refer to the security kit installation guide before attaching the ceiling plate to the edge of the wood stud. Locate the inverted projectors top of the lens point to have the top edge of the lens as well. 4. Before you mount your installation environment (Figure 9). Page ...ceiling mount to parallel with other (commercially available) hardware depending on the screen and no higher then the top image edge of the projector. NOTE: Make sure to measure from the front of the lens to the ceiling or wall. 5. ELPMBUNI Securing the Upper Assembly Ceiling Plate 1....
...kit (ELPMBSEC), please refer to the security kit installation guide before attaching the ceiling plate to the edge of the wood stud. Locate the inverted projectors top of the lens point to have the top edge of the lens as well. 4. Before you mount your installation environment (Figure 9). Page ...ceiling mount to parallel with other (commercially available) hardware depending on the screen and no higher then the top image edge of the projector. NOTE: Make sure to measure from the front of the lens to the ceiling or wall. 5. ELPMBUNI Securing the Upper Assembly Ceiling Plate 1....

Installation Guide - ELPMBUNI Universal Mount Assembly
Page 17
...mounting bracket to the upper assembly Insert universal bracket to the tri-lock, then rotate the projector 180° Universal Mount Page - 18 - NOTE: Follow the number sequence prior to securing the projector to the Upper Assembly 1. Tighten the remaining two tension knurl knobs until the mount becomes ...the upper assembly. 3. The alignment slot must be in the base of the upper assembly. 2. ELPMBUNI Securing the Projector to the upper assembly. Once inserted rotate the projector and mounting bracket 180° and secure the rear safety knob first to the "tri-lock" mounting plate in ...
...mounting bracket to the upper assembly Insert universal bracket to the tri-lock, then rotate the projector 180° Universal Mount Page - 18 - NOTE: Follow the number sequence prior to securing the projector to the Upper Assembly 1. Tighten the remaining two tension knurl knobs until the mount becomes ...the upper assembly. 3. The alignment slot must be in the base of the upper assembly. 2. ELPMBUNI Securing the Projector to the upper assembly. Once inserted rotate the projector and mounting bracket 180° and secure the rear safety knob first to the "tri-lock" mounting plate in ...

Installation Guide - ELPMBUNI Universal Mount Assembly
Page 18
... roll and yaw to the screen and firmly tighten the two M8 tilt adjustment screws (Figure 15). 5. To adjust the tilt angle of the projector, slightly loosen the side M8 screws and tilt to the desired angle to optimize the projected image. 2. Wood Stud Ceiling Allen Wrench Height Adjustable Screws... Installation Manual Figure 14 Figure 15 Wood Stud Ceiling Tilt Adjusting Screws Allen Wrench Wood Stud Ceiling Figure 16 Page - 19 - With the projector secured in the mount and power on the screen, slightly loosen the front and rear M8 screws and adjust to the desired angle then firmly...
... roll and yaw to the screen and firmly tighten the two M8 tilt adjustment screws (Figure 15). 5. To adjust the tilt angle of the projector, slightly loosen the side M8 screws and tilt to the desired angle to optimize the projected image. 2. Wood Stud Ceiling Allen Wrench Height Adjustable Screws... Installation Manual Figure 14 Figure 15 Wood Stud Ceiling Tilt Adjusting Screws Allen Wrench Wood Stud Ceiling Figure 16 Page - 19 - With the projector secured in the mount and power on the screen, slightly loosen the front and rear M8 screws and adjust to the desired angle then firmly...

Product Brochure
Page 1
... them • Conveniently placed lamp and air filter access, designed for easy, affordable changes, even when the projector is ceiling-mounted User-friendly enhancements • A/V Mute Slide for greater control and more effective presentations •...automatically optimize your next presentation Epson 3LCD technology for outstanding image quality and performance • 3-chip engine for added dependability • Epson Road Service Program - Presentation Mode to your PowerPoint® or Keynote viewing experience - Epson PowerLite® S4 Versatility, value and outstanding...
... them • Conveniently placed lamp and air filter access, designed for easy, affordable changes, even when the projector is ceiling-mounted User-friendly enhancements • A/V Mute Slide for greater control and more effective presentations •...automatically optimize your next presentation Epson 3LCD technology for outstanding image quality and performance • 3-chip engine for added dependability • Epson Road Service Program - Presentation Mode to your PowerPoint® or Keynote viewing experience - Epson PowerLite® S4 Versatility, value and outstanding...

Product Brochure
Page 2
...3Z5 Specifications and terms are service marks of Seiko Epson Corporation. Epson PowerLite S4 Specifications Projection System Epson 3LCD technology Projection Method Front/rear/ceiling mount LCD Driving method Pixel number Native resolution Aspect ratio Pixel arrangement Epson Poly-silicon TFT Active Matrix 480,000 dots x... CD-ROM, Quick Setup Sheet, PrivateLine support card, password protection sticker Product/Accessory Part Numbers Epson PowerLite S4 projector Replacement lamp Air filter set (2 filters) Universal ceiling mount Suspension adapter False ceiling plate Adjustable ceiling...
...3Z5 Specifications and terms are service marks of Seiko Epson Corporation. Epson PowerLite S4 Specifications Projection System Epson 3LCD technology Projection Method Front/rear/ceiling mount LCD Driving method Pixel number Native resolution Aspect ratio Pixel arrangement Epson Poly-silicon TFT Active Matrix 480,000 dots x... CD-ROM, Quick Setup Sheet, PrivateLine support card, password protection sticker Product/Accessory Part Numbers Epson PowerLite S4 projector Replacement lamp Air filter set (2 filters) Universal ceiling mount Suspension adapter False ceiling plate Adjustable ceiling...

Product Information Guide
Page 1
Epson PowerLite S4 Projector Parts Lamp cover Control panel Focus ring Ventilation slots Lens cover Infrared receiver Foot release button Adjustable foot (for raising projector) Monitor Out port Computer port S-Video port Video port USB port Audio input AC power inlet Adjustable foot (for leveling projector) Speaker Infrared receiver Menu button (displays on-screen menu) Power button... Range 20 feet (6 meters) Battery AAA × 2 Dimensions Height Width Depth Weight 3.4 inches (87 mm) 12.9 inches (327 mm) 9.7 inches (247 mm) 5.7 lb (2.6 kg) 6/06 Epson PowerLite S4 - 1
Epson PowerLite S4 Projector Parts Lamp cover Control panel Focus ring Ventilation slots Lens cover Infrared receiver Foot release button Adjustable foot (for raising projector) Monitor Out port Computer port S-Video port Video port USB port Audio input AC power inlet Adjustable foot (for leveling projector) Speaker Infrared receiver Menu button (displays on-screen menu) Power button... Range 20 feet (6 meters) Battery AAA × 2 Dimensions Height Width Depth Weight 3.4 inches (87 mm) 12.9 inches (327 mm) 9.7 inches (247 mm) 5.7 lb (2.6 kg) 6/06 Epson PowerLite S4 - 1

Product Information Guide
Page 2
... 800 × 600 800 × 450 800 × 450 * Connection is not possible if the equipment does not have a VGA output port. 2 - Epson PowerLite S4 Electrical Rated frequency 50/60 Hz Power supply 100 to 120 V: 2.2 A 200 to 240 V: 1.0 A Power consumption Operating: 250 W Standby: 5 W Environmental... United States Canada FCC Part 15B Class B (DoC) UL60950 Third Edition ICES-003 Class B CSA C22.2 No. 60950 ) Compatible Video Formats The projector supports the video formats listed in the following tables. Component Video Signal SDTV (480i) (D1) SDTV (576i) SDTV (480p) (D2) HDTV (...
... 800 × 600 800 × 450 800 × 450 * Connection is not possible if the equipment does not have a VGA output port. 2 - Epson PowerLite S4 Electrical Rated frequency 50/60 Hz Power supply 100 to 120 V: 2.2 A 200 to 240 V: 1.0 A Power consumption Operating: 250 W Standby: 5 W Environmental... United States Canada FCC Part 15B Class B (DoC) UL60950 Third Edition ICES-003 Class B CSA C22.2 No. 60950 ) Compatible Video Formats The projector supports the video formats listed in the following tables. Component Video Signal SDTV (480i) (D1) SDTV (576i) SDTV (480p) (D2) HDTV (...
Product Information Guide
Page 3
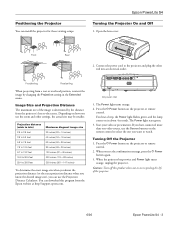
...projecting from a rear or overhead position, reorient the image by the distance from the Epson website at http://support.epson.com. Image Size and Projection Distance The maximum size of the projector. 6/06 Epson PowerLite S4 - 3 You hear a beep, the Power light flashes green, and the lamp... confirmation message, press the P Power button again. 3. Press the P Power button on how you can install the projector for these viewing setups: Epson PowerLite S4 Turning the Projector On and Off 1. The Power light stays green. 5. Front Rear 2. AC power inlet 3. When you want to...
...projecting from a rear or overhead position, reorient the image by the distance from the Epson website at http://support.epson.com. Image Size and Projection Distance The maximum size of the projector. 6/06 Epson PowerLite S4 - 3 You hear a beep, the Power light flashes green, and the lamp... confirmation message, press the P Power button again. 3. Press the P Power button on how you can install the projector for these viewing setups: Epson PowerLite S4 Turning the Projector On and Off 1. The Power light stays green. 5. Front Rear 2. AC power inlet 3. When you want to...
Product Information Guide
Page 4
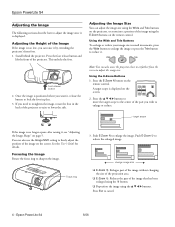
...remote control. Using the Wide and Tele Buttons To enlarge or reduce your image size in the back of the projector to raise or lower the side. Epson PowerLite S4 6/06 Note: You can also use the Image Shift setting to finely adjust the position of the part you wish.... Press the u d l r buttons to move the projector closer to or farther from the screen to adjust the image size. Focusing the Image Rotate the focus ring to cancel. 4 - Press the E-Zoom z button on the screen. Epson PowerLite S4 Adjusting the Image The following sections describe how to adjust the...
...remote control. Using the Wide and Tele Buttons To enlarge or reduce your image size in the back of the projector to raise or lower the side. Epson PowerLite S4 6/06 Note: You can also use the Image Shift setting to finely adjust the position of the part you wish.... Press the u d l r buttons to move the projector closer to or farther from the screen to adjust the image size. Focusing the Image Rotate the focus ring to cancel. 4 - Press the E-Zoom z button on the screen. Epson PowerLite S4 Adjusting the Image The following sections describe how to adjust the...

Product Information Guide
Page 5
...aspect ratio of the screen (not to make sure the projector is positioned in the Signal menu is turned off E-Zoom and A/V Mute before pressing this mode. ❏ Presentation Ideal for 16:9 images. Epson PowerLite S4 Adjusting the Image Shape To avoid projecting with a distorted image...horizontal stripes ❏ Only a portion of signal output by the computer. Make sure the projector faces the screen squarely. Ideal for playing video games in 16:9 wide-screen format. 6/06 Epson PowerLite S4 - 5 Adjusting Computer Images If you can also change the aspect ratio to view the ...
...aspect ratio of the screen (not to make sure the projector is positioned in the Signal menu is turned off E-Zoom and A/V Mute before pressing this mode. ❏ Presentation Ideal for 16:9 images. Epson PowerLite S4 Adjusting the Image Shape To avoid projecting with a distorted image...horizontal stripes ❏ Only a portion of signal output by the computer. Make sure the projector faces the screen squarely. Ideal for playing video games in 16:9 wide-screen format. 6/06 Epson PowerLite S4 - 5 Adjusting Computer Images If you can also change the aspect ratio to view the ...


