Printer Guide
Page 6
... Color Management and Paper Configuration Options . . . . . 55 Choosing Expansion Settings 57 Creating a Custom Preset and Printing 58 Choosing Advanced Black and White Photo Settings 59 Managing Print Jobs 61 Checking Ink and Maintenance Status 62 4 Printing with Epson ... . 77 5 Maintaining and Transporting the Printer Checking Printer Status and Part Life 82 Printing Status Information 82 Viewing Status Information 83 Checking and Cleaning the Print Head 84 Running a Power Cleaning Cycle 86 Aligning the Print Head 87 Replacing Ink Cartridges 88 Performing Additional Maintenance...
... Color Management and Paper Configuration Options . . . . . 55 Choosing Expansion Settings 57 Creating a Custom Preset and Printing 58 Choosing Advanced Black and White Photo Settings 59 Managing Print Jobs 61 Checking Ink and Maintenance Status 62 4 Printing with Epson ... . 77 5 Maintaining and Transporting the Printer Checking Printer Status and Part Life 82 Printing Status Information 82 Viewing Status Information 83 Checking and Cleaning the Print Head 84 Running a Power Cleaning Cycle 86 Aligning the Print Head 87 Replacing Ink Cartridges 88 Performing Additional Maintenance...
Printer Guide
Page 13
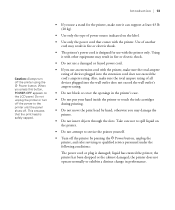
... the ink cartridges during printing. • Do not move the print head by pressing the P Power button, unplug the printer, and refer servicing to the printer until the panel shuts off the printer using the P Power button. the printer has been dropped or the cabinet damaged; When you press this button,... POWER OFF appears on the label. • Use only the power cord that the print head is designed for the printer, make sure it with other equipment may damage the printer. • Do not insert objects through the slots. This ensures that comes with the...
... the ink cartridges during printing. • Do not move the print head by pressing the P Power button, unplug the printer, and refer servicing to the printer until the panel shuts off the printer using the P Power button. the printer has been dropped or the cabinet damaged; When you press this button,... POWER OFF appears on the label. • Use only the power cord that the print head is designed for the printer, make sure it with other equipment may damage the printer. • Do not insert objects through the slots. This ensures that comes with the...

Printer Guide
Page 14
If ink gets in your skin, wash it freely. However, each time the cartridge is inserted, some ink is consumed because the printer automatically performs a reliability check. • If you remove an ink cartridge for later use, protect the ink supply area from a cold storage site, allow ... of the ink cartridge. 14 | Introduction Caution: Do not shake cartridges that have been installed previously with soap and water. This could damage the print head. • After bringing an ink cartridge inside from dirt and dust, and store it for best results. • Do not use an ink cartridge...
If ink gets in your skin, wash it freely. However, each time the cartridge is inserted, some ink is consumed because the printer automatically performs a reliability check. • If you remove an ink cartridge for later use, protect the ink supply area from a cold storage site, allow ... of the ink cartridge. 14 | Introduction Caution: Do not shake cartridges that have been installed previously with soap and water. This could damage the print head. • After bringing an ink cartridge inside from dirt and dust, and store it for best results. • Do not use an ink cartridge...
Printer Guide
Page 47
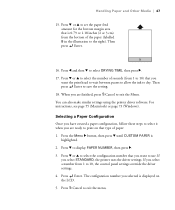
... a paper configuration, follow these steps to select it when you select a number from 1 to print on the LCD. 5. If you want the print head to wait between passes to allow the ink to select DRYING TIME, then press r. 17. If you are finished, press + Cancel to use. Press... the paper (labelled B in the illustration to save the setting. 18. Then press Enter to the right). You can also make similar settings using the printer driver software. Press + Cancel to display PAPER NUMBER, then press r. 3. Then press Enter. 16. Press the Menu r button, then press d until CUSTOM ...
... a paper configuration, follow these steps to select it when you select a number from 1 to print on the LCD. 5. If you want the print head to wait between passes to allow the ink to select DRYING TIME, then press r. 17. If you are finished, press + Cancel to use. Press... the paper (labelled B in the illustration to save the setting. 18. Then press Enter to the right). You can also make similar settings using the printer driver software. Press + Cancel to display PAPER NUMBER, then press r. 3. Then press Enter. 16. Press the Menu r button, then press d until CUSTOM ...
Printer Guide
Page 56
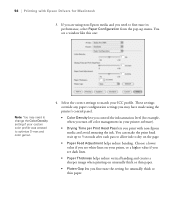
... may have made using non-Epson media and you print with Epson Drivers for example, when you turn off color management in your printer software). • Drying Time per Print Head Pass lets you need to change the Color Density setting if your custom color profile was created to optimize D-max and color gamut. 4. You can make the...
... may have made using non-Epson media and you print with Epson Drivers for example, when you turn off color management in your printer software). • Drying Time per Print Head Pass lets you need to change the Color Density setting if your custom color profile was created to optimize D-max and color gamut. 4. You can make the...

Printer Guide
Page 73
...for example, when you turn off color management in your ICC profile. Then type a name for reuse. Printing with non-Epson media and avoid smearing the ink. You can make the print head wait up to 5 seconds after each pass to allow ink to match your printer software). • Drying Time ...per Print Head Pass lets you print with Epson Drivers for Windows | 73 You see a...
...for example, when you turn off color management in your ICC profile. Then type a name for reuse. Printing with non-Epson media and avoid smearing the ink. You can make the print head wait up to 5 seconds after each pass to allow ink to match your printer software). • Drying Time ...per Print Head Pass lets you print with Epson Drivers for Windows | 73 You see a...
Printer Guide
Page 81
81 Chapter 5: Maintaining and Transporting the Printer The Epson Stylus Pro 3800 requires little maintenance to fine-tune a variety of printer settings. This chapter describes the following routine procedures: • Checking printer status and part life • Checking and cleaning the print head • Aligning the print head • Replacing ink cartridges • Performing additional maintenance tasks (changing the black...
81 Chapter 5: Maintaining and Transporting the Printer The Epson Stylus Pro 3800 requires little maintenance to fine-tune a variety of printer settings. This chapter describes the following routine procedures: • Checking printer status and part life • Checking and cleaning the print head • Aligning the print head • Replacing ink cartridges • Performing additional maintenance tasks (changing the black...
Printer Guide
Page 84
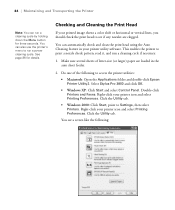
... Stylus Pro 3800 and click OK. • Windows XP: Click Start and select Control Panel. Right-click your printer icon and select Printing Preferences. Click the Utility tab. Do one of letter-size (or larger) paper are clogged. You can run a cleaning cycle by holding down the Menu button for details. Right-click your printer...
... Stylus Pro 3800 and click OK. • Windows XP: Click Start and select Control Panel. Right-click your printer icon and select Printing Preferences. Click the Utility tab. Do one of letter-size (or larger) paper are clogged. You can run a cleaning cycle by holding down the Menu button for details. Right-click your printer...

Printer Guide
Page 85
Or click Auto if you want to check the pattern. 5. Maintaining and Transporting the Printer | 85 3. Click Print to print the nozzle check pattern so you can see any gaps as shown below , you see if the print head needs to make sure it has no gaps or lines. • If the printout... cleaned. Note: You must use at least a 10× eye loupe to run a Power Cleaning Cycle, as shown below , click Clean to clean the print head and follow the on-screen instructions. 6. If the nozzles do not clear after a few cleaning cycles, run the nozzle check and have the...
Or click Auto if you want to check the pattern. 5. Maintaining and Transporting the Printer | 85 3. Click Print to print the nozzle check pattern so you can see any gaps as shown below , you see if the print head needs to make sure it has no gaps or lines. • If the printout... cleaned. Note: You must use at least a 10× eye loupe to run a Power Cleaning Cycle, as shown below , click Clean to clean the print head and follow the on-screen instructions. 6. If the nozzles do not clear after a few cleaning cycles, run the nozzle check and have the...

Printer Guide
Page 86
.... When cleaning is finished and the P Power light stops flashing, print the nozzle check again to confirm that the head is still missing segments after a few power cleaning cycles, turn off the printer and let it is not on page 84. 2. If the pattern is clean. If you can run a nozzle...can reinsert the old cartridge. 1. The cartridges need to replace a low cartridge to use power cleaning. After cleaning, you still see no improvement, contact Epson for assistance. 5-86 You may need to be at least 50% full to run the cleaning cycle. Press the Menu r button. 4. Make sure the...
.... When cleaning is finished and the P Power light stops flashing, print the nozzle check again to confirm that the head is still missing segments after a few power cleaning cycles, turn off the printer and let it is not on page 84. 2. If the pattern is clean. If you can run a nozzle...can reinsert the old cartridge. 1. The cartridges need to replace a low cartridge to use power cleaning. After cleaning, you still see no improvement, contact Epson for assistance. 5-86 You may need to be at least 50% full to run the cleaning cycle. Press the Menu r button. 4. Make sure the...
Printer Guide
Page 87
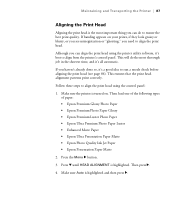
... Photo Paper • Epson Premium Photo Paper Glossy • Epson Premium Luster Photo Paper • Epson Ultra Premium Photo Paper Luster • Enhanced Matte Paper • Epson Ultra Presentation Paper Matte • Epson Photo Quality Ink Jet Paper • Epson Presentation Paper Matte 2. Follow these steps to align the print head using the printer utility software, it 's all...
... Photo Paper • Epson Premium Photo Paper Glossy • Epson Premium Luster Photo Paper • Epson Ultra Premium Photo Paper Luster • Enhanced Matte Paper • Epson Ultra Presentation Paper Matte • Epson Photo Quality Ink Jet Paper • Epson Presentation Paper Matte 2. Follow these steps to align the print head using the printer utility software, it 's all...

Printer Guide
Page 88
...large print job. Replacing Ink Cartridges Before you begin a large print job, you don't open the top cover or turn off the printer during this process. Or you can wait until the ink cartridge needs to start . Press Enter to be replaced, and then continue...PREM. If you want to check ink levels is complete, the printer starts aligning the print head. Press d or u to run the head alignment. However, it before you can perform a manual head alignment. GLOSSY/LUSTER, P Q INK JET PAPER (Epson Presentation Paper Matte), or ENHANCED MATTE PAPER (Ultra Premium Presentation Paper...
...large print job. Replacing Ink Cartridges Before you begin a large print job, you don't open the top cover or turn off the printer during this process. Or you can wait until the ink cartridge needs to start . Press Enter to be replaced, and then continue...PREM. If you want to check ink levels is complete, the printer starts aligning the print head. Press d or u to run the head alignment. However, it before you can perform a manual head alignment. GLOSSY/LUSTER, P Q INK JET PAPER (Epson Presentation Paper Matte), or ENHANCED MATTE PAPER (Ultra Premium Presentation Paper...

Printer Guide
Page 97
...steps to replace the maintenance cartridge: 1. You can purchase replacement items for your printer from the system during print head cleaning. When the cartridge is completely full, the printer stops working and REPLACE THE CARTRIDGE appears on the control panel). 2. Maintenance cartridge ...indicator (showing a new cartridge) Replacement cartridges are available from Epson (product code T582000). Make sure the printer is...
...steps to replace the maintenance cartridge: 1. You can purchase replacement items for your printer from the system during print head cleaning. When the cartridge is completely full, the printer stops working and REPLACE THE CARTRIDGE appears on the control panel). 2. Maintenance cartridge ...indicator (showing a new cartridge) Replacement cartridges are available from Epson (product code T582000). Make sure the printer is...

Printer Guide
Page 101
...the ink cartridges. 1. Preparing the Printer for instructions. Turn the printer on for a long time. Turn off a power strip. If you do not have these items, contact Epson to request them . If you do not have these items, contact Epson to lock the print head, and ink may leak out of... the reservoir, damaging the printer. 2. Unplug the power cord and interface cable. 4. WARNING: The printer weighs about 43 lb (20 kg),...
...the ink cartridges. 1. Preparing the Printer for instructions. Turn the printer on for a long time. Turn off a power strip. If you do not have these items, contact Epson to request them . If you do not have these items, contact Epson to lock the print head, and ink may leak out of... the reservoir, damaging the printer. 2. Unplug the power cord and interface cable. 4. WARNING: The printer weighs about 43 lb (20 kg),...
Printer Guide
Page 109
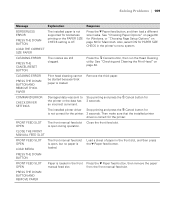
..." on page 84. Press the + Cancel button, then run the Head Cleaning utility. Also, select ON for the printer. 3 seconds. CLEANING ERROR PRESS THE CANCEL/RESET BUTTON The nozzles are still clogged. The installed printer driver Stop printing and press the + Cancel button for is not supported... for Macintosh. PRESS THE DOWN BUTTON FRONT FEED SLOT OPEN Paper is loaded. CLEANING ERROR PRESS THE DOWN BUTTON AND REMOVE THICK PAPER Print head cleaning cannot be started...
..." on page 84. Press the + Cancel button, then run the Head Cleaning utility. Also, select ON for the printer. 3 seconds. CLEANING ERROR PRESS THE CANCEL/RESET BUTTON The nozzles are still clogged. The installed printer driver Stop printing and press the + Cancel button for is not supported... for Macintosh. PRESS THE DOWN BUTTON FRONT FEED SLOT OPEN Paper is loaded. CLEANING ERROR PRESS THE DOWN BUTTON AND REMOVE THICK PAPER Print head cleaning cannot be started...

Printer Guide
Page 112
... the same as the paper type selected for details. Load the paper that matches the type of paper you selected. See "Aligning the Print Head" on page 87. Flatten the media. LOAD THE CORRECT PAPER PAPER SENSOR ERROR PRESS THE + BUTTON The loaded paper does not match the ...matches the type selected for PAPER SIZE CHECK using the printer's menu system, or load the correct type of the paper is wavy or curled. The printer cannot detect the loaded media because the color of genuine Epson paper. LOAD PAPER CORRECTLY The printer cannot detect the loaded media because it is either ...
... the same as the paper type selected for details. Load the paper that matches the type of paper you selected. See "Aligning the Print Head" on page 87. Flatten the media. LOAD THE CORRECT PAPER PAPER SENSOR ERROR PRESS THE + BUTTON The loaded paper does not match the ...matches the type selected for PAPER SIZE CHECK using the printer's menu system, or load the correct type of the paper is wavy or curled. The printer cannot detect the loaded media because the color of genuine Epson paper. LOAD PAPER CORRECTLY The printer cannot detect the loaded media because it is either ...
Printer Guide
Page 114
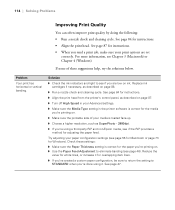
...'re printing on page 87. ◗ Turn off High Speed in your Advanced settings. ◗ Make sure the Media Type setting in the printer software is correct for adjusting the paper feed. Try adjusting your paper configuration settings (see Chapter 3 (Macintosh) or Chapter 4 (Windows). Reduce ... lines, or increase it . See page 84 for instructions. ◗ Align the print head from the printer's control panel, as SuperPhoto - 2880dpi. ◗ If you 're done using a third-party RIP and non-Epson media, see page 46). See page 47. 6-114 For more information, see page 56...
...'re printing on page 87. ◗ Turn off High Speed in your Advanced settings. ◗ Make sure the Media Type setting in the printer software is correct for adjusting the paper feed. Try adjusting your paper configuration settings (see Chapter 3 (Macintosh) or Chapter 4 (Windows). Reduce ... lines, or increase it . See page 84 for instructions. ◗ Align the print head from the printer's control panel, as SuperPhoto - 2880dpi. ◗ If you 're done using a third-party RIP and non-Epson media, see page 46). See page 47. 6-114 For more information, see page 56...

Printer Guide
Page 115
...-up in the tray. ◗ Choose a higher resolution, such as described on page 87. ◗ Make sure the Media Type setting in the printer software is correct for Windows) to choose the correct setting. ◗ The platen gap setting is correct for Windows). Solving Problems | 115 Problem Your ... are low on ink. See page 84 for instructions. ◗ Align the print head from the printer's control panel, as SuperPhoto - 2880. ◗ Turn off High Speed in the printer software is too wide. Use your printer software (see page 56 for Macintosh or page 73 for the media you 're ...
...-up in the tray. ◗ Choose a higher resolution, such as described on page 87. ◗ Make sure the Media Type setting in the printer software is correct for Windows) to choose the correct setting. ◗ The platen gap setting is correct for Windows). Solving Problems | 115 Problem Your ... are low on ink. See page 84 for instructions. ◗ Align the print head from the printer's control panel, as SuperPhoto - 2880. ◗ Turn off High Speed in the printer software is too wide. Use your printer software (see page 56 for Macintosh or page 73 for the media you 're ...
Printer Guide
Page 117
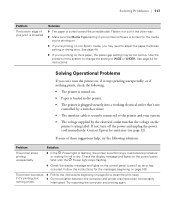
...these suggestions help, try the following : • The printer is turned on. • Paper is loaded in your print is correct for the media you're printing on. ◗ If you're printing on the control panel to clean the print head. See page 44. ◗ If you're printing ...6-117 Check the display message and lights on page 84 to see page 12). If not, turn the printer on page 108. Contact Epson for ink to WIDE or WIDER. If none of your printer software is smeared. Solution ◗ The paper is performing a maintenance procedure or waiting for assistance (see if...
...these suggestions help, try the following : • The printer is turned on. • Paper is loaded in your print is correct for the media you're printing on. ◗ If you're printing on the control panel to clean the print head. See page 44. ◗ If you're printing ...6-117 Check the display message and lights on page 84 to see page 12). If not, turn the printer on page 108. Contact Epson for ink to WIDE or WIDER. If none of your printer software is smeared. Solution ◗ The paper is performing a maintenance procedure or waiting for assistance (see if...

Printer Guide
Page 119
...to clear any stalled print jobs from the Printer Setup Utility. ◗ Turn off the Flip Horizontal setting in your print Align the print head as described on your printer software. Your image is inverted. ◗ Turn off the printer and computer. only. cancelled a job....incorrectly. Your print has incorrect margins. ◗ Check the page size or paper size settings in your printer software. Color images print in black Make sure Color is selected in your application. Solving Problems | 119 Solving Miscellaneous Printing Problems If your printouts are correct ...
...to clear any stalled print jobs from the Printer Setup Utility. ◗ Turn off the Flip Horizontal setting in your print Align the print head as described on your printer software. Your image is inverted. ◗ Turn off the printer and computer. only. cancelled a job....incorrectly. Your print has incorrect margins. ◗ Check the page size or paper size settings in your printer software. Color images print in black Make sure Color is selected in your application. Solving Problems | 119 Solving Miscellaneous Printing Problems If your printouts are correct ...


