Product Brochure
Page 6
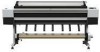
... about ink and printer activity Superior Connectivity Standard connectivity includes one USB 2.0 interface and one - the Epson Stylus Pro series printers are used to identify ink status to print engine activity. Epson Intelligent High-capacity Ink System Pressurized ink cartridge technology ensures reliable ink...and studios. High-performance Print Engine SpeedsB Utilizing our latest high-performance print head technology, the Epson Stylus Pro 11880 is among the fastest wide-format printers in min:sec. Extremely visible from long distances for Macintosh® and Windows® Optional ...
... about ink and printer activity Superior Connectivity Standard connectivity includes one USB 2.0 interface and one - the Epson Stylus Pro series printers are used to identify ink status to print engine activity. Epson Intelligent High-capacity Ink System Pressurized ink cartridge technology ensures reliable ink...and studios. High-performance Print Engine SpeedsB Utilizing our latest high-performance print head technology, the Epson Stylus Pro 11880 is among the fastest wide-format printers in min:sec. Extremely visible from long distances for Macintosh® and Windows® Optional ...

Product Brochure
Page 8
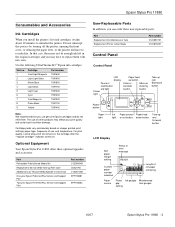
..., ink jet 9-cartridge (C, LC, VM, VLM, Y, LK, LLK, PK and MK) Auto Black Ink Mode Switching - Visit www.wilhelm-research.com for more information about cartridges. Epson Stylus®Pro11880 Print ...Color and Monochrome 360 nozzles x 9 Droplet Technology Smallest droplet size 3.5 picoliters Variable Droplet Technology can be automatically cut to any and all prints under glass. Epson disclaims any length when printing on Fine - 720 dpi HS. Copyright 2007, Epson America, Inc. no condensation) Product/Accessories Epson Stylus Pro 11880 Printer Epson Stylus Pro 11880...
..., ink jet 9-cartridge (C, LC, VM, VLM, Y, LK, LLK, PK and MK) Auto Black Ink Mode Switching - Visit www.wilhelm-research.com for more information about cartridges. Epson Stylus®Pro11880 Print ...Color and Monochrome 360 nozzles x 9 Droplet Technology Smallest droplet size 3.5 picoliters Variable Droplet Technology can be automatically cut to any and all prints under glass. Epson disclaims any length when printing on Fine - 720 dpi HS. Copyright 2007, Epson America, Inc. no condensation) Product/Accessories Epson Stylus Pro 11880 Printer Epson Stylus Pro 11880...

Product Information Guide
Page 2
... paper stock before loading. Using the Menu system, you can set all the margins to the quality of any non-Epson brand or type of paper. Epson Stylus Pro 11880 10/07 Epson Stylus Pro 11880 Cut sheets Weight range Paper thickness A3 (11.7 × 16.5 inches) US B (11 × 17 inches...time, Epson cannot attest to 15 mm or 3 mm. Safety Approvals Safety standards UL 60950-1, CSA No. 60950-1 EMC FCC part 15 subpart B, Class A, CAN/CSA-CEI/IEC CISPR 22 class A Printer Interfaces ❏ USB (1.1 and 2.0 compatible) ❏ 10/100/1000 BaseT Ethernet port Ink Cartridges Cartridge life ...
... paper stock before loading. Using the Menu system, you can set all the margins to the quality of any non-Epson brand or type of paper. Epson Stylus Pro 11880 10/07 Epson Stylus Pro 11880 Cut sheets Weight range Paper thickness A3 (11.7 × 16.5 inches) US B (11 × 17 inches...time, Epson cannot attest to 15 mm or 3 mm. Safety Approvals Safety standards UL 60950-1, CSA No. 60950-1 EMC FCC part 15 subpart B, Class A, CAN/CSA-CEI/IEC CISPR 22 class A Printer Interfaces ❏ USB (1.1 and 2.0 compatible) ❏ 10/100/1000 BaseT Ethernet port Ink Cartridges Cartridge life ...
Product Information Guide
Page 3
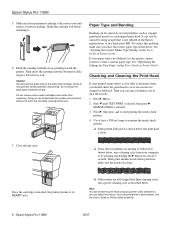
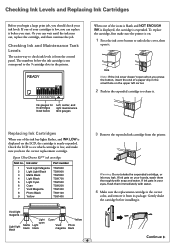
...-initialize. The use of use genuine Epson cartridges and do not refill them with new ones. In that you install the printer's first ink cartridges, it takes about 10 minutes to initialize the printer. For print quality, a small amount of roll paper remaining Paper source Platen Ink gauges gap setting Maintenance tank gauges 10/07 Epson Stylus Pro 11880 - 3
...-initialize. The use of use genuine Epson cartridges and do not refill them with new ones. In that you install the printer's first ink cartridges, it takes about 10 minutes to initialize the printer. For print quality, a small amount of roll paper remaining Paper source Platen Ink gauges gap setting Maintenance tank gauges 10/07 Epson Stylus Pro 11880 - 3

Product Information Guide
Page 4
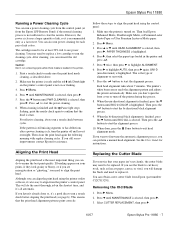
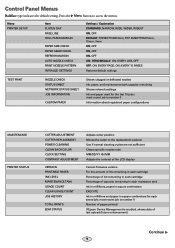
...cartridge Percentage of pages printed Future enhancement Media type loaded in centimeters EXECUTE Ink and paper used for the last 10 jobs; to the replacement position POWER CLEANING Use if normal cleaning cycles are not sufficient CLEAN EACH COLOR Cleans specific nozzles only; Menu Item Settings/Explanation PRINTER...CUTTER ADJUSTMENT Adjusts cutter position CUTTER REPLACEMENT Moves the cutter to 10.0 sec. Epson Stylus Pro 11880 10/07 STANDARD, -1, -2, -3, -4 4 - Epson Stylus Pro 11880 Control Panel Menus Boldface indicates the default setting. Press the r Menu button...
...cartridge Percentage of pages printed Future enhancement Media type loaded in centimeters EXECUTE Ink and paper used for the last 10 jobs; to the replacement position POWER CLEANING Use if normal cleaning cycles are not sufficient CLEAN EACH COLOR Cleans specific nozzles only; Menu Item Settings/Explanation PRINTER...CUTTER ADJUSTMENT Adjusts cutter position CUTTER REPLACEMENT Moves the cutter to 10.0 sec. Epson Stylus Pro 11880 10/07 STANDARD, -1, -2, -3, -4 4 - Epson Stylus Pro 11880 Control Panel Menus Boldface indicates the default setting. Press the r Menu button...

Product Information Guide
Page 5
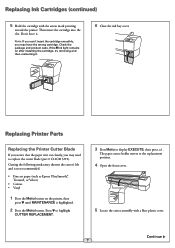
..., wash them immediately with the printer turned off. 3. Warning: Do not shake the expended cartridge, or ink may leak out. To prevent ink reporting errors, never replace the ink cartridges with water. 10/07 Epson Stylus Pro 11880 - 5 If ink gets on or flashing. Note the color of a paper clip in the expended cartridge to replace it . 4. Remove the...
..., wash them immediately with the printer turned off. 3. Warning: Do not shake the expended cartridge, or ink may leak out. To prevent ink reporting errors, never replace the ink cartridges with water. 10/07 Epson Stylus Pro 11880 - 5 If ink gets on or flashing. Note the color of a paper clip in the expended cartridge to replace it . 4. Remove the...
Product Information Guide
Page 6
... it from your printed image shows a color shift or horizontal lines, you can check the print head using your paper type is installed, the printer returns to create a custom paper type. Do not remove and re-insert cartridges more often than necessary. Press r, then press pattern. Epson Stylus Pro 11880 10/07 Doing so may prevent normal...
... it from your printed image shows a color shift or horizontal lines, you can check the print head using your paper type is installed, the printer returns to create a custom paper type. Do not remove and re-insert cartridges more often than necessary. Press r, then press pattern. Epson Stylus Pro 11880 10/07 Doing so may prevent normal...
Product Information Guide
Page 7
...the cleaning cycle. Make sure you don't open the front cover or turn the printer off the printer during this process. 8. Press r Menu. 2. The cartridges need to be replaced. You may need to replace a low cartridge to highlight AUTO, then press r again. Press to highlight ALIGNMENT. 6. For...all automatic. Epson Stylus Pro 11880 Running a Power Cleaning Cycle You can run a power cleaning cycle from the control panel (or from the Epson LFP Remote Panel) if the normal cleaning process is not sufficient to exit head alignment mode. This is the type of ink colors. However, ...
...the cleaning cycle. Make sure you don't open the front cover or turn the printer off the printer during this process. 8. Press r Menu. 2. The cartridges need to be replaced. You may need to replace a low cartridge to highlight AUTO, then press r again. Press to highlight ALIGNMENT. 6. For...all automatic. Epson Stylus Pro 11880 Running a Power Cleaning Cycle You can run a power cleaning cycle from the control panel (or from the Epson LFP Remote Panel) if the normal cleaning process is not sufficient to exit head alignment mode. This is the type of ink colors. However, ...
Quick Reference Guide
Page 7
... water. 4 Make sure the replacement cartridge is from the printer. Epson UltraChrome K3TM ink cartridges Slot no. Checking Ink Levels and Replacing Ink Cartridges Before you begin a large print job, you have the correct replacement cartridge. If one of a paper clip in the expended cartridge to check ink levels is the correct color, and remove it . Or you...
... water. 4 Make sure the replacement cartridge is from the printer. Epson UltraChrome K3TM ink cartridges Slot no. Checking Ink Levels and Replacing Ink Cartridges Before you begin a large print job, you have the correct replacement cartridge. If one of a paper clip in the expended cartridge to check ink levels is the correct color, and remove it . Or you...
Quick Reference Guide
Page 8
... the arrow mark pointing toward the printer. Continue 7 ▲ If the Ink light remains on the printer, then press until MAINTENANCE is not recommended: • Fine art paper (such as Epson UltraSmooth®, Textured, or Velvet) • Canvas • Vinyl 1 Press the Menu button on after installing the cartridge, try removing and then reinserting...
... the arrow mark pointing toward the printer. Continue 7 ▲ If the Ink light remains on the printer, then press until MAINTENANCE is not recommended: • Fine art paper (such as Epson UltraSmooth®, Textured, or Velvet) • Canvas • Vinyl 1 Press the Menu button on after installing the cartridge, try removing and then reinserting...
Quick Reference Guide
Page 10
...the contrast of the LCD display Current firmware version For the amount of ink remaining in each cartridge Percentage of ink remaining in each cartridge Percentage of capacity remaining in each maintance tank Ink in milliliters, paper in square centimeters EXECUTE Ink...job is enabled, shows date of pages printed If Epson Device Management is number 0 Information about registered paper configurations MAINTENANCE CUTTER ADJUSTMENT CUTTER REPLACEMENT POWER CLEANING CLEAN EACH COLOR CLOCK SETTING CONTRAST ADJUSTMENT PRINTER STATUS VERSION PRINTABLE PAGES INK LEVEL MAINTENANCE TANK USAGE ...
...the contrast of the LCD display Current firmware version For the amount of ink remaining in each cartridge Percentage of ink remaining in each cartridge Percentage of capacity remaining in each maintance tank Ink in milliliters, paper in square centimeters EXECUTE Ink...job is enabled, shows date of pages printed If Epson Device Management is number 0 Information about registered paper configurations MAINTENANCE CUTTER ADJUSTMENT CUTTER REPLACEMENT POWER CLEANING CLEAN EACH COLOR CLOCK SETTING CONTRAST ADJUSTMENT PRINTER STATUS VERSION PRINTABLE PAGES INK LEVEL MAINTENANCE TANK USAGE ...
User's Guide
Page 5
...Important Safety Instructions 12 Ink Cartridge Safety Instructions 15 Printer Parts 16 Front 16 Back 16 Control Panel 17 LCD Display 17 1 Setting Up the Printer Unpacking and Assembling the Printer 19 Unpacking and Assembling the Stand 20 Unpacking the Printer 22 Mounting the Printer on the Stand 23 ...Take-up Reel 25 Installing the Take-up Reel Core and Paper Guides 29 Plugging in the Printer 31 Installing Ink 33 Connecting the Printer 35 Configuring the Network Interface 36 Updating Your Printer Firmware 37 Downloading the Firmware 37 Updating the Firmware 38 Configuring the...
...Important Safety Instructions 12 Ink Cartridge Safety Instructions 15 Printer Parts 16 Front 16 Back 16 Control Panel 17 LCD Display 17 1 Setting Up the Printer Unpacking and Assembling the Printer 19 Unpacking and Assembling the Stand 20 Unpacking the Printer 22 Mounting the Printer on the Stand 23 ...Take-up Reel 25 Installing the Take-up Reel Core and Paper Guides 29 Plugging in the Printer 31 Installing Ink 33 Connecting the Printer 35 Configuring the Network Interface 36 Updating Your Printer Firmware 37 Downloading the Firmware 37 Updating the Firmware 38 Configuring the...
User's Guide
Page 7
Contents | 7 4 Printing with Epson Drivers for Windows Choosing Basic Print Options 96 Selecting the Correct Media Type Setting 99 Choosing Printer Color Management Options 100 Choosing Roll Paper Options 102 Borderless Printing 104 Choosing Cut Sheet Paper Options 106 Choosing Page Layout ... Menu 124 Automatically Checking and Cleaning the Print Head 124 Running a Power Cleaning Cycle 125 Aligning the Print Head 126 Replacing Ink Cartridges 127 Changing the Date and Time 130 Using Maintenance Mode 131 Replacing the Paper Cutter Blade 132 Removing the Old Blade 132 Installing...
Contents | 7 4 Printing with Epson Drivers for Windows Choosing Basic Print Options 96 Selecting the Correct Media Type Setting 99 Choosing Printer Color Management Options 100 Choosing Roll Paper Options 102 Borderless Printing 104 Choosing Cut Sheet Paper Options 106 Choosing Page Layout ... Menu 124 Automatically Checking and Cleaning the Print Head 124 Running a Power Cleaning Cycle 125 Aligning the Print Head 126 Replacing Ink Cartridges 127 Changing the Date and Time 130 Using Maintenance Mode 131 Replacing the Paper Cutter Blade 132 Removing the Old Blade 132 Installing...
User's Guide
Page 8
... Electrical 159 Dimensions and Weight 159 Printer Interfaces 160 Safety Approvals 160 Media 160 Roll Paper 160 Cut Sheets 160 Printable Area 162 Ink Cartridges 162 Appendix Control Panel Menus 163 Epson Roll Paper Information and ICC Profiles 166 Epson Cut Sheet Paper Information and ICC Profiles 167 Managing Color With Profiles 168 Aligning the...
... Electrical 159 Dimensions and Weight 159 Printer Interfaces 160 Safety Approvals 160 Media 160 Roll Paper 160 Cut Sheets 160 Printable Area 162 Ink Cartridges 162 Appendix Control Panel Menus 163 Epson Roll Paper Information and ICC Profiles 166 Epson Cut Sheet Paper Information and ICC Profiles 167 Managing Color With Profiles 168 Aligning the...
User's Guide
Page 9
.... Tips contain additional hints on how to keep it to your printer for easy reference. • The on-screen Epson Network Guide on the CD-ROM describes how to set up and using your printer. 9 For additional information, see the following: • The Quick...about your equipment. 9 Introduction This User's Guide provides important information on setting up and configure the printer for daily use and printer maintenance-loading paper, replacing ink cartridges and other components, cleaning and aligning the print head, and using the Epson® printer drivers, and replacing ink...
.... Tips contain additional hints on how to keep it to your printer for easy reference. • The on-screen Epson Network Guide on the CD-ROM describes how to set up and using your printer. 9 For additional information, see the following: • The Quick...about your equipment. 9 Introduction This User's Guide provides important information on setting up and configure the printer for daily use and printer maintenance-loading paper, replacing ink cartridges and other components, cleaning and aligning the print head, and using the Epson® printer drivers, and replacing ink...
User's Guide
Page 10
...Part Replacement Ink Maintenance Tank (see page 135) Replacement Printer Cutter Blade (see page 132) Ink Cartridges Part number C12C890191 C12C815291 See page 128 for accessories and options that came with the Epson Preferred Limited Warranty Plan information that are subject to ...number, call , make sure you can purchase optional equipment and genuine Epson ink and paper from an Epson Professional Imaging authorized reseller. Options and Accessories Your Epson Stylus® Pro 11880 offers these optional upgrades and accessories: Optional equipment Option Retractable Fabric-Based ...
...Part Replacement Ink Maintenance Tank (see page 135) Replacement Printer Cutter Blade (see page 132) Ink Cartridges Part number C12C890191 C12C815291 See page 128 for accessories and options that came with the Epson Preferred Limited Warranty Plan information that are subject to ...number, call , make sure you can purchase optional equipment and genuine Epson ink and paper from an Epson Professional Imaging authorized reseller. Options and Accessories Your Epson Stylus® Pro 11880 offers these optional upgrades and accessories: Optional equipment Option Retractable Fabric-Based ...

User's Guide
Page 14
... Metal plate For California customers only: The lithium batteries in the upper left ink cartridge compartment. special handling may apply, See www.dtsc.ca.gov/hazardouswaste/perchlorate. 14 the printer does not operate normally or exhibits a distinct change in performance. • The ... touch the metal plate located in this product contain Perchlorate Material - liquid has entered the printer; 14 | Introduction • Power down the printer from the control panel, unplug the printer, and refer servicing to qualified service personnel under the following conditions: The power cord or ...
... Metal plate For California customers only: The lithium batteries in the upper left ink cartridge compartment. special handling may apply, See www.dtsc.ca.gov/hazardouswaste/perchlorate. 14 the printer does not operate normally or exhibits a distinct change in performance. • The ... touch the metal plate located in this product contain Perchlorate Material - liquid has entered the printer; 14 | Introduction • Power down the printer from the control panel, unplug the printer, and refer servicing to qualified service personnel under the following conditions: The power cord or ...

User's Guide
Page 15
...soap and water. Ink Cartridge Safety Instructions • Keep ink cartridges out of the reach of children and do not drink the ink. • Store ink cartridges in the ink supply port, making covers or plugs unnecessary, but care is consumed because the printer automatically performs a reliability check.... • If you shake cartridges that the cartridge touches. • Do not touch the ink supply port, its surrounding area, or the green IC chip ...
...soap and water. Ink Cartridge Safety Instructions • Keep ink cartridges out of the reach of children and do not drink the ink. • Store ink cartridges in the ink supply port, making covers or plugs unnecessary, but care is consumed because the printer automatically performs a reliability check.... • If you shake cartridges that the cartridge touches. • Do not touch the ink supply port, its surrounding area, or the green IC chip ...

User's Guide
Page 22
Remove the ink cartridges and other accessories from the printer. 1-22 22 | Setting Up the Printer Unpacking the Printer 1. Remove ink cartridges and accessories 3. Remove the plastic cover from the side as shown below. Lift the box up and away from around the printer. 4. Open the box and remove the roll paper, spindle, polystyrene foam, and cardboard cushions. 2. Remove the cardboard panels from the printer.
Remove the ink cartridges and other accessories from the printer. 1-22 22 | Setting Up the Printer Unpacking the Printer 1. Remove ink cartridges and accessories 3. Remove the plastic cover from the side as shown below. Lift the box up and away from around the printer. 4. Open the box and remove the roll paper, spindle, polystyrene foam, and cardboard cushions. 2. Remove the cardboard panels from the printer.

User's Guide
Page 23
Caster locks 1-23 Turn the two front casters and push down the locks to the printer: Power cord Roll paper and spindle 9 Ink cartridges 7 Paper guides Spindle adapters Mounting the Printer on the Stand 1. Setting Up the Printer | 23 Note: The ink cartridges included with the printer are mainly for initial setup. 5. Make sure you have all the items shown below, in addition to keep the stand from rolling.
Caster locks 1-23 Turn the two front casters and push down the locks to the printer: Power cord Roll paper and spindle 9 Ink cartridges 7 Paper guides Spindle adapters Mounting the Printer on the Stand 1. Setting Up the Printer | 23 Note: The ink cartridges included with the printer are mainly for initial setup. 5. Make sure you have all the items shown below, in addition to keep the stand from rolling.


