Product Brochure
Page 6
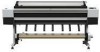
... ink cartridges On-the-fly ink cartridge replacement for increased productivity Unique Printer Activity Lighting System Nine individual amber LED lights provide live feedback about ink and printer activity Superior Connectivity Standard connectivity includes one USB 2.0 interface and one - High-performance Print Engine SpeedsB Utilizing our latest high-performance print head technology, the Epson Stylus Pro 11880 is...
... ink cartridges On-the-fly ink cartridge replacement for increased productivity Unique Printer Activity Lighting System Nine individual amber LED lights provide live feedback about ink and printer activity Superior Connectivity Standard connectivity includes one USB 2.0 interface and one - High-performance Print Engine SpeedsB Utilizing our latest high-performance print head technology, the Epson Stylus Pro 11880 is...

Product Brochure
Page 8
...condensation) Product/Accessories Epson Stylus Pro 11880 Printer Epson Stylus Pro 11880 ColorBurst Edition Includes ColorBurst® RIP Additional One-year Epson Preferred Plus service Additional Two-year Epson Preferred Plus service ...color x 9 colors total Ink cartridge shelf life 2 years from 4:08 to 85% (no ink waste Auto Head Alignment technology Auto Nozzle Verification and Cleaning technology Epson UltraChrome K3 with ColorBurst Edition bundle) Supported by application, OS and driver/RIP used for the latest information. Copyright 2007, Epson America, Inc. Epson Stylus...
...condensation) Product/Accessories Epson Stylus Pro 11880 Printer Epson Stylus Pro 11880 ColorBurst Edition Includes ColorBurst® RIP Additional One-year Epson Preferred Plus service Additional Two-year Epson Preferred Plus service ...color x 9 colors total Ink cartridge shelf life 2 years from 4:08 to 85% (no ink waste Auto Head Alignment technology Auto Nozzle Verification and Cleaning technology Epson UltraChrome K3 with ColorBurst Edition bundle) Supported by application, OS and driver/RIP used for the latest information. Copyright 2007, Epson America, Inc. Epson Stylus...

Product Information Guide
Page 2
.../07 Printable Area Default roll paper margins are 0.59 inch (15 mm) top and bottom, and 0.12 inch (3 mm) right and left. Epson Stylus Pro 11880 Cut sheets Weight range Paper thickness A3 (11.7 × 16.5 inches) US B (11 × 17 inches) 12 × 12 inches ARCH B (12 ×... CSA No. 60950-1 EMC FCC part 15 subpart B, Class A, CAN/CSA-CEI/IEC CISPR 22 class A Printer Interfaces ❏ USB (1.1 and 2.0 compatible) ❏ 10/100/1000 BaseT Ethernet port Ink Cartridges Cartridge life Temperature 2 years from the paper path when not in a cool, dry place. Always test samples of ...
.../07 Printable Area Default roll paper margins are 0.59 inch (15 mm) top and bottom, and 0.12 inch (3 mm) right and left. Epson Stylus Pro 11880 Cut sheets Weight range Paper thickness A3 (11.7 × 16.5 inches) US B (11 × 17 inches) 12 × 12 inches ARCH B (12 ×... CSA No. 60950-1 EMC FCC part 15 subpart B, Class A, CAN/CSA-CEI/IEC CISPR 22 class A Printer Interfaces ❏ USB (1.1 and 2.0 compatible) ❏ 10/100/1000 BaseT Ethernet port Ink Cartridges Cartridge life Temperature 2 years from the paper path when not in a cool, dry place. Always test samples of ...
Product Information Guide
Page 3
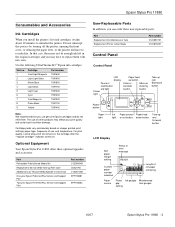
... Status or error message Length of other products may have to initialize the printer. Epson Stylus Pro 11880 Consumables and Accessories Ink Cartridges When you use genuine Epson cartridges and do not refill them with new ones. Use the following UltraChrome K3™ Epson ink cartridges: Slot no. 1 2 3 4 5 6 7 8 9 Cartridge Vivid Light Magenta Light Light Black Matte Black Light Black Light Cyan...
... Status or error message Length of other products may have to initialize the printer. Epson Stylus Pro 11880 Consumables and Accessories Ink Cartridges When you use genuine Epson cartridges and do not refill them with new ones. Use the following UltraChrome K3™ Epson ink cartridges: Slot no. 1 2 3 4 5 6 7 8 9 Cartridge Vivid Light Magenta Light Light Black Matte Black Light Black Light Cyan...

Product Information Guide
Page 4
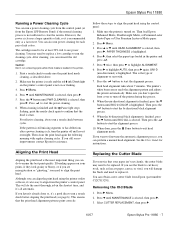
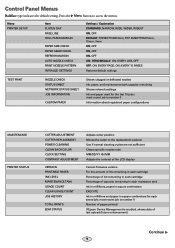
...Epson Stylus Pro 11880 10/07 Press the r Menu button to access the menus and the arrow buttons to the replacement position POWER CLEANING Use if normal cleaning cycles are not sufficient CLEAN EACH COLOR...version For the amount of ink remaining in each cartridge Percentage of ink remaining in each cartridge Percentage of pages printed Future enhancement Media type loaded... to navigate. to 0.70% 0. 0 sec. Epson Stylus Pro 11880 Control Panel Menus Boldface indicates the default setting. Menu Item Settings/Explanation PRINTER SETUP PLATEN GAP STANDARD, NARROW, WIDE, WIDER, ...
...Epson Stylus Pro 11880 10/07 Press the r Menu button to access the menus and the arrow buttons to the replacement position POWER CLEANING Use if normal cleaning cycles are not sufficient CLEAN EACH COLOR...version For the amount of ink remaining in each cartridge Percentage of ink remaining in each cartridge Percentage of pages printed Future enhancement Media type loaded... to navigate. to 0.70% 0. 0 sec. Epson Stylus Pro 11880 Control Panel Menus Boldface indicates the default setting. Menu Item Settings/Explanation PRINTER SETUP PLATEN GAP STANDARD, NARROW, WIDE, WIDER, ...

Product Information Guide
Page 5
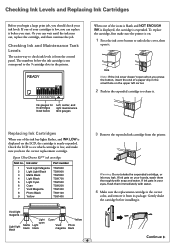
... cartridges with water. 10/07 Epson Stylus Pro 11880 - 5 The numbers below the ink icons on page 2). Then follow these steps to the 9 ink cartridge slots on the printer (as follows: Full Half full 20% or less Ink low (flashing) Letters indicate ink color Ink expended Cartridge error or no cartridge ... button, insert the end of the cartridge whose icon and abbreviation is expended. Push in the expended cartridge to unlock the ink bay, then open when you can use them immediately with the printer turned off. 3. Epson Stylus Pro 11880 Menu HEAD ALIGNMENT NETWORK SETUP Item PAPER...
... cartridges with water. 10/07 Epson Stylus Pro 11880 - 5 The numbers below the ink icons on page 2). Then follow these steps to the 9 ink cartridge slots on the printer (as follows: Full Half full 20% or less Ink low (flashing) Letters indicate ink color Ink expended Cartridge error or no cartridge ... button, insert the end of the cartridge whose icon and abbreviation is expended. Push in the expended cartridge to unlock the ink bay, then open when you can use them immediately with the printer turned off. 3. Epson Stylus Pro 11880 Menu HEAD ALIGNMENT NETWORK SETUP Item PAPER...
Product Information Guide
Page 6
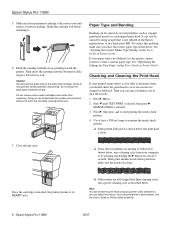
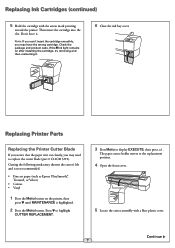
... Use at least 3 seconds. Epson Stylus Pro 11880 10/07 Make sure the replacement cartridge is clean. 7. Shake the cartridge well before installing it in the User's Guide or Printer Guide. Then insert the cartridge into the slot until TEST PRINT is not defined in the Epson printer driver or in the driver. ... a power cleaning cycle as described below , the print head is the correct color and remove it clicks in the User's Guide or Printer Guide. NOZZLE CHECK is not defined, use the printer's menu system to examine the nozzle check pattern. ❏ If the pattern looks...
... Use at least 3 seconds. Epson Stylus Pro 11880 10/07 Make sure the replacement cartridge is clean. 7. Shake the cartridge well before installing it in the User's Guide or Printer Guide. Then insert the cartridge into the slot until TEST PRINT is not defined in the Epson printer driver or in the driver. ... a power cleaning cycle as described below , the print head is the correct color and remove it clicks in the User's Guide or Printer Guide. NOZZLE CHECK is not defined, use the printer's menu system to examine the nozzle check pattern. ❏ If the pattern looks...
Product Information Guide
Page 7
...check again to start the power cleaning. 6. Press u or d until BI-D 2-COLOR is not sufficient to run the cleaning cycle. Press r, then select the paper type loaded in the printer. 1. Replacing the Cutter Blade If you can align the print head using the ... THICKNESS is highlighted. Press the button to ensure the best print quality. Make sure you can reinsert the old cartridge. Select CUTTER REPLACEMENT, then press r. 10/07 Epson Stylus Pro 11880 - 7 However, the power cycle uses a larger quantity of alignment to start the bi-directional black alignment process...
...check again to start the power cleaning. 6. Press u or d until BI-D 2-COLOR is not sufficient to run the cleaning cycle. Press r, then select the paper type loaded in the printer. 1. Replacing the Cutter Blade If you can align the print head using the ... THICKNESS is highlighted. Press the button to ensure the best print quality. Make sure you can reinsert the old cartridge. Select CUTTER REPLACEMENT, then press r. 10/07 Epson Stylus Pro 11880 - 7 However, the power cycle uses a larger quantity of alignment to start the bi-directional black alignment process...
Quick Reference Guide
Page 7
... make sure you start. Hole Note: If the ink cover doesn't open it . Check the LCD to see which cartridge is from the control panel. Ink color Part number 1 Vivid Light Magenta T591600 2 Light Light Black T591900 3 Matte Black T591800 4 Light Black T591700 5 Light Cyan... 9 Yellow T591400 3 Remove the expended ink cartridge from its package. Epson UltraChrome K3TM ink cartridges Slot no. If ink gets on . 1 Press the ink cover button to release it from the printer. Checking Ink Levels and Replacing Ink Cartridges Before you begin a large print job, you...
... make sure you start. Hole Note: If the ink cover doesn't open it . Check the LCD to see which cartridge is from the control panel. Ink color Part number 1 Vivid Light Magenta T591600 2 Light Light Black T591900 3 Matte Black T591800 4 Light Black T591700 5 Light Cyan... 9 Yellow T591400 3 Remove the expended ink cartridge from its package. Epson UltraChrome K3TM ink cartridges Slot no. If ink gets on . 1 Press the ink cover button to release it from the printer. Checking Ink Levels and Replacing Ink Cartridges Before you begin a large print job, you...
Quick Reference Guide
Page 8
... cutter blade (part # C12C815291). Replacing Ink Cartridges (continued) 5 Hold the cartridge with a blue plastic cover. Replacing Printer Parts Replacing the Printer Cutter Blade If you notice that the paper isn't cut cleanly, you may shorten the cutter's life and is not recommended: • Fine art paper (such as Epson UltraSmooth®, Textured, or Velvet) •...
... cutter blade (part # C12C815291). Replacing Ink Cartridges (continued) 5 Hold the cartridge with a blue plastic cover. Replacing Printer Parts Replacing the Printer Cutter Blade If you notice that the paper isn't cut cleanly, you may shorten the cutter's life and is not recommended: • Fine art paper (such as Epson UltraSmooth®, Textured, or Velvet) •...
Quick Reference Guide
Page 10
... in square centimeters EXECUTE Ink in milliliters and paper in square centimeters for the last 10 jobs; Menu Item PRINTER SETUP PLATEN GAP PAGE LINE ROLL PAPER MARGIN PAPER SIZE CHECK PAPER SKEW CHECK REFRESH MARGIN AUTO NOZZLE CHECK PRINT...cartridge Percentage of last upload (future enhancement) Continue 9 ▲ most recent job is number 0 Number of pages printed If Epson Device Management is number 0 Information about registered paper configurations MAINTENANCE CUTTER ADJUSTMENT CUTTER REPLACEMENT POWER CLEANING CLEAN EACH COLOR CLOCK SETTING CONTRAST ADJUSTMENT PRINTER...
... in square centimeters EXECUTE Ink in milliliters and paper in square centimeters for the last 10 jobs; Menu Item PRINTER SETUP PLATEN GAP PAGE LINE ROLL PAPER MARGIN PAPER SIZE CHECK PAPER SKEW CHECK REFRESH MARGIN AUTO NOZZLE CHECK PRINT...cartridge Percentage of last upload (future enhancement) Continue 9 ▲ most recent job is number 0 Number of pages printed If Epson Device Management is number 0 Information about registered paper configurations MAINTENANCE CUTTER ADJUSTMENT CUTTER REPLACEMENT POWER CLEANING CLEAN EACH COLOR CLOCK SETTING CONTRAST ADJUSTMENT PRINTER...
User's Guide
Page 5
...Important Safety Instructions 12 Ink Cartridge Safety Instructions 15 Printer Parts 16 Front 16 Back 16 Control Panel 17 LCD Display 17 1 Setting Up the Printer Unpacking and Assembling the Printer 19 Unpacking and Assembling the Stand 20 Unpacking the Printer 22 Mounting the Printer on the Stand 23 ...Take-up Reel 25 Installing the Take-up Reel Core and Paper Guides 29 Plugging in the Printer 31 Installing Ink 33 Connecting the Printer 35 Configuring the Network Interface 36 Updating Your Printer Firmware 37 Downloading the Firmware 37 Updating the Firmware 38 Configuring the...
...Important Safety Instructions 12 Ink Cartridge Safety Instructions 15 Printer Parts 16 Front 16 Back 16 Control Panel 17 LCD Display 17 1 Setting Up the Printer Unpacking and Assembling the Printer 19 Unpacking and Assembling the Stand 20 Unpacking the Printer 22 Mounting the Printer on the Stand 23 ...Take-up Reel 25 Installing the Take-up Reel Core and Paper Guides 29 Plugging in the Printer 31 Installing Ink 33 Connecting the Printer 35 Configuring the Network Interface 36 Updating Your Printer Firmware 37 Downloading the Firmware 37 Updating the Firmware 38 Configuring the...
User's Guide
Page 7
Contents | 7 4 Printing with Epson Drivers for Windows Choosing Basic Print Options 96 Selecting the Correct Media Type Setting 99 Choosing Printer Color Management Options 100 Choosing Roll Paper Options 102 Borderless Printing 104 Choosing Cut Sheet Paper Options 106 Choosing Page Layout ... Menu 124 Automatically Checking and Cleaning the Print Head 124 Running a Power Cleaning Cycle 125 Aligning the Print Head 126 Replacing Ink Cartridges 127 Changing the Date and Time 130 Using Maintenance Mode 131 Replacing the Paper Cutter Blade 132 Removing the Old Blade 132 Installing...
Contents | 7 4 Printing with Epson Drivers for Windows Choosing Basic Print Options 96 Selecting the Correct Media Type Setting 99 Choosing Printer Color Management Options 100 Choosing Roll Paper Options 102 Borderless Printing 104 Choosing Cut Sheet Paper Options 106 Choosing Page Layout ... Menu 124 Automatically Checking and Cleaning the Print Head 124 Running a Power Cleaning Cycle 125 Aligning the Print Head 126 Replacing Ink Cartridges 127 Changing the Date and Time 130 Using Maintenance Mode 131 Replacing the Paper Cutter Blade 132 Removing the Old Blade 132 Installing...
User's Guide
Page 8
... Electrical 159 Dimensions and Weight 159 Printer Interfaces 160 Safety Approvals 160 Media 160 Roll Paper 160 Cut Sheets 160 Printable Area 162 Ink Cartridges 162 Appendix Control Panel Menus 163 Epson Roll Paper Information and ICC Profiles 166 Epson Cut Sheet Paper Information and ICC Profiles 167 Managing Color With Profiles 168 Aligning the...
... Electrical 159 Dimensions and Weight 159 Printer Interfaces 160 Safety Approvals 160 Media 160 Roll Paper 160 Cut Sheets 160 Printable Area 162 Ink Cartridges 162 Appendix Control Panel Menus 163 Epson Roll Paper Information and ICC Profiles 166 Epson Cut Sheet Paper Information and ICC Profiles 167 Managing Color With Profiles 168 Aligning the...
User's Guide
Page 9
... other components, cleaning and aligning the print head, and using your printer. Notes contain important information about your printer, loading paper, using the Epson® printer drivers, and replacing ink cartridges. It also tells you how to maintain your printer to get the most out of your equipment. Tips contain additional hints on the CD-ROM...
... other components, cleaning and aligning the print head, and using your printer. Notes contain important information about your printer, loading paper, using the Epson® printer drivers, and replacing ink cartridges. It also tells you how to maintain your printer to get the most out of your equipment. Tips contain additional hints on the CD-ROM...
User's Guide
Page 10
...) 276-1305. 10 | Introduction Tip: Check the Epson Pro Imaging website at www.epsonstore.com (U.S. Options and Accessories Your Epson Stylus® Pro 11880 offers these user-replaceable items: Consumables and user-replaceable parts Part Replacement Ink Maintenance Tank (see page 135) Replacement Printer Cutter Blade (see page 132) Ink Cartridges Part number C12C890191 C12C815291 See page 128...
...) 276-1305. 10 | Introduction Tip: Check the Epson Pro Imaging website at www.epsonstore.com (U.S. Options and Accessories Your Epson Stylus® Pro 11880 offers these user-replaceable items: Consumables and user-replaceable parts Part Replacement Ink Maintenance Tank (see page 135) Replacement Printer Cutter Blade (see page 132) Ink Cartridges Part number C12C890191 C12C815291 See page 128...

User's Guide
Page 14
... refer servicing to qualified service personnel under the following conditions: The power cord or plug is damaged; liquid has entered the printer; the printer does not operate normally or exhibits a distinct change in performance. • The interface connectors and the connector for the Auto Take-up ...metal plate located in this product contain Perchlorate Material - special handling may apply, See www.dtsc.ca.gov/hazardouswaste/perchlorate. 14 the printer has been dropped or the cabinet damaged; Metal plate For California customers only: The lithium batteries in the upper left ink...
... refer servicing to qualified service personnel under the following conditions: The power cord or plug is damaged; liquid has entered the printer; the printer does not operate normally or exhibits a distinct change in performance. • The interface connectors and the connector for the Auto Take-up ...metal plate located in this product contain Perchlorate Material - special handling may apply, See www.dtsc.ca.gov/hazardouswaste/perchlorate. 14 the printer has been dropped or the cabinet damaged; Metal plate For California customers only: The lithium batteries in the upper left ink...

User's Guide
Page 15
Doing so may affect normal operation and printing. 15 However, each time the cartridge is inserted, some ink is consumed because the printer automatically performs a reliability check. • If you remove an ink cartridge for later use, protect the ink supply area from dirt and dust, and store it in ..., but care is a valve in the same environment as this product. This could damage the print head. • After bringing an ink cartridge inside from staining items that have been previously installed. Note that there is needed to prevent ink from a cold storage site, allow it to...
Doing so may affect normal operation and printing. 15 However, each time the cartridge is inserted, some ink is consumed because the printer automatically performs a reliability check. • If you remove an ink cartridge for later use, protect the ink supply area from dirt and dust, and store it in ..., but care is a valve in the same environment as this product. This could damage the print head. • After bringing an ink cartridge inside from staining items that have been previously installed. Note that there is needed to prevent ink from a cold storage site, allow it to...

User's Guide
Page 22
Lift the box up and away from around the printer. 4. Open the box and remove the roll paper, spindle, polystyrene foam, and cardboard cushions. 2. Remove the cardboard panels from the printer. Remove the plastic cover from the side as shown below. Remove the ink cartridges and other accessories from the printer. 1-22 Remove ink cartridges and accessories 3. 22 | Setting Up the Printer Unpacking the Printer 1.
Lift the box up and away from around the printer. 4. Open the box and remove the roll paper, spindle, polystyrene foam, and cardboard cushions. 2. Remove the cardboard panels from the printer. Remove the plastic cover from the side as shown below. Remove the ink cartridges and other accessories from the printer. 1-22 Remove ink cartridges and accessories 3. 22 | Setting Up the Printer Unpacking the Printer 1.

User's Guide
Page 23
Setting Up the Printer | 23 Note: The ink cartridges included with the printer are mainly for initial setup. 5. Make sure you have all the items shown below, in addition to keep the stand from rolling. Caster locks 1-23 Turn the two front casters and push down the locks to the printer: Power cord Roll paper and spindle 9 Ink cartridges 7 Paper guides Spindle adapters Mounting the Printer on the Stand 1.
Setting Up the Printer | 23 Note: The ink cartridges included with the printer are mainly for initial setup. 5. Make sure you have all the items shown below, in addition to keep the stand from rolling. Caster locks 1-23 Turn the two front casters and push down the locks to the printer: Power cord Roll paper and spindle 9 Ink cartridges 7 Paper guides Spindle adapters Mounting the Printer on the Stand 1.


