
Product Brochure
Page 4
... ink jet print head ever manufactured. With an even higher level of Creative Professionals who helped guide our engineering development to significantly raise the quality levels for superior direct printer control and operational status. We never forget the thousands of ink droplet accuracy, we never forget our heritage. Introducing the all -new Epson Stylus Pro 11880 is...
... ink jet print head ever manufactured. With an even higher level of Creative Professionals who helped guide our engineering development to significantly raise the quality levels for superior direct printer control and operational status. We never forget the thousands of ink droplet accuracy, we never forget our heritage. Introducing the all -new Epson Stylus Pro 11880 is...
Product Brochure
Page 5
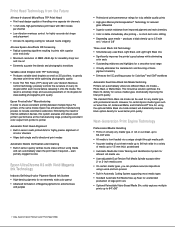
...) no short-term color shifting Depending upon media - The standard Photo Black ink mode can automatically utilize two different Black ink modes - or 3-inch media cores On certain media types, you can automatically clean the print head if required - Epson PreciseColor™ Manufacturing In order to ensure consistent printing between multiple Stylus Pro printers of the same model...
...) no short-term color shifting Depending upon media - The standard Photo Black ink mode can automatically utilize two different Black ink modes - or 3-inch media cores On certain media types, you can automatically clean the print head if required - Epson PreciseColor™ Manufacturing In order to ensure consistent printing between multiple Stylus Pro printers of the same model...
Product Brochure
Page 6
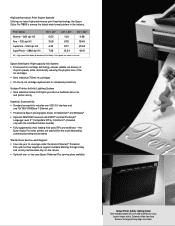
... 10/100/1000Base-T Ethernet port Professional Epson photographic drivers for larger printing shops and studios. the Epson Stylus Pro series printers are used to identify ink status to print engine activity. High-performance Print Engine SpeedsB Utilizing our latest high-performance print head technology, the Epson Stylus Pro 11880 is among the fastest wide-format printers in min:sec. Print Mode 16" x 20" 20" x 30" 40...
... 10/100/1000Base-T Ethernet port Professional Epson photographic drivers for larger printing shops and studios. the Epson Stylus Pro series printers are used to identify ink status to print engine activity. High-performance Print Engine SpeedsB Utilizing our latest high-performance print head technology, the Epson Stylus Pro 11880 is among the fastest wide-format printers in min:sec. Print Mode 16" x 20" 20" x 30" 40...

Product Brochure
Page 8
realtime switch; no condensation) Product/Accessories Epson Stylus Pro 11880 Printer Epson Stylus Pro 11880 ColorBurst Edition Includes ColorBurst® RIP Additional One-year Epson Preferred Plus service Additional Two-year Epson Preferred Plus service Retractable Fabric-Based Media Bin Additional 64" Wide Media Take-up to three different droplet sizes per print line Resolution 2880 x 1440 dpi; 1440 x 720 dpi; 720 x 720...
realtime switch; no condensation) Product/Accessories Epson Stylus Pro 11880 Printer Epson Stylus Pro 11880 ColorBurst Edition Includes ColorBurst® RIP Additional One-year Epson Preferred Plus service Additional Two-year Epson Preferred Plus service Retractable Fabric-Based Media Bin Additional 64" Wide Media Take-up to three different droplet sizes per print line Resolution 2880 x 1440 dpi; 1440 x 720 dpi; 720 x 720...
Product Information Guide
Page 6
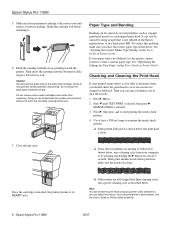
...Checking and Cleaning the Print Head If your printer utility software or, you should check the print head to examine the nozzle check pattern. ❏ If the pattern looks good as described below , the print head is selected. 3. Once the cartridge is the correct color and remove it clicks...cartridge. See "Selecting the Correct Media Type Setting" in the User's Guide or Printer Guide. Press r Menu. 2. Then print another nozzle check pattern to create a custom paper type. Epson Stylus Pro 11880 10/07 Shake the cartridge well before installing it in a third-party RIP. Do...
...Checking and Cleaning the Print Head If your printer utility software or, you should check the print head to examine the nozzle check pattern. ❏ If the pattern looks good as described below , the print head is selected. 3. Once the cartridge is the correct color and remove it clicks...cartridge. See "Selecting the Correct Media Type Setting" in the User's Guide or Printer Guide. Press r Menu. 2. Then print another nozzle check pattern to create a custom paper type. Epson Stylus Pro 11880 10/07 Shake the cartridge well before installing it in a third-party RIP. Do...
Product Information Guide
Page 7
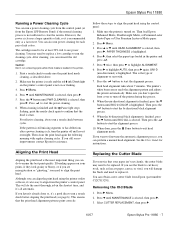
... vinyl, you can also run power cleaning for instructions. Epson Stylus Pro 11880 Running a Power Cleaning Cycle You can run a power cleaning cycle from the control panel (or from Epson (part number C12C815291). You can perform a manual head alignment. The cartridges need to run a nozzle check between cycles. Print a nozzle check to start the alignment process. Press...
... vinyl, you can also run power cleaning for instructions. Epson Stylus Pro 11880 Running a Power Cleaning Cycle You can run a power cleaning cycle from the control panel (or from Epson (part number C12C815291). You can perform a manual head alignment. The cartridges need to run a nozzle check between cycles. Print a nozzle check to start the alignment process. Press...

Product Information Guide
Page 8
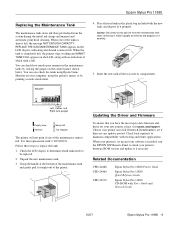
Epson Stylus Pro 11880 4. Open the front cover. 9. Hold down on the left . 8. Epson Stylus Pro 11880 10/07 Do not touch the black parts inside the printer or the cables around the print head. Insert the new cutter as shown and turn the latch to slide the carriage by hand, or .... Caution: Do not try to the right. Caution: Wrap the used cutter blade and dispose of the print head. 7. Caution: To avoid damaging the printer, make sure you may damage the printer. 5. Be careful when removing it : 1. Carefully remove the cutter blade. Make sure the spring doesn't...
Epson Stylus Pro 11880 4. Open the front cover. 9. Hold down on the left . 8. Epson Stylus Pro 11880 10/07 Do not touch the black parts inside the printer or the cables around the print head. Insert the new cutter as shown and turn the latch to slide the carriage by hand, or .... Caution: Do not try to the right. Caution: Wrap the used cutter blade and dispose of the print head. 7. Caution: To avoid damaging the printer, make sure you may damage the printer. 5. Be careful when removing it : 1. Carefully remove the cutter blade. Make sure the spring doesn't...
Product Information Guide
Page 9
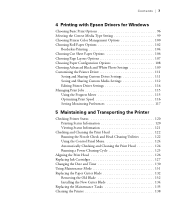
... Documentation CPD-24468 CPD-24469 CPD-24519 Epson Stylus Pro 11880 Printer Guide Epson Stylus Pro 11880 Quick Reference Guide Epson Stylus Pro 11880 CD-ROM with existing and future applications. Choose your new printer, please visit epson.com/support. Left, Center, and Right tank guages Empty (new) Half full Nearly full Full (replace) The printer will not print if one of which tank needs to spill...
... Documentation CPD-24468 CPD-24469 CPD-24519 Epson Stylus Pro 11880 Printer Guide Epson Stylus Pro 11880 Quick Reference Guide Epson Stylus Pro 11880 CD-ROM with existing and future applications. Choose your new printer, please visit epson.com/support. Left, Center, and Right tank guages Empty (new) Half full Nearly full Full (replace) The printer will not print if one of which tank needs to spill...

Quick Reference Guide
Page 6
... need to start the alignment process. Aligning the Print Head If your Printer Guide for 3 seconds. Load Epson Doubleweight Matte, Ultra Premium Presentation Paper Matte, Enhanced Matte, Ultra Premium Photo Paper Luster, or Premium Luster Photo Paper. 2 Press the Menu button. 3 Press the or button until BI-D 2-COLOR is highlighted, then press Menu. 3 Select one...
... need to start the alignment process. Aligning the Print Head If your Printer Guide for 3 seconds. Load Epson Doubleweight Matte, Ultra Premium Presentation Paper Matte, Enhanced Matte, Ultra Premium Photo Paper Luster, or Premium Luster Photo Paper. 2 Press the Menu button. 3 Press the or button until BI-D 2-COLOR is highlighted, then press Menu. 3 Select one...
User's Guide
Page 7
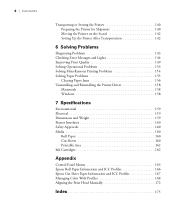
Contents | 7 4 Printing with Epson Drivers for Windows Choosing Basic Print Options 96 Selecting the Correct Media Type Setting 99 Choosing Printer Color Management Options 100 Choosing Roll Paper Options 102 Borderless Printing 104 Choosing Cut Sheet Paper Options 106 Choosing Page Layout... the Printer Checking Printer Status 120 Printing Status Information 120 Viewing Status Information 121 Checking and Cleaning the Print Head 122 Running the Nozzle Check and Head Cleaning Utilities 122 Using the Control Panel Menu 124 Automatically Checking and Cleaning the Print Head 124 ...
Contents | 7 4 Printing with Epson Drivers for Windows Choosing Basic Print Options 96 Selecting the Correct Media Type Setting 99 Choosing Printer Color Management Options 100 Choosing Roll Paper Options 102 Borderless Printing 104 Choosing Cut Sheet Paper Options 106 Choosing Page Layout... the Printer Checking Printer Status 120 Printing Status Information 120 Viewing Status Information 121 Checking and Cleaning the Print Head 122 Running the Nozzle Check and Head Cleaning Utilities 122 Using the Control Panel Menu 124 Automatically Checking and Cleaning the Print Head 124 ...
User's Guide
Page 8
...Error Messages and Lights 144 Improving Print Quality 149 Solving Operational Problems 153 Solving Miscellaneous Printing Problems 154 Solving Paper Problems 155 Clearing Paper Jams 156 Uninstalling and Reinstalling the Printer Driver 158 Macintosh 158 Windows 158...Printer Interfaces 160 Safety Approvals 160 Media 160 Roll Paper 160 Cut Sheets 160 Printable Area 162 Ink Cartridges 162 Appendix Control Panel Menus 163 Epson Roll Paper Information and ICC Profiles 166 Epson Cut Sheet Paper Information and ICC Profiles 167 Managing Color With Profiles 168 Aligning the Print Head...
...Error Messages and Lights 144 Improving Print Quality 149 Solving Operational Problems 153 Solving Miscellaneous Printing Problems 154 Solving Paper Problems 155 Clearing Paper Jams 156 Uninstalling and Reinstalling the Printer Driver 158 Macintosh 158 Windows 158...Printer Interfaces 160 Safety Approvals 160 Media 160 Roll Paper 160 Cut Sheets 160 Printable Area 162 Ink Cartridges 162 Appendix Control Panel Menus 163 Epson Roll Paper Information and ICC Profiles 166 Epson Cut Sheet Paper Information and ICC Profiles 167 Managing Color With Profiles 168 Aligning the Print Head...
User's Guide
Page 9
... handy summary of procedures for daily use on a network. • The Printer Guide is a printed version of your printer, loading paper, using the Epson® printer drivers, and replacing ink cartridges. It also tells you have a problem. ...printer. Attach it working at its best, and provides troubleshooting tips in case you how to your equipment. 9 Introduction This User's Guide provides important information on setting up and configure the printer for use and printer maintenance-loading paper, replacing ink cartridges and other components, cleaning and aligning the print head...
... handy summary of procedures for daily use on a network. • The Printer Guide is a printed version of your printer, loading paper, using the Epson® printer drivers, and replacing ink cartridges. It also tells you have a problem. ...printer. Attach it working at its best, and provides troubleshooting tips in case you how to your equipment. 9 Introduction This User's Guide provides important information on setting up and configure the printer for use and printer maintenance-loading paper, replacing ink cartridges and other components, cleaning and aligning the print head...
User's Guide
Page 13
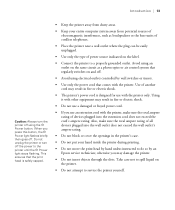
...the openings in fire or electric shock. • The printer's power cord is safely capped. • Keep the printer away from dusty areas. • Keep your hand inside the printer during printing. • Do not move the print head by an Epson service technician; Avoid using an outlet on the same ...circuit as a photocopier or air control system that regularly switches on the printer. • Do not attempt to do so...
...the openings in fire or electric shock. • The printer's power cord is safely capped. • Keep the printer away from dusty areas. • Keep your hand inside the printer during printing. • Do not move the print head by an Epson service technician; Avoid using an outlet on the same ...circuit as a photocopier or air control system that regularly switches on the printer. • Do not attempt to do so...

User's Guide
Page 15
...eyes, flush them immediately with soap and water. Note that there is a valve in the same environment as this product. This could damage the print head. • After bringing an ink cartridge inside from dirt and dust, and store it off with water. • Shake ink cartridges well before... hours before installing them . Doing so may affect normal operation and printing. 15 If ink gets in your skin, wash it in the ink supply port, making covers or plugs unnecessary, but care is consumed because the printer automatically performs a reliability check. • If you remove an ink...
...eyes, flush them immediately with soap and water. Note that there is a valve in the same environment as this product. This could damage the print head. • After bringing an ink cartridge inside from dirt and dust, and store it off with water. • Shake ink cartridges well before... hours before installing them . Doing so may affect normal operation and printing. 15 If ink gets in your skin, wash it in the ink supply port, making covers or plugs unnecessary, but care is consumed because the printer automatically performs a reliability check. • If you remove an ink...

User's Guide
Page 31
... bolts and brackets in the Printer 1. Caution: To avoid damaging the printer, be careful not to touch the cables around the print head. 3. Unlock the front casters. Setting Up the Printer | 31 Plugging in case you move the printer to the place of the print head compartment. Loosen the bolts and... remove the two metal brackets from the printer and the protetive materials inside the ...
... bolts and brackets in the Printer 1. Caution: To avoid damaging the printer, be careful not to touch the cables around the print head. 3. Unlock the front casters. Setting Up the Printer | 31 Plugging in case you move the printer to the place of the print head compartment. Loosen the bolts and... remove the two metal brackets from the printer and the protetive materials inside the ...

User's Guide
Page 39
... need to start the firmware updating process. (If it is updating. Make sure your printer is on page 126. 5. If the firmware version of the file is newer, click Update to align the print head, as described on , its LCD displays Ready, and it is the same, you just..., then choose your network. 1-39 Setting Up the Printer | 39 You see the Firmware Updater window. If the print quality is satisfactory, your setup is complete, close the Firmware Updater window and Epson LFP Remote window. Caution: Don't turn off the printer while the firmware is connected to update.) 8.
... need to start the firmware updating process. (If it is updating. Make sure your printer is on page 126. 5. If the firmware version of the file is newer, click Update to align the print head, as described on , its LCD displays Ready, and it is the same, you just..., then choose your network. 1-39 Setting Up the Printer | 39 You see the Firmware Updater window. If the print quality is satisfactory, your setup is complete, close the Firmware Updater window and Epson LFP Remote window. Caution: Don't turn off the printer while the firmware is connected to update.) 8.

User's Guide
Page 66
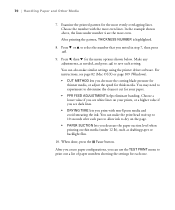
...; 60 inches. otherwise, the printer may be damaged. 4. Feed the posterboard into the paper slot until appears on Epson Enhanced Matte Posterboard or other heavy stock up fully and close the roll paper cover. 2. If the paper lever is locked, press and hold the button for printing. You can print on the LCD display.... (The cover has a lip that acts as a paper support.) 5. Make sure the Paper Check light is loaded for 3 seconds to touch the cables around the print head;
...; 60 inches. otherwise, the printer may be damaged. 4. Feed the posterboard into the paper slot until appears on Epson Enhanced Matte Posterboard or other heavy stock up fully and close the roll paper cover. 2. If the paper lever is locked, press and hold the button for printing. You can print on the LCD display.... (The cover has a lip that acts as a paper support.) 5. Make sure the Paper Check light is loaded for 3 seconds to touch the cables around the print head;
User's Guide
Page 70
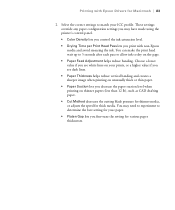
... 10. Choose a lower value if you decrease the paper suction level when printing on your paper. • PPR FEED ADJUSTMENT helps eliminate banding. After you create paper configurations, you can make similar settings using the printer driver software. In the example shown above, the lines under 12 lb), ...white lines on thin media (under number 4 are the most evenly overlapping lines. Choose the number with non-Epson media and avoid smearing the ink. You can also make the print head wait up to 10 seconds after each pass to allow ink to dry on the page. • PAPER ...
... 10. Choose a lower value if you decrease the paper suction level when printing on your paper. • PPR FEED ADJUSTMENT helps eliminate banding. After you create paper configurations, you can make similar settings using the printer driver software. In the example shown above, the lines under 12 lb), ...white lines on thin media (under number 4 are the most evenly overlapping lines. Choose the number with non-Epson media and avoid smearing the ink. You can also make the print head wait up to 10 seconds after each pass to allow ink to dry on the page. • PAPER ...
User's Guide
Page 83
...determine the best setting for your paper. • Platen Gap lets you print with Epson Drivers for Macintosh | 83 2. You can make the print head wait up to 5 seconds after each pass to allow ink to match your prints, or a higher value if you see dark lines. • Paper Thickness... blade pressure for thinner media, or adjusts the speed for various paper thicknesses. 3-83 You may have made using the printer's control panel. • Color Density lets you control the ink saturation level. • Drying Time per Print Head Pass lets you fine-tune the setting for thick media.
...determine the best setting for your paper. • Platen Gap lets you print with Epson Drivers for Macintosh | 83 2. You can make the print head wait up to 5 seconds after each pass to allow ink to match your prints, or a higher value if you see dark lines. • Paper Thickness... blade pressure for thinner media, or adjusts the speed for various paper thicknesses. 3-83 You may have made using the printer's control panel. • Color Density lets you control the ink saturation level. • Drying Time per Print Head Pass lets you fine-tune the setting for thick media.

User's Guide
Page 109
... for various paper thicknesses. 2. You may have made using the printer's control panel. • Color Density lets you control the ink saturation level (for example, when you turn off color management in your printer software). • Drying Time per Print Head Pass lets you print with Epson Drivers for Windows | 109 Select the correct settings to match your...
... for various paper thicknesses. 2. You may have made using the printer's control panel. • Color Density lets you control the ink saturation level (for example, when you turn off color management in your printer software). • Drying Time per Print Head Pass lets you print with Epson Drivers for Windows | 109 Select the correct settings to match your...


