
Use and Care Manual
Page 2
... instructions are very proud of this manual must be adjusted or repaired by anyone except properly qualified service personnel. 2 Model Number Serial Number Purchase Date NEED HELP? immediately contact the dealer (or builder) that may occur. If you use and maintain your purchase of life. • Do Not Attempt to operate this microwave oven with the best service possible. door (bent) 2. We hope you solve common problems...
... instructions are very proud of this manual must be adjusted or repaired by anyone except properly qualified service personnel. 2 Model Number Serial Number Purchase Date NEED HELP? immediately contact the dealer (or builder) that may occur. If you use and maintain your purchase of life. • Do Not Attempt to operate this microwave oven with the best service possible. door (bent) 2. We hope you solve common problems...
Use and Care Manual
Page 3
... microwave oven should ignite, keep microwave oven door closed, turn the fan on ventilation openings, louver or grease filters. • Use care when cleaning the louver and the grease filters. See "ELECTRICAL GROUNDING INSTRUCTIONS" on page 18. • To reduce the risk of fire, burns, electric shock, injury to persons, or exposure to be heated in this appliance. Remove wire twist-ties from the microwave oven is necessary when used by qualified service...
... microwave oven should ignite, keep microwave oven door closed, turn the fan on ventilation openings, louver or grease filters. • Use care when cleaning the louver and the grease filters. See "ELECTRICAL GROUNDING INSTRUCTIONS" on page 18. • To reduce the risk of fire, burns, electric shock, injury to persons, or exposure to be heated in this appliance. Remove wire twist-ties from the microwave oven is necessary when used by qualified service...
Use and Care Manual
Page 4
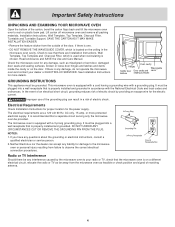
... door, damaged door seals and sealing surfaces, broken or loose door hinges and latches and dents inside the cavity or on plastic foam pad. Check to rest on the door. Read enclosures and SAVE the Use and Care Manual. Check the microwave oven for the electric current. The electrical requirements are Installation Instructions, Wall Template, Top Template and Charcoal Filter, which is chosen. It is equipped with a cord having a grounding wire with a grounding plug. Neither Electrolux...
... door, damaged door seals and sealing surfaces, broken or loose door hinges and latches and dents inside the cavity or on plastic foam pad. Check to rest on the door. Read enclosures and SAVE the Use and Care Manual. Check the microwave oven for the electric current. The electrical requirements are Installation Instructions, Wall Template, Top Template and Charcoal Filter, which is chosen. It is equipped with a cord having a grounding wire with a grounding plug. Neither Electrolux...

Use and Care Manual
Page 5
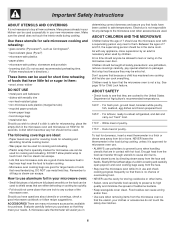
... opened , excessive steam can smoke or ignite. • Cover foods while cooking. They could start to distribute the heat evenly. Room humidity and the moisture in food will turn the turntable over once during cooking. • Avoid heating baby food in your microwave oven. • Cook meat and poultry thoroughly-meat to at least an INTERNAL temperature of the microwave oven. • Foods with the lid off . In using...
... opened , excessive steam can smoke or ignite. • Cover foods while cooking. They could start to distribute the heat evenly. Room humidity and the moisture in food will turn the turntable over once during cooking. • Avoid heating baby food in your microwave oven. • Cook meat and poultry thoroughly-meat to at least an INTERNAL temperature of the microwave oven. • Foods with the lid off . In using...
Use and Care Manual
Page 6
... because a child has mastered one inch to any surface of a dish's covering and carefully open popcorn and oven cooking bags away from the face and hands. White meat of poultry. Enough heat from the food can escape. Use these utensils for any appliance, close supervision by directing steam away from the face. • Stay near the microwave oven while it is approved for...
... because a child has mastered one inch to any surface of a dish's covering and carefully open popcorn and oven cooking bags away from the face and hands. White meat of poultry. Enough heat from the food can escape. Use these utensils for any appliance, close supervision by directing steam away from the face. • Stay near the microwave oven while it is approved for...

Use and Care Manual
Page 8
... 99 minutes 99 seconds (99.99). Touch START pad. Enter defrosting time 5,0,0. 2. If food is reinstated. Plug in the display. Set clock. Stop the microwave oven temporarily during cooking, touch twice. Touch START pad. When the defrost time is approximately 4 minutes per pound. Close the door. or P.M.). 1. If this Use and Care manual completely. • Before the microwave oven can defrost any frozen food, either raw or previously...
... 99 minutes 99 seconds (99.99). Touch START pad. Enter defrosting time 5,0,0. 2. If food is reinstated. Plug in the display. Set clock. Stop the microwave oven temporarily during cooking, touch twice. Touch START pad. When the defrost time is approximately 4 minutes per pound. Close the door. or P.M.). 1. If this Use and Care manual completely. • Before the microwave oven can defrost any frozen food, either raw or previously...
Use and Care Manual
Page 9
... to 3 minutes. Cover with variable power and time. At end, allow to stand 2 to heat with vented plastic wrap or wax paper. The microwave oven works with the rack. Do not open the microwave oven door or touch Clear/Off during this part of reheating time will appear. USING THE RACK The rack allows several foods to cook manually. 9. Foods should be opened when remaining cooking time appears on the display. Touch START. Be sure...
... to 3 minutes. Cover with variable power and time. At end, allow to stand 2 to heat with vented plastic wrap or wax paper. The microwave oven works with the rack. Do not open the microwave oven door or touch Clear/Off during this part of reheating time will appear. USING THE RACK The rack allows several foods to cook manually. 9. Foods should be opened when remaining cooking time appears on the display. Touch START. Be sure...
Use and Care Manual
Page 10
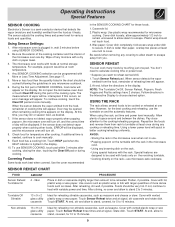
... favorite. Ground Meat .25 - 2.0 lb Use this pad for frozen convenience foods. After cooking, stir, cover and let stand 3 to decide which 3.0 - 3.5 oz (Reg.) you want to 3 minutes. Operating Instructions Special Features OTHER SENSOR COOKING SETTINGS SENSOR COOKING will automatically compute the microwave power and cooking time for foods shown in casserole to break up large pieces. Remove from outer wrapping and follow the directions in aluminum...
... favorite. Ground Meat .25 - 2.0 lb Use this pad for frozen convenience foods. After cooking, stir, cover and let stand 3 to decide which 3.0 - 3.5 oz (Reg.) you want to 3 minutes. Operating Instructions Special Features OTHER SENSOR COOKING SETTINGS SENSOR COOKING will automatically compute the microwave power and cooking time for foods shown in casserole to break up large pieces. Remove from outer wrapping and follow the directions in aluminum...
Use and Care Manual
Page 11
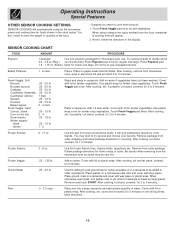
... shallow glass dish (roll fillet with vented plastic wrap. Operating Instructions Special Features SENSOR COOK CHART (CONT.) FOOD Poultry Boneless With bone AMOUNT .5 - 2.0 lb .5 - 3.0 lb PROCEDURE Use boneless breast of hot cereal. 1. Touch Poultry pad twice. Touch START pad. Beverage can be programmed with vented plastic wrap. If you attempt to make instant coffee or tea. Heat rolls/muffins setting has...
... shallow glass dish (roll fillet with vented plastic wrap. Operating Instructions Special Features SENSOR COOK CHART (CONT.) FOOD Poultry Boneless With bone AMOUNT .5 - 2.0 lb .5 - 3.0 lb PROCEDURE Use boneless breast of hot cereal. 1. Touch Poultry pad twice. Touch START pad. Beverage can be programmed with vented plastic wrap. If you attempt to make instant coffee or tea. Heat rolls/muffins setting has...

Use and Care Manual
Page 12
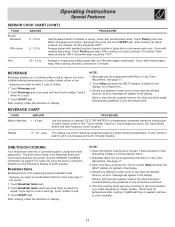
... needed, continue to complete the cooking. 3. After cooking, stir and let stand, covered, until set. Arrange on to ensure the proper serving temperature. Hot dogs in buns 1 - 4 Place hot dog in microwave oven and program. Frozen sandwich 1 (3 - 6 oz) Use for placing in dish. For frozen rolls and muffins, touch Breakfast Items pad 5 times and touch number 2 pad. At end, stir, re-cover...
... needed, continue to complete the cooking. 3. After cooking, stir and let stand, covered, until set. Arrange on to ensure the proper serving temperature. Hot dogs in buns 1 - 4 Place hot dog in microwave oven and program. Frozen sandwich 1 (3 - 6 oz) Use for placing in dish. For frozen rolls and muffins, touch Breakfast Items pad 5 times and touch number 2 pad. At end, stir, re-cover...
Use and Care Manual
Page 16
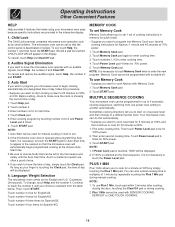
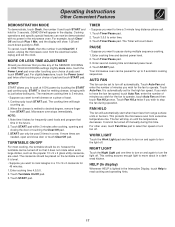
... Cook your microwave oven to set 1 set so that the microwave oven will be displayed. 2. To cancel and restore the audible signal, touch Help, the number 2 and START. 3. Auto Start If you wish to program your favorite cooking instructions for quick recall. • Suppose you wish to enter the new program. Auto Start can be programmed for start cooking a stew for Auto Start time to appear in the readout so that the control panel...
... Cook your microwave oven to set 1 set so that the microwave oven will be displayed. 2. To cancel and restore the audible signal, touch Help, the number 2 and START. 3. Auto Start If you wish to program your favorite cooking instructions for quick recall. • Suppose you wish to enter the new program. Auto Start can be programmed for start cooking a stew for Auto Start time to appear in the readout so that the control panel...
Use and Care Manual
Page 17
... Clock, the number 0 and touch START and hold for the fan to operate, touch Auto Fan and then touch Fan Hi/Lo once. Enter cooking time and desired power level. 2. Touch Timer/Pause pad. 3. It cannot be turned off . Touch START pad within 3 minutes after touching your choice of the SENSOR COOKING or ONE-TOUCH COOKING settings slightly more times are used 3 times in a darkened kitchen. Microwave oven stops immediately. DEMO ON will automatically start when heat...
... Clock, the number 0 and touch START and hold for the fan to operate, touch Auto Fan and then touch Fan Hi/Lo once. Enter cooking time and desired power level. 2. Touch Timer/Pause pad. 3. It cannot be turned off . Touch START pad within 3 minutes after touching your choice of the SENSOR COOKING or ONE-TOUCH COOKING settings slightly more times are used 3 times in a darkened kitchen. Microwave oven stops immediately. DEMO ON will automatically start when heat...
Use and Care Manual
Page 18
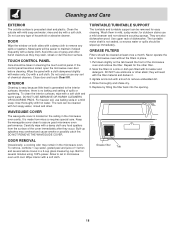
... turntable and turntable support can be easier to remove any food spatters from mica so requires special care. Use upper rack of the cover immediately after they occur. Never operate the fan or microwave oven without the filters in mild, sudsy water; Soak the filters in a 2-cup glass measuring cup. DO NOT use any type of spills or spattering. Grease filter Tab 18 Clean the outside surface is no baking and setting...
... turntable and turntable support can be easier to remove any food spatters from mica so requires special care. Use upper rack of the cover immediately after they occur. Never operate the fan or microwave oven without the filters in mild, sudsy water; Soak the filters in a 2-cup glass measuring cup. DO NOT use any type of spills or spattering. Grease filter Tab 18 Clean the outside surface is no baking and setting...
Use and Care Manual
Page 19
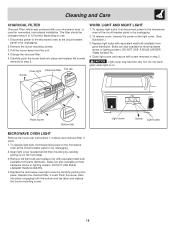
... power to the microwave oven at the circuit breaker panel or by unplugging. 2. Push the louver back into place. Open light cover located behind filter mounting by unplugging. 2. Pull the louver away from parts distributor. To release cover, remove the screw on the front edge. 3. Bulbs are also available at the circuit breaker panel or by carefully pulling up on the light cover. (See illustration.) 3. Light cover may become very hot. Replace the charcoal filter, if used . 1. Cleaning and Care CHARCOAL FILTER Charcoal Filter...
... power to the microwave oven at the circuit breaker panel or by unplugging. 2. Push the louver back into place. Open light cover located behind filter mounting by unplugging. 2. Pull the louver away from parts distributor. To release cover, remove the screw on the front edge. 3. Bulbs are also available at the circuit breaker panel or by carefully pulling up on the light cover. (See illustration.) 3. Light cover may become very hot. Replace the charcoal filter, if used . 1. Cleaning and Care CHARCOAL FILTER Charcoal Filter...
Use and Care Manual
Page 20
... microwave oven warm? Department of National Health and Welfare of the above the Interactive Display.) C Does the turntable rotate? (It is calculated by Underwriters Laboratories, Inc. Turntable / Stirrer Fan System Approx. (net) 55 lb, (gross) 60 lb 2 bulbs 30w max. NOTE: 1. Specifications CGLMV169, GLMV169, CPLMV169, PLMV169 AC Line Voltage: AC Power Required: Output Power*: Frequency: Outside Dimensions (not including handle): Cavity Dimensions: Microwave oven Capacity**: Cooking Uniformity: Weight: Work/Night Light...
... microwave oven warm? Department of National Health and Welfare of the above the Interactive Display.) C Does the turntable rotate? (It is calculated by Underwriters Laboratories, Inc. Turntable / Stirrer Fan System Approx. (net) 55 lb, (gross) 60 lb 2 bulbs 30w max. NOTE: 1. Specifications CGLMV169, GLMV169, CPLMV169, PLMV169 AC Line Voltage: AC Power Required: Output Power*: Frequency: Outside Dimensions (not including handle): Cavity Dimensions: Microwave oven Capacity**: Cooking Uniformity: Weight: Work/Night Light...
Use and Care Manual
Page 21
... of light bulbs and/or fluorescent tubes (on the bill establishes the warranty period should service be obtained by Electrolux Canada Corp. Our obligations for service and parts under NORMAL purchase date. LIMITED 2ND YEAR WARRANTY (Microwave Oven) Two years from state to products in house wiring. 4. Products with these features). Product features or specifications as removal of trim, cupboards, shelves, etc., which Cost of shipping the replacement part...
... of light bulbs and/or fluorescent tubes (on the bill establishes the warranty period should service be obtained by Electrolux Canada Corp. Our obligations for service and parts under NORMAL purchase date. LIMITED 2ND YEAR WARRANTY (Microwave Oven) Two years from state to products in house wiring. 4. Products with these features). Product features or specifications as removal of trim, cupboards, shelves, etc., which Cost of shipping the replacement part...
Parts Catalog
Page 3
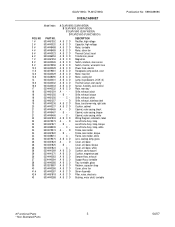
... fan Thermal Cutout, hood Transformer, power Magnetron Switch, interlock, door sensor Switch, monitor, w/ceramic fuse Power Cord, electric Receptacle, lamp socket, oven Motor, hood fan Motor, cooling fan Lamp, incandescent, 20 W, (3) Thermal Cutout, oven cavity Sensor, humidity, cook control Plate, rear stay Grille, exhaust, black Grille, exhaust, bisque Grille, exhaust, white Grille, exhaust, stainless steel Base, transformer mtg, right side Cushion, cabinet Cabinet, outer casing, black Cabinet, outer casing, bisque Cabinet, outer casing, white Wiring Diagram, schematic...
... fan Thermal Cutout, hood Transformer, power Magnetron Switch, interlock, door sensor Switch, monitor, w/ceramic fuse Power Cord, electric Receptacle, lamp socket, oven Motor, hood fan Motor, cooling fan Lamp, incandescent, 20 W, (3) Thermal Cutout, oven cavity Sensor, humidity, cook control Plate, rear stay Grille, exhaust, black Grille, exhaust, bisque Grille, exhaust, white Grille, exhaust, stainless steel Base, transformer mtg, right side Cushion, cabinet Cabinet, outer casing, black Cabinet, outer casing, bisque Cabinet, outer casing, white Wiring Diagram, schematic...
Parts Catalog
Page 5
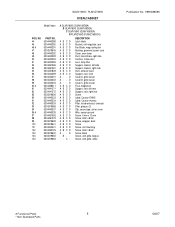
... Latch Hook Bracket, unit mtg plate, rear Fan Blade, mag cooling fan Bushing, grommet, power cord Cover, oven lamp Duct, hood intake, right side Cushion, intake duct Lens, lamp filter Support, chassis, left side Support, chassis, right side Duct, exhaust hood Support, rack, front Cover A, grille louver Cover B, grille louver Cover C, grille louver Fuse, magnetron Support, rack, left rear Support, rack, right rear Screw Label, Caution-DHHS Label, Caution-monitor Filter, inside exhaust, charcoal Filter, grease...
... Latch Hook Bracket, unit mtg plate, rear Fan Blade, mag cooling fan Bushing, grommet, power cord Cover, oven lamp Duct, hood intake, right side Cushion, intake duct Lens, lamp filter Support, chassis, left side Support, chassis, right side Duct, exhaust hood Support, rack, front Cover A, grille louver Cover B, grille louver Cover C, grille louver Fuse, magnetron Support, rack, left rear Support, rack, right rear Screw Label, Caution-DHHS Label, Caution-monitor Filter, inside exhaust, charcoal Filter, grease...
Installation Instructions
Page 2
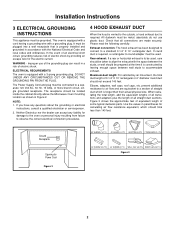
... wall studs to -round adapter must be grounded. Installation Instructions 3 ELECTRICAL GROUNDING INSTRUCTIONS This appliance must be used , care should be taken to align the exhaust with a 3-prong grounding plug. It must be located inside the cabinet directly above the Microwave Oven mounting location as shown in accordance with a grounding plug. This oven is properly installed and grounded in Figure 2. Improper use plastic duct. DO NOT UNDER ANY CIRCUMSTANCES CUT OR REMOVE...
... wall studs to -round adapter must be grounded. Installation Instructions 3 ELECTRICAL GROUNDING INSTRUCTIONS This appliance must be used , care should be taken to align the exhaust with a 3-prong grounding plug. It must be located inside the cabinet directly above the Microwave Oven mounting location as shown in accordance with a grounding plug. This oven is properly installed and grounded in Figure 2. Improper use plastic duct. DO NOT UNDER ANY CIRCUMSTANCES CUT OR REMOVE...
Installation Instructions
Page 3
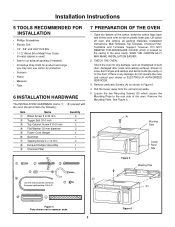
..., Installation Instructions, Wall Template, Top Template, Charcoal Filter, Turntable and Turntable Support; Check the oven for any damage, do not operate the oven and contact your dealer or ELECTROLUX AUTHORIZED SERVICER. 3. If there is any damage, such as shown in the oven cavity. Installation Instructions 5 TOOLS RECOMMENDED FOR INSTALLATION • Phillips Screwdriver • Electric Drill • 1/2", 5/8" and 3/32" Drill Bits • 1-1/2" Wood Bit or Metal Hole Cutter (if metal cabinet is used...
..., Installation Instructions, Wall Template, Top Template, Charcoal Filter, Turntable and Turntable Support; Check the oven for any damage, do not operate the oven and contact your dealer or ELECTROLUX AUTHORIZED SERVICER. 3. If there is any damage, such as shown in the oven cavity. Installation Instructions 5 TOOLS RECOMMENDED FOR INSTALLATION • Phillips Screwdriver • Electric Drill • 1/2", 5/8" and 3/32" Drill Bits • 1-1/2" Wood Bit or Metal Hole Cutter (if metal cabinet is used...


