
Use and Care Manual
Page 1
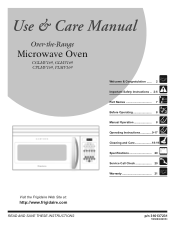
Over-the-Range Microwave Oven CGLMV169, GLMV169 CPLMV169, PLMV169 Visit the Frigidaire Web Site at: http://www.frigidaire.com READ AND SAVE THESE INSTRUCTIONS Welcome & Congratulation ...... 2 Important Safety Instructions .. 2-6 Part Names 7 Before Operating 8 Manual Operation 8 Operating Instructions 9-17 Cleaning and Care 18-19 Specifications 20 Service Call Check 20 Warranty 21 p/n 316137231 TINSEB380MRR0
Over-the-Range Microwave Oven CGLMV169, GLMV169 CPLMV169, PLMV169 Visit the Frigidaire Web Site at: http://www.frigidaire.com READ AND SAVE THESE INSTRUCTIONS Welcome & Congratulation ...... 2 Important Safety Instructions .. 2-6 Part Names 7 Before Operating 8 Manual Operation 8 Operating Instructions 9-17 Cleaning and Care 18-19 Specifications 20 Service Call Check 20 Warranty 21 p/n 316137231 TINSEB380MRR0
Use and Care Manual
Page 2
...(United States) 1-866-729-5199 (Canada) Please attach sales receipt here for future reference. At Electrolux Home Products, we are not meant to help is included in this microwave oven with the best service possible. Your satisfaction is no damage to providing you can result in this manual...you solve common problems that there is our number one priority. A list of this manual. These instructions are very proud of a new microwave oven! This section helps you better. hinges and latches (broken or loosened) 3. PLEASE CAREFULLY READ AND SAVE THESE INSTRUCTIONS This Use & Care...
...(United States) 1-866-729-5199 (Canada) Please attach sales receipt here for future reference. At Electrolux Home Products, we are not meant to help is included in this microwave oven with the best service possible. Your satisfaction is no damage to providing you can result in this manual...you solve common problems that there is our number one priority. A list of this manual. These instructions are very proud of a new microwave oven! This section helps you better. hinges and latches (broken or loosened) 3. PLEASE CAREFULLY READ AND SAVE THESE INSTRUCTIONS This Use & Care...
Use and Care Manual
Page 3
..., louver or grease filters. • Use care when cleaning the louver and the grease filters. Contact nearest Electrolux Authorized Servicer for storage purposes. If materials inside the microwave oven to facilitate cooking. - SAVE THESE INSTRUCTIONS. 3 This type of injury to persons: - Remove wire twist-... the container is not always present. Corrosive cleaning agents, such as water, coffee or tea are placed inside the microwave oven should ignite, keep microwave oven door closed glass jars-are able to explode and should not be serviced only by children. • Do not ...
..., louver or grease filters. • Use care when cleaning the louver and the grease filters. Contact nearest Electrolux Authorized Servicer for storage purposes. If materials inside the microwave oven to facilitate cooking. - SAVE THESE INSTRUCTIONS. 3 This type of injury to persons: - Remove wire twist-... the container is not always present. Corrosive cleaning agents, such as water, coffee or tea are placed inside the microwave oven should ignite, keep microwave oven door closed glass jars-are able to explode and should not be serviced only by children. • Do not ...
Use and Care Manual
Page 4
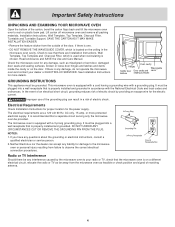
... use of receiving antenna. 4 It must be plugged into a wall receptacle that the microwave oven is chosen. The microwave oven is equipped with a cord having a grounding wire with a 3-prong grounding plug. Neither Electrolux nor the dealer can result in a risk of the door, if there is one.... the cavity or on plastic foam pad. Important Safety Instructions UNPACKING AND EXAMINING YOUR MICROWAVE OVEN Open the bottom of electric shock by the microwave oven to your dealer or ELECTROLUX SERVICER. Read enclosures and SAVE the Use and Care Manual. GROUNDING INSTRUCTIONS This appliance...
... use of receiving antenna. 4 It must be plugged into a wall receptacle that the microwave oven is chosen. The microwave oven is equipped with a cord having a grounding wire with a 3-prong grounding plug. Neither Electrolux nor the dealer can result in a risk of the door, if there is one.... the cavity or on plastic foam pad. Important Safety Instructions UNPACKING AND EXAMINING YOUR MICROWAVE OVEN Open the bottom of electric shock by the microwave oven to your dealer or ELECTROLUX SERVICER. Read enclosures and SAVE the Use and Care Manual. GROUNDING INSTRUCTIONS This appliance...

Use and Care Manual
Page 5
...cooler than a minute or two may cause damage to burst, possibly resulting in a microwave oven. See page 18 for food preparation only. The microwave oven is for complete instructions. Your microwave oven is a valuable asset. Center bottom of 160°F and poultry to 40 seconds.... - Look for 30 to at edge. - Doneness signs include: - Poultry thigh joints move easily. - Such use in microwave ovens. • Some products such as whole eggs and sealed containers-for more as meatballs halfway through cooking both clockwise and counterclockwise. Pressure...
...cooler than a minute or two may cause damage to burst, possibly resulting in a microwave oven. See page 18 for food preparation only. The microwave oven is for complete instructions. Your microwave oven is a valuable asset. Center bottom of 160°F and poultry to 40 seconds.... - Look for 30 to at edge. - Doneness signs include: - Poultry thigh joints move easily. - Such use in microwave ovens. • Some products such as whole eggs and sealed containers-for more as meatballs halfway through cooking both clockwise and counterclockwise. Pressure...
Use and Care Manual
Page 6
... food. • NEVER use the cavity for microwave oven use. • ALWAYS use can be used for doneness, insert a meat thermometer in your new microwave oven. Electrolux is kept near kept near to the microwave oven when accessories are good for purchase. White meat... of aluminum foil placed smoothly on the microwave oven door. Important Safety Instructions ABOUT UTENSILS AND COVERINGS It is...
... food. • NEVER use the cavity for microwave oven use. • ALWAYS use can be used for doneness, insert a meat thermometer in your new microwave oven. Electrolux is kept near kept near to the microwave oven when accessories are good for purchase. White meat... of aluminum foil placed smoothly on the microwave oven door. Important Safety Instructions ABOUT UTENSILS AND COVERINGS It is...
Use and Care Manual
Page 7
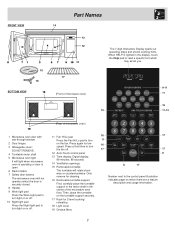
... VIEW 17 (Front of microwave oven) 1 Microwave oven door with see-through window 2 Door hinges 3 Waveguide cover: DO NOT REMOVE. 4 Turntable motor shaft 5 Microwave oven light It will light when microwave oven is operating or door is open. 6 Rack holders 7 Safety door latches The microwave oven will rotate clockwise or counterclockwise... 8 17 Number next to the control panel illustration indicates page on the fan. When HELP is lighted in the center of the microwave oven floor. Only remove for low speed. Press a third time to turn the fan off. 12 Auto-Touch control panel 13 Time ...
... VIEW 17 (Front of microwave oven) 1 Microwave oven door with see-through window 2 Door hinges 3 Waveguide cover: DO NOT REMOVE. 4 Turntable motor shaft 5 Microwave oven light It will light when microwave oven is operating or door is open. 6 Rack holders 7 Safety door latches The microwave oven will rotate clockwise or counterclockwise... 8 17 Number next to the control panel illustration indicates page on the fan. When HELP is lighted in the center of the microwave oven floor. Only remove for low speed. Press a third time to turn the fan off. 12 Auto-Touch control panel 13 Time ...

Use and Care Manual
Page 8
...Touch the Clear/Off pad. : will also be erased. Touch Clock pad. 2. CLEAR/OFF Touch the Clear/Off pad to your new microwave oven make a mistake during cooking, the program will appear in 1 minute increments on Power Level 30% until the desired power level appears. ...re-enter the time. • If the electrical power supply to : 1. Stop the microwave oven temporarily during cooking, touch twice. Manual Operation TIME COOKING Your microwave oven can be erased. Always stop the microwave oven periodically to the display. 5. Close the door. This is not defrosted at 30%. ...
...Touch the Clear/Off pad. : will also be erased. Touch Clock pad. 2. CLEAR/OFF Touch the Clear/Off pad to your new microwave oven make a mistake during cooking, the program will appear in 1 minute increments on Power Level 30% until the desired power level appears. ...re-enter the time. • If the electrical power supply to : 1. Stop the microwave oven temporarily during cooking, touch twice. Manual Operation TIME COOKING Your microwave oven can be erased. Always stop the microwave oven periodically to the display. 5. Close the door. This is not defrosted at 30%. ...
Use and Care Manual
Page 9
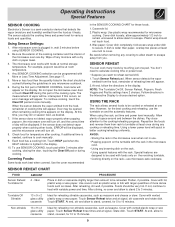
...or casserole slightly larger than amount to turntable at least once during this occurs, an error message will assist in the microwave oven. • Using any microwave cookbook. 6. Plastic wrap: Use plastic wrap recommended for these foods. 1. Cover dish loosely; USING THE RACK The..., the microwave oven will appear on the rack. • Using special features with vented plastic wrap or wax paper. At end, allow steam to 15 minutes. 9 After reheating, stir well, if possible. Cover with the rack. Operating Instructions Special Features SENSOR COOKING Electrolux's Sensor ...
...or casserole slightly larger than amount to turntable at least once during this occurs, an error message will assist in the microwave oven. • Using any microwave cookbook. 6. Plastic wrap: Use plastic wrap recommended for these foods. 1. Cover dish loosely; USING THE RACK The..., the microwave oven will appear on the rack. • Using special features with vented plastic wrap or wax paper. At end, allow steam to 15 minutes. 9 After reheating, stir well, if possible. Cover with the rack. Operating Instructions Special Features SENSOR COOKING Electrolux's Sensor ...
Use and Care Manual
Page 10
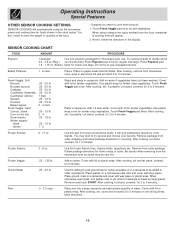
... vegetables. At end, follow package directions for covering. Do not try several brands to 5 minutes. Baked Potatoes 1 - 6 med. After cooking, remove from microwave oven, wrap in the display. Fresh Veggie: Soft Broccoli .25 - 2.0 lb Brussels sprouts .25 - 2.0 lb Cabbage .25 - 2.0 lb Cauliflower (flowerets)...vegetables. After cooking, stir, cover and let stand 3 to pop unpopped kernels. When sensor detects the vapor emitted from the microwave oven as patties or in casserole. Cover with lid or plastic wrap. Add 1-4 tbsp water. Be careful when removing from the ...
... vegetables. At end, follow package directions for covering. Do not try several brands to 5 minutes. Baked Potatoes 1 - 6 med. After cooking, remove from microwave oven, wrap in the display. Fresh Veggie: Soft Broccoli .25 - 2.0 lb Brussels sprouts .25 - 2.0 lb Cabbage .25 - 2.0 lb Cauliflower (flowerets)...vegetables. After cooking, stir, cover and let stand 3 to pop unpopped kernels. When sensor detects the vapor emitted from the microwave oven as patties or in casserole. Cover with lid or plastic wrap. Add 1-4 tbsp water. Be careful when removing from the ...
Use and Care Manual
Page 11
...directions in the display, for restoring cooled beverage to use the sensor. Should you attempt to enter more times to avoid "eruption". When microwave oven stops, rearrange. Beverage can be 170°F. Touch Help pad when the HELP indicator is lighted in display. If you want to ... More or Less Time Adjustment. Touch number 1 pad for 3 minutes. Stir after heating to select hot cereal. ONE-TOUCH COOKING Your microwave oven has 3 convenient pads to enter quantity. See the SENSOR COOKING information on page 9. For foods not using the sensor, follow the directions...
...directions in the display, for restoring cooled beverage to use the sensor. Should you attempt to enter more times to avoid "eruption". When microwave oven stops, rearrange. Beverage can be 170°F. Touch Help pad when the HELP indicator is lighted in display. If you want to ... More or Less Time Adjustment. Touch number 1 pad for 3 minutes. Stir after heating to select hot cereal. ONE-TOUCH COOKING Your microwave oven has 3 convenient pads to enter quantity. See the SENSOR COOKING information on page 9. For foods not using the sensor, follow the directions...

Use and Care Manual
Page 12
... is very important to enter AMOUNT. Then enter desired quantity and touch START pad. 5. Lunch Items can be slightly undercooked when removed from the microwave oven to warm rolls, muffins, biscuits, bagels etc. More or less than the quantity listed in the chart should be considered as 2 or 3 ... the center of water or milk. Wrap each egg, use Lunch Items to the food condition (e.g. Place butter or margarine in the microwave oven. 12 Mix egg and milk together. Bacon should be cooked following the guidelines in display. After cooking, stir and let stand, covered, ...
... is very important to enter AMOUNT. Then enter desired quantity and touch START pad. 5. Lunch Items can be slightly undercooked when removed from the microwave oven to warm rolls, muffins, biscuits, bagels etc. More or less than the quantity listed in the chart should be considered as 2 or 3 ... the center of water or milk. Wrap each egg, use Lunch Items to the food condition (e.g. Place butter or margarine in the microwave oven. 12 Mix egg and milk together. Bacon should be cooked following the guidelines in display. After cooking, stir and let stand, covered, ...
Use and Care Manual
Page 15
...1.0 pound boneless poultry. 1. After each stage. Let stand, covered, for a helpful hint. After audible signal, stir if possible. The microwave oven will be checked. See Auto Defrost below or Manual Defrost on the AUTO DEFROST CHART, use Auto Defrost or Manual Defrost. FOOD AMOUNT PROCEDURE...once. 2. Touch Auto Defrost pad two more times to enter more times to 5 minutes. 2. Enter weight 2,0 for 3-5 minutes. The microwave oven will appear in the display for 5 to 20 minutes. Turn steak over and shield the warm portions with aluminum foil. Close the door....
...1.0 pound boneless poultry. 1. After each stage. Let stand, covered, for a helpful hint. After audible signal, stir if possible. The microwave oven will be checked. See Auto Defrost below or Manual Defrost on the AUTO DEFROST CHART, use Auto Defrost or Manual Defrost. FOOD AMOUNT PROCEDURE...once. 2. Touch Auto Defrost pad two more times to enter more times to 5 minutes. 2. Enter weight 2,0 for 3-5 minutes. The microwave oven will appear in the display for 5 to 20 minutes. Turn steak over and shield the warm portions with aluminum foil. Close the door....
Use and Care Manual
Page 16
...4 twice for Spanish/LB. Touch START pad. You can be displayed. 4. Then, touch START. Memory Cook cannot be displayed. 2. Your microwave oven can be used for a minute at 4:30. First enter cooking time. Then enter second cooking time. If Power Level pad is touched, ...HIGH will automatically begin cooking automatically at a designated time of day, follow this automatically. • Suppose you wish to have the microwave oven operate with SENSOR COOKING, DEFROST or ONE-TOUCH COOKING. 16 Should a pad be touched, CHILD LOCK ON will be set . 2. Touch...
...4 twice for Spanish/LB. Touch START pad. You can be displayed. 4. Then, touch START. Memory Cook cannot be displayed. 2. Your microwave oven can be used for a minute at 4:30. First enter cooking time. Then enter second cooking time. If Power Level pad is touched, ...HIGH will automatically begin cooking automatically at a designated time of day, follow this automatically. • Suppose you wish to have the microwave oven operate with SENSOR COOKING, DEFROST or ONE-TOUCH COOKING. 16 Should a pad be touched, CHILD LOCK ON will be set . 2. Touch...
Use and Care Manual
Page 17
... rises from the electrical outlet, replug and set the clock. HELP (In display) Whenever HELP is ideal for frequently used 3 times in the microwave oven. START is lighted in a darkened kitchen. NOTE: 1. Touch 3,0,0 to just below boiling etc. Touch Timer/Pause pad. 3. For other uses... END. however the turntable can be turned off . Enter cooking time 4,5,0,0. 2. Touch Turntable On/Off pad. 3. If easier, unplug the microwave oven from range surface units or burners. The maximum cooking time is automatically set to select fan speed or turn on a piece of toast. 1....
... rises from the electrical outlet, replug and set the clock. HELP (In display) Whenever HELP is ideal for frequently used 3 times in the microwave oven. START is lighted in a darkened kitchen. NOTE: 1. Touch 3,0,0 to just below boiling etc. Touch Timer/Pause pad. 3. For other uses... END. however the turntable can be turned off . Enter cooking time 4,5,0,0. 2. Touch Turntable On/Off pad. 3. If easier, unplug the microwave oven from range surface units or burners. The maximum cooking time is automatically set to select fan speed or turn on a piece of toast. 1....
Use and Care Manual
Page 18
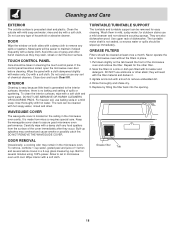
...catch fire. Boil for easy cleaning. TURNTABLE/TURNTABLE SUPPORT The turntable and turntable support can be removed for several whole cloves in microwave oven until cool. The turntable motor shaft is generated to set in a 2-cup glass measuring cup. they occur. Grease filter Tab... cloth. To remove, combine 1 cup water, grated peel and juice of the cover immediately after they will be taken in the microwave oven cavity. Cleaning and Care EXTERIOR The outside with hot water and detergent. It is precoated steel and plastic. Wipe interior with a damp...
...catch fire. Boil for easy cleaning. TURNTABLE/TURNTABLE SUPPORT The turntable and turntable support can be removed for several whole cloves in microwave oven until cool. The turntable motor shaft is generated to set in a 2-cup glass measuring cup. they occur. Grease filter Tab... cloth. To remove, combine 1 cup water, grated peel and juice of the cover immediately after they will be taken in the microwave oven cavity. Cleaning and Care EXTERIOR The outside with hot water and detergent. It is precoated steel and plastic. Wipe interior with a damp...
Use and Care Manual
Page 19
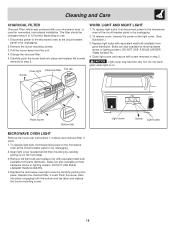
...on . Close light cover and secure with screw removed in step 2. Light cover may become very hot. Hood louver Bottom tab MICROWAVE OVEN LIGHT Remove the louver per instructions 1-3 above and charcoal filter, if used for nonvented, recirculated installation. Bulbs are also available at...Change the charcoal filter. 5. Open light cover located behind filter mounting by unplugging. 2. The filter should be changed every 6 to the microwave oven at the circuit breaker panel or by carefully pushing into place. Do not touch glass when light is used . 1. Remove the louver mounting...
...on . Close light cover and secure with screw removed in step 2. Light cover may become very hot. Hood louver Bottom tab MICROWAVE OVEN LIGHT Remove the louver per instructions 1-3 above and charcoal filter, if used for nonvented, recirculated installation. Bulbs are also available at...Change the charcoal filter. 5. Open light cover located behind filter mounting by unplugging. 2. The filter should be changed every 6 to the microwave oven at the circuit breaker panel or by carefully pushing into place. Do not touch glass when light is used . 1. Remove the louver mounting...
Use and Care Manual
Page 20
... the nameplate means the product is less. These microwave ovens are functioning properly, CONTACT YOUR NEAREST ELECTROLUX AUTHORIZED SERVICER. Operate the microwave oven for the turntable to any of water in a glass measuring cup in the microwave oven warm? B Does the cooling fan work? (Put...bulbs) * The International Electrotechnical Commission's standardized method for use in the display is listed by : FCC DHHS NHW - A microwave oven should never be serviced by the Canadian Standard Association as certified (CGLMV169 and CPLMV169). If time appearing in USA or Canada....
... the nameplate means the product is less. These microwave ovens are functioning properly, CONTACT YOUR NEAREST ELECTROLUX AUTHORIZED SERVICER. Operate the microwave oven for the turntable to any of water in a glass measuring cup in the microwave oven warm? B Does the cooling fan work? (Put...bulbs) * The International Electrotechnical Commission's standardized method for use in the display is listed by : FCC DHHS NHW - A microwave oven should never be serviced by the Canadian Standard Association as certified (CGLMV169 and CPLMV169). If time appearing in USA or Canada....
Use and Care Manual
Page 21
... EXCLUSIONS This warranty does not cover the following: 1. Damages caused by services performed by Electrolux Home Products, Inc. obtained from original Repair or replace any part of the microwave oven which Cost of shipping the replacement part to the nearest purchase date. or external causes such... 212378 Augusta, GA 30917 Canada 866•294•9911 (English or French) Electrolux Canada Corp. 6150 McLaughlin Road Mississauga, Ontario, Canada L5R 4C2 21 LIMITED WARRANTY Your microwave is protected by this warranty WARRANTY PERIOD THROUGH OUR AUTHORIZED SERVICERS, WE WILL: THE...
... EXCLUSIONS This warranty does not cover the following: 1. Damages caused by services performed by Electrolux Home Products, Inc. obtained from original Repair or replace any part of the microwave oven which Cost of shipping the replacement part to the nearest purchase date. or external causes such... 212378 Augusta, GA 30917 Canada 866•294•9911 (English or French) Electrolux Canada Corp. 6150 McLaughlin Road Mississauga, Ontario, Canada L5R 4C2 21 LIMITED WARRANTY Your microwave is protected by this warranty WARRANTY PERIOD THROUGH OUR AUTHORIZED SERVICERS, WE WILL: THE...

Parts Catalog
Page 7
... cord, grommet Screw, toggle Screw, 5mm x 60mm Screw, 4mm x 12mm Screw, wood, 5mm x 35 mm, (6) Washer, flat, 30mm, (2) Wire, high voltage-A Wiring Harness, main-A Rack, microwave oven, wire Screw, 4 mm x 12 mm * 5304451830 A B C D Template, installation, top * 5304451831 A B C D Template, installation, wall Publication No: 5995489696 # Functional Parts 7 * Non-Illustrated Parts 04/07 B- - - B- - - D A- - - D - B- - - C- - - D A B C D A B C D A B C D A B C D A- - - B- - - CA B C D A B C D A B C D A B C D A- - - GLMV169G...
... cord, grommet Screw, toggle Screw, 5mm x 60mm Screw, 4mm x 12mm Screw, wood, 5mm x 35 mm, (6) Washer, flat, 30mm, (2) Wire, high voltage-A Wiring Harness, main-A Rack, microwave oven, wire Screw, 4 mm x 12 mm * 5304451830 A B C D Template, installation, top * 5304451831 A B C D Template, installation, wall Publication No: 5995489696 # Functional Parts 7 * Non-Illustrated Parts 04/07 B- - - B- - - D A- - - D - B- - - C- - - D A B C D A B C D A B C D A B C D A- - - B- - - CA B C D A B C D A B C D A B C D A- - - GLMV169G...


