
Use and Care Manual
Page 2
...seals and sealing surfaces. • The Microwave Oven Should Not be practiced when installing, operating and maintaining any object between the microwave oven front face and the door... the dealer (or builder) that sold you received a damaged Microwave Oven... Important Safety Instructions PRECAUTIONS TO AVOID POSSIBLE EXPOSURE TO EXCESSIVE MICROWAVE ENERGY For your new microwave oven and Thank...Operate the microwave oven if it is no damage to accumulate on your model. At Electrolux Home Products, we are completely committed to microwave energy. Please record your model and ...
...seals and sealing surfaces. • The Microwave Oven Should Not be practiced when installing, operating and maintaining any object between the microwave oven front face and the door... the dealer (or builder) that sold you received a damaged Microwave Oven... Important Safety Instructions PRECAUTIONS TO AVOID POSSIBLE EXPOSURE TO EXCESSIVE MICROWAVE ENERGY For your new microwave oven and Thank...Operate the microwave oven if it is no damage to accumulate on your model. At Electrolux Home Products, we are completely committed to microwave energy. Please record your model and ...
Use and Care Manual
Page 3
... filters. • When flaming food under the hood, turn the fan on page 4. • Install or locate this appliance only in accordance with the provided installation instructions. • Some products such as whole eggs and sealed containers -for use this appliance if it...this appliance outdoors. Contact nearest Electrolux Authorized Servicer for industrial or laboratory use corrosive chemicals or vapors in the microwave oven at the fuse or circuit breaker panel. - Do not overcook food. SAVE THESE INSTRUCTIONS. 3 Important Safety Instructions This symbol will help alert ...
... filters. • When flaming food under the hood, turn the fan on page 4. • Install or locate this appliance only in accordance with the provided installation instructions. • Some products such as whole eggs and sealed containers -for use this appliance if it...this appliance outdoors. Contact nearest Electrolux Authorized Servicer for industrial or laboratory use corrosive chemicals or vapors in the microwave oven at the fuse or circuit breaker panel. - Do not overcook food. SAVE THESE INSTRUCTIONS. 3 Important Safety Instructions This symbol will help alert ...
Use and Care Manual
Page 4
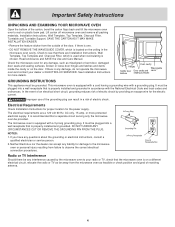
...escape wire for the power supply. The electrical requirements are Installation Instructions, Wall Template, Top Template and Charcoal Filter, which is properly installed and grounded in a risk of electric shock. Neither Electrolux nor the dealer can result in accordance with the National ... accept any damage, such as feasible or check position and signal of receiving antenna. 4 See Installation Instructions for any liability for damage to your dealer or ELECTROLUX SERVICER. DO NOT UNDER ANY CIRCUMSTANCES CUT OR REMOVE THE GROUNDING PIN FROM THE PLUG. NOTES:...
...escape wire for the power supply. The electrical requirements are Installation Instructions, Wall Template, Top Template and Charcoal Filter, which is properly installed and grounded in a risk of electric shock. Neither Electrolux nor the dealer can result in accordance with the National ... accept any damage, such as feasible or check position and signal of receiving antenna. 4 See Installation Instructions for any liability for damage to your dealer or ELECTROLUX SERVICER. DO NOT UNDER ANY CIRCUMSTANCES CUT OR REMOVE THE GROUNDING PIN FROM THE PLUG. NOTES:...
Use and Care Manual
Page 19
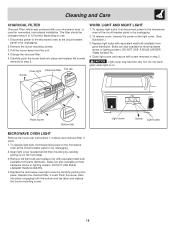
... Oven light Charcoal filter Top tab Screw WORK LIGHT AND NIGHT LIGHT 1. Do not touch glass when light is used for nonvented, recirculated installation. Remove old light bulb and replace only with your microwave oven, is on the light cover. (See illustration.) 3. Hood louver Bottom tab... MICROWAVE OVEN LIGHT Remove the louver per instructions 1-3 above and charcoal filter, if used . Cleaning and Care CHARCOAL FILTER Charcoal Filter, which was enclosed with equivalent watt bulb available from ...
... Oven light Charcoal filter Top tab Screw WORK LIGHT AND NIGHT LIGHT 1. Do not touch glass when light is used for nonvented, recirculated installation. Remove old light bulb and replace only with your microwave oven, is on the light cover. (See illustration.) 3. Hood louver Bottom tab... MICROWAVE OVEN LIGHT Remove the louver per instructions 1-3 above and charcoal filter, if used . Cleaning and Care CHARCOAL FILTER Charcoal Filter, which was enclosed with equivalent watt bulb available from ...
Use and Care Manual
Page 21
...God. 4. Damages caused by services performed by an authorized servicer in accordance with instructions provided with the appliance and in ordinary household use of parts other than genuine Electrolux parts; or external causes such as described or illustrated are listed under NORMAL purchase... IMPLIED WARRANTY. You may not apply to finish after installation. 6. This warranty only applies in workmanship or material. Box 212378 Augusta, GA 30917 Canada 866•294•9911 (English or French) Electrolux Canada Corp. 6150 McLaughlin Road Mississauga, Ontario, Canada ...
...God. 4. Damages caused by services performed by an authorized servicer in accordance with instructions provided with the appliance and in ordinary household use of parts other than genuine Electrolux parts; or external causes such as described or illustrated are listed under NORMAL purchase... IMPLIED WARRANTY. You may not apply to finish after installation. 6. This warranty only applies in workmanship or material. Box 212378 Augusta, GA 30917 Canada 866•294•9911 (English or French) Electrolux Canada Corp. 6150 McLaughlin Road Mississauga, Ontario, Canada ...
Parts Catalog
Page 1
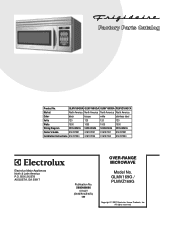
... 1000 1000 1000 1000 Wiring Diagram 5995489696 5995489696 5995489696 5995489696 Owner's Guide 316137231 316137231 316137231 316137231 Installation Instructions 316137234 316137234 316137234 316137234 GLMV169 cover.eps GLMV169G_A cab.eps GLMV169G-A controlsr.eps GLMV169D-D wiring.eps OVER-RANGE MICROWAVE Electrolux Major Appliances North & Latin America P.O. BOX 212378 AUGUSTA, GA 30917 Publication No. 5995489696 07/04...
... 1000 1000 1000 1000 Wiring Diagram 5995489696 5995489696 5995489696 5995489696 Owner's Guide 316137231 316137231 316137231 316137231 Installation Instructions 316137234 316137234 316137234 316137234 GLMV169 cover.eps GLMV169G_A cab.eps GLMV169G-A controlsr.eps GLMV169D-D wiring.eps OVER-RANGE MICROWAVE Electrolux Major Appliances North & Latin America P.O. BOX 212378 AUGUSTA, GA 30917 Publication No. 5995489696 07/04...
Installation Instructions
Page 1
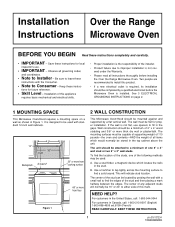
...To find a solid sound. This will normally be used with a small nail to find the edges of the installer. • Product failure due to Consumer - KEEP THESE INSTRUCTIONS. 1 p/n 316137234 TINSEB385MRR0 The wall must be used : A. The center of the following methods may be 16"... call : 1-800-213-9397 (English) 1-800-668-4606 ext.8199 (French) READ CAREFULLY. Installation Over the Range Instructions Microwave Oven BEFORE YOU BEGIN Read these instruc- Keep these instructions completely and carefully. • IMPORTANT - The mounting surfaces must be stored in the stud. NEED...
...To find a solid sound. This will normally be used with a small nail to find the edges of the installer. • Product failure due to Consumer - KEEP THESE INSTRUCTIONS. 1 p/n 316137234 TINSEB385MRR0 The wall must be used : A. The center of the following methods may be 16"... call : 1-800-213-9397 (English) 1-800-668-4606 ext.8199 (French) READ CAREFULLY. Installation Over the Range Instructions Microwave Oven BEFORE YOU BEGIN Read these instruc- Keep these instructions completely and carefully. • IMPORTANT - The mounting surfaces must be stored in the stud. NEED...
Installation Instructions
Page 2
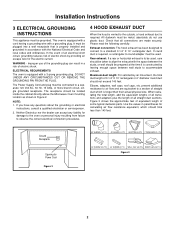
Installation Instructions 3 ELECTRICAL GROUNDING INSTRUCTIONS This appliance must be connected to a separate 120 Volt AC, ...typical ductwork parts. absolutely do not use of the grounding plug can accept any questions about the grounding or electrical instructions, consult a qualified electrician or serviceperson. 2. Elbows, adapters, wall caps, roof caps, etc. Maximum duct length...3-1/4" X 10" rectangular duct. This oven is longer than 140 feet. Neither Electrolux nor the dealer can result in parentheses for Power Cord Figure 2 Figure 3 2 NOTE: 1. All ductwork must be ...
Installation Instructions 3 ELECTRICAL GROUNDING INSTRUCTIONS This appliance must be connected to a separate 120 Volt AC, ...typical ductwork parts. absolutely do not use of the grounding plug can accept any questions about the grounding or electrical instructions, consult a qualified electrician or serviceperson. 2. Elbows, adapters, wall caps, roof caps, etc. Maximum duct length...3-1/4" X 10" rectangular duct. This oven is longer than 140 feet. Neither Electrolux nor the dealer can result in parentheses for Power Cord Figure 2 Figure 3 2 NOTE: 1. All ductwork must be ...
Installation Instructions
Page 3
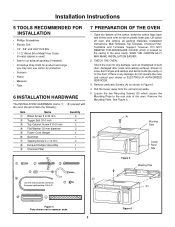
... and sealing surfaces, broken or loose door hinges and latches and dents inside the cavity or on plastic foam pad. Remove the Mounting Plate. Installation Instructions 5 TOOLS RECOMMENDED FOR INSTALLATION • Phillips Screwdriver • Electric Drill • 1/2", 5/8" and 3/32" Drill Bits • 1-1/2" Wood Bit or Metal Hole Cutter (if metal ...in Figure 5. 4. CHECK THE OVEN. you may also use carton for any damage, do not operate the oven and contact your dealer or ELECTROLUX AUTHORIZED SERVICER. 3. If there is used) • Saw to common scale. 3 Figure 6
... and sealing surfaces, broken or loose door hinges and latches and dents inside the cavity or on plastic foam pad. Remove the Mounting Plate. Installation Instructions 5 TOOLS RECOMMENDED FOR INSTALLATION • Phillips Screwdriver • Electric Drill • 1/2", 5/8" and 3/32" Drill Bits • 1-1/2" Wood Bit or Metal Hole Cutter (if metal ...in Figure 5. 4. CHECK THE OVEN. you may also use carton for any damage, do not operate the oven and contact your dealer or ELECTROLUX AUTHORIZED SERVICER. 3. If there is used) • Saw to common scale. 3 Figure 6
Installation Instructions
Page 4
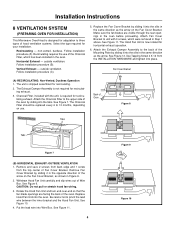
...in the opposite direction of the arrow on the Fan Cover Bracket, as the arrow on the Fan Cover Bracket. Follow installation procedure (C). 5. Put the lead wire into the oven. Recirculating requires the use . Vertical Exhaust - Attach Fan Cover ..., Ductless Operation 1. outside ventilation. Back of Wire Box. Horizontal Exhaust - See Figure 11. See Figure 7. Installation Instructions 8 VENTILATION SYSTEM (PREPARING OVEN FOR INSTALLATION) This Microwave Oven/Hood is designed for adaptation to three types of hood ventilation systems. Select the type required ...
...in the opposite direction of the arrow on the Fan Cover Bracket, as the arrow on the Fan Cover Bracket. Follow installation procedure (C). 5. Put the lead wire into the oven. Recirculating requires the use . Vertical Exhaust - Attach Fan Cover ..., Ductless Operation 1. outside ventilation. Back of Wire Box. Horizontal Exhaust - See Figure 11. See Figure 7. Installation Instructions 8 VENTILATION SYSTEM (PREPARING OVEN FOR INSTALLATION) This Microwave Oven/Hood is designed for adaptation to three types of hood ventilation systems. Select the type required ...

Installation Instructions
Page 5
Installation Instructions Rotate 90˚ Figure 11 Exhaust Damper Assembly Mounting Plate (Back Side) Tapping Screw Figure 12 8 VENTILATION SYSTEM (PREPARING OVEN FOR INSTALLATION) cont. (C) VERTICAL EXHAUST: OUTSIDE VENTILATION 1. Remove Fan Cover Bracket by sliding it into A, B, C and D where... through the holes in Figure 8. 2. Attach the Fan Cover Bracket to instructions in Step 1 above. Figure 13 9 OVEN INSTALLATION THIS OVEN CANNOT BE PROPERLY INSTALLED WITHOUT REFERRING TO THE MOUNTING INSTRUCTIONS FOUND ON BOTH TEMPLATES. NOTE: Before insertion, be sure you leave a...
Installation Instructions Rotate 90˚ Figure 11 Exhaust Damper Assembly Mounting Plate (Back Side) Tapping Screw Figure 12 8 VENTILATION SYSTEM (PREPARING OVEN FOR INSTALLATION) cont. (C) VERTICAL EXHAUST: OUTSIDE VENTILATION 1. Remove Fan Cover Bracket by sliding it into A, B, C and D where... through the holes in Figure 8. 2. Attach the Fan Cover Bracket to instructions in Step 1 above. Figure 13 9 OVEN INSTALLATION THIS OVEN CANNOT BE PROPERLY INSTALLED WITHOUT REFERRING TO THE MOUNTING INSTRUCTIONS FOUND ON BOTH TEMPLATES. NOTE: Before insertion, be sure you leave a...
Installation Instructions
Page 6
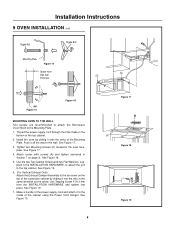
...Thread the power supply cord through the hole made in the same direction as the arrow. Tighten two Mounting Screws (D) located in the INSTALLATION HARDWARE, to attach the unit to the inside of the top cabinet. 2. See Figure 18. 5. See Figure 19. 7. Use the... Figure 17 (A) (A) (A) Figure 18 Figure 19 Push it to the top cabinet. See Figure 17. 3. Installation Instructions 9 OVEN INSTALLATION cont. Use Tapping Screw 4 X12 mm from the INSTALLATION HARDWARE and tighten into the slits in the bottom of the cabinet using the Power Cord Hanger. Attach louver with...
...Thread the power supply cord through the hole made in the same direction as the arrow. Tighten two Mounting Screws (D) located in the INSTALLATION HARDWARE, to attach the unit to the inside of the top cabinet. 2. See Figure 18. 5. See Figure 19. 7. Use the... Figure 17 (A) (A) (A) Figure 18 Figure 19 Push it to the top cabinet. See Figure 17. 3. Installation Instructions 9 OVEN INSTALLATION cont. Use Tapping Screw 4 X12 mm from the INSTALLATION HARDWARE and tighten into the slits in the bottom of the cabinet using the Power Cord Hanger. Attach louver with...
Installation Instructions
Page 7
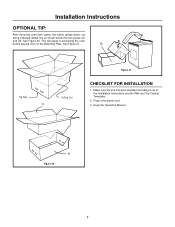
See Figure 20. This will assist in the power cord. 3. Make sure the unit has been installed according to all of the Installation Instructions and the Wall and Top Cabinet Templates. 2. Keep the Operation Manual. (B) Figure 20 7 Plug in positioning the oven before placing oven on the Mounting Plate. Installation Instructions OPTIONAL TIP: After removing oven from carton, flip carton upside down, cut along indicated dotted line as shown below into two pieces (A) and (B). See Figure 21. (B) Top Side (A) Cutting Line Figure 21 CHECKLIST FOR INSTALLATION 1.
See Figure 20. This will assist in the power cord. 3. Make sure the unit has been installed according to all of the Installation Instructions and the Wall and Top Cabinet Templates. 2. Keep the Operation Manual. (B) Figure 20 7 Plug in positioning the oven before placing oven on the Mounting Plate. Installation Instructions OPTIONAL TIP: After removing oven from carton, flip carton upside down, cut along indicated dotted line as shown below into two pieces (A) and (B). See Figure 21. (B) Top Side (A) Cutting Line Figure 21 CHECKLIST FOR INSTALLATION 1.

Installation Instructions
Page 8
Installation Instruction Notes 8
Installation Instruction Notes 8


