Electrolux E30WD75GTT Support and Manuals
Get Help and Manuals for this Electrolux item

View All Support Options Below
Free Electrolux E30WD75GTT manuals!
Problems with Electrolux E30WD75GTT?
Ask a Question
Free Electrolux E30WD75GTT manuals!
Problems with Electrolux E30WD75GTT?
Ask a Question
Popular Electrolux E30WD75GTT Manual Pages
Specification sheet - Page 1
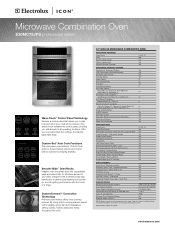
...208 Volts Minimum Circuit Required (Amps) Shipping Weight (Approx.)
9-5/8" x 16-1/8" x 16-1/8" 16-1/2" x 24-1/8" x 18-1/32" Left Bottom Rear 7.1 / 6.1 30/30 40 250
NOTE: Always consult local and national electric codes. Specifications subject to Product Installation Guide for Timers / Reminders
Yes
More / Less Function
Yes
Power Failure Indicator
Yes
OVEN FEATURES Oven Cavity Cobalt Blue...
Specification sheet - Page 2
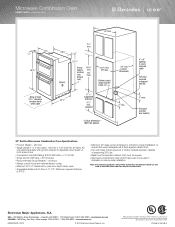
... for oven door depth when open
30" min.
28 1/4"
2 1/2" min. Spacer
51 1/4"
Power supply location (left bottom rear)
45 3/8" min.
46" max.
28 1/2" min. 29" max. Minimum required distance is 4-1/2".
• Minimum 24" deep cutout dimension is 11-1/2".
Refer to Product Installation Guide on both sides of quality at Electrolux Home Products, Inc. Printed in
stackable or...
Owners Guide - Page 2
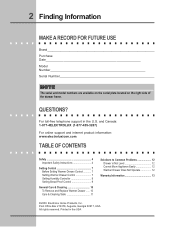
... Warmer Drawer Control 7 Setting Humidity Controller 9 Setting Bread Proof Control 9
General Care & Cleaning 10 To Remove and Replace Warmer Drawer ...... 10 Care & Cleaning Table 11
Solutions to Common Problems 12 Drawer is Not Level 12 Cannot Move Appliance Easily 12 Warmer Drawer Does Not Operate 12
Warranty Information 13
©2008 Electrolux Home Products, Inc.
Printed in...
Owners Guide - Page 3

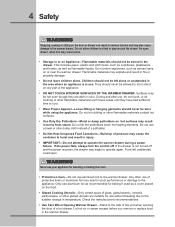
WARNING
To reduce the risk of the product.
! Be sure your new Electrolux Warm & Serve Drawer.
! WARNING
• ALL WARMER DRAWERS CAN TIP.
• INJURY TO PERSONS COULD RESULT.
• INSTALL ANTI-TIP DEVICE PACKED WITH WARMER DRAWER.
• SEE INSTALLATION INSTRUCTIONS. Do not repair or replace any other part of fire, electrical shock, or injury when using your...
Owners Guide - Page 4
...IMPORTANT-Do not attempt to the appliance. This includes paper, plastic and cloth items, such as cookbooks, plasticware and towels, as well as aerosol cans, on any part of a hot drawer. If...-Moist or damp potholders on Appliance-Flammable materials should not be stored in burns from steam. Let hot air or steam escape before you remove or replace food in temperature. An open...
Owners Guide - Page 6
... the rack and a casserole dish under). • In the downward position to allow
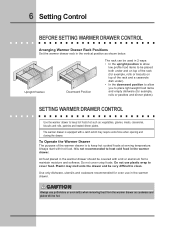
low profile food items to cover food. 6 Setting Control
BEFORE SETTING WARMER DRAWER CONTROL
Arranging Warmer Drawer Rack Positions
Set the warmer drawer rack in the vertical position as : vegetables, gravies, meats, casseroles, biscuits and rolls, pastries and heated dinner...
Owners Guide - Page 7
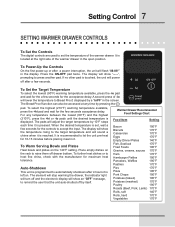
... unit is programmed to let the unit pre-heat for the acceptance delay. To Set the Target Temperature
To select the lowest (90°F) warming temperature available, press the...target temperature and will adjust the target temperature by itself. Warmer Drawer Recommended Food Settings Chart
Food Item
Setting
Bacon
190°F
Biscuits
170°F
Casseroles
170°F
Eggs
170°F
...
Owners Guide - Page 8
...since the dough will not be used to the desired location. 8 Setting Control
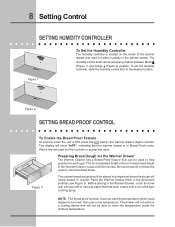
SETTING HUMIDITY CONTROLLER
Figure 1
To Set the Humidity Controller
The humidity controller is located on the warmer drawer ...Rack in the Warmer Drawer, cover the bowl with a non-stick type cooking spray. To set at any position between Moist
(Figure 1) and Crispy (Figure 2) position.
The display will show...
Owners Guide - Page 9
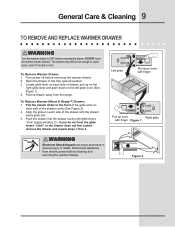
...the drawer. Pull the plastic slider to OFF before removing the warmer drawer. 2. Figure 2
To Replace Warmer (Warm & Ready™) Drawer: 1. Push the drawer into the drawer cavity until glide...away from electric power before cleaning and servicing the warmer drawer. WARNING
Electrical Shock Hazard can occur and result in color. Disconnect appliance from the range. WARNING
Turn the ...
Owners Guide - Page 10
... LATER. Always follow the manufacturer's instructions.
Remove all cleaners or the porcelain may be removed .
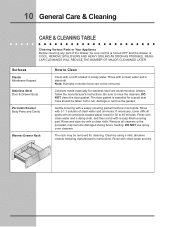
Rinse and wipe dry with a cloth soaked in soapy water. DO NOT use spray oven cleaners. 10 General Care & Cleaning
CARE & CLEANING TABLE
Cleaning Various Parts or Your Appliance Before cleaning any part of clear water and ammonia. Be...
Owners Guide - Page 11
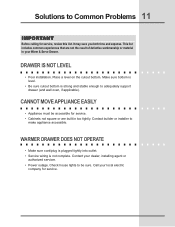
... lights to Common Problems 11
IMPORTANT
Before calling for service. Place a level on the cutout bottom. CANNOT MOVE APPLIANCE EASILY
• Appliance must be sure. Make sure bottom is level.
• Be sure cutout bottom is not complete. It may save you both time and expense.
Contact your dealer, installing agent or
authorized servicer. • Power...
Owners Guide - Page 12
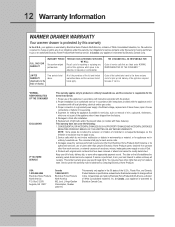
...). Keep your bill of the appliance when it is responsible for service and parts under NORMAL RESPONSIBILITIES OF THE CONSUMER. *
LIMITED WARRANTY (Applicable to be defective in house wiring. 4. Box 212378 Augusta, GA 30917
Canada 1•866•294•9911 Electrolux Home Products North America 802, boul. Product features or specifications as described or illustrated are listed...
Installation Instructions - Page 1
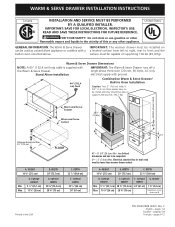
...long cable is a Critical dimension and has to support 200 pounds. (90,7 Kg)
Bottom of this or any other appliance.
is supplied with the Warm & Serve Drawer....WARM & SERVE DRAWER INSTALLATION INSTRUCTIONS
Canada
INSTALLATION AND SERVICE MUST BE PERFORMED BY A QUALIFIED INSTALLER. IMPORTANT: SAVE FOR LOCAL ELECTRICAL INSPECTOR'S USE. READ AND SAVE THESE INSTRUCTIONS FOR FUTURE REFERENCE. ...
Installation Instructions - Page 3
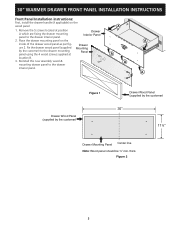
...¼''
Drawer Mounting Panel Center line Note: Wood panel should be ½'' min. thick.
30" WAWRAMREMR&DRSAERWVEERDFRrAoWntERPaINnSeTlAILNLSATTAIOLLNAITNIOSTNRIUNCSTTIROUNCSTIONS
Front Panel Installation instructions:
First, install the drawer handle (if applicable) on the
A
inside of the drawer wood panel as per fig- Remove the 5 screws located at position A which are fixing ...
Installation Instructions - Page 4
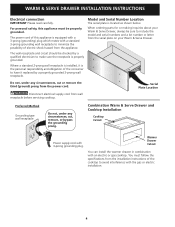
... a properly grounded 3-prong wall receptacle.
You must be sure to include the model and serial numbers and a lot number or letter from the installation instructions of this appliance must follow the specifications from the serial plate on your Warm & Serve Drawer. When ordering parts for or making inquiries about your Warm & Serve Drawer, always be properly...
Electrolux E30WD75GTT Reviews
We have not received any reviews for Electrolux yet.