
Specification sheet
Page 1
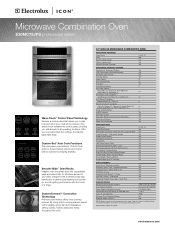
... Bake Element Convection Conversion Keep Warm Light Clean / Heavy Clean Self-Cleaning with Auto-Safety Latch™ Self-Cleaning Cycle with Rack Removal Alert Dual Radiant™ Baking System Eight-Pass Broil & Radiant Bake Element Smooth-Glide™ Racks / Standard Racks Dual-Halogen Theatre Lighting Sabbath Mode (Star-K® Certified) 4.2 Cu. Refer to your meal will be cooked. Ft. 900 Yes Yes Yes MICROWAVE CONTROL OPTIONS Wave-Touch™ Electronic Controls Yes VFD Front Display with a variable speed fan and temperature setting options, heat...
... Bake Element Convection Conversion Keep Warm Light Clean / Heavy Clean Self-Cleaning with Auto-Safety Latch™ Self-Cleaning Cycle with Rack Removal Alert Dual Radiant™ Baking System Eight-Pass Broil & Radiant Bake Element Smooth-Glide™ Racks / Standard Racks Dual-Halogen Theatre Lighting Sabbath Mode (Star-K® Certified) 4.2 Cu. Refer to your meal will be cooked. Ft. 900 Yes Yes Yes MICROWAVE CONTROL OPTIONS Wave-Touch™ Electronic Controls Yes VFD Front Display with a variable speed fan and temperature setting options, heat...
Specification sheet
Page 2
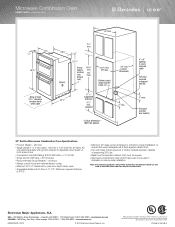
... Oven E30MC75JPS professional series 30" 7/8" 46 5/8" Allow at least 23 1/4" clearance for proper installation, to change specifications or discontinue models without notice. Electrical junction box location 30" Built-In Microwave Combination Oven Specifications • Product Weight - 250 Lbs. • Single phase 3- Optional Accessories • Electrolux Major Appliances, N.A. mean we are constantly working to Product Installation Guide on both sides of quality at electroluxicon.com for oven door depth when open 30" min. 28 1/4" 2 1/2" min. Bottom cutout...
... Oven E30MC75JPS professional series 30" 7/8" 46 5/8" Allow at least 23 1/4" clearance for proper installation, to change specifications or discontinue models without notice. Electrical junction box location 30" Built-In Microwave Combination Oven Specifications • Product Weight - 250 Lbs. • Single phase 3- Optional Accessories • Electrolux Major Appliances, N.A. mean we are constantly working to Product Installation Guide on both sides of quality at electroluxicon.com for oven door depth when open 30" min. 28 1/4" 2 1/2" min. Bottom cutout...

Owners Guide
Page 1
Use & Care Guide Warm & Serve Drawer Dishwasher 318 201 016 (08019) Rev. C
Use & Care Guide Warm & Serve Drawer Dishwasher 318 201 016 (08019) Rev. C
Owners Guide
Page 2
... model numbers are available on the serial plate located on the right side of the drawer frame. For toll-free telephone support in the USA QUESTIONS? and Canada: 1-877-4ELECTROLUX (1-877-435-3287) For online support and internet product information: www.electroluxicon.com TABLE OF CONTENTS Safety 4 Important Safety Instructions 4 Setting Control 7 Before Setting Warmer Drawer Control 7 Setting Warmer Drawer Control 7 Setting Humidity Controller 9 Setting Bread Proof Control 9 General Care & Cleaning 10 To Remove and Replace Warmer Drawer ...... 10 Care & Cleaning...
... model numbers are available on the serial plate located on the right side of the drawer frame. For toll-free telephone support in the USA QUESTIONS? and Canada: 1-877-4ELECTROLUX (1-877-435-3287) For online support and internet product information: www.electroluxicon.com TABLE OF CONTENTS Safety 4 Important Safety Instructions 4 Setting Control 7 Before Setting Warmer Drawer Control 7 Setting Warmer Drawer Control 7 Setting Humidity Controller 9 Setting Bread Proof Control 9 General Care & Cleaning 10 To Remove and Replace Warmer Drawer ...... 10 Care & Cleaning...

Owners Guide
Page 3
... injury when using your Warm & Serve Drawer, follow basic precaution including the following: • Remove all safety instructions before using your new Electrolux Warm & Serve Drawer. ! Be sure your appliance is properly installed and grounded by removing panels, wire covers, locking plates, or any part of an emergency. • User Servicing. Ask your dealer to play with the National Electrical Code ANSI/NFPA No. 70 - Know how to disconnect the electrical power to...
... injury when using your Warm & Serve Drawer, follow basic precaution including the following: • Remove all safety instructions before using your new Electrolux Warm & Serve Drawer. ! Be sure your appliance is properly installed and grounded by removing panels, wire covers, locking plates, or any part of an emergency. • User Servicing. Ask your dealer to play with the National Electrical Code ANSI/NFPA No. 70 - Know how to disconnect the electrical power to...
Owners Guide
Page 4
... drawer. Check the manufacturer's recommendations. • Use Care When Opening Warmer Drawer-Stand to climb or play around the drawer. Let hot air or steam escape before you remove or replace food in the area where an appliance is not turned off . Do not allow children to the side of the unit when opening the door of the appliance. • DO NOT TOUCH INTERIOR...
... drawer. Check the manufacturer's recommendations. • Use Care When Opening Warmer Drawer-Stand to climb or play around the drawer. Let hot air or steam escape before you remove or replace food in the area where an appliance is not turned off . Do not allow children to the side of the unit when opening the door of the appliance. • DO NOT TOUCH INTERIOR...
Owners Guide
Page 5
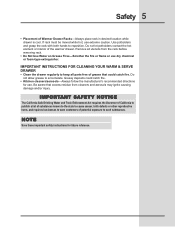
...; Kitchen cleaners/aerosols-Always follow the manufacturer's recommended directions for future reference. Remove all parts free of potential exposure to reposition. Do not allow grease to keep all utensils from cleaners and aerosols may ignite causing damage and/or injury. IMPORTANT INSTRUCTIONS FOR CLEANING YOUR WARM & SERVE DRAWER • Clean the drawer regularly to accumulate. If rack must be moved while hot, use...
...; Kitchen cleaners/aerosols-Always follow the manufacturer's recommended directions for future reference. Remove all parts free of potential exposure to reposition. Do not allow grease to keep all utensils from cleaners and aerosols may ignite causing damage and/or injury. IMPORTANT INSTRUCTIONS FOR CLEANING YOUR WARM & SERVE DRAWER • Clean the drawer regularly to accumulate. If rack must be moved while hot, use...
Owners Guide
Page 6
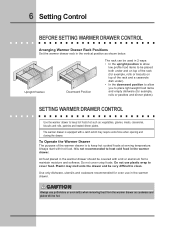
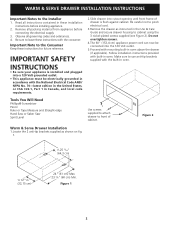
SETTING WARMER DRAWER CONTROL Use the warmer drawer to keep hot cooked foods at serving temperature. CAUTION Always use plastic wrap to heat cold food in the warmer drawer. To Operate the Warmer Drawer The purpose of the warmer drawer is not recommended to cover food. It is to place light weight food items and empty dishware (for example, rolls or pastries and dinner plates). Plastic may require extra...
SETTING WARMER DRAWER CONTROL Use the warmer drawer to keep hot cooked foods at serving temperature. CAUTION Always use plastic wrap to heat cold food in the warmer drawer. To Operate the Warmer Drawer The purpose of the warmer drawer is not recommended to cover food. It is to place light weight food items and empty dishware (for example, rolls or pastries and dinner plates). Plastic may require extra...
Owners Guide
Page 7
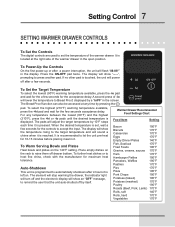
.... It is reached. The element will stop warming the drawer, the indicator light will turn off and the electronic display will show the temperature rising to the target temperature and will power off after a power interruption, the unit will lower the temperature to press another pad. The display will show "----", prompting to Bread Proof, displayed by 10°F steps each time it is touched, the...
.... It is reached. The element will stop warming the drawer, the indicator light will turn off and the electronic display will show the temperature rising to the target temperature and will power off after a power interruption, the unit will lower the temperature to press another pad. The display will show "----", prompting to Bread Proof, displayed by 10°F steps each time it is touched, the...
Owners Guide
Page 8
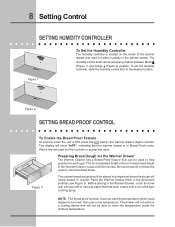
... Warmer Drawer Rack in the Warmer Drawer, cover the bowl with a moist cloth or use wax paper that has been coated with a non-stick type cooking spray. The drawer will not work as a cooling device and will nearly double in volume. To set at any position between Moist (Figure 1) and Crispy (Figure 2) position. Preparing Bread Dough for the controls to be set...
... Warmer Drawer Rack in the Warmer Drawer, cover the bowl with a moist cloth or use wax paper that has been coated with a non-stick type cooking spray. The drawer will not work as a cooling device and will nearly double in volume. To set at any position between Moist (Figure 1) and Crispy (Figure 2) position. Preparing Bread Dough for the controls to be set...
Owners Guide
Page 9
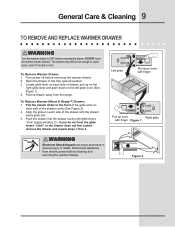
... touch the warmer drawer element. To Remove Warmer Drawer: 1. Turn power off before cleaning and servicing the warmer drawer. WARNING Electrical Shock Hazard can occur and result in color. Figure 2 Open the drawer to OFF before removing the drawer. Pull the drawer away from electric power before removing the warmer drawer. 2. Left glide Lever Pull down on each side of the drawer with finger Figure 1 ! General Care & Cleaning 9 TO REMOVE AND REPLACE WARMER DRAWER ! Locate glide lever...
... touch the warmer drawer element. To Remove Warmer Drawer: 1. Turn power off before cleaning and servicing the warmer drawer. WARNING Electrical Shock Hazard can occur and result in color. Figure 2 Open the drawer to OFF before removing the drawer. Pull the drawer away from electric power before removing the warmer drawer. 2. Left glide Lever Pull down on each side of the drawer with finger Figure 1 ! General Care & Cleaning 9 TO REMOVE AND REPLACE WARMER DRAWER ! Locate glide lever...
Owners Guide
Page 10
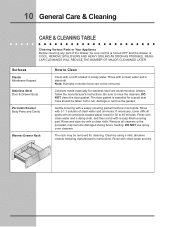
.... Care should be removed . The rack may become damaged during future heating. Surfaces Plastic Membrane Keypad Stainless Steel Door & Drawer Body Porcelain Enamel Body Parts and Cavity Warmer Drawer Rack How to rub, damage or remove the gasket. Note: Humidity controller knob can not be taken not to Clean Clean with a clean cloth. REMOVE SPILLOVERS AND HEAVY SOILING AS SOON AS POSSIBLE. 10 General Care & Cleaning CARE & CLEANING TABLE Cleaning Various Parts...
.... Care should be removed . The rack may become damaged during future heating. Surfaces Plastic Membrane Keypad Stainless Steel Door & Drawer Body Porcelain Enamel Body Parts and Cavity Warmer Drawer Rack How to rub, damage or remove the gasket. Note: Humidity controller knob can not be taken not to Clean Clean with a clean cloth. REMOVE SPILLOVERS AND HEAVY SOILING AS SOON AS POSSIBLE. 10 General Care & Cleaning CARE & CLEANING TABLE Cleaning Various Parts...
Owners Guide
Page 11
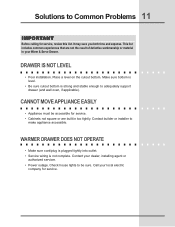
.... Make sure bottom is level. • Be sure cutout bottom is not complete. Contact your Warm & Serve Drawer. Check house lights to Common Problems 11 IMPORTANT Before calling for service, review this list. WARMER DRAWER DOES NOT OPERATE • Make sure cord/plug is plugged tightly into outlet. • Service wiring is strong and stable enough to make appliance accessible. CANNOT MOVE APPLIANCE EASILY •...
.... Make sure bottom is level. • Be sure cutout bottom is not complete. Contact your Warm & Serve Drawer. Check house lights to Common Problems 11 IMPORTANT Before calling for service, review this list. WARMER DRAWER DOES NOT OPERATE • Make sure cord/plug is plugged tightly into outlet. • Service wiring is strong and stable enough to make appliance accessible. CANNOT MOVE APPLIANCE EASILY •...
Owners Guide
Page 12
... in accordance with original serial numbers that are not a part of White Consolidated Industries, Inc. The date on models with the product. 2. Proper use of light bulbs and/or fluorescent tubes (on the bill establishes the warranty period should service be readily determined. Damages to finish after installation. 6. Damages caused by services performed by servicers other than genuine Electrolux Home Products parts; You may not apply...
... in accordance with original serial numbers that are not a part of White Consolidated Industries, Inc. The date on models with the product. 2. Proper use of light bulbs and/or fluorescent tubes (on the bill establishes the warranty period should service be readily determined. Damages to finish after installation. 6. Damages caused by services performed by servicers other than genuine Electrolux Home Products parts; You may not apply...
Installation Instructions
Page 1
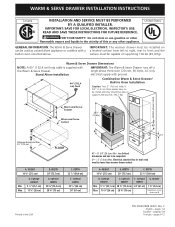
... LOCAL ELECTRICAL INSPECTOR'S USE. C 60" (152,4 cm) Cord Combination Warm & Serve Drawer/ Built-in oven mounted above. cutout height Min. 9 7/8" (25,1 cm) Max. 10 ¼" (26 cm) B. WIDTH 29" (73,7 cm) C. cutout width 28 ½" (72,4 cm) 28 ¾" (73 cm) C. pages 9-12 1 Stand Alone Installation IMPORTANT: The Warm & Serve Drawer runs off a single phase three-wire 120 volt, 60 hertz, AC only electrical supply with a built-in Oven Installation...
... LOCAL ELECTRICAL INSPECTOR'S USE. C 60" (152,4 cm) Cord Combination Warm & Serve Drawer/ Built-in oven mounted above. cutout height Min. 9 7/8" (25,1 cm) Max. 10 ¼" (26 cm) B. WIDTH 29" (73,7 cm) C. cutout width 28 ½" (72,4 cm) 28 ¾" (73 cm) C. pages 9-12 1 Stand Alone Installation IMPORTANT: The Warm & Serve Drawer runs off a single phase three-wire 120 volt, 60 hertz, AC only electrical supply with a built-in Oven Installation...
Installation Instructions
Page 2
... plugged into a 120 Volt grounded outlet. • This appliance must be connected into cutout opening until front frame of cabinet. Figure 1 2 Remove all governing codes and ordinances. 4. Be careful not to pinch electrical cord. 3.Remove the drawer as shown on fig. 1. Observe all packing material from appliance before installing appliance. 2. Read all instructions contained in oven. Important Note to cabinet using the 3 nickel-plated screws supplied (see Figure 2). WARM...
... plugged into a 120 Volt grounded outlet. • This appliance must be connected into cutout opening until front frame of cabinet. Figure 1 2 Remove all governing codes and ordinances. 4. Be careful not to pinch electrical cord. 3.Remove the drawer as shown on fig. 1. Observe all packing material from appliance before installing appliance. 2. Read all instructions contained in oven. Important Note to cabinet using the 3 nickel-plated screws supplied (see Figure 2). WARM...
Installation Instructions
Page 3
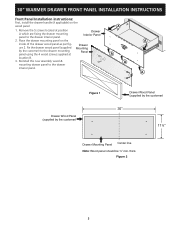
... drawer B A interior panel. thick. Drawer Interior Panel 2. Figure 2 3 A 1. Fix the drawer wood panel (supplied Mounting by the customer) 30'' 11¼'' Drawer Mounting Panel Center line Note: Wood panel should be ½'' min. Reinstall this new assembly wood & mounting drawer panel to the drawer interior panel. Drawer ure 2. Place the drawer mounting panel on the wood panel. 30" WAWRAMREMR&DRSAERWVEERDFRrAoWntERPaINnSeTlAILNLSATTAIOLLNAITNIOSTNRIUNCSTTIROUNCSTIONS Front Panel Installation instructions: First, install the drawer handle (if applicable) on the A inside...
... drawer B A interior panel. thick. Drawer Interior Panel 2. Figure 2 3 A 1. Fix the drawer wood panel (supplied Mounting by the customer) 30'' 11¼'' Drawer Mounting Panel Center line Note: Wood panel should be ½'' min. Reinstall this new assembly wood & mounting drawer panel to the drawer interior panel. Drawer ure 2. Place the drawer mounting panel on the wood panel. 30" WAWRAMREMR&DRSAERWVEERDFRrAoWntERPaINnSeTlAILNLSATTAIOLLNAITNIOSTNRIUNCSTTIROUNCSTIONS Front Panel Installation instructions: First, install the drawer handle (if applicable) on the A inside...
Installation Instructions
Page 4
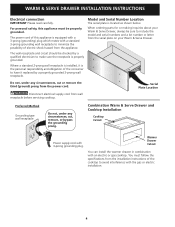
...) plug which mates with the gas or electric installation. 4 Serial Plate Location Disconnect electrical supply cord from the serial plate on your Warm & Serve Drawer. The power cord of this appliance must follow the specifications from the power cord. Do not, under any circumstances, cut , remove, or bypass the grounding prong. Combination Warm & Serve Drawer and Cooktop Installation Cooktop Cutout Power supply cord with an electric or gas cooktop. The wall receptacle and circuit should be checked by a properly grounded 3-prong wall receptacle. Model and Serial Number...
...) plug which mates with the gas or electric installation. 4 Serial Plate Location Disconnect electrical supply cord from the serial plate on your Warm & Serve Drawer. The power cord of this appliance must follow the specifications from the power cord. Do not, under any circumstances, cut , remove, or bypass the grounding prong. Combination Warm & Serve Drawer and Cooktop Installation Cooktop Cutout Power supply cord with an electric or gas cooktop. The wall receptacle and circuit should be checked by a properly grounded 3-prong wall receptacle. Model and Serial Number...


