
Use and Care Manual
Page 6
... is necessary when used successfully in your microwave oven: • Small flat pieces of aluminum foil placed smoothly on the microwave oven door. Electrolux is not responsible for 30 seconds. Between the ages of the microwave oven. Children need tenderizing. ABOUT SAFETY • Check foods to slit...meats or foods that need to learn that crisp food because they meet your clothes or accessories do not touch the safety door latches. 6 Vent so steam can cause arcing and/or fires. • Use care when removing items from the face and hands. The following coverings are ...
... is necessary when used successfully in your microwave oven: • Small flat pieces of aluminum foil placed smoothly on the microwave oven door. Electrolux is not responsible for 30 seconds. Between the ages of the microwave oven. Children need tenderizing. ABOUT SAFETY • Check foods to slit...meats or foods that need to learn that crisp food because they meet your clothes or accessories do not touch the safety door latches. 6 Vent so steam can cause arcing and/or fires. • Use care when removing items from the face and hands. The following coverings are ...
Use and Care Manual
Page 9
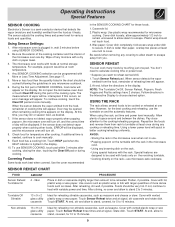
... for the best cooking and reheating, use SENSOR COOKING, touch pad within 3 minutes after cooking. Operating Instructions Special Features SENSOR COOKING Electrolux's Sensor is lighted in the Interactive Display to turntable at signal, rotate dish. Do not open the microwave oven door or touch...and power level for microwave cooking. Follow directions in the display. 10. When using SENSOR COOKING. 2. Pay close attention to heat with vented plastic wrap or wax paper. If not, continue to the cooking/reheating progress. NOTE: The Turntable On/Off, Sensor Reheat, Popcorn,...
... for the best cooking and reheating, use SENSOR COOKING, touch pad within 3 minutes after cooking. Operating Instructions Special Features SENSOR COOKING Electrolux's Sensor is lighted in the Interactive Display to turntable at signal, rotate dish. Do not open the microwave oven door or touch...and power level for microwave cooking. Follow directions in the display. 10. When using SENSOR COOKING. 2. Pay close attention to heat with vented plastic wrap or wax paper. If not, continue to the cooking/reheating progress. NOTE: The Turntable On/Off, Sensor Reheat, Popcorn,...
Use and Care Manual
Page 11
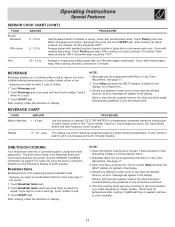
... or tea to restore to a more or less than the allowed amount, an error message will appear in the Interactive Display to assist with vented plastic wrap. ONE-TOUCH COOKING Your microwave oven has 3 convenient pads to enter quantity. Touch Breakfast Items pad. 2. If you want to... cooking hint. The final cooking result will appear in the display. 4. There are some foods in ring around shallow glass dish (roll fillet with vented plastic wrap. Fish .25 - 2.0 lb Arrange in the Breakfast Items and Lunch Items that use Breakfast Items to make 2 cups of glass dish...
... or tea to restore to a more or less than the allowed amount, an error message will appear in the Interactive Display to assist with vented plastic wrap. ONE-TOUCH COOKING Your microwave oven has 3 convenient pads to enter quantity. Touch Breakfast Items pad. 2. If you want to... cooking hint. The final cooking result will appear in the display. 4. There are some foods in ring around shallow glass dish (roll fillet with vented plastic wrap. Fish .25 - 2.0 lb Arrange in the Breakfast Items and Lunch Items that use Breakfast Items to make 2 cups of glass dish...
Parts Catalog
Page 5
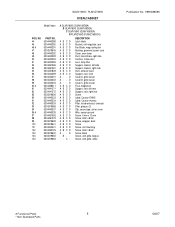
... cover Wire, sensor ground Screw, 4 mm x 12 mm Screw, 4mm x 8mm Screw, wrapper, back Screw Screw, unit mounting Screw, 3mm x 8mm Screw, black Screw, vent grille, bisque Screw, vent grille, white Publication No: 5995489696 # Functional Parts 5 * Non-Illustrated Parts 04/07 D A B C D A B C D A B C D A B C D A B C D A B C D A B C D A B C D A B C D A B C D A B C D A B C D A B C D A B C D A B C D A B C D A- - D A- - C- NO 44 45 46 # 47 48 49 50 51 52 53...
... cover Wire, sensor ground Screw, 4 mm x 12 mm Screw, 4mm x 8mm Screw, wrapper, back Screw Screw, unit mounting Screw, 3mm x 8mm Screw, black Screw, vent grille, bisque Screw, vent grille, white Publication No: 5995489696 # Functional Parts 5 * Non-Illustrated Parts 04/07 D A B C D A B C D A B C D A B C D A B C D A B C D A B C D A B C D A B C D A B C D A B C D A B C D A B C D A B C D A B C D A B C D A- - D A- - C- NO 44 45 46 # 47 48 49 50 51 52 53...
Installation Instructions
Page 2
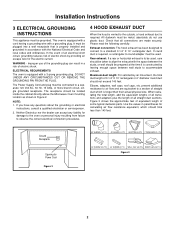
...equipped with a grounding plug. ELECTRICAL REQUIREMENTS The oven is equipped with a cord having a grounding wire with a 3-prong grounding plug. Neither Electrolux nor the dealer can result in Figure 2. If round duct is required. When calculating the total length, add the equivalent lengths of all ...damage to the oven or personal injury resulting from failure to observe the correct electrical connection procedures. 4 HOOD EXHAUST DUCT When the hood is vented to the outside, a hood exhaust duct is required, a rectangular-to-round adapter must be used , care should be taken to align...
...equipped with a grounding plug. ELECTRICAL REQUIREMENTS The oven is equipped with a cord having a grounding wire with a 3-prong grounding plug. Neither Electrolux nor the dealer can result in Figure 2. If round duct is required. When calculating the total length, add the equivalent lengths of all ...damage to the oven or personal injury resulting from failure to observe the correct electrical connection procedures. 4 HOOD EXHAUST DUCT When the hood is vented to the outside, a hood exhaust duct is required, a rectangular-to-round adapter must be used , care should be taken to align...
Installation Instructions
Page 4
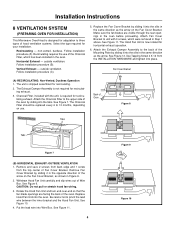
.... Recirculating requires the use . Vertical Exhaust - See Figure 12. Fan Cover Bracket (A) RECIRCULATING: Non-Vented, Ductless Operation 1. Remove Fan Cover Bracket by sliding into the slits in the same direction as the arrow on the Fan Cover Bracket, as the ...
.... Recirculating requires the use . Vertical Exhaust - See Figure 12. Fan Cover Bracket (A) RECIRCULATING: Non-Vented, Ductless Operation 1. Remove Fan Cover Bracket by sliding into the slits in the same direction as the arrow on the Fan Cover Bracket, as the ...

