

Use and Care Manual
Page 1
Over-the-Range Microwave Oven CGLMV169, GLMV169 CPLMV169, PLMV169 Visit the Frigidaire Web Site at: http://www.frigidaire.com READ AND SAVE THESE INSTRUCTIONS Welcome & Congratulation ...... 2 Important Safety Instructions .. 2-6 Part Names 7 Before Operating 8 Manual Operation 8 Operating Instructions 9-17 Cleaning and Care 18-19 Specifications 20 Service Call Check 20 Warranty 21 p/n 316137231 TINSEB380MRR0
Over-the-Range Microwave Oven CGLMV169, GLMV169 CPLMV169, PLMV169 Visit the Frigidaire Web Site at: http://www.frigidaire.com READ AND SAVE THESE INSTRUCTIONS Welcome & Congratulation ...... 2 Important Safety Instructions .. 2-6 Part Names 7 Before Operating 8 Manual Operation 8 Operating Instructions 9-17 Cleaning and Care 18-19 Specifications 20 Service Call Check 20 Warranty 21 p/n 316137231 TINSEB380MRR0

Use and Care Manual
Page 5
... of microwave cooking. Even if the container is . To prevent possible injury, direct steam away from microwave oven and stir, if possible. Condensation is a normal part of dish is very hot to boil during cooking. • Avoid heating baby food in injury. • Operating the microwave with the lid off . It...
... of microwave cooking. Even if the container is . To prevent possible injury, direct steam away from microwave oven and stir, if possible. Condensation is a normal part of dish is very hot to boil during cooking. • Avoid heating baby food in injury. • Operating the microwave with the lid off . It...
Use and Care Manual
Page 7
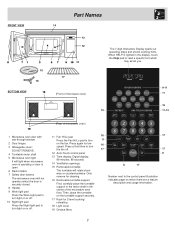
... unless the door is lighted in the center of microwave oven) The 7-digit Interactive Display spells out operating steps and shows cooking hints. FRONT VIEW Part Names 14 13 12 15 16 BOTTOM VIEW 17 (Front of the microwave oven floor.
... unless the door is lighted in the center of microwave oven) The 7-digit Interactive Display spells out operating steps and shows cooking hints. FRONT VIEW Part Names 14 13 12 15 16 BOTTOM VIEW 17 (Front of the microwave oven floor.
Use and Care Manual
Page 9
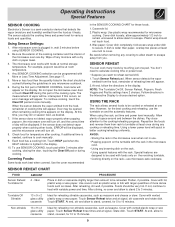
... secure. The microwave oven works with vented plastic wrap or wax paper. More or less food than amount to be interrupted. If this part of reheating time will assist in the SENSOR COOKING CHART for 10 to stand, covered, for these foods. 1. If additional time is ...or during this occurs, an error message will be opened when remaining cooking time appears on the display. Operating Instructions Special Features SENSOR COOKING Electrolux's Sensor is needed, continue to cook manually. 9. When the sensor detects the vapor emitted from the food, remainder of the cooking cycle...
... secure. The microwave oven works with vented plastic wrap or wax paper. More or less food than amount to be interrupted. If this part of reheating time will assist in the SENSOR COOKING CHART for 10 to stand, covered, for these foods. 1. If additional time is ...or during this occurs, an error message will be opened when remaining cooking time appears on the display. Operating Instructions Special Features SENSOR COOKING Electrolux's Sensor is needed, continue to cook manually. 9. When the sensor detects the vapor emitted from the food, remainder of the cooking cycle...
Use and Care Manual
Page 18
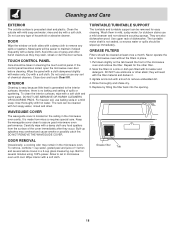
... filter Tab 18 Cleaning and Care EXTERIOR The outside with hot water and detergent. DOOR Wipe the window on both sides with a damp cloth. Metal parts will react with a damp cloth any type of chemical cleaners. Wipe the panel with a cloth dampened slightly with a soft cloth and warm water. Carefully wipe...
... filter Tab 18 Cleaning and Care EXTERIOR The outside with hot water and detergent. DOOR Wipe the window on both sides with a damp cloth. Metal parts will react with a damp cloth any type of chemical cleaners. Wipe the panel with a cloth dampened slightly with a soft cloth and warm water. Carefully wipe...
Use and Care Manual
Page 19
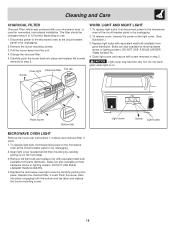
Pull the louver away from parts distributor. Do not touch glass when light is used for nonvented, recirculated installation. Open light cover located behind filter mounting by carefully pushing into place. ... power to 12 months depending on the front edge. 3. Cleaning and Care CHARCOAL FILTER Charcoal Filter, which was enclosed with equivalent watt bulb available from parts distributor. Carefully push the louver back into place (engaging both the bottom and top tabs) and replace the louver mounting screw.
Pull the louver away from parts distributor. Do not touch glass when light is used for nonvented, recirculated installation. Open light cover located behind filter mounting by carefully pushing into place. ... power to 12 months depending on the front edge. 3. Cleaning and Care CHARCOAL FILTER Charcoal Filter, which was enclosed with equivalent watt bulb available from parts distributor. Carefully push the louver back into place (engaging both the bottom and top tabs) and replace the louver mounting screw.
Use and Care Manual
Page 21
...service charges. All of the provisions of service calls that are made by contacting Electrolux Home Products, Inc. Our obligations for any magnetron tube which Cost of shipping the replacement part to the nearest purchase date. Proper connection to obtain and keep all receipts....original Pay all local plumbing, electrical and/or gas codes. 3. Damages caused by services performed by servicers other than genuine Electrolux parts; You may not apply to state. CONSEQUENTIAL OR INCIDENTAL DAMAGES SUCH AS PROPERTY DAMAGE AND INCIDENTAL EXPENSES RESULTING FROM ANY ...
...service charges. All of the provisions of service calls that are made by contacting Electrolux Home Products, Inc. Our obligations for any magnetron tube which Cost of shipping the replacement part to the nearest purchase date. Proper connection to obtain and keep all receipts....original Pay all local plumbing, electrical and/or gas codes. 3. Damages caused by services performed by servicers other than genuine Electrolux parts; You may not apply to state. CONSEQUENTIAL OR INCIDENTAL DAMAGES SUCH AS PROPERTY DAMAGE AND INCIDENTAL EXPENSES RESULTING FROM ANY ...
Parts Catalog
Page 3
... Assy, turntable Tray, turntable, glass Retainer, capacitor strap Cover, stirrer fan Stirrer Assembly Filter, noise, electronic Bushing, motor shaft, turntable Publication No: 5995489696 # Functional Parts 3 * Non-Illustrated Parts 04/07 CA B C D A- - CA B C D A- - D - C- - - D - D - B- - - NO 1 # 2 # 3 # 4 # 5 # 6 # 7 # 8 # 9 # 10 # 11 # 12 # ...24 25 26 26 26 28 29 36 37 38 39 40 41 # 42 # 43 PART NO. 5304461352 5304440020 5304448488 5304448489 5304440023 5304456053 5304461353 5304440026 5303319559 5304440028 5303319561 5304440029 5304448490 5304440031 5304440032 ...
... Assy, turntable Tray, turntable, glass Retainer, capacitor strap Cover, stirrer fan Stirrer Assembly Filter, noise, electronic Bushing, motor shaft, turntable Publication No: 5995489696 # Functional Parts 3 * Non-Illustrated Parts 04/07 CA B C D A- - CA B C D A- - D - C- - - D - D - B- - - NO 1 # 2 # 3 # 4 # 5 # 6 # 7 # 8 # 9 # 10 # 11 # 12 # ...24 25 26 26 26 28 29 36 37 38 39 40 41 # 42 # 43 PART NO. 5304461352 5304440020 5304448488 5304448489 5304440023 5304456053 5304461353 5304440026 5303319559 5304440028 5303319561 5304440029 5304448490 5304440031 5304440032 ...
Parts Catalog
Page 5
...62 83 90 91 92 93 94 96 # 97 98 99 100 101 102 103 103 103 PART NO. 5304440289 5304440290 5304440291 5303319605 5304440292 5304440293 5304440294 5304440295 5304461366 5304461367 5304451828 5304440299 5304440301 5304440302 5304440303 5304458211 ...x 8mm Screw, wrapper, back Screw Screw, unit mounting Screw, 3mm x 8mm Screw, black Screw, vent grille, bisque Screw, vent grille, white Publication No: 5995489696 # Functional Parts 5 * Non-Illustrated Parts 04/07 D - D A B C D A B C D A B C D A B C D A B C D A B C D A B C D A B C D A B C D A B C D A B C D A B C D A B C D A B C D ...
...62 83 90 91 92 93 94 96 # 97 98 99 100 101 102 103 103 103 PART NO. 5304440289 5304440290 5304440291 5303319605 5304440292 5304440293 5304440294 5304440295 5304461366 5304461367 5304451828 5304440299 5304440301 5304440302 5304440303 5304458211 ...x 8mm Screw, wrapper, back Screw Screw, unit mounting Screw, 3mm x 8mm Screw, black Screw, vent grille, bisque Screw, vent grille, white Publication No: 5995489696 # Functional Parts 5 * Non-Illustrated Parts 04/07 D - D A B C D A B C D A B C D A B C D A B C D A B C D A B C D A B C D A B C D A B C D A B C D A B C D A B C D A B C D ...

Parts Catalog
Page 7
...65 65 67 69 71 72 73 73 73 73 74 75 76 77 78 79 80 81 82 88 # 89 # 95 97 PART NO. 5304440245 5304461358 5304461359 5304461360 5304461361 5304461362 5304461363 5304461364 5304461365 5304458568 5304456930 5304440300 5304461368 5304461369 5304461370 5304461371 5304461372 5304461373 5304461374 5304440308 5304440314 5304440316 5304440320..., main-A Rack, microwave oven, wire Screw, 4 mm x 12 mm * 5304451830 A B C D Template, installation, top * 5304451831 A B C D Template, installation, wall Publication No: 5995489696 # Functional Parts 7 * Non-Illustrated Parts 04/07 B- - - D A- -
...65 65 67 69 71 72 73 73 73 73 74 75 76 77 78 79 80 81 82 88 # 89 # 95 97 PART NO. 5304440245 5304461358 5304461359 5304461360 5304461361 5304461362 5304461363 5304461364 5304461365 5304458568 5304456930 5304440300 5304461368 5304461369 5304461370 5304461371 5304461372 5304461373 5304461374 5304440308 5304440314 5304440316 5304440320..., main-A Rack, microwave oven, wire Screw, 4 mm x 12 mm * 5304451830 A B C D Template, installation, top * 5304451831 A B C D Template, installation, wall Publication No: 5995489696 # Functional Parts 7 * Non-Illustrated Parts 04/07 B- - - D A- -
Installation Instructions
Page 2
... the following carefully: Exhaust connection: The hood exhaust has been designed to connect to a section of some typical ductwork parts. present additional resistance to air flow and are made securely. WARNING - Neither Electrolux nor the dealer can result in accordance with the space between wall studs to accommodate exhaust. Maximum duct length...
... the following carefully: Exhaust connection: The hood exhaust has been designed to connect to a section of some typical ductwork parts. present additional resistance to air flow and are made securely. WARNING - Neither Electrolux nor the dealer can result in accordance with the space between wall studs to accommodate exhaust. Maximum duct length...
Installation Instructions
Page 3
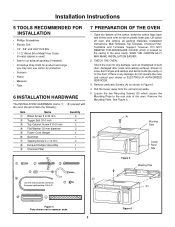
...) • Saw to cut exhaust opening (if needed) • Protective Drop Cloth for any damage, do not operate the oven and contact your dealer or ELECTROLUX AUTHORIZED SERVICER. 3. you may also use carton for protection • Scissors • Pencil • Measure • Tape 6 INSTALLATION HARDWARE The INSTALLATION HARDWARE (...1 1 4 1 1 7 PREPARATION OF THE OVEN 1. SAVE THE CARTON AS IT MAY MAKE INSTALLATION EASIER. 2. See Figure 6. (A) (A) (A) (A) Mounting Plate Control Panel Side Figure 5 Mounting Plate (D) (D) Figure 4 Parts shown not to common scale. 3 Figure 6
...) • Saw to cut exhaust opening (if needed) • Protective Drop Cloth for any damage, do not operate the oven and contact your dealer or ELECTROLUX AUTHORIZED SERVICER. 3. you may also use carton for protection • Scissors • Pencil • Measure • Tape 6 INSTALLATION HARDWARE The INSTALLATION HARDWARE (...1 1 4 1 1 7 PREPARATION OF THE OVEN 1. SAVE THE CARTON AS IT MAY MAKE INSTALLATION EASIER. 2. See Figure 6. (A) (A) (A) (A) Mounting Plate Control Panel Side Figure 5 Mounting Plate (D) (D) Figure 4 Parts shown not to common scale. 3 Figure 6


