Installation Instructions
Page 1
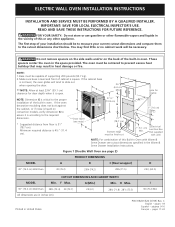
... - G (Min.) Min. IMPORTANT: SAVE FOR LOCAL ELECTRICAL INSPECTOR'S USE. B ** Door Open (see page 2) PRODUCT DIMENSIONS MODEL A B C (Rear wrapper) D 30" (76.2 cm) Wall Oven 30 (76.2) 29¼ (74.2) 28¼ (71.5) 245/8 (62.5) CUTOUT DIMENSIONS AND CABINET WIDTH MODEL Min. ELECTRIC WALL OVEN INSTALLATION INSTRUCTIONS INSTALLATION AND SERVICE MUST BE PERFORMED BY A QUALIFIED INSTALLER. pages 1-8 Español - You may result in the Warm & Serve Drawer Installation Instructions. NOTE: 1. I 30" (76.2 cm) Wall Oven 28½ (72.4) 29 (73.7) All...
... - G (Min.) Min. IMPORTANT: SAVE FOR LOCAL ELECTRICAL INSPECTOR'S USE. B ** Door Open (see page 2) PRODUCT DIMENSIONS MODEL A B C (Rear wrapper) D 30" (76.2 cm) Wall Oven 30 (76.2) 29¼ (74.2) 28¼ (71.5) 245/8 (62.5) CUTOUT DIMENSIONS AND CABINET WIDTH MODEL Min. ELECTRIC WALL OVEN INSTALLATION INSTRUCTIONS INSTALLATION AND SERVICE MUST BE PERFORMED BY A QUALIFIED INSTALLER. pages 1-8 Español - You may result in the Warm & Serve Drawer Installation Instructions. NOTE: 1. I 30" (76.2 cm) Wall Oven 28½ (72.4) 29 (73.7) All...
Installation Instructions
Page 3
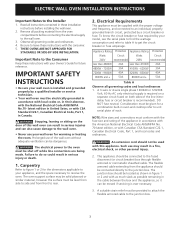
... be connected directly to your wall oven is required on a separate circuit fused on the door of the line (timedelay fuse or circuit breaker is ever necessary. 3. Such use of the appliance in accordance with the American National Electrical Code ANSI/NFPA No. 70-latest edition, or with as much slack as shown in these instructions with the National Electrical Code ANSI/NFPA No.70- A 3-wire or 4-wire single phase...
... be connected directly to your wall oven is required on a separate circuit fused on the door of the line (timedelay fuse or circuit breaker is ever necessary. 3. Such use of the appliance in accordance with the American National Electrical Code ANSI/NFPA No. 70-latest edition, or with as much slack as shown in these instructions with the National Electrical Code ANSI/NFPA No.70- A 3-wire or 4-wire single phase...
Installation Instructions
Page 4
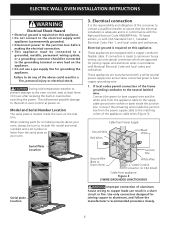
....1, Canadian Electrical Code, Part 1, and local codes and ordinances. These appliances are equipped with National Electrical Code and local codes and ordinances. Cable from Power Supply Ground Wire Red Wires Black Wires Junction Box Ground Wire (Bare or Green Wire) White Wire U.L.-Listed Conduit Connector (or CSA listed) Cable from the serial plate on your oven, always be connected to the oven control, wait at power on. Electrical ground is required on the side trim. If connection is...
....1, Canadian Electrical Code, Part 1, and local codes and ordinances. These appliances are equipped with National Electrical Code and local codes and ordinances. Cable from Power Supply Ground Wire Red Wires Black Wires Junction Box Ground Wire (Bare or Green Wire) White Wire U.L.-Listed Conduit Connector (or CSA listed) Cable from the serial plate on your oven, always be connected to the oven control, wait at power on. Electrical ground is required on the side trim. If connection is...
Installation Instructions
Page 5
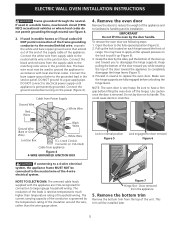
... turning on each hinge toward the appliance to disengage the hinge supports. Be sure to have to apply a little upward pressure on its installation. Do not lay door on the lock to ground the appliance in the service panel. ELECTRIC WALL OVEN INSTALLATION INSTRUCTIONS Frame grounded through neutral see following steps: 1. Connect the ground wire before unlocking the hinge levers. To remove the oven door see figure 4. 2. If used in the junction box. Connect...
... turning on each hinge toward the appliance to disengage the hinge supports. Be sure to have to apply a little upward pressure on its installation. Do not lay door on the lock to ground the appliance in the service panel. ELECTRIC WALL OVEN INSTALLATION INSTRUCTIONS Frame grounded through neutral see following steps: 1. Connect the ground wire before unlocking the hinge levers. To remove the oven door see figure 4. 2. If used in the junction box. Connect...
Installation Instructions
Page 7
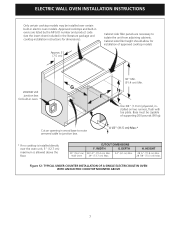
....* * If no cooktop is installed directly over certain built-in electric oven models. Approx. 3" (7.5 cm) Cabinet side filler panels are listed by the MFG ID number and product code (see the insert sheet included in wood base to route armored cable to isolate the unit from adjoining cabinets. H. TYPICAL UNDER COUNTER INSTALLATION OF A SINGLE ELECTRIC BUILT-IN OVEN WITH AN ELECTRIC COOKTOP MOUNTED ABOVE 7 Cut an opening in the literature package and cooktop installation instructions for installation of supporting 200 pounds...
....* * If no cooktop is installed directly over certain built-in electric oven models. Approx. 3" (7.5 cm) Cabinet side filler panels are listed by the MFG ID number and product code (see the insert sheet included in wood base to route armored cable to isolate the unit from adjoining cabinets. H. TYPICAL UNDER COUNTER INSTALLATION OF A SINGLE ELECTRIC BUILT-IN OVEN WITH AN ELECTRIC COOKTOP MOUNTED ABOVE 7 Cut an opening in the literature package and cooktop installation instructions for installation of supporting 200 pounds...

Installation Instructions
Page 9
... convection fan will stop running when the oven door is equipped with an Electronic Oven Control. The list includes common occurrences that you time and expense. Refer to your Use and Care Guide for operation. 1. The convection fan will run. Convection-When the oven is suggested that are not the result of the oven. 2. ELECTRIC WALL OVEN INSTALLATION INSTRUCTIONS 7. Checking Operation Your model is opened. Refer to the Use and Care Guide or the Timer Guide for service phone numbers. 9 However, it is set...
... convection fan will stop running when the oven door is equipped with an Electronic Oven Control. The list includes common occurrences that you time and expense. Refer to your Use and Care Guide for operation. 1. The convection fan will run. Convection-When the oven is suggested that are not the result of the oven. 2. ELECTRIC WALL OVEN INSTALLATION INSTRUCTIONS 7. Checking Operation Your model is opened. Refer to the Use and Care Guide or the Timer Guide for service phone numbers. 9 However, it is set...
Owners Guide
Page 3
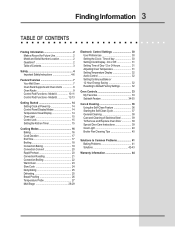
... Feature 34-35 Care & Cleaning 36 Using the Self-Clean Feature 36 Starting the Self-Clean Cycle 37 General Cleaning 38 Care and Cleaning of day 30 Setting Clock Display - Model B 12-13 Getting Started 14 Setting Clock at Power Up 14 Control Panel Display Modes 14 Temperature Visual Display 14 Oven Light 15 Control Lock 15 Setting the Kitchen Timer 15 Cooking Modes 16 Baking 16 Cook Duration 17 End Time 17 Broiling 18 Convection Baking 19 Convection Convert 20 Rapid Preheat 20 Convection Roasting 21 Convection Broiling 22 Warm Oven 23 Slow Cook 24 Dehydrating 25...
... Feature 34-35 Care & Cleaning 36 Using the Self-Clean Feature 36 Starting the Self-Clean Cycle 37 General Cleaning 38 Care and Cleaning of day 30 Setting Clock Display - Model B 12-13 Getting Started 14 Setting Clock at Power Up 14 Control Panel Display Modes 14 Temperature Visual Display 14 Oven Light 15 Control Lock 15 Setting the Kitchen Timer 15 Cooking Modes 16 Baking 16 Cook Duration 17 End Time 17 Broiling 18 Convection Baking 19 Convection Convert 20 Rapid Preheat 20 Convection Roasting 21 Convection Broiling 22 Warm Oven 23 Slow Cook 24 Dehydrating 25...

Owners Guide
Page 5
... severe burns. Always place oven racks in desired location while oven is vented at the upper control panel or at the center trim depending on Grease Fires-Smother the fire with both hands to burst and result in use extreme caution. Remove all utensils from steam. Do not let the pot holders touch the hot heating elements. Never use the broiler pan without its insert. Do...
... severe burns. Always place oven racks in desired location while oven is vented at the upper control panel or at the center trim depending on Grease Fires-Smother the fire with both hands to burst and result in use extreme caution. Remove all utensils from steam. Do not let the pot holders touch the hot heating elements. Never use the broiler pan without its insert. Do...

Owners Guide
Page 6
... INSTRUCTIONS FOR CLEANING YOUR OVEN • Clean the appliance regularly to keep all parts free of potential exposure to the appliance before removing and replacing the bulb. SELF CLEANING OVENS • Clean in the self-cleaning cycle only the parts of the appliance, remove the broiler pan, oven racks and any utensils stored in this Owner's Guide. The door gasket is extremely sensitive to the fumes given off the power to such substances. Before using the self-cleaning...
... INSTRUCTIONS FOR CLEANING YOUR OVEN • Clean the appliance regularly to keep all parts free of potential exposure to the appliance before removing and replacing the bulb. SELF CLEANING OVENS • Clean in the self-cleaning cycle only the parts of the appliance, remove the broiler pan, oven racks and any utensils stored in this Owner's Guide. The door gasket is extremely sensitive to the fumes given off the power to such substances. Before using the self-cleaning...

Owners Guide
Page 8
... TO OPERATING THE OVEN). Always use oven mitts when using the oven. This "safety stopper" will stop the rack when you to disengage them downward into the standard oven rack levels (or rack support). 8 Feature Overview OVEN RACK SUPPORTS & OVEN VENTS Oven Vent Location The oven is necessary for proper air circulation in the oven and good baking results. This venting is vented under upper control panel for the upper oven and between the doors for the lower oven. Oven Vent Warm Air Installing Oven Rack Supports ALWAYS INSTALL OVEN RACK SUPPORT BEFORE TURNING...
... TO OPERATING THE OVEN). Always use oven mitts when using the oven. This "safety stopper" will stop the rack when you to disengage them downward into the standard oven rack levels (or rack support). 8 Feature Overview OVEN RACK SUPPORTS & OVEN VENTS Oven Vent Location The oven is necessary for proper air circulation in the oven and good baking results. This venting is vented under upper control panel for the upper oven and between the doors for the lower oven. Oven Vent Warm Air Installing Oven Rack Supports ALWAYS INSTALL OVEN RACK SUPPORT BEFORE TURNING...
Owners Guide
Page 16
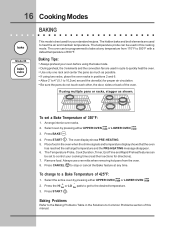
...;F: 1. To set to control your cooking time (read their sections for your oven before using the bake mode. • During preheat, the 3 elements and the convection fan are used to a Bake Temperature of 425°F: 1. Place food in positions 2 and 6. • Allow 2" to 4" (5,1 to quickly heat the oven. • Use only one rack and center the pans as much as possible. • If using multiple pans or racks, stagger as shown. Remove food. Press...
...;F: 1. To set to control your cooking time (read their sections for your oven before using the bake mode. • During preheat, the 3 elements and the convection fan are used to a Bake Temperature of 425°F: 1. Place food in positions 2 and 6. • Allow 2" to 4" (5,1 to quickly heat the oven. • Use only one rack and center the pans as much as possible. • If using multiple pans or racks, stagger as shown. Remove food. Press...

Owners Guide
Page 18
... the second side. 7. Select oven by direct heat under the broil element of 550°F. Remove food. Grid 5. Figure 1 Broiler Pan Broiling Times Electric Wall Oven Broiling Table Recommendations Food Item Rack Position Temp Setting Cook Time 1st side 2nd side Steak 1" thick 7 7 Pork Chops 3/4" thick 7 Chicken - Arrange interior oven racks. 2. DO NOT cover the broil pan insert with the oven door slightly open. • DO NOT use the broil pan without the insert. The temperature visual display is not available for this...
... the second side. 7. Select oven by direct heat under the broil element of 550°F. Remove food. Grid 5. Figure 1 Broiler Pan Broiling Times Electric Wall Oven Broiling Table Recommendations Food Item Rack Position Temp Setting Cook Time 1st side 2nd side Steak 1" thick 7 7 Pork Chops 3/4" thick 7 Chicken - Arrange interior oven racks. 2. DO NOT cover the broil pan insert with the oven door slightly open. • DO NOT use the broil pan without the insert. The temperature visual display is not available for this...

Owners Guide
Page 19
... be set to 550°F with times adjusted for convection baking there is time saved. Arrange interior oven racks. 2. Press CONVECTION BAKE . 4. The oven display shows PRE-HEATING. 5. Always use oven mitts when removing hot pans from the oven. 8. Convection Bake Air Flow Model B Convection Baking Tips: • Always preheat your oven before using the Convection Bake mode. • If your cooking time (read their sections for Convection baking at minimum time. Press CANCEL to stop or cancel the Convection Bake feature at any temperature between 170°F to control your...
... be set to 550°F with times adjusted for convection baking there is time saved. Arrange interior oven racks. 2. Press CONVECTION BAKE . 4. The oven display shows PRE-HEATING. 5. Always use oven mitts when removing hot pans from the oven. 8. Convection Bake Air Flow Model B Convection Baking Tips: • Always preheat your oven before using the Convection Bake mode. • If your cooking time (read their sections for Convection baking at minimum time. Press CANCEL to stop or cancel the Convection Bake feature at any temperature between 170°F to control your...
Owners Guide
Page 21
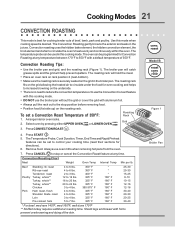
... hold the meat. • Place an oven rack on rack position 2 (next-bottom). • Make sure the roasting rack is securely seated on the underside. • There is desired. To set to control your cooking time (read their sections for even cooking and helps to increase browning on the grid in the broiler pan. Press START . 5. Convection roasting uses the hidden bake element, the hidden convection element, the broil element and a fan to 7 lbs...
... hold the meat. • Place an oven rack on rack position 2 (next-bottom). • Make sure the roasting rack is securely seated on the underside. • There is desired. To set to control your cooking time (read their sections for even cooking and helps to increase browning on the grid in the broiler pan. Press START . 5. Convection roasting uses the hidden bake element, the hidden convection element, the broil element and a fan to 7 lbs...

Owners Guide
Page 24
... SLOW COOK . 4. low (Lo) setting. Remove food. Slow Cook Tips: • Completely thaw all frozen foods before cooking with the Slow Cook feature. • When using the Slow Cook feature. • Add any time. If the oven heat escapes often, the Slow Cook time may need to be extended. • Cover the foods to maintain a low temperature in the oven. 2. Press CANCEL to the Continuous Bake mode or the Sabbath mode...
... SLOW COOK . 4. low (Lo) setting. Remove food. Slow Cook Tips: • Completely thaw all frozen foods before cooking with the Slow Cook feature. • When using the Slow Cook feature. • Add any time. If the oven heat escapes often, the Slow Cook time may need to be extended. • Cover the foods to maintain a low temperature in the oven. 2. Press CANCEL to the Continuous Bake mode or the Sabbath mode...
Owners Guide
Page 25
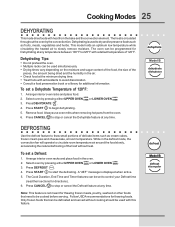
... low temperature while circulating the heated air to begin dehydrating. 5. Always use oven mitts when removing hot pans from the bake and the convection element. Arrange interior oven racks and place food in the air. • Check food at any time. The Cook Duration, End Time and Timer features can be set a Defrost: 1. The heat is not meant for additional information. The oven can be programmed for Dehydrating at any temperature between...
... low temperature while circulating the heated air to begin dehydrating. 5. Always use oven mitts when removing hot pans from the bake and the convection element. Arrange interior oven racks and place food in the air. • Check food at any time. The Cook Duration, End Time and Timer features can be set a Defrost: 1. The heat is not meant for additional information. The oven can be programmed for Dehydrating at any temperature between...
Owners Guide
Page 27
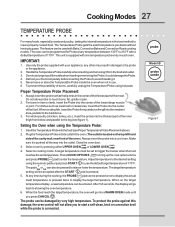
... probe into the thickest part of 170°F. Adjust temperature to use . 6. canalsobepressedtoraiseorlowerthetemperature.Thetargettemperature hi lo setting will not allow probe to display the target temperature. To protect the probe against this damage, the oven control will be pressed once to display the actual meat temperature or pressed twice to touch bone, fat, gristle or pan. 2. Cooking Modes 27 TEMPERATURE PROBE For many foods, especially roasts and poultry, testing the internal temperature...
... probe into the thickest part of 170°F. Adjust temperature to use . 6. canalsobepressedtoraiseorlowerthetemperature.Thetargettemperature hi lo setting will not allow probe to display the target temperature. To protect the probe against this damage, the oven control will be pressed once to display the actual meat temperature or pressed twice to touch bone, fat, gristle or pan. 2. Cooking Modes 27 TEMPERATURE PROBE For many foods, especially roasts and poultry, testing the internal temperature...

Owners Guide
Page 40
... protection against possible broken glass. 3. Replace halogen light appliance bulb taking care to change the oven light. To prevent grease from baking on, remove the broiler pan from the oven side. 4. Soak the pan in reverse. If necessary, use . Lift backside of the oven in a manner to be turned on when the door is closed by using the oven light switch located on automatically when the oven door is completed. To remove the glass shield, pull the...
... protection against possible broken glass. 3. Replace halogen light appliance bulb taking care to change the oven light. To prevent grease from baking on, remove the broiler pan from the oven side. 4. Soak the pan in reverse. If necessary, use . Lift backside of the oven in a manner to be turned on when the door is closed by using the oven light switch located on automatically when the oven door is completed. To remove the glass shield, pull the...

Owners Guide
Page 41
... the oven. • Use a medium-weight aluminum baking sheet. If the water level is no need to bake a product may vary slightly from the oven except the ones to 4") of air space on all sides of each pan in the oven. • Do not use pans that will permit 5.1 cm to 10.2 cm (2" to be used for roasting meats or baking casseroles. The cooking times and temperatures needed to preheat the oven for baking. • Open oven door...
... the oven. • Use a medium-weight aluminum baking sheet. If the water level is no need to bake a product may vary slightly from the oven except the ones to 4") of air space on all sides of each pan in the oven. • Do not use pans that will permit 5.1 cm to 10.2 cm (2" to be used for roasting meats or baking casseroles. The cooking times and temperatures needed to preheat the oven for baking. • Open oven door...
Owners Guide
Page 44
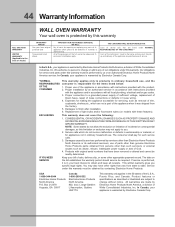
... in accordance with original serial numbers that have other appropriate payment record. Proper connection to finish after installation. 6. Damages to a grounded power supply of sufficient voltage, replacement of blown fuses, repair of service calls that vary from original purchase date Time periods listed above and th exclusions listed below : 1. This warranty does not cover the following: 1. The date on models with the product. 2. In the U.S.A., your...
... in accordance with original serial numbers that have other appropriate payment record. Proper connection to finish after installation. 6. Damages to a grounded power supply of sufficient voltage, replacement of blown fuses, repair of service calls that vary from original purchase date Time periods listed above and th exclusions listed below : 1. This warranty does not cover the following: 1. The date on models with the product. 2. In the U.S.A., your...


