Installation Instructions
Page 1
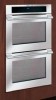
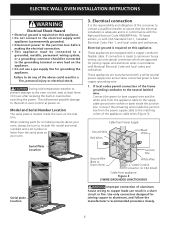
...23¼" (59.1 cm) C clearance for cable NOTE: Dimension G is 31" (78.7 cm). Electrical Junction Box (not supplied with Warm & Serve Drawer see cutout dimensions specified in oven. I 21/2" (6.4 cm) Min. NOTE: 1. Make sure base is square. páginas 9-16 Fran...(71.8) 287/8 (73.3) 30 (76.2) Min Printed in the space provided. Figure 1 (Double Wall Oven see note) A Spacer D 27 7/8" (70.8 cm) H F 31"* (78.7 cm) Bottom edge must be necessary. B ** Door Open (see page 2) PRODUCT DIMENSIONS MODEL A B C (Rear wrapper) D 30" (76.2 cm) Wall Oven 30 (76.2) 29¼ (...
...23¼" (59.1 cm) C clearance for cable NOTE: Dimension G is 31" (78.7 cm). Electrical Junction Box (not supplied with Warm & Serve Drawer see cutout dimensions specified in oven. I 21/2" (6.4 cm) Min. NOTE: 1. Make sure base is square. páginas 9-16 Fran...(71.8) 287/8 (73.3) 30 (76.2) Min Printed in the space provided. Figure 1 (Double Wall Oven see note) A Spacer D 27 7/8" (70.8 cm) H F 31"* (78.7 cm) Bottom edge must be necessary. B ** Door Open (see page 2) PRODUCT DIMENSIONS MODEL A B C (Rear wrapper) D 30" (76.2 cm) Wall Oven 30 (76.2) 29¼ (...
Installation Instructions
Page 2
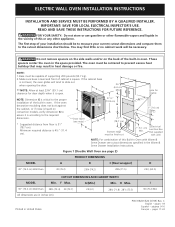
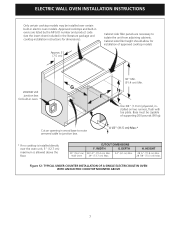
... remove spacers on the side walls and/or on convection models, verify dimension G to assure it is open. 21/2" I 30 (76.2) Min 2 Electrical Junction Box (not supplied with unit) MODEL 30" (76.2 cm) Wall Oven Figure 2 (Single Wall Oven see note) D (11.4 cm). H Max. 30" (76.2 cm) Wall Oven 28½ (72.4) 29 (73.7) All dimensions are in heat...
... remove spacers on the side walls and/or on convection models, verify dimension G to assure it is open. 21/2" I 30 (76.2) Min 2 Electrical Junction Box (not supplied with unit) MODEL 30" (76.2 cm) Wall Oven Figure 2 (Single Wall Oven see note) D (11.4 cm). H Max. 30" (76.2 cm) Wall Oven 28½ (72.4) 29 (73.7) All dimensions are in heat...
Installation Instructions
Page 3
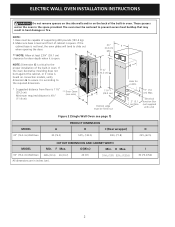
...wire or 4-wire single phase 120/240 or 120/208 Volt, 60 Hz AC only electrical supply is ever necessary. 3. DO NOT fuse neutral. An extension cord should be used with your model, see the serial plate to find the wattage consumption and refer to table A to...serious injury or death. 1. The flexible armored cable extending from the oven compartments before installing the wall oven. 2. THESE OVENS ARE NOT APPROVED FOR STACKABLE OR SIDE-BY-SIDE INSTALLATION. Electrical Requirements This appliance must be electrically grounded in accordance with local codes or, in their absence, with...
...wire or 4-wire single phase 120/240 or 120/208 Volt, 60 Hz AC only electrical supply is ever necessary. 3. DO NOT fuse neutral. An extension cord should be used with your model, see the serial plate to find the wattage consumption and refer to table A to...serious injury or death. 1. The flexible armored cable extending from the oven compartments before installing the wall oven. 2. THESE OVENS ARE NOT APPROVED FOR STACKABLE OR SIDE-BY-SIDE INSTALLATION. Electrical Requirements This appliance must be electrically grounded in accordance with local codes or, in their absence, with...
Installation Instructions
Page 4
...location 3. Electrical ground is located inside the oven on the side trim. If local codes permit connection of the frame grounding conductor to aluminum, and follow the manufacturer's recommended procedure closely. 4 Use only connectors designed for grounding the appliance. Model and ... and a frame connected green or bare copper grounding wire. 1. ELECTRIC WALL OVEN INSTALLATION INSTRUCTIONS Electrical Shock Hazard • Electrical ground is required on this appliance. • Do not connect to the electrical supply until appliance is permanently grounded. • Disconnect power to ...
...location 3. Electrical ground is located inside the oven on the side trim. If local codes permit connection of the frame grounding conductor to aluminum, and follow the manufacturer's recommended procedure closely. 4 Use only connectors designed for grounding the appliance. Model and ... and a frame connected green or bare copper grounding wire. 1. ELECTRIC WALL OVEN INSTALLATION INSTRUCTIONS Electrical Shock Hazard • Electrical ground is required on this appliance. • Do not connect to the electrical supply until appliance is permanently grounded. • Disconnect power to ...
Installation Instructions
Page 7
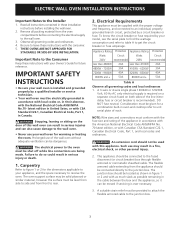
....5 cm) Max.* * If no cooktop is allowed above the floor. 30" (76.2 cm) Wall Oven CUTOUT DIMENSIONS F. HEIGHT 28 ¼" (71.8 cm) Min. 28 7/8" (73.3 cm) Max. Figure 12- ELECTRIC WALL OVEN INSTALLATION INSTRUCTIONS Only certain cooktop models may be capable of approved cooktop models 208/240 Volt junction box for dimensions). Approved cooktops and built...
....5 cm) Max.* * If no cooktop is allowed above the floor. 30" (76.2 cm) Wall Oven CUTOUT DIMENSIONS F. HEIGHT 28 ¼" (71.8 cm) Min. 28 7/8" (73.3 cm) Max. Figure 12- ELECTRIC WALL OVEN INSTALLATION INSTRUCTIONS Only certain cooktop models may be capable of approved cooktop models 208/240 Volt junction box for dimensions). Approved cooktops and built...

Installation Instructions
Page 9
...: Bake- Turn on and off alternately and the convection fan will stop running when the oven door is set for operation. 1. Verify the operation of the oven. 2. The convection fan will run. ELECTRIC WALL OVEN INSTALLATION INSTRUCTIONS 7. Checking Operation Your model is set to the Use and Care Guide or the Timer Guide for a convection...
...: Bake- Turn on and off alternately and the convection fan will stop running when the oven door is set for operation. 1. Verify the operation of the oven. 2. The convection fan will run. ELECTRIC WALL OVEN INSTALLATION INSTRUCTIONS 7. Checking Operation Your model is set to the Use and Care Guide or the Timer Guide for a convection...
Owners Guide
Page 2
QUESTIONS? For toll-free telephone support in the USA Printed in the U. 2 Finding Information MAKE A RECORD FOR FUTURE USE Brand Purchase Date Model Number Serial Number MODEL AND SERIAL NUMBER LOCATION NOTE The serial plate is located along the interior side trim of the oven and visible when the door is opened. See picture below. and Canada: 1-877-4ELECTROLUX (1-877-435-3287) For online support and internet product information: www.electroluxicon.com ©2008 Electrolux Home Products, Inc. Post Office Box 212378, Augusta, Georgia 30917, USA All rights reserved. S.
QUESTIONS? For toll-free telephone support in the USA Printed in the U. 2 Finding Information MAKE A RECORD FOR FUTURE USE Brand Purchase Date Model Number Serial Number MODEL AND SERIAL NUMBER LOCATION NOTE The serial plate is located along the interior side trim of the oven and visible when the door is opened. See picture below. and Canada: 1-877-4ELECTROLUX (1-877-435-3287) For online support and internet product information: www.electroluxicon.com ©2008 Electrolux Home Products, Inc. Post Office Box 212378, Augusta, Georgia 30917, USA All rights reserved. S.
Owners Guide
Page 3
... Cycle 37 General Cleaning 38 Care and Cleaning of day 30 Setting Clock Display - Time of Stainless Steel 39 To Remove and Replace Oven Door 39 Special Door Care Instructions 39 Oven Light 40 Broiler Pan Cleaning Tips 40 Solutions to Common ... Finding Information 2 Make a Record for Future Use 2 Model and Serial Number Location 2 Questions 2 Table of Contents 3 Safety 4 Important Safety Instructions 4-6 Feature Overview 7 Your Wall Oven 7 Oven Rack Supports and Oven Vents 8 Oven Racks 9 Control Pad Functions - Model B 12-13 Getting Started 14 Setting Clock at Power ...
... Cycle 37 General Cleaning 38 Care and Cleaning of day 30 Setting Clock Display - Time of Stainless Steel 39 To Remove and Replace Oven Door 39 Special Door Care Instructions 39 Oven Light 40 Broiler Pan Cleaning Tips 40 Solutions to Common ... Finding Information 2 Make a Record for Future Use 2 Model and Serial Number Location 2 Questions 2 Table of Contents 3 Safety 4 Important Safety Instructions 4-6 Feature Overview 7 Your Wall Oven 7 Oven Rack Supports and Oven Vents 8 Oven Racks 9 Control Pad Functions - Model B 12-13 Getting Started 14 Setting Clock at Power ...

Owners Guide
Page 4
...on Appliance-Flammable materials should be stored or discarded. Children climbing on the door of fire, electrical shock, or injury when using your wall oven, follow basic precautions including the following: • Remove all safety instructions before using the ... remove the wiring label and other part of the product. • Remove the oven door from any part of the wall oven. Do not remove model/serial number plate. • Proper Installation-Be sure your appliance is to be ... INSTRUCTIONS Please read all tape and packaging wrap before using your new Electrolux wall oven. !
...on Appliance-Flammable materials should be stored or discarded. Children climbing on the door of fire, electrical shock, or injury when using your wall oven, follow basic precautions including the following: • Remove all safety instructions before using the ... remove the wiring label and other part of the product. • Remove the oven door from any part of the wall oven. Do not remove model/serial number plate. • Proper Installation-Be sure your appliance is to be ... INSTRUCTIONS Please read all tape and packaging wrap before using your new Electrolux wall oven. !

Owners Guide
Page 5
... Safety 5 To reduce the risk of tipping of Oven Racks. The appliance must be kept away from the rack before you remove or replace food in use your appliance for warming or heating the room. • Do Not Use Water or Flour on the model. See installation instructions. • Do not leave... children alone-Children should never be allowed to become hot enough to cool. If rack must be left alone or unattended in this area when the wall oven is cool. Do not let pot holders contact...
... Safety 5 To reduce the risk of tipping of Oven Racks. The appliance must be kept away from the rack before you remove or replace food in use your appliance for warming or heating the room. • Do Not Use Water or Flour on the model. See installation instructions. • Do not leave... children alone-Children should never be allowed to become hot enough to cool. If rack must be left alone or unattended in this area when the wall oven is cool. Do not let pot holders contact...
Owners Guide
Page 10
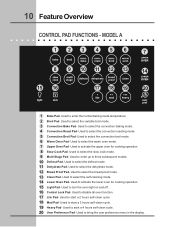
MODEL A 123 456 7 8 9 10 11 12 13 14 15 16 17 18 19 20 1 Bake Pad- Used to select the defrost mode. 11 Dehydrate Pad- Used to select the convection roasting mode. 5 Convection Broil Pad- Used to select the self-cleaning mode. 14 Lower Oven Pad- Used to disable all oven ...Used to select the dehydrate mode. 12 Bread Proof Pad- Used to bring the user preference menu in the display. Used to activate the upper oven for cooking operation. 15 Light Pad- Used to select the convection baking mode. 4 Convection Roast Pad- 10 Feature Overview CONTROL PAD FUNCTIONS - Used...
MODEL A 123 456 7 8 9 10 11 12 13 14 15 16 17 18 19 20 1 Bake Pad- Used to select the defrost mode. 11 Dehydrate Pad- Used to select the convection roasting mode. 5 Convection Broil Pad- Used to select the self-cleaning mode. 14 Lower Oven Pad- Used to disable all oven ...Used to select the dehydrate mode. 12 Bread Proof Pad- Used to bring the user preference menu in the display. Used to activate the upper oven for cooking operation. 15 Light Pad- Used to select the convection baking mode. 4 Convection Roast Pad- 10 Feature Overview CONTROL PAD FUNCTIONS - Used...

Owners Guide
Page 11
Used to preheat the oven to save or recall the favorite 3 cooking mode. 12 Cancel Pad- Used to the desired temperature. 5 Probe Pad- Used to set a cooking duration time. 7 End Time Pad- MODEL A (CONTINUED) 1 2 34 567 8 1 12 13 14 15 9 10 11 1 Timer Pads- Used to select the time at ... to enter temperature and times. 3 Conv. Used to activate the meat probe mode. 6 Cook Duration Pad- The minute timer does not start all oven functions. 14 - Push Cancel pad to set or cancel the minute timer. Used to cancel any function previously entered except the time of day and...
Used to preheat the oven to save or recall the favorite 3 cooking mode. 12 Cancel Pad- Used to the desired temperature. 5 Probe Pad- Used to set a cooking duration time. 7 End Time Pad- MODEL A (CONTINUED) 1 2 34 567 8 1 12 13 14 15 9 10 11 1 Timer Pads- Used to select the time at ... to enter temperature and times. 3 Conv. Used to activate the meat probe mode. 6 Cook Duration Pad- The minute timer does not start all oven functions. 14 - Push Cancel pad to set or cancel the minute timer. Used to cancel any function previously entered except the time of day and...

Owners Guide
Page 12
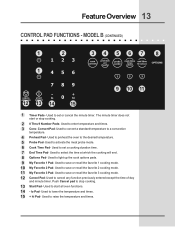
... to start a 2 hours self-clean cycle. 18 Med Pad- Used to select the bread proof mode. 13 Clean Pad- Used to activate the upper oven for cooking operation. 15 Light Pad- 12 Feature Overview CONTROL PAD FUNCTIONS - Used to select the convection broil mode. 6 Warm Pad- Used to select the... defrost mode. 11 Dehydrate Pad- Used to start a 4 hours self-clean cycle. 20 User Preference Pad- Used to select the warm oven mode. 7 Upper Oven Pad- Used to start a 3 hours self-clean cycle. 19 Heavy Pad- MODEL B 123 456 7 8 9 10 11 12 13 14 15 16 17 18 19 20 1 Bake Pad-
... to start a 2 hours self-clean cycle. 18 Med Pad- Used to select the bread proof mode. 13 Clean Pad- Used to activate the upper oven for cooking operation. 15 Light Pad- 12 Feature Overview CONTROL PAD FUNCTIONS - Used to select the convection broil mode. 6 Warm Pad- Used to select the... defrost mode. 11 Dehydrate Pad- Used to start a 4 hours self-clean cycle. 20 User Preference Pad- Used to select the warm oven mode. 7 Upper Oven Pad- Used to start a 3 hours self-clean cycle. 19 Heavy Pad- MODEL B 123 456 7 8 9 10 11 12 13 14 15 16 17 18 19 20 1 Bake Pad-
Owners Guide
Page 13
The minute timer does not start all oven functions. 14 - Used to light up the cook options pads. 9 My Favorite 1 Pad- Used to enter temperature and times. 3 Conv. lo Pad- Used to activate ... Pad- Convert Pad- Used to stop cooking. 2 0 Thru 9 Number Pads- Push Cancel pad to set a cooking duration time. 7 End Time Pad- MODEL B (CONTINUED) 1 2 1 34 567 8 9 10 11 12 13 14 15 1 Timer Pads- Used to preheat the oven to cancel any function previously entered except the time of day and minute timer.
The minute timer does not start all oven functions. 14 - Used to light up the cook options pads. 9 My Favorite 1 Pad- Used to enter temperature and times. 3 Conv. lo Pad- Used to activate ... Pad- Convert Pad- Used to stop cooking. 2 0 Thru 9 Number Pads- Push Cancel pad to set a cooking duration time. 7 End Time Pad- MODEL B (CONTINUED) 1 2 1 34 567 8 9 10 11 12 13 14 15 1 Timer Pads- Used to preheat the oven to cancel any function previously entered except the time of day and minute timer.
Owners Guide
Page 16
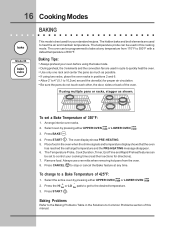
...pans do not touch each other, the door, sides or back of 425°F: 1. 16 Cooking Modes BAKING Model B This mode is best used for directions). 7. The hidden bake and broil elements are used in the Solutions to quickly heat...to heat the air and maintain temperature. Select the active oven by pressing either UPPER OVEN UPPER OVEN or LOWER OVEN LOWER OVEN . 2. The oven display shows PRE-HEATING. 5. Press START . Select oven by pressing either UPPER OVEN UPPER OVEN or LOWER OVEN LOWER OVEN . 3. The Temperature Probe, Cook Duration, Timer, End...
...pans do not touch each other, the door, sides or back of 425°F: 1. 16 Cooking Modes BAKING Model B This mode is best used for directions). 7. The hidden bake and broil elements are used in the Solutions to quickly heat...to heat the air and maintain temperature. Select the active oven by pressing either UPPER OVEN UPPER OVEN or LOWER OVEN LOWER OVEN . 2. The oven display shows PRE-HEATING. 5. Press START . Select oven by pressing either UPPER OVEN UPPER OVEN or LOWER OVEN LOWER OVEN . 3. The Temperature Probe, Cook Duration, Timer, End...
Owners Guide
Page 17
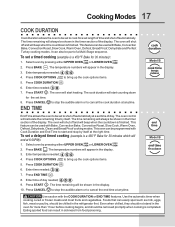
It can be set to shut off automatically. Press BAKE . Press COOK OPTIONS to bring up the cook options items. 5. The oven will start counting down for 30 minutes): 1. To set a delayed timed cooking (example is a 450°F Bake for more than 1 hour before cooking begins, and should be... and shut off automatically at anytime. Press COOK DURATION . 6. The time remaining will calculate the remaining time by itself . Model B End Time allows the oven to be used with Cook Duration and End Time to start and stop the audible alarm or to cancel the cook duration at...
It can be set to shut off automatically. Press BAKE . Press COOK OPTIONS to bring up the cook options items. 5. The oven will start counting down for 30 minutes): 1. To set a delayed timed cooking (example is a 450°F Bake for more than 1 hour before cooking begins, and should be... and shut off automatically at anytime. Press COOK DURATION . 6. The time remaining will calculate the remaining time by itself . Model B End Time allows the oven to be used with Cook Duration and End Time to start and stop the audible alarm or to cancel the cook duration at...

Owners Guide
Page 18
...START . Turn food when the top side is browned and cook on the fire. Remove food. Figure 1 Broiler Pan Broiling Times Electric Wall Oven Broiling Table Recommendations Food Item Rack Position Temp Setting Cook Time 1st side 2nd side Steak 1" thick 7 7 Pork Chops 3/4" thick ...To set a Broil Temperature of meat by pressing either UPPER OVEN UPPER OVEN or LOWER OVEN LOWER OVEN . 3. If the fire continues, throw baking soda on the second side. Arrange interior oven racks. 2. 18 Cooking Modes BROILING Model B This mode is best for meats, fish and poultry up...
...START . Turn food when the top side is browned and cook on the fire. Remove food. Figure 1 Broiler Pan Broiling Times Electric Wall Oven Broiling Table Recommendations Food Item Rack Position Temp Setting Cook Time 1st side 2nd side Steak 1" thick 7 7 Pork Chops 3/4" thick ...To set a Broil Temperature of meat by pressing either UPPER OVEN UPPER OVEN or LOWER OVEN LOWER OVEN . 3. If the fire continues, throw baking soda on the second side. Arrange interior oven racks. 2. 18 Cooking Modes BROILING Model B This mode is best for meats, fish and poultry up...

Owners Guide
Page 19
... 7. • Most bakeries (except cakes) should be cooked. • When using this cooking mode. Always use oven mitts when removing hot pans from the oven. 8. Convection Bake Air Flow Model B Convection Baking Tips: • Always preheat your oven before using the Convection Bake mode. • If your recipe cooking temperature has already been converted...
... 7. • Most bakeries (except cakes) should be cooked. • When using this cooking mode. Always use oven mitts when removing hot pans from the oven. 8. Convection Bake Air Flow Model B Convection Baking Tips: • Always preheat your oven before using the Convection Bake mode. • If your recipe cooking temperature has already been converted...
Owners Guide
Page 20
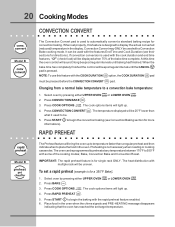
... is for convection baking. Press START to begin the convection baking (see their sections for directions). 20 Cooking Modes Model B Model B CONVECTION CONVERT The Convection Convert pad is used to be programmed to preheat at any temperature between 170°F to... automatically convert a standard baking recipe for single rack ONLY. Press START informations). Press BAKE . 3. Select oven by pressing either UPPER OVEN UPPER OVEN or LOWER OVEN LOWER OVEN . 2. The heat distribution with a Convection Bake cooking mode. It can be . . NOTE: To ...
... is for convection baking. Press START to begin the convection baking (see their sections for directions). 20 Cooking Modes Model B Model B CONVECTION CONVERT The Convection Convert pad is used to be programmed to preheat at any temperature between 170°F to... automatically convert a standard baking recipe for single rack ONLY. Press START informations). Press BAKE . 3. Select oven by pressing either UPPER OVEN UPPER OVEN or LOWER OVEN LOWER OVEN . 2. The heat distribution with a Convection Bake cooking mode. It can be . . NOTE: To ...
Owners Guide
Page 21
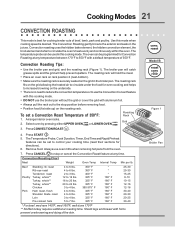
...• DO NOT use oven mitts when removing hot pans from the oven. 7. Arrange interior oven racks. Select oven by pressing either UPPER OVEN UPPER OVEN or LOWER OVEN LOWER OVEN . 3. The Temperature Probe.... Press CONVECTION ROAST . 4. The temperature probe can be programmed for directions). 6. Model B Figure 1 Broiler Pan Always use the broiler pan without the grid or cover ...160° F 160° F 160° F 160° F 25-30 25-30 15-25 8-10 10-15 12-16 12-16 30-40 20-30 20-25 30-40 * For beef: med rare 145°F, med 160°F, well done ...
...• DO NOT use oven mitts when removing hot pans from the oven. 7. Arrange interior oven racks. Select oven by pressing either UPPER OVEN UPPER OVEN or LOWER OVEN LOWER OVEN . 3. The Temperature Probe.... Press CONVECTION ROAST . 4. The temperature probe can be programmed for directions). 6. Model B Figure 1 Broiler Pan Always use the broiler pan without the grid or cover ...160° F 160° F 160° F 160° F 25-30 25-30 15-25 8-10 10-15 12-16 12-16 30-40 20-30 20-25 30-40 * For beef: med rare 145°F, med 160°F, well done ...


