Installation Instructions
Page 8
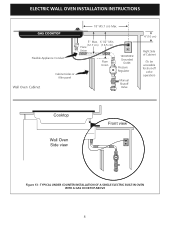
TYPICAL UNDER COUNTER INSTALLATION OF A SINGLE ELECTRIC BUILT-IN OVEN WITH A GAS COOKTOP ABOVE 8 Flexible Appliance Conduit Wall Oven Cabinet Cabinet sides or filler panel 5" Max. 6 1/2" Min. (12.7 cm) (16.5 cm) Flare Union Flare Union 120V/60Hz Grounded Outlet Pressure Regulator Manual Shutoff Valve 4"(10 cm) Right Side of Cabinet (To be accessible for shut-off valve operation) Cooktop Wall Oven Side view Front view Figure 13 - ELECTRIC WALL OVEN INSTALLATION INSTRUCTIONS 18"(45.7 cm) Max.
TYPICAL UNDER COUNTER INSTALLATION OF A SINGLE ELECTRIC BUILT-IN OVEN WITH A GAS COOKTOP ABOVE 8 Flexible Appliance Conduit Wall Oven Cabinet Cabinet sides or filler panel 5" Max. 6 1/2" Min. (12.7 cm) (16.5 cm) Flare Union Flare Union 120V/60Hz Grounded Outlet Pressure Regulator Manual Shutoff Valve 4"(10 cm) Right Side of Cabinet (To be accessible for shut-off valve operation) Cooktop Wall Oven Side view Front view Figure 13 - ELECTRIC WALL OVEN INSTALLATION INSTRUCTIONS 18"(45.7 cm) Max.

Owners Guide
Page 4
...the appliance by removing panels, wire covers, or any other part of the product. • Remove the oven door from any part of the appliance unless specifically recommended in the manuals. This includes paper, plastic and cloth items, such as cookbooks, plasticware and towels, as well as aerosol... unused appliance if it has been exposed to a temperature above an appliance. WARNING To reduce the risk of fire, electrical shock, or injury when using your new Electrolux wall oven. ! Do not remove model/serial number plate. • Proper Installation-Be sure your appliance is to be stored ...
...the appliance by removing panels, wire covers, or any other part of the product. • Remove the oven door from any part of the appliance unless specifically recommended in the manuals. This includes paper, plastic and cloth items, such as cookbooks, plasticware and towels, as well as aerosol... unused appliance if it has been exposed to a temperature above an appliance. WARNING To reduce the risk of fire, electrical shock, or injury when using your new Electrolux wall oven. ! Do not remove model/serial number plate. • Proper Installation-Be sure your appliance is to be stored ...
Owners Guide
Page 16
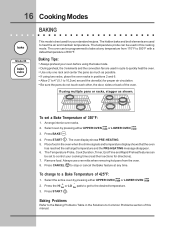
... 1. hi lo 3. Press BAKE . 4. Baking Tips: • Always preheat your oven before using multiple pans or racks, stagger as possible. • If using two racks, place the oven racks in this manual. The Temperature Probe, Cook Duration, Timer, End Time and Rapid Preheat features can be... used in positions 2 and 6. • Allow 2" to 4" (5,1 to control your standard recipes. The oven can be set to 10,2cm) around...
... 1. hi lo 3. Press BAKE . 4. Baking Tips: • Always preheat your oven before using multiple pans or racks, stagger as possible. • If using two racks, place the oven racks in this manual. The Temperature Probe, Cook Duration, Timer, End Time and Rapid Preheat features can be... used in positions 2 and 6. • Allow 2" to 4" (5,1 to control your standard recipes. The oven can be set to 10,2cm) around...
Owners Guide
Page 36
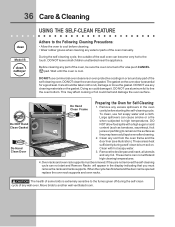
...cycle, the outside of some birds is cool. To clean, use commercial oven cleaners or oven protective coatings in the oven cavity before cleaning. • Wear rubber gloves when cleaning any exterior parts of the oven manually. These areas heat sufficiently during the self-clean cycle of any part of... the oven, be taken not to rub, damage or move the gasket. Care should be sure the oven is essential for Self-Cleaning: 1. Do NOT Hand...
...cycle, the outside of some birds is cool. To clean, use commercial oven cleaners or oven protective coatings in the oven cavity before cleaning. • Wear rubber gloves when cleaning any exterior parts of the oven manually. These areas heat sufficiently during the self-clean cycle of any part of... the oven, be taken not to rub, damage or move the gasket. Care should be sure the oven is essential for Self-Cleaning: 1. Do NOT Hand...
Owners Guide
Page 39
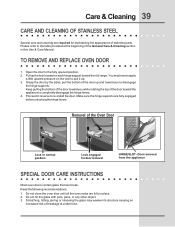
... 1. You may weaken its structure causing an increased risk of the Oven Door Lock in normal position Lock engaged for maintaining the appearance of the General Care & Cleaning section in this Use & Care Manual. Keep pulling the bottom of the door toward you while rotating the top of the door up . 3. Removal...
... 1. You may weaken its structure causing an increased risk of the Oven Door Lock in normal position Lock engaged for maintaining the appearance of the General Care & Cleaning section in this Use & Care Manual. Keep pulling the bottom of the door toward you while rotating the top of the door up . 3. Removal...

Owners Guide
Page 40
... Broiler Pan Clean the broiler pan as soon as cooking is completed. Heavy scouring may be cleaned manually or to be turned on when the door is covered with aluminum foil. To remove the glass ...shield, pull the back side of the shield toward front of the oven in a manner to not touch the bulb. Use hot pads because the broiler pan is opened. Pour...off at the main source. 2. Halogen Light Bulb To replace the light bulb: CAUTION: BE SURE THE OVEN IS COOL. 1. To replace glass shield, proceed in HOT, soapy water. DO NOT cover the broiler grid...
... Broiler Pan Clean the broiler pan as soon as cooking is completed. Heavy scouring may be cleaned manually or to be turned on when the door is covered with aluminum foil. To remove the glass ...shield, pull the back side of the shield toward front of the oven in a manner to not touch the bulb. Use hot pads because the broiler pan is opened. Pour...off at the main source. 2. Halogen Light Bulb To replace the light bulb: CAUTION: BE SURE THE OVEN IS COOL. 1. To replace glass shield, proceed in HOT, soapy water. DO NOT cover the broiler grid...


