
Datasheet
Page 2
....edimax.com FEATURES & TECHNICAL SPECIFICATIONS Video / Audio 1.3 megapixel CMOS sensor 1.0 lux 3.58mm, f/2.0 Recording format: AVI Video compression: H.264, MPEG‐4 & M‐JPEG 2‐way audio Standards Interface Fast Ethernet IEEE 802.3/802.3u Wireless IEEE 802.11b/g/n (IC‐7110W only) PoE IEEE 802.3af (IC&#...8208;7110P only) 1 Ethernet (RJ‐45) port 1 Power jack 1 Audio output 1 Microphone 1 Reset/WPS button (IC‐7110W only) 1 SDHC/SD card slot (up to 32GB) 1...
....edimax.com FEATURES & TECHNICAL SPECIFICATIONS Video / Audio 1.3 megapixel CMOS sensor 1.0 lux 3.58mm, f/2.0 Recording format: AVI Video compression: H.264, MPEG‐4 & M‐JPEG 2‐way audio Standards Interface Fast Ethernet IEEE 802.3/802.3u Wireless IEEE 802.11b/g/n (IC‐7110W only) PoE IEEE 802.3af (IC&#...8208;7110P only) 1 Ethernet (RJ‐45) port 1 Power jack 1 Audio output 1 Microphone 1 Reset/WPS button (IC‐7110W only) 1 SDHC/SD card slot (up to 32GB) 1...
Manual
Page 15
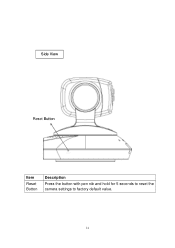
Side View Reset Button Item Reset Button Description Press the button with pen nib and hold for 5 seconds to reset the camera settings to factory default value. 14
Side View Reset Button Item Reset Button Description Press the button with pen nib and hold for 5 seconds to reset the camera settings to factory default value. 14
Manual
Page 23
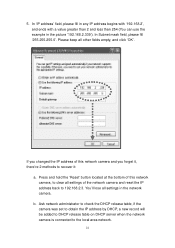
... server when the network camera is connected to recover it , there‟re 2 methods to the local area network. 22 Press and hold the „Reset‟ button located at the bottom of this network camera and you changed the IP address of the network camera and... reset the IP address back to 192.168.2.3. b. In „IP address‟ field, please fill in any IP address begins with „192.168.2‟, ...
... server when the network camera is connected to recover it , there‟re 2 methods to the local area network. 22 Press and hold the „Reset‟ button located at the bottom of this network camera and you changed the IP address of the network camera and... reset the IP address back to 192.168.2.3. b. In „IP address‟ field, please fill in any IP address begins with „192.168.2‟, ...
Manual
Page 31
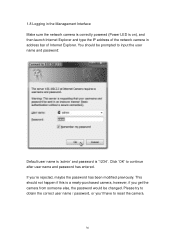
Click „OK‟ to reset the camera. 30 If you ‟ll have to continue after user name and password has entered. This should be changed. 1.8 Logging in the Management ...
Click „OK‟ to reset the camera. 30 If you ‟ll have to continue after user name and password has entered. This should be changed. 1.8 Logging in the Management ...
Manual
Page 80
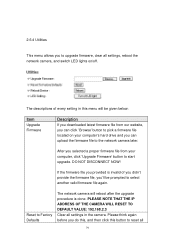
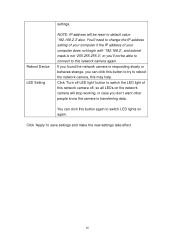
... file from our website, you can upload the firmware file to the network camera later. PLEASE NOTE THAT THE IP ADDRESS OF THE CAMERA WILL RESET TO DEFAULT VALUE: 192.168.2.3 Clear all settings, reboot the network camera, and switch LED lights on your computer, click „Upgrade Firmware‟ button... reboot after the upgrade procedure is invalid of every setting in this button to upgrade firmware, clear all settings in the camera. After you to reset all 79 Reset to Factory Defaults The network camera will be prompted to select another valid firmware file again.
... file from our website, you can upload the firmware file to the network camera later. PLEASE NOTE THAT THE IP ADDRESS OF THE CAMERA WILL RESET TO DEFAULT VALUE: 192.168.2.3 Clear all settings, reboot the network camera, and switch LED lights on your computer, click „Upgrade Firmware‟ button... reboot after the upgrade procedure is invalid of every setting in this button to upgrade firmware, clear all settings in the camera. After you to reset all 79 Reset to Factory Defaults The network camera will be prompted to select another valid firmware file again.
Manual
Page 81
... network camera is responding slowly or behaves strange, you 'll not be able to connect to switch LED lights on the network camera will be reset to save settings and make the new settings take effect. 80 You can click this button to try to change the IP address setting of...
... network camera is responding slowly or behaves strange, you 'll not be able to connect to switch LED lights on the network camera will be reset to save settings and make the new settings take effect. 80 You can click this button to try to change the IP address setting of...
Manual
Page 100
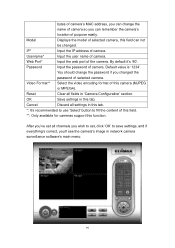
Username* Input the user name of the camera. Reset Clear all settings in „Camera Configuration‟ section. After you‟ve set all channels you wish to set, click „OK‟ to ...
Username* Input the user name of the camera. Reset Clear all settings in „Camera Configuration‟ section. After you‟ve set all channels you wish to set, click „OK‟ to ...
Manual
Page 169
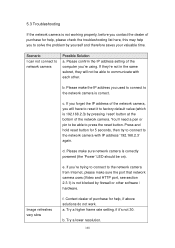
... forget the IP address of the network camera, you will not be able to factory default value (which is 192.168.2.3) by pressing „reset‟ button at the bottom of the network camera. d. Image refreshes very slow f. Please make the IP address you used to connect to...Contact dealer of purchase for help you to network camera Possible Solution a. Try a lower resolution. 168 Press and hold reset button for 5 seconds, then try to connect to press the reset button. b. Please make sure the port that network camera uses (Video and HTTP port, see section 2.3.1) is not ...
... forget the IP address of the network camera, you will not be able to factory default value (which is 192.168.2.3) by pressing „reset‟ button at the bottom of the network camera. d. Image refreshes very slow f. Please make the IP address you used to connect to...Contact dealer of purchase for help you to network camera Possible Solution a. Try a lower resolution. 168 Press and hold reset button for 5 seconds, then try to connect to press the reset button. b. Please make sure the port that network camera uses (Video and HTTP port, see section 2.3.1) is not ...