
Datasheet
Page 1
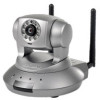
...for iPhone & Android phones IC-7110 / IC-7110W / IC-7110P 1.3Mpx H.264 Day & Night PT Network Camera Fast Ethernet / Wireless / PoE The Edimax IC‐7110 series pan and tilt network camera is detected in the specified areas, this network camera will produce snapshots or video footage of a criminal event...you are . The IC‐7110 series comes in three network interfaces (Fast Ethernet, wireless & PoE), making it gets dark, ensuring that you get video footage of your home in a few simple steps and access it easy for motion detection; With Edimax's innovative Plug‐n&#...
...for iPhone & Android phones IC-7110 / IC-7110W / IC-7110P 1.3Mpx H.264 Day & Night PT Network Camera Fast Ethernet / Wireless / PoE The Edimax IC‐7110 series pan and tilt network camera is detected in the specified areas, this network camera will produce snapshots or video footage of a criminal event...you are . The IC‐7110 series comes in three network interfaces (Fast Ethernet, wireless & PoE), making it gets dark, ensuring that you get video footage of your home in a few simple steps and access it easy for motion detection; With Edimax's innovative Plug‐n&#...

Datasheet
Page 2
www.edimax.com FEATURES & TECHNICAL SPECIFICATIONS Video / Audio 1.3 megapixel CMOS sensor 1.0 lux 3.58mm, f/2.0 Recording format: AVI Video compression: H.264, MPEG‐4 & M‐JPEG 2‐way audio Standards Interface Fast Ethernet IEEE 802.3/802.3u Wireless IEEE 802.11b/g/n (IC‐7110W only) PoE IEEE 802.3af (IC‐7110P only) 1 Ethernet (RJ‐45) port 1 Power jack...
www.edimax.com FEATURES & TECHNICAL SPECIFICATIONS Video / Audio 1.3 megapixel CMOS sensor 1.0 lux 3.58mm, f/2.0 Recording format: AVI Video compression: H.264, MPEG‐4 & M‐JPEG 2‐way audio Standards Interface Fast Ethernet IEEE 802.3/802.3u Wireless IEEE 802.11b/g/n (IC‐7110W only) PoE IEEE 802.3af (IC‐7110P only) 1 Ethernet (RJ‐45) port 1 Power jack...
Quick Install Guide
Page 6
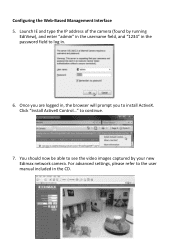
Launch IE and type the IP address of the camera (found by your new Edimax network camera. to install ActiveX. For advanced settings, please refer to log in the CD. 5 Configuring the Web-Based Management Interface 5. Once you are logged in, the browser will prompt you to continue. 7. Click "Install ActiveX Control..." You should now be able to see the video images captured by running EdiView), and enter "admin" in the username field, and "1234" in the password field to the user manual included in . 6.
Launch IE and type the IP address of the camera (found by your new Edimax network camera. to install ActiveX. For advanced settings, please refer to log in the CD. 5 Configuring the Web-Based Management Interface 5. Once you are logged in, the browser will prompt you to continue. 7. Click "Install ActiveX Control..." You should now be able to see the video images captured by running EdiView), and enter "admin" in the username field, and "1234" in the password field to the user manual included in . 6.
Quick Install Guide
Page 8
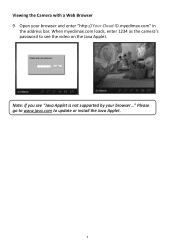
Note: If you see the video on the Java Applet. When myedimax.com loads, enter 1234 as the camera's password to update or install the Java Applet. 7 Viewing the Camera with a Web Browser 9. Please go to www.java.com to see "Java Applet is not supported by your browser and enter "http://Your Cloud ID.myedimax.com" in the address bar. Open your browser..."
Note: If you see the video on the Java Applet. When myedimax.com loads, enter 1234 as the camera's password to update or install the Java Applet. 7 Viewing the Camera with a Web Browser 9. Please go to www.java.com to see "Java Applet is not supported by your browser and enter "http://Your Cloud ID.myedimax.com" in the address bar. Open your browser..."
Manual
Page 3
... the Camera Admin Software to Locate the Camera 23 1.8 Logging in the Management Interface 30 Chapter II: Using the Management Interface 35 2.1 Camera Settings 35 2.2 Video 39 2.2.1 MJPEG 40 2.2.2 MPEG4 41 2.2.3 H.264 42 2.2.4 OSD 43 2.2.5 Night Vision 44 2.3 Pan and Tilt 45 2.3.1 Preset Points 45 2.3.2 Guard Tour 47 2.4 Network Settings 50...
... the Camera Admin Software to Locate the Camera 23 1.8 Logging in the Management Interface 30 Chapter II: Using the Management Interface 35 2.1 Camera Settings 35 2.2 Video 39 2.2.1 MJPEG 40 2.2.2 MPEG4 41 2.2.3 H.264 42 2.2.4 OSD 43 2.2.5 Night Vision 44 2.3 Pan and Tilt 45 2.3.1 Preset Points 45 2.3.2 Guard Tour 47 2.4 Network Settings 50...
Manual
Page 4
... 3.3.2.4 About 111 3.4 Change Display Layout 113 3.5 Full-screen mode 117 3.6 Scan 118 3.7 Zoom-in / Zoom-out 120 3.8 PTZ 122 3.9 Snapshot 123 3.10 Recording 124 3.11 Video Playback 125 Chapter IV: How to Access the Network Camera Remotely with iPhone & Android Phones 126 4.1 iPhone App Installation 129 4.2 Android App installation 141 4.3 Web...
... 3.3.2.4 About 111 3.4 Change Display Layout 113 3.5 Full-screen mode 117 3.6 Scan 118 3.7 Zoom-in / Zoom-out 120 3.8 PTZ 122 3.9 Snapshot 123 3.10 Recording 124 3.11 Video Playback 125 Chapter IV: How to Access the Network Camera Remotely with iPhone & Android Phones 126 4.1 iPhone App Installation 129 4.2 Android App installation 141 4.3 Web...
Manual
Page 7
Edimax IC-7110 series is tailor made to look at with user interface. Some people may concern that there will be some places which will not be ... a preset path, and the camera will illuminate automatically when the environment is completely solved by this Network camera! Besides, Edimax IC-7110 series features high quality and high frame rate video streaming through advanced video compression. If the environment is an ideal product for purchasing this camera will still be clear. 1.2 Introduction Thank you...
Edimax IC-7110 series is tailor made to look at with user interface. Some people may concern that there will be some places which will not be ... a preset path, and the camera will illuminate automatically when the environment is completely solved by this Network camera! Besides, Edimax IC-7110 series features high quality and high frame rate video streaming through advanced video compression. If the environment is an ideal product for purchasing this camera will still be clear. 1.2 Introduction Thank you...
Manual
Page 8
...also assign a fixed IP address to different user. Configurable motion detection sensitivity (6 levels from most sensitive to 16 video cameras and view images captured by every camera at the same time. Upgradeable firmware - all you can set different ... Send captured picture and video by fluorescent lights, 50 / 60Hz selectable). Usage and event logging. 7 Video control functions, like video conference or environment monitor. Audio function, suitable for applications like brightness and zoom-in network neighbor automatically. Wired and wireless network (IC-7110W only, 802.11b /...
...also assign a fixed IP address to different user. Configurable motion detection sensitivity (6 levels from most sensitive to 16 video cameras and view images captured by every camera at the same time. Upgradeable firmware - all you can set different ... Send captured picture and video by fluorescent lights, 50 / 60Hz selectable). Usage and event logging. 7 Video control functions, like video conference or environment monitor. Audio function, suitable for applications like brightness and zoom-in network neighbor automatically. Wired and wireless network (IC-7110W only, 802.11b /...
Manual
Page 9
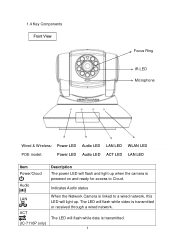
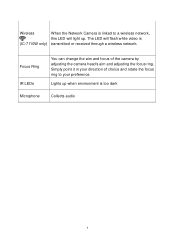
1.4 Key Components Front View Focus Ring IR LED Microphone Wired & Wireless: Power LED Audio LED LAN LED WLAN LED POE model: Power LED Audio LED ACT LED LAN LED Item Power/Cloud Audio Description The power LED will flash while video is transmitted or received through a wired network. The LED will flash and light up . Indicates Audio status LAN ACT (IC-7110P only) When the Network Camera is transmitted. 8 The LED will light up when the camera is powered on and ready for access to a wired network, this LED will flash while data is linked to Cloud.
1.4 Key Components Front View Focus Ring IR LED Microphone Wired & Wireless: Power LED Audio LED LAN LED WLAN LED POE model: Power LED Audio LED ACT LED LAN LED Item Power/Cloud Audio Description The power LED will flash while video is transmitted or received through a wired network. The LED will flash and light up . Indicates Audio status LAN ACT (IC-7110P only) When the Network Camera is transmitted. 8 The LED will light up when the camera is powered on and ready for access to a wired network, this LED will flash while data is linked to Cloud.
Manual
Page 10
Lights up . Focus Ring IR LEDs Microphone You can change the aim and focus of choice and rotate the focus ring to a wireless network, this LED will flash while video is (IC-7110W only) transmitted or received through a wireless network. Simply point it in your preference. Wireless When the Network Camera is too dark Collects audio 9 The LED will light up when environment is linked to your direction of the camera by adjusting the camera head's aim and adjusting the focus ring.
Lights up . Focus Ring IR LEDs Microphone You can change the aim and focus of choice and rotate the focus ring to a wireless network, this LED will flash while video is (IC-7110W only) transmitted or received through a wireless network. Simply point it in your preference. Wireless When the Network Camera is too dark Collects audio 9 The LED will light up when environment is linked to your direction of the camera by adjusting the camera head's aim and adjusting the focus ring.

Manual
Page 13
IC-7110P: Power Connector Ethernet Port SD Card Slot Audio Connector Item Power Connector SD Card Slot USB Port* (IC-7110 only) Audio Connector Ethernet Connector Description Connects to 12V DC power adapter Accepts SD / SD-HC memory card for image / video storage Accepts USB WiFi adapter** to enable wireless Connects to external speaker for audio output Connect to your local area network 12
IC-7110P: Power Connector Ethernet Port SD Card Slot Audio Connector Item Power Connector SD Card Slot USB Port* (IC-7110 only) Audio Connector Ethernet Connector Description Connects to 12V DC power adapter Accepts SD / SD-HC memory card for image / video storage Accepts USB WiFi adapter** to enable wireless Connects to external speaker for audio output Connect to your local area network 12
Manual
Page 37
...image. Select brightness, saturation, and sharpness from dropdown menu, and click „ - ' or „ + „ button to 5 (slowest). Specifies video encoding type. If the place where this setting to has a (or more accurate manner, select a slower speed. For following functions, changes will take effect....speed when you change any of them and select one with less flicker. Different encoding type requires different bandwidth, and provides different video quality. If you‟re not putting this camera on the ceiling or wall, you will take effect right away. 36 Available...
...image. Select brightness, saturation, and sharpness from dropdown menu, and click „ - ' or „ + „ button to 5 (slowest). Specifies video encoding type. If the place where this setting to has a (or more accurate manner, select a slower speed. For following functions, changes will take effect....speed when you change any of them and select one with less flicker. Different encoding type requires different bandwidth, and provides different video quality. If you‟re not putting this camera on the ceiling or wall, you will take effect right away. 36 Available...
Manual
Page 38
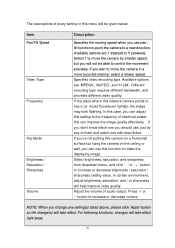
...enlarge certain portion of saved image file (default filename is „C:\‟, you can change the directory used to save the displaying image as a video file in AVI format, and you ‟ll be connected to „home‟ (original) position. Default directory used to save image ...you can set preset points. Click „Snapshot‟ button to a new direction. Pan / Tilt Control Preset Points Snapshot Moves camera to save video file. Press „C‟ and the camera will appear after you click „Snapshot‟ button, showing the filename and location of the ...
...enlarge certain portion of saved image file (default filename is „C:\‟, you can change the directory used to save the displaying image as a video file in AVI format, and you ‟ll be connected to „home‟ (original) position. Default directory used to save image ...you can set preset points. Click „Snapshot‟ button to a new direction. Pan / Tilt Control Preset Points Snapshot Moves camera to save video file. Press „C‟ and the camera will appear after you click „Snapshot‟ button, showing the filename and location of the ...
Manual
Page 40
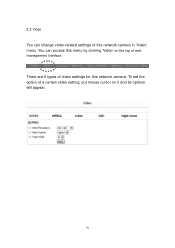
You can change video-related settings of this network camera in „Video‟ menu. To set the option of a certain video setting, put mouse cursor on the top of video settings for this network camera. There are 5 types of web management interface. 2.2 Video You can access this menu by clicking „Video‟ on it and its options will appear. 39
You can change video-related settings of this network camera in „Video‟ menu. To set the option of a certain video setting, put mouse cursor on the top of video settings for this network camera. There are 5 types of web management interface. 2.2 Video You can access this menu by clicking „Video‟ on it and its options will appear. 39
Manual
Page 41
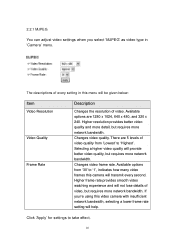
...‟ to „1‟, indicates how many video frames this menu will be given below: Item Video Resolution Video Quality Frame Rate Description Changes the resolution of video. Selecting a higher video quality will help. Changes video frame rate. 2.2.1 MJPEG You can adjust video settings when you ‟re using this video camera with insufficient network bandwidth, selecting a lower...
...‟ to „1‟, indicates how many video frames this menu will be given below: Item Video Resolution Video Quality Frame Rate Description Changes the resolution of video. Selecting a higher video quality will help. Changes video frame rate. 2.2.1 MJPEG You can adjust video settings when you ‟re using this video camera with insufficient network bandwidth, selecting a lower...
Manual
Page 42
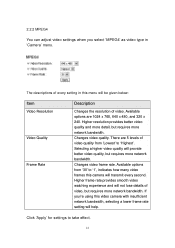
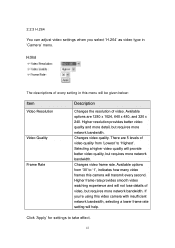
... menu. There are 1024 x 768, 640 x 480, and 320 x 240. Changes video frame rate. 2.2.2 MPEG4 You can adjust video settings when you ‟re using this video camera with insufficient network bandwidth, selecting a lower frame rate setting will help. Higher resolution ...provides better video quality and more detail, but requires more network bandwidth. Selecting a higher video quality will be given below: Item Video Resolution Video Quality Frame Rate Description Changes the resolution of video, but requires more network bandwidth. If ...
... menu. There are 1024 x 768, 640 x 480, and 320 x 240. Changes video frame rate. 2.2.2 MPEG4 You can adjust video settings when you ‟re using this video camera with insufficient network bandwidth, selecting a lower frame rate setting will help. Higher resolution ...provides better video quality and more detail, but requires more network bandwidth. Selecting a higher video quality will be given below: Item Video Resolution Video Quality Frame Rate Description Changes the resolution of video, but requires more network bandwidth. If ...
Manual
Page 43
... a lower frame rate setting will help. Changes video quality. Higher frame rate provides smooth video watching experience and will provide better video quality, but requires more network bandwidth. Available options are 5 levels of video, but requires more network bandwidth. Selecting a higher video quality will not lose details of video quality from „30‟ to take...
... a lower frame rate setting will help. Changes video quality. Higher frame rate provides smooth video watching experience and will provide better video quality, but requires more network bandwidth. Available options are 5 levels of video, but requires more network bandwidth. Selecting a higher video quality will not lose details of video quality from „30‟ to take...
Manual
Page 45
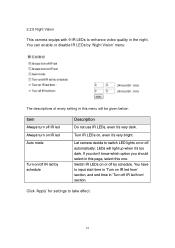
... input start time in this page, select this menu will light up when it‟s too dark. Click „Apply‟ for settings to enhance video quality in „Turn off IR led by schedule. 2.2.5 Night Vision This camera equips with 9 IR LEDs to take effect. 44 Turn IR LEDs on...
... input start time in this page, select this menu will light up when it‟s too dark. Click „Apply‟ for settings to enhance video quality in „Turn off IR led by schedule. 2.2.5 Night Vision This camera equips with 9 IR LEDs to take effect. 44 Turn IR LEDs on...
Manual
Page 62
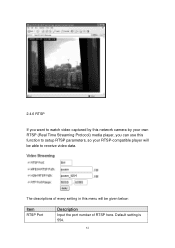
The descriptions of every setting in this function to receive video data. Default setting is 554. 61 2.4.6 RTSP If you want to watch video captured by this network camera by your RTSP-compatible player will be able to setup RTSP parameters, so your own RTSP (Real Time Streaming Protocol) media player, you can use this menu will be given below: Item RTSP Port Description Input the port number of RTSP here.
The descriptions of every setting in this function to receive video data. Default setting is 554. 61 2.4.6 RTSP If you want to watch video captured by this network camera by your RTSP-compatible player will be able to setup RTSP parameters, so your own RTSP (Real Time Streaming Protocol) media player, you can use this menu will be given below: Item RTSP Port Description Input the port number of RTSP here.

Manual
Page 63
When you use RTSP-compatible media player to play RTSP stream, please remember to add „.sdp‟ file extension. 62 Input the path of MPEG4 RTSP video file. MPEG4 RTSP Path H.264 RTSP Path Input the path of H.264 RTSP video file. When you use RTSP-compatible media player to play RTSP stream, please remember to add „.sdp‟ file extension.
When you use RTSP-compatible media player to play RTSP stream, please remember to add „.sdp‟ file extension. 62 Input the path of MPEG4 RTSP video file. MPEG4 RTSP Path H.264 RTSP Path Input the path of H.264 RTSP video file. When you use RTSP-compatible media player to play RTSP stream, please remember to add „.sdp‟ file extension.
