
User Manual (English)
Page 2
....book Page ii Wednesday, May 13, 2009 11:38 AM ii Dynex DX-L321-10A 32" LCD TV Contents CHILD SAFETY 1 Important safety instructions 2 Warnings 2 Cautions 2 Installing and removing the stand 3 Installing the stand 3 Removing the stand 4 Installing a wall... an antenna, cable TV, or satellite TV box 7 Connecting a VCR 8 Connecting a camcorder or gaming console 9 Connecting an HDMI device 9 Connecting a component video device 10 Connecting a computer 10 Connecting an external audio device 11 Turning on your TV for the first time 11 Understanding the basics 12 Turning your TV on or...
....book Page ii Wednesday, May 13, 2009 11:38 AM ii Dynex DX-L321-10A 32" LCD TV Contents CHILD SAFETY 1 Important safety instructions 2 Warnings 2 Cautions 2 Installing and removing the stand 3 Installing the stand 3 Removing the stand 4 Installing a wall... an antenna, cable TV, or satellite TV box 7 Connecting a VCR 8 Connecting a camcorder or gaming console 9 Connecting an HDMI device 9 Connecting a component video device 10 Connecting a computer 10 Connecting an external audio device 11 Turning on your TV for the first time 11 Understanding the basics 12 Turning your TV on or...
User Manual (English)
Page 6
...be grounded to prevent possible electric shock. Make sure that produce heat. 9 Do not defeat the safety purpose of the obsolete outlet. 10 Protect the power cord from being walked on the back of your TV only from the type of electric shock is damaged or frayed....like. 18 The apparatus should not be exposed to rain or moisture. This may result in fire, electric shock, personal injury, or other . DX-L321-10A_09-0407_MAN_ENG_V3.book Page 2 Wednesday, May 13, 2009 11:38 AM 2 Important safety instructions Important safety instructions CAUTION RISK OF ELECTRIC SHOCK DO...
...be grounded to prevent possible electric shock. Make sure that produce heat. 9 Do not defeat the safety purpose of the obsolete outlet. 10 Protect the power cord from being walked on the back of your TV only from the type of electric shock is damaged or frayed....like. 18 The apparatus should not be exposed to rain or moisture. This may result in fire, electric shock, personal injury, or other . DX-L321-10A_09-0407_MAN_ENG_V3.book Page 2 Wednesday, May 13, 2009 11:38 AM 2 Important safety instructions Important safety instructions CAUTION RISK OF ELECTRIC SHOCK DO...
User Manual (English)
Page 9
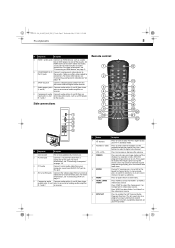
...video input source. To continue with the regular programming display, press the button one more information, see "Connecting an HDMI device" on page 10. 6 SPDIF out jack Connect a digital optical cable from this jack. For more time. 5 ENTER During TV viewing, press to switch ...these jacks. Press again to display the image capture using an alternative second language. Press COMP to select a digital sub-channel. 3 VOL+/VOL- DX-L321-10A_09-0407_MAN_ENG_V3.book Page 5 Wednesday, May 13, 2009 11:38 AM TV components 5 ## Component Description 4 HDMI 1 and 2 jacks Connect an...
...video input source. To continue with the regular programming display, press the button one more information, see "Connecting an HDMI device" on page 10. 6 SPDIF out jack Connect a digital optical cable from this jack. For more time. 5 ENTER During TV viewing, press to switch ...these jacks. Press again to display the image capture using an alternative second language. Press COMP to select a digital sub-channel. 3 VOL+/VOL- DX-L321-10A_09-0407_MAN_ENG_V3.book Page 5 Wednesday, May 13, 2009 11:38 AM TV components 5 ## Component Description 4 HDMI 1 and 2 jacks Connect an...

User Manual (English)
Page 10
... 13. For more information, see "Turning closed captioning on the front of batteries in the battery compartment. DX-L321-10A_09-0407_MAN_ENG_V3.book Page 6 Wednesday, May 13, 2009 11:38 AM 6 Using the remote control # Button 9 SLEEP 10 PICTURE 11 ZOOM 12 (Mute) 13 RECALL 14 CH / 15 INFO 16 17 EXIT 18 TV...
... 13. For more information, see "Turning closed captioning on the front of batteries in the battery compartment. DX-L321-10A_09-0407_MAN_ENG_V3.book Page 6 Wednesday, May 13, 2009 11:38 AM 6 Using the remote control # Button 9 SLEEP 10 PICTURE 11 ZOOM 12 (Mute) 13 RECALL 14 CH / 15 INFO 16 17 EXIT 18 TV...
User Manual (English)
Page 14
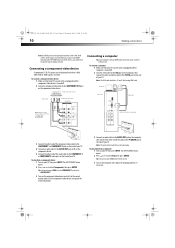
... of your TV, then press INPUT. The INPUT SOURCE menu opens. 2 Press or to select Component, then press ENTER. DX-L321-10A_09-0407_MAN_ENG_V3.book Page 10 Wednesday, May 13, 2009 11:38 AM 10 Making connections Note: An HDMI picture can also press VGA on the remote control. 3 Turn on the computer, then adjust...
... of your TV, then press INPUT. The INPUT SOURCE menu opens. 2 Press or to select Component, then press ENTER. DX-L321-10A_09-0407_MAN_ENG_V3.book Page 10 Wednesday, May 13, 2009 11:38 AM 10 Making connections Note: An HDMI picture can also press VGA on the remote control. 3 Turn on the computer, then adjust...
User Manual (English)
Page 25
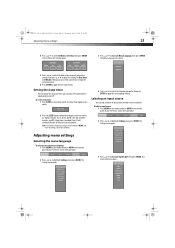
DX-L321-10A_09-0407_MAN_ENG_V3.book Page 21 Wednesday, May 13, 2009 11:38 AM Adjusting menu settings 21 4 Press or to identify. Setting the sleep timer You can specify the amount of your TV. Options include: 10, 15, 30, 45, 60, 90, 120, 180, and 240 minutes; Labeling an input source You can use...
DX-L321-10A_09-0407_MAN_ENG_V3.book Page 21 Wednesday, May 13, 2009 11:38 AM Adjusting menu settings 21 4 Press or to identify. Setting the sleep timer You can specify the amount of your TV. Options include: 10, 15, 30, 45, 60, 90, 120, 180, and 240 minutes; Labeling an input source You can use...
User Manual (English)
Page 28
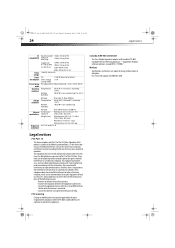
DX-L321-10A_09-0407_MAN_ENG_V3.book Page 24 Wednesday, May 13, 2009 11:38 AM 24 Legal notices PC Recommended 1360 x 768 @ 60 Hz compatibility (reduced blanking) 1366 x 768 @ 60 Hz Power voltage Power consumption Preset timing mode Operating conditions Supported 1280 x 720 @ 60 Hz H = 30-63 KHz 1024 x 768 @ 60 Hz V= 50-75 Hz 720 x 400 @ 70 Hz 640 x 480 @ 60, 75 Hz 120 VAC, 60 Hz, 3A On
DX-L321-10A_09-0407_MAN_ENG_V3.book Page 24 Wednesday, May 13, 2009 11:38 AM 24 Legal notices PC Recommended 1360 x 768 @ 60 Hz compatibility (reduced blanking) 1366 x 768 @ 60 Hz Power voltage Power consumption Preset timing mode Operating conditions Supported 1280 x 720 @ 60 Hz H = 30-63 KHz 1024 x 768 @ 60 Hz V= 50-75 Hz 720 x 400 @ 70 Hz 640 x 480 @ 60, 75 Hz 120 VAC, 60 Hz, 3A On
