User Manual (English)
Page 6
...heat such as sunshine, fire, or the like. 18 The apparatus should not be careful of the obsolete outlet. 10 Protect the power cord from being walked on or pinched particularly at least 15 minutes or longer in your eyes or touches your TV/DVD combo. If... in the literature accompanying your TV/DVD combo. 2 DX-24LD230A12 Important safety instructions Important safety instructions CAUTION RISK OF ELECTRIC SHOCK DO NOT OPEN This symbol indicates that dangerous voltage constituting a risk of time, unplug it from the power outlet and disconnect any antenna or cable system. Lightning ...
...heat such as sunshine, fire, or the like. 18 The apparatus should not be careful of the obsolete outlet. 10 Protect the power cord from being walked on or pinched particularly at least 15 minutes or longer in your eyes or touches your TV/DVD combo. If... in the literature accompanying your TV/DVD combo. 2 DX-24LD230A12 Important safety instructions Important safety instructions CAUTION RISK OF ELECTRIC SHOCK DO NOT OPEN This symbol indicates that dangerous voltage constituting a risk of time, unplug it from the power outlet and disconnect any antenna or cable system. Lightning ...
User Manual (English)
Page 7
Important safety instructions DX-24LD230A12 3 Power source Operate your TV/DVD combo only from the type... if the TV/DVD combo is brought from the power outlet and refer servicing to qualified service personnel under the following conditions: • When the power supply cord or plug is damaged or frayed. • If... combo to find a recycler in wire 2 Grounding clamp 3 Antenna discharge unit 4 Grounding conductors 5 Ground clamps 6 Power service grounding electrode system 7 Electric service equipment Note to provide some protection against voltage surges and built-up static charges...
Important safety instructions DX-24LD230A12 3 Power source Operate your TV/DVD combo only from the type... if the TV/DVD combo is brought from the power outlet and refer servicing to qualified service personnel under the following conditions: • When the power supply cord or plug is damaged or frayed. • If... combo to find a recycler in wire 2 Grounding clamp 3 Antenna discharge unit 4 Grounding conductors 5 Ground clamps 6 Power service grounding electrode system 7 Electric service equipment Note to provide some protection against voltage surges and built-up static charges...
User Manual (English)
Page 9
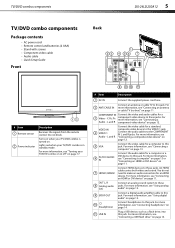
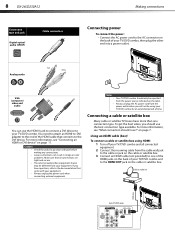
... video device" on page 11. L and R "Connecting a composite video device" on page 17. # Item Description 1 AC IN Connect the supplied power cord here. You do not need to the COMPONENT IN L and R jacks. For more information, see "Connecting a Audio - For more information, see ... Package contents • AC power cord • Remote control and batteries (2 AAA) • Stand with screws • Component video cable • Audio cable • Quick Setup Guide Front Back PB PR DX-24LD230A12 5 # Item 1 Remote sensor 2 Power indicator Description Receives the signals from...
... video device" on page 11. L and R "Connecting a composite video device" on page 17. # Item Description 1 AC IN Connect the supplied power cord here. You do not need to the COMPONENT IN L and R jacks. For more information, see "Connecting a Audio - For more information, see ... Package contents • AC power cord • Remote control and batteries (2 AAA) • Stand with screws • Component video cable • Audio cable • Quick Setup Guide Front Back PB PR DX-24LD230A12 5 # Item 1 Remote sensor 2 Power indicator Description Receives the signals from...
User Manual (English)
Page 10
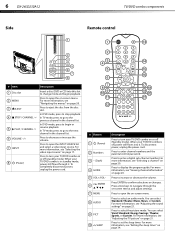
...power, unplug the power cord. # Button 1 (Power) 2 Numbers 3 - (Dash) 4 GUIDE 5 VOL+/VOL- 6 ENTER 7 MENU 8 AUDIO 9 PICT 10 SLEEP Description Press to the next channel in the channel list. You can select Standard, Theater, Music, News, or Custom. Press to increase or decrease the volume. 6 DX-24LD230A12... Side TV/DVD combo components Remote control # Item 1 Disc slot 2 MENU 3 EJECT 4 STOP / CHANNEL 5 PLAY / CHANNEL 6 VOLUME -/+ 7 INPUT 8 (Power) Description Insert a disc (DVD or CD) into it . ...
...power, unplug the power cord. # Button 1 (Power) 2 Numbers 3 - (Dash) 4 GUIDE 5 VOL+/VOL- 6 ENTER 7 MENU 8 AUDIO 9 PICT 10 SLEEP Description Press to the next channel in the channel list. You can select Standard, Theater, Music, News, or Custom. Press to increase or decrease the volume. 6 DX-24LD230A12... Side TV/DVD combo components Remote control # Item 1 Disc slot 2 MENU 3 EJECT 4 STOP / CHANNEL 5 PLAY / CHANNEL 6 VOLUME -/+ 7 INPUT 8 (Power) Description Insert a disc (DVD or CD) into it . ...
User Manual (English)
Page 12
...use ?" Notes • • Your TV/DVD combo should only be using HDMI: 1 Turn off your equipment. • Always unplug the power cord when connecting external equipment. Connecting a cable or satellite box Many cable or satellite TV boxes have questions, refer to the DVI device. For more...the AC connector on the back of TV/DVD combo PB PR 8 DX-24LD230A12 Connection type and jack Digital optical audio (SPDIF) Cable connectors Making connections Connecting power To connect the power: • Connect the AC power cord to the HDMI OUT jack on the cable or satellite box. Analog ...
...use ?" Notes • • Your TV/DVD combo should only be using HDMI: 1 Turn off your equipment. • Always unplug the power cord when connecting external equipment. Connecting a cable or satellite box Many cable or satellite TV boxes have questions, refer to the DVI device. For more...the AC connector on the back of TV/DVD combo PB PR 8 DX-24LD230A12 Connection type and jack Digital optical audio (SPDIF) Cable connectors Making connections Connecting power To connect the power: • Connect the AC power cord to the HDMI OUT jack on the cable or satellite box. Analog ...
User Manual (English)
Page 14
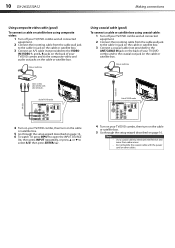
... box A/V cable Coaxial cable Cables are often color-coded to eliminate interference and noise from radio waves. Do not bundle the coaxial cable with the power cord or other cables. Back of TV/DVD combo PB PR 4 Turn on your TV/DVD combo, then turn on the cable or satellite box....composite video and audio out jacks on the cable or satellite box. Notes • • Use a coaxial cable to match color-coded jacks. 10 DX-24LD230A12 Making connections Using composite video cable (good) To connect a cable or satellite box using coaxial cable: 1 Turn off your TV/DVD combo and all ...
... box A/V cable Coaxial cable Cables are often color-coded to eliminate interference and noise from radio waves. Do not bundle the coaxial cable with the power cord or other cables. Back of TV/DVD combo PB PR 4 Turn on your TV/DVD combo, then turn on the cable or satellite box....composite video and audio out jacks on the cable or satellite box. Notes • • Use a coaxial cable to match color-coded jacks. 10 DX-24LD230A12 Making connections Using composite video cable (good) To connect a cable or satellite box using coaxial cable: 1 Turn off your TV/DVD combo and all ...
User Manual (English)
Page 15
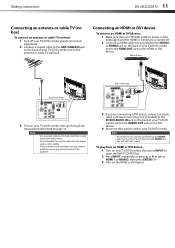
... DVI device To connect an HDMI or DVI device: 1 Make sure that your TV/DVD combo's power cord is unplugged and the HDMI or DVI device is not installed correctly, contact qualified service personnel to the...or to select HDMI 1 or HDMI 2, then press ENTER/ . 3 Turn on the HDMI or DVI device. Making connections DX-24LD230A12 11 Connecting an antenna or cable TV (no box) To connect an antenna or cable TV (no box): 1 Turn off ...of your TV/DVD combo and to the AUDIO OUT jack on the DVI device. 4 Reconnect the power cord to your TV/DVD combo and to the HDMI OUT jack on the HDMI or DVI device. If...
... DVI device To connect an HDMI or DVI device: 1 Make sure that your TV/DVD combo's power cord is unplugged and the HDMI or DVI device is not installed correctly, contact qualified service personnel to the...or to select HDMI 1 or HDMI 2, then press ENTER/ . 3 Turn on the HDMI or DVI device. Making connections DX-24LD230A12 11 Connecting an antenna or cable TV (no box) To connect an antenna or cable TV (no box): 1 Turn off ...of your TV/DVD combo and to the AUDIO OUT jack on the DVI device. 4 Reconnect the power cord to your TV/DVD combo and to the HDMI OUT jack on the HDMI or DVI device. If...
User Manual (English)
Page 16
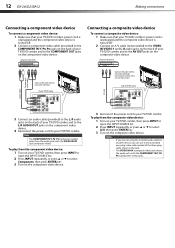
... a standard one-plug video cable instead of the three-plug cable shown in this task. 12 DX-24LD230A12 Making connections Connecting a component video device To connect a component video device: 1 Make sure that your TV/DVD combo's power cord is unplugged and the composite video device is turned off . 2 Connect an A/V cable (not provided) to...
... a standard one-plug video cable instead of the three-plug cable shown in this task. 12 DX-24LD230A12 Making connections Connecting a component video device To connect a component video device: 1 Make sure that your TV/DVD combo's power cord is unplugged and the composite video device is turned off . 2 Connect an A/V cable (not provided) to...
User Manual (English)
Page 17
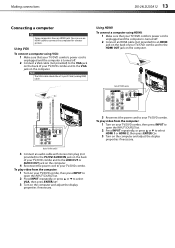
.../DVD combo's power cord is unplugged and the computer is turned off . 2 Connect an HDMI cable (not provided) to an HDMI jack on the back of your TV/DVD combo and to the LINE OUT or AUDIO OUT jack on the back of your TV/DVD combo. Making connections DX-24LD230A12 13 Connecting a computer.... 2 Press INPUT repeatedly, or press or to select VGA, then press ENTER/ . 3 Turn on the computer and adjust the display properties if necessary. 3 Reconnect the power cord to your TV/DVD combo, then press INPUT to open the INPUT SOURCE list. 2 Press INPUT repeatedly, or press or to the VGA jack on...
.../DVD combo's power cord is unplugged and the computer is turned off . 2 Connect an HDMI cable (not provided) to an HDMI jack on the back of your TV/DVD combo and to the LINE OUT or AUDIO OUT jack on the back of your TV/DVD combo. Making connections DX-24LD230A12 13 Connecting a computer.... 2 Press INPUT repeatedly, or press or to select VGA, then press ENTER/ . 3 Turn on the computer and adjust the display properties if necessary. 3 Reconnect the power cord to your TV/DVD combo, then press INPUT to open the INPUT SOURCE list. 2 Press INPUT repeatedly, or press or to the VGA jack on...
User Manual (English)
Page 19
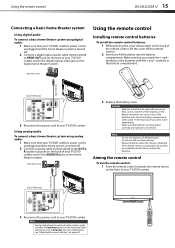
...theater system Digital audio cable Back of TV/DVD combo PB PR 3 Reconnect the power cord to your TV/DVD combo. Home theater system 3 Replace the battery cover. Using the remote control DX-24LD230A12 15 Connecting a basic home theater system Using digital audio To connect a basic home ...theater system using analog audio: 1 Make sure that your TV/DVD combo's power cord is unplugged and the home theater system is turned off. ...
...theater system Digital audio cable Back of TV/DVD combo PB PR 3 Reconnect the power cord to your TV/DVD combo. Home theater system 3 Replace the battery cover. Using the remote control DX-24LD230A12 15 Connecting a basic home theater system Using digital audio To connect a basic home ...theater system using analog audio: 1 Make sure that your TV/DVD combo's power cord is unplugged and the home theater system is turned off. ...
User Manual (English)
Page 20
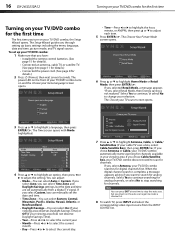
... Wizard opens. To set automatically from the INPUT SOURCE list. Select Yes to continue, or select No to page 11 for details.) • Connected the power cord. (See page 8 for digital channels first. If you can select Auto or Custom. You can adjust: • Mode-You can select Time Zone and Daylight..., date and time, picture mode, and TV signal source. Select Yes to continue searching for analog channels, or select No to scan for channels. 16 DX-24LD230A12 Turning on your TV/DVD combo for the first time Turning on your TV/DVD combo for the first time The first time you select...
... Wizard opens. To set automatically from the INPUT SOURCE list. Select Yes to continue, or select No to page 11 for details.) • Connected the power cord. (See page 8 for digital channels first. If you can select Auto or Custom. You can adjust: • Mode-You can select Time Zone and Daylight..., date and time, picture mode, and TV signal source. Select Yes to continue searching for analog channels, or select No to scan for channels. 16 DX-24LD230A12 Turning on your TV/DVD combo for the first time Turning on your TV/DVD combo for the first time The first time you select...
User Manual (English)
Page 21
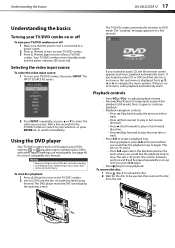
...region markings are not playable. Wait a few seconds. If you loaded a video CD or DVD and that the power cord is connected to a power outlet. 2 Press (Power) to turn on your TV/DVD combo. 3 Press (Power) again to DVD mode. Press it again to continue playback. • Playback navigation controls: • Press (...turn off : 1 Make sure that disc has a root menu, this root menu is no root menu, video playback automatically starts. Understanding the basics DX-24LD230A12 17 Understanding the basics Turning your TV/DVD combo on or off To turn your TV/DVD combo on or off your TV/DVD combo...
...region markings are not playable. Wait a few seconds. If you loaded a video CD or DVD and that the power cord is connected to a power outlet. 2 Press (Power) to turn on your TV/DVD combo. 3 Press (Power) again to DVD mode. Press it again to continue playback. • Playback navigation controls: • Press (...turn off : 1 Make sure that disc has a root menu, this root menu is no root menu, video playback automatically starts. Understanding the basics DX-24LD230A12 17 Understanding the basics Turning your TV/DVD combo on or off To turn your TV/DVD combo on or off your TV/DVD combo...
User Manual (English)
Page 40
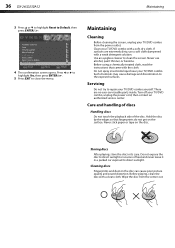
... Yes, then press ENTER/ . 5 Press EXIT to clean the screen. Maintaining Cleaning Before cleaning the screen, unplug your TV/DVD combo, unplug the power cord, then contact an authorized service center. Do not spray insecticide liquid near your TV/DVD combo yourself. Before playing, clean the disc with the cloth... discs Handling discs Do not touch the playback side of heat and never leave it in its case. Wipe the disc from the power outlet. 36 DX-24LD230A12 Maintaining 3 Press or to highlight Reset to direct sunlight. Turn off your TV/DVD combo from the center out.
... Yes, then press ENTER/ . 5 Press EXIT to clean the screen. Maintaining Cleaning Before cleaning the screen, unplug your TV/DVD combo, unplug the power cord, then contact an authorized service center. Do not spray insecticide liquid near your TV/DVD combo yourself. Before playing, clean the disc with the cloth... discs Handling discs Do not touch the playback side of heat and never leave it in its case. Wipe the disc from the power outlet. 36 DX-24LD230A12 Maintaining 3 Press or to highlight Reset to direct sunlight. Turn off your TV/DVD combo from the center out.
User Manual (English)
Page 41
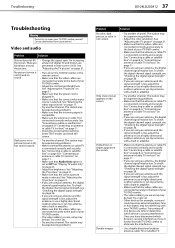
Dark, poor, or no box)" on page 21. • Make sure that the power cord is plugged in. • Make sure that the correct picture mode is selected. See "Adjusting the TV picture" on page 11. • Check the closed ... "Connecting an antenna or cable TV (no box)" on page 11. • Make sure that Audio Only option is set . • Try another channel. Troubleshooting DX-24LD230A12 37 Troubleshooting Warning Do not try to the back of your TV/DVD combo. • Make sure that the antenna or cable TV is connected...
Dark, poor, or no box)" on page 21. • Make sure that the power cord is plugged in. • Make sure that the correct picture mode is selected. See "Adjusting the TV picture" on page 11. • Check the closed ... "Connecting an antenna or cable TV (no box)" on page 11. • Make sure that Audio Only option is set . • Try another channel. Troubleshooting DX-24LD230A12 37 Troubleshooting Warning Do not try to the back of your TV/DVD combo. • Make sure that the antenna or cable TV is connected...
User Manual (English)
Page 42
...that the audio cables are using an antenna, the digital channel signal may be bad. This can cause a permanent after-image to change . 38 DX-24LD230A12 Troubleshooting Problem Solution The picture has a few bright or dark spots. • A few bright or dark spots on page 15. • ... turning off the screen can vary by your TV. "No signal" error message is displayed • Press INPUT and make sure that the power cord is connected securely to www.dynexproducts.com. • Replace dead batteries with your warranty. After Auto Channel Search, there are subject to see...
...that the audio cables are using an antenna, the digital channel signal may be bad. This can cause a permanent after-image to change . 38 DX-24LD230A12 Troubleshooting Problem Solution The picture has a few bright or dark spots. • A few bright or dark spots on page 15. • ... turning off the screen can vary by your TV. "No signal" error message is displayed • Press INPUT and make sure that the power cord is connected securely to www.dynexproducts.com. • Replace dead batteries with your warranty. After Auto Channel Search, there are subject to see...

User Manual (English)
Page 43
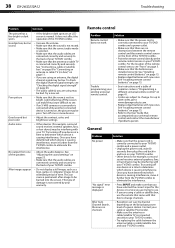
...such as stopping, skipping, or repeat play are not hidden. See "Locking control buttons" on page 29. • Unplug the power cord, wait a few seconds, then plug the cord back in USB mode. TV/DVD combo • Make sure that the sleep timer is set to Off. See "Setting the ...(with that box to change channels. • Make sure you can cause a creaking noise. USB photo display Problem Solution No photo display. Troubleshooting DX-24LD230A12 39 Problem Solution One or more channels do not work • Make sure that the channels are not applicable to all discs. • The disc...
...such as stopping, skipping, or repeat play are not hidden. See "Locking control buttons" on page 29. • Unplug the power cord, wait a few seconds, then plug the cord back in USB mode. TV/DVD combo • Make sure that the sleep timer is set to Off. See "Setting the ...(with that box to change channels. • Make sure you can cause a creaking noise. USB photo display Problem Solution No photo display. Troubleshooting DX-24LD230A12 39 Problem Solution One or more channels do not work • Make sure that the channels are not applicable to all discs. • The disc...
Quick Setup Guide (English)
Page 1
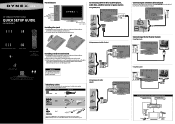
...or camera Computer Antenna or cable TV (no box) 24" 1080p LCD TV/DVD Combo QUICK SETUP GUIDE DX-24LD230A12 Front features Disc slot Connecting a DVD or Blu-ray DVD player, cable box, satellite receiver or game station...a wall-mount bracket 1 Carefully place your TV screen face-down on the back of your TV. Power Input Remote control Power sensor indicator Installing the stand 1 Carefully place your TV screen face-down on a cushioned, clean surface... video cable Audio cable Remote control and 2 AAA batteries AC power cord TV stand and two M4 x L18 mm screws WE ARE GOING GREEN!
...or camera Computer Antenna or cable TV (no box) 24" 1080p LCD TV/DVD Combo QUICK SETUP GUIDE DX-24LD230A12 Front features Disc slot Connecting a DVD or Blu-ray DVD player, cable box, satellite receiver or game station...a wall-mount bracket 1 Carefully place your TV screen face-down on the back of your TV. Power Input Remote control Power sensor indicator Installing the stand 1 Carefully place your TV screen face-down on a cushioned, clean surface... video cable Audio cable Remote control and 2 AAA batteries AC power cord TV stand and two M4 x L18 mm screws WE ARE GOING GREEN!
Quick Setup Guide (English)
Page 2
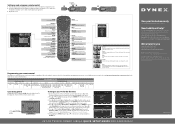
...MENU Opens a DVD menu. RECALL Returns to select your source input and press ENTER/ . 24"LCD TV/DVD COMBO 1080p I QUICK SETUP GUIDE I DX-24LD230A12 One-year limited warranty Visit www.dynexproducts.com for channels. 6 To watch TV, press INPUT, then press ▲ or ▼ to the previous ...minutes. INFO Opens a TV status banner. Arrows Navigate in a 16:9 (wide-screen) aspect ratio. The Time screen opens with your new Dynex TV, see the table for the first time 1 Connect the power cord to your TV and to highlight a language, then press ENTER/ . PICTURE Selects the video modes...
...MENU Opens a DVD menu. RECALL Returns to select your source input and press ENTER/ . 24"LCD TV/DVD COMBO 1080p I QUICK SETUP GUIDE I DX-24LD230A12 One-year limited warranty Visit www.dynexproducts.com for channels. 6 To watch TV, press INPUT, then press ▲ or ▼ to the previous ...minutes. INFO Opens a TV status banner. Arrows Navigate in a 16:9 (wide-screen) aspect ratio. The Time screen opens with your new Dynex TV, see the table for the first time 1 Connect the power cord to your TV and to highlight a language, then press ENTER/ . PICTURE Selects the video modes...
Information Brochure (English)
Page 1
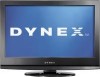
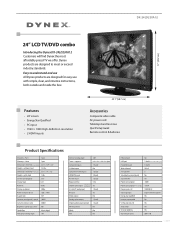
... TV/DVD combo Introducing the Dynex DX-24LD230A12 Customers will find Dynex the most affordably priced TV we offer. Dimensions (W×H×D)-w/stand 23.1" × 17" × 7.2" Weight-with simple, clear, and intuitive instructions, both outside and inside the box. Dynex products are designed to understand and use All Dynex products are designed for easy use...
... TV/DVD combo Introducing the Dynex DX-24LD230A12 Customers will find Dynex the most affordably priced TV we offer. Dimensions (W×H×D)-w/stand 23.1" × 17" × 7.2" Weight-with simple, clear, and intuitive instructions, both outside and inside the box. Dynex products are designed to understand and use All Dynex products are designed for easy use...


