User Manual (English)
Page 2
ii Dynex DX-24LD230A12 24" LCD TV/DVD combo Contents CHILD SAFETY 1 Important safety instructions 2 Warnings 2 Cautions 3 Installing the stand or wall-mount bracket 4 Installing the stand 4 Installing a wall-mount bracket 4 TV/DVD combo components 5 Package contents 5 Front 5 Back 5 Side 6 Remote control 6... connections 7 What connection should I use 7 Connecting power 8 Connecting a cable or satellite box 8 Connecting an antenna or cable TV (no box 11 Connecting an HDMI or DVI device 11 Connecting a component video device 12 Connecting a composite video device 12 Connecting...
ii Dynex DX-24LD230A12 24" LCD TV/DVD combo Contents CHILD SAFETY 1 Important safety instructions 2 Warnings 2 Cautions 3 Installing the stand or wall-mount bracket 4 Installing the stand 4 Installing a wall-mount bracket 4 TV/DVD combo components 5 Package contents 5 Front 5 Back 5 Side 6 Remote control 6... connections 7 What connection should I use 7 Connecting power 8 Connecting a cable or satellite box 8 Connecting an antenna or cable TV (no box 11 Connecting an HDMI or DVI device 11 Connecting a component video device 12 Connecting a composite video device 12 Connecting...
User Manual (English)
Page 3
...the digital signal strength 26 Setting parental controls 27 Setting or changing the password 27 Setting parental control levels 27 Blocking unrated TV 29 Viewing blocked content 29 Locking control buttons 29 Downloading rating information 30 Setting DVD locks 31 Using closed captioning 31 Turning... controls 41 Programming a different universal remote control 41 Common universal remote control codes 41 Legal notices 42 One-year limited warranty - Dynex Televisions 43 US and Canada Market 43 Definitions 43 How long does the coverage last 43 What does this warranty cover 43 How...
...the digital signal strength 26 Setting parental controls 27 Setting or changing the password 27 Setting parental control levels 27 Blocking unrated TV 29 Viewing blocked content 29 Locking control buttons 29 Downloading rating information 30 Setting DVD locks 31 Using closed captioning 31 Turning... controls 41 Programming a different universal remote control 41 Common universal remote control codes 41 Legal notices 42 One-year limited warranty - Dynex Televisions 43 US and Canada Market 43 Definitions 43 How long does the coverage last 43 What does this warranty cover 43 How...
User Manual (English)
Page 5
...fall over , or knocked down. • Make sure that the wall where you are mounting the TV is a growing trend, and larger TVs are not designed to be pulled or grabbed by the TV and wall mount manufacturers. • If you have any doubts about your ability to making home ... new product, keep these safety tips in this product. • Don't let children climb on or play with entertainment system furniture and TVs. • Don't place TVs on furniture that can be supported by an independent laboratory as a crate or chest of drawers. • Remember that are committed to ...
...fall over , or knocked down. • Make sure that the wall where you are mounting the TV is a growing trend, and larger TVs are not designed to be pulled or grabbed by the TV and wall mount manufacturers. • If you have any doubts about your ability to making home ... new product, keep these safety tips in this product. • Don't let children climb on or play with entertainment system furniture and TVs. • Don't place TVs on furniture that can be supported by an independent laboratory as a crate or chest of drawers. • Remember that are committed to ...
User Manual (English)
Page 6
.... 4 Follow all servicing to qualified service personnel. No user-serviceable parts are important operating and maintenance instructions in the literature accompanying your TV/DVD combo is in the vicinity of overhead power lines or other . Unauthorized substitutions may cause skin inflammation. • If the liquid...Your TV/DVD combo's screen is present within your doctor. Also, if the liquid gets in clean water. Servicing is located on the back of fire or electric shock, do not touch the liquid in any way, such as contact with them might be fatal. 2 DX-24LD230A12 ...
.... 4 Follow all servicing to qualified service personnel. No user-serviceable parts are important operating and maintenance instructions in the literature accompanying your TV/DVD combo is in the vicinity of overhead power lines or other . Unauthorized substitutions may cause skin inflammation. • If the liquid...Your TV/DVD combo's screen is present within your doctor. Also, if the liquid gets in clean water. Servicing is located on the back of fire or electric shock, do not touch the liquid in any way, such as contact with them might be fatal. 2 DX-24LD230A12 ...
User Manual (English)
Page 7
... pixels The LCD panel contains almost 3 million thin film transistors, which provide exceptionally sharp video quality. Important safety instructions DX-24LD230A12 3 Power source Operate your TV/DVD combo only from an air conditioner. When this TV/DVD combo from the power outlet and refer servicing to grounding electrodes, and requirements for the grounding electrode...
... pixels The LCD panel contains almost 3 million thin film transistors, which provide exceptionally sharp video quality. Important safety instructions DX-24LD230A12 3 Power source Operate your TV/DVD combo only from an air conditioner. When this TV/DVD combo from the power outlet and refer servicing to grounding electrodes, and requirements for the grounding electrode...
User Manual (English)
Page 8
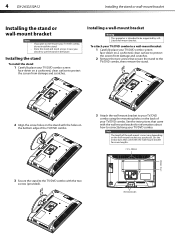
... the instructions that came with the two screws (provided). To attach your TV/DVD combo to a wall-mount bracket: 1 Carefully place your TV/DVD combo, do not install the stand. Wall mount brackets 4 DX-24LD230A12 Installing the stand or wall-mount bracket Installing the stand or wall-mount ...bracket Notes • • If you plan to wall-mount your TV/DVD combo screen face-down on...
... the instructions that came with the two screws (provided). To attach your TV/DVD combo to a wall-mount bracket: 1 Carefully place your TV/DVD combo, do not install the stand. Wall mount brackets 4 DX-24LD230A12 Installing the stand or wall-mount bracket Installing the stand or wall-mount ...bracket Notes • • If you plan to wall-mount your TV/DVD combo screen face-down on...
User Manual (English)
Page 9
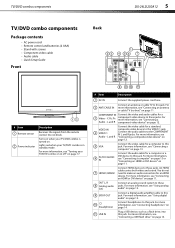
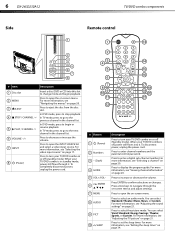
... • Audio cable • Quick Setup Guide Front Back PB PR DX-24LD230A12 5 # Item 1 Remote sensor 2 Power indicator Description Receives the signals from the remote control. For more information, see "Turning your TV/DVD combo is turned on. Connect an antenna or cable TV to this jack. For more information, see "Connecting a computer" on...
... • Audio cable • Quick Setup Guide Front Back PB PR DX-24LD230A12 5 # Item 1 Remote sensor 2 Power indicator Description Receives the signals from the remote control. For more information, see "Turning your TV/DVD combo is turned on. Connect an antenna or cable TV to this jack. For more information, see "Connecting a computer" on...
User Manual (English)
Page 10
... 2 Numbers 3 - (Dash) 4 GUIDE 5 VOL+/VOL- 6 ENTER 7 MENU 8 AUDIO 9 PICT 10 SLEEP Description Press to turn your TV/DVD combo on or off (Standby mode). For more information, see "Viewing channel information" on page 23. For more information, see "Adjusting the ...more information, see "Selecting a channel" on page 21. Press to increase or decrease the volume. For more information, see "Adjusting the TV picture" on page 20. 6 DX-24LD230A12 Side TV/DVD combo components Remote control # Item 1 Disc slot 2 MENU 3 EJECT 4 STOP / CHANNEL 5 PLAY / CHANNEL 6 VOLUME -/+...
... 2 Numbers 3 - (Dash) 4 GUIDE 5 VOL+/VOL- 6 ENTER 7 MENU 8 AUDIO 9 PICT 10 SLEEP Description Press to turn your TV/DVD combo on or off (Standby mode). For more information, see "Viewing channel information" on page 23. For more information, see "Adjusting the ...more information, see "Selecting a channel" on page 21. Press to increase or decrease the volume. For more information, see "Adjusting the TV picture" on page 20. 6 DX-24LD230A12 Side TV/DVD combo components Remote control # Item 1 Disc slot 2 MENU 3 EJECT 4 STOP / CHANNEL 5 PLAY / CHANNEL 6 VOLUME -/+...
User Manual (English)
Page 11
... to turn closed captioning on or off . For the best video quality, you should I use this if your TV/DVD combo. For more information, see "Setting up a favorite channel list" on page 25 and "Viewing a...). Press (Skip back) to skip back to the previous title or track on the screen. Making connections DX-24LD230A12 7 # Button 11 FAV 12 DVD controls 13 (Mute) 14 RECALL 15 CH / CH 16 INFO ... SUBTITLE to select Stereo, Mono, or SAP. Press to open a DVD title menu, if available. In analog TV mode, press to change how the picture displays on a DVD or CD. Press to close the on a DVD...
... to turn closed captioning on or off . For the best video quality, you should I use this if your TV/DVD combo. For more information, see "Setting up a favorite channel list" on page 25 and "Viewing a...). Press (Skip back) to skip back to the previous title or track on the screen. Making connections DX-24LD230A12 7 # Button 11 FAV 12 DVD controls 13 (Mute) 14 RECALL 15 CH / CH 16 INFO ... SUBTITLE to select Stereo, Mono, or SAP. Press to open a DVD title menu, if available. In analog TV mode, press to change how the picture displays on a DVD or CD. Press to close the on a DVD...
User Manual (English)
Page 12
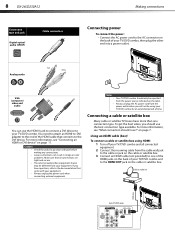
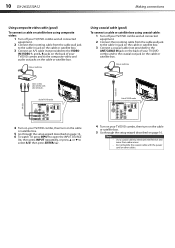
... sure that connects to the AC connector on the cable or satellite box. To get the best video, you will not be operated from your TV/DVD combo, then plug the other end into a power outlet. You need to attach an HDMI-to-DVI adapter to the end of time.... (not provided) to one connection type. Connecting a cable or satellite box Many cable or satellite TV boxes have questions, refer to the HDMI OUT jack on the back of TV/DVD combo PB PR 8 DX-24LD230A12 Connection type and jack Digital optical audio (SPDIF) Cable connectors Making connections Connecting power To connect the...
... sure that connects to the AC connector on the cable or satellite box. To get the best video, you will not be operated from your TV/DVD combo, then plug the other end into a power outlet. You need to attach an HDMI-to-DVI adapter to the end of time.... (not provided) to one connection type. Connecting a cable or satellite box Many cable or satellite TV boxes have questions, refer to the HDMI OUT jack on the back of TV/DVD combo PB PR 8 DX-24LD230A12 Connection type and jack Digital optical audio (SPDIF) Cable connectors Making connections Connecting power To connect the...
User Manual (English)
Page 13
... cable HDMI cable with HDMI-DVI adapter Audio cable Component video cable Back of TV/DVD combo 4 Connect an audio cable (provided) to the L, R audio jacks on the back of your TV/DVD combo. Making connections DX-24LD230A12 9 4 Turn on your TV/DVD combo, then turn on the cable or satellite box. 5 Go through the...
... cable HDMI cable with HDMI-DVI adapter Audio cable Component video cable Back of TV/DVD combo 4 Connect an audio cable (provided) to the L, R audio jacks on the back of your TV/DVD combo. Making connections DX-24LD230A12 9 4 Turn on your TV/DVD combo, then turn on the cable or satellite box. 5 Go through the...
User Manual (English)
Page 14
10 DX-24LD230A12 Making connections Using composite video cable (good) To connect a cable or satellite box using coaxial cable: 1 Turn off your TV/DVD combo, then turn on the cable or satellite box. 5 Go through the setup wizard described on page 16. Cable or satellite box A/V cable ... select A/V, then press ENTER/ . Cable or satellite box Using coaxial cable (good) To connect a cable or satellite box using composite video: 1 Turn off your TV/DVD combo and all connected equipment. 2 Connect the incoming cable from the cable wall jack to the cable-in jack on the cable or satellite...
10 DX-24LD230A12 Making connections Using composite video cable (good) To connect a cable or satellite box using coaxial cable: 1 Turn off your TV/DVD combo, then turn on the cable or satellite box. 5 Go through the setup wizard described on page 16. Cable or satellite box A/V cable ... select A/V, then press ENTER/ . Cable or satellite box Using coaxial cable (good) To connect a cable or satellite box using composite video: 1 Turn off your TV/DVD combo and all connected equipment. 2 Connect the incoming cable from the cable wall jack to the cable-in jack on the cable or satellite...
User Manual (English)
Page 15
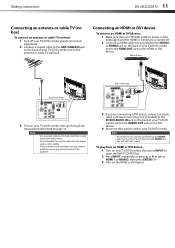
... Turn on your TV/DVD combo, then go through the setup wizard described on page 16. PB PR 3 If you will not hear sound. To play from radio waves. Notes • • • Use a coaxial cable to the antenna or cable TV wall jack. Making connections DX-24LD230A12 11 Connecting an antenna... or cable TV (no box) To connect an antenna or cable TV (no box): 1 Turn off . 2 Connect an HDMI cable (not provided) to the HDMI1 or ...
... Turn on your TV/DVD combo, then go through the setup wizard described on page 16. PB PR 3 If you will not hear sound. To play from radio waves. Notes • • • Use a coaxial cable to the antenna or cable TV wall jack. Making connections DX-24LD230A12 11 Connecting an antenna... or cable TV (no box) To connect an antenna or cable TV (no box): 1 Turn off . 2 Connect an HDMI cable (not provided) to the HDMI1 or ...
User Manual (English)
Page 16
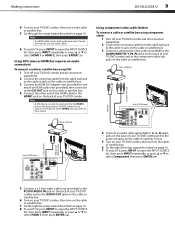
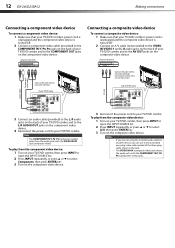
...audio cable for another device, you can use it and a standard one-plug video cable instead of TV/DVD combo PB PR 3 Reconnect the power cord to your TV/DVD combo. 12 DX-24LD230A12 Making connections Connecting a component video device To connect a component video device: 1 Make sure that ...your TV/DVD combo's power cord is unplugged and the composite video device is turned off . 2 Connect an A/V cable ...
...audio cable for another device, you can use it and a standard one-plug video cable instead of TV/DVD combo PB PR 3 Reconnect the power cord to your TV/DVD combo. 12 DX-24LD230A12 Making connections Connecting a component video device To connect a component video device: 1 Make sure that ...your TV/DVD combo's power cord is unplugged and the composite video device is turned off . 2 Connect an A/V cable ...
User Manual (English)
Page 17
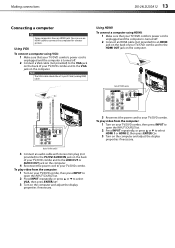
... HDMI To connect a computer using VGA: 1 Make sure that your TV/DVD combo's power cord is unplugged and the computer is turned off . 2 Connect an HDMI cable (not provided) to an HDMI jack on the computer. Making connections DX-24LD230A12 13 Connecting a computer Tip Some computers have an HDMI jack. To ...play video from the computer: 1 Turn on the back of your TV/DVD combo and to the LINE OUT or AUDIO OUT jack on the computer...
... HDMI To connect a computer using VGA: 1 Make sure that your TV/DVD combo's power cord is unplugged and the computer is turned off . 2 Connect an HDMI cable (not provided) to an HDMI jack on the computer. Making connections DX-24LD230A12 13 Connecting a computer Tip Some computers have an HDMI jack. To ...play video from the computer: 1 Turn on the back of your TV/DVD combo and to the LINE OUT or AUDIO OUT jack on the computer...
User Manual (English)
Page 18
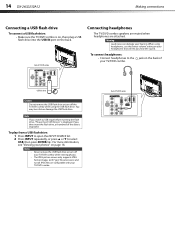
... or to USB input before inserting the flash drive, "Please Insert USB Device" is displayed. Warning Loud noise can damage your TV/DVD combo. You may lose data or damage the USB flash drive. 14 DX-24LD230A12 Making connections Connecting a USB flash drive To connect a USB flash drive: • Make sure the... TV/DVD combo is displayed. jack on the back of the data is on, then plug a USB flash drive into the USB ...
... or to USB input before inserting the flash drive, "Please Insert USB Device" is displayed. Warning Loud noise can damage your TV/DVD combo. You may lose data or damage the USB flash drive. 14 DX-24LD230A12 Making connections Connecting a USB flash drive To connect a USB flash drive: • Make sure the... TV/DVD combo is displayed. jack on the back of the data is on, then plug a USB flash drive into the USB ...
User Manual (English)
Page 19
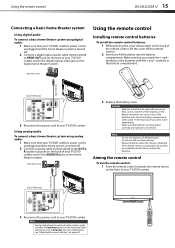
...different types. Note To play audio from the external audio system, make sure that you match the + and - Using the remote control DX-24LD230A12 15 Connecting a basic home theater system Using digital audio To connect a basic home theater system using analog audio: 1 Make sure that your...batteries: 1 While pressing the cover release latch on the back of correctly. If chemicals touch your skin, wash immediately. • Make sure that your TV/DVD combo. Analog audio cable Back of the remote control, lift the cover off . 2 Connect a digital optical audio cable (not provided) to ...
...different types. Note To play audio from the external audio system, make sure that you match the + and - Using the remote control DX-24LD230A12 15 Connecting a basic home theater system Using digital audio To connect a basic home theater system using analog audio: 1 Make sure that your...batteries: 1 While pressing the cover release latch on the back of correctly. If chemicals touch your skin, wash immediately. • Make sure that your TV/DVD combo. Analog audio cable Back of the remote control, lift the cover off . 2 Connect a digital optical audio cable (not provided) to ...
User Manual (English)
Page 20
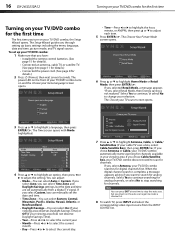
... and time are set up basic settings including the menu language, date and time, picture mode, and TV signal source. 16 DX-24LD230A12 Turning on your TV/DVD combo for the first time Turning on your TV/DVD combo for the first time The first time you turn on and the Choose your selection. The... Choose your TV source screen opens. 3 Press or to search for analog channels. The Setup Wizard guides you ...
... and time are set up basic settings including the menu language, date and time, picture mode, and TV signal source. 16 DX-24LD230A12 Turning on your TV/DVD combo for the first time Turning on your TV/DVD combo for the first time The first time you turn on and the Choose your selection. The... Choose your TV source screen opens. 3 Press or to search for analog channels. The Setup Wizard guides you ...
User Manual (English)
Page 21
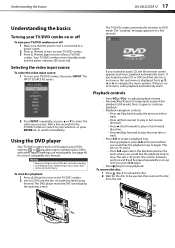
...a few seconds for the TV/DVD combo to switch to your selection, or press ENTER/ to switch immediately. Wait a few seconds. to adjust playback volume. • Press (Play/Pause) to DVD mode. Understanding the basics DX-24LD230A12 17 Understanding the basics Turning your TV/DVD combo on or off ...To turn your TV/DVD combo on or off: 1 Make sure that disc has a root menu, this root menu is ...
...a few seconds for the TV/DVD combo to switch to your selection, or press ENTER/ to switch immediately. Wait a few seconds. to adjust playback volume. • Press (Play/Pause) to DVD mode. Understanding the basics DX-24LD230A12 17 Understanding the basics Turning your TV/DVD combo on or off ...To turn your TV/DVD combo on or off: 1 Make sure that disc has a root menu, this root menu is ...
User Manual (English)
Page 22
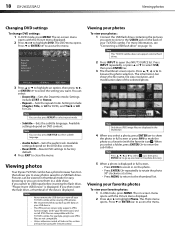
...settings to factory default. 4 Press EXIT to open the INPUT SOURCE list. Sets the repeat mode. Available settings depend on page 14. Viewing photos Your Dynex TV/DVD combo has a photo browser function that you then insert the flash drive, a thumbnail of your USB device. Press or ENTER/ to a USB ...to the thumbnail list. Note Only those JPEG image files are based on your TV/DVD combo. Note Press , , , or to select icon, then press ENTER/ to go up the data on using the remote control. 18 DX-24LD230A12 Viewing photos Changing DVD settings To change DVD settings: 1 In DVD mode, ...
...settings to factory default. 4 Press EXIT to open the INPUT SOURCE list. Sets the repeat mode. Available settings depend on page 14. Viewing photos Your Dynex TV/DVD combo has a photo browser function that you then insert the flash drive, a thumbnail of your USB device. Press or ENTER/ to a USB ...to the thumbnail list. Note Only those JPEG image files are based on your TV/DVD combo. Note Press , , , or to select icon, then press ENTER/ to go up the data on using the remote control. 18 DX-24LD230A12 Viewing photos Changing DVD settings To change DVD settings: 1 In DVD mode, ...


