User Manual (English)
Page 2
...stand or wall-mount bracket 4 Installing the stand 4 Installing a wall-mount bracket 4 TV/DVD combo components 5 Package contents 5 Front 5 Back 5 Side 6 Remote control 6 Making connections 7 What connection should I use 7 Connecting power 8 Connecting a cable or satellite box 8 Connecting an antenna or cable TV (no box 11 Connecting an HDMI or DVI device 11 Connecting a component video device 12 Connecting a composite video device 12 Connecting a computer 13 Connecting a USB flash drive 14 Connecting headphones 14 Connecting a basic home theater system 15 Using the remote...
...stand or wall-mount bracket 4 Installing the stand 4 Installing a wall-mount bracket 4 TV/DVD combo components 5 Package contents 5 Front 5 Back 5 Side 6 Remote control 6 Making connections 7 What connection should I use 7 Connecting power 8 Connecting a cable or satellite box 8 Connecting an antenna or cable TV (no box 11 Connecting an HDMI or DVI device 11 Connecting a component video device 12 Connecting a composite video device 12 Connecting a computer 13 Connecting a USB flash drive 14 Connecting headphones 14 Connecting a basic home theater system 15 Using the remote...
User Manual (English)
Page 3
... information 30 Setting DVD locks 31 Using closed captioning 31 Turning closed captioning on or off 31 Selecting the closed captioning mode 32 Customizing digital closed captioning styles 32 Adjusting time settings 33 Manually setting the date and time 33 Setting the sleep timer 34 Adjusting menu settings 34 Selecting the menu language and transparency 34 Labeling an input source 35 Restoring default settings 35 Restoring default settings 35 Maintaining 36 Cleaning 36 Servicing 36 Care and handling of discs 36 Troubleshooting 37 Video and audio 37 Remote control 38 General...
... information 30 Setting DVD locks 31 Using closed captioning 31 Turning closed captioning on or off 31 Selecting the closed captioning mode 32 Customizing digital closed captioning styles 32 Adjusting time settings 33 Manually setting the date and time 33 Setting the sleep timer 34 Adjusting menu settings 34 Selecting the menu language and transparency 34 Labeling an input source 35 Restoring default settings 35 Restoring default settings 35 Maintaining 36 Cleaning 36 Servicing 36 Care and handling of discs 36 Troubleshooting 37 Video and audio 37 Remote control 38 General...
User Manual (English)
Page 5
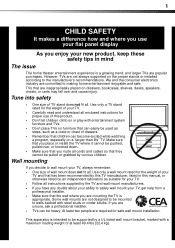
... proper use your flat panel display As you enjoy your TV and that has been recommended by this TV manufacturer, listed in mind The issue The home theater entertainment experience is a growing trend, and larger TVs are committed to safely wall mount your TV. • Follow all cords and cables so that they cannot be pulled or grabbed by a UL listed wall mount bracket...
... proper use your flat panel display As you enjoy your TV and that has been recommended by this TV manufacturer, listed in mind The issue The home theater entertainment experience is a growing trend, and larger TVs are committed to safely wall mount your TV. • Follow all cords and cables so that they cannot be pulled or grabbed by a UL listed wall mount bracket...
User Manual (English)
Page 9
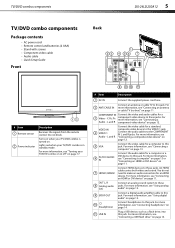
... 15. 10 (headphone) Connect headphones to this jack. TV/DVD combo components TV/DVD combo components Package contents • AC power cord • Remote control and batteries (2 AAA) • Stand with screws • Component video cable • Audio cable • Quick Setup Guide Front Back PB PR DX-24LD230A12 5 # Item 1 Remote sensor 2 Power indicator Description Receives the signals from the remote control. An HDMI cable carries both video and sound. You do not need to make an audio connection for a computer to these jacks. Connect the video cable for a standard...
... 15. 10 (headphone) Connect headphones to this jack. TV/DVD combo components TV/DVD combo components Package contents • AC power cord • Remote control and batteries (2 AAA) • Stand with screws • Component video cable • Audio cable • Quick Setup Guide Front Back PB PR DX-24LD230A12 5 # Item 1 Remote sensor 2 Power indicator Description Receives the signals from the remote control. An HDMI cable carries both video and sound. You do not need to make an audio connection for a computer to these jacks. Connect the video cable for a standard...
User Manual (English)
Page 10
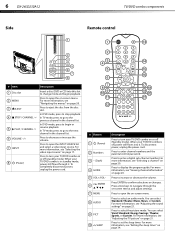
.../DVD combo components Remote control # Item 1 Disc slot 2 MENU 3 EJECT 4 STOP / CHANNEL 5 PLAY / CHANNEL 6 VOLUME -/+ 7 INPUT 8 (Power) Description Insert a disc (DVD or CD) into it . Press to navigate through it . For more information, see "Selecting the video input source" on page 21. Press to select the picture mode. Press to enter a digital sub-channel number. Press to enter channel numbers and the parental control password. For more information, see "Adjusting the sound settings" on page 34. Press to select an audio mode...
.../DVD combo components Remote control # Item 1 Disc slot 2 MENU 3 EJECT 4 STOP / CHANNEL 5 PLAY / CHANNEL 6 VOLUME -/+ 7 INPUT 8 (Power) Description Insert a disc (DVD or CD) into it . Press to navigate through it . For more information, see "Selecting the video input source" on page 21. Press to select the picture mode. Press to enter a digital sub-channel number. Press to enter channel numbers and the parental control password. For more information, see "Adjusting the sound settings" on page 34. Press to select an audio mode...
User Manual (English)
Page 11
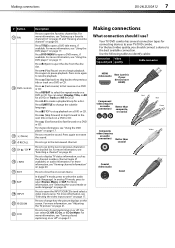
... sound. Press to open the Favorites channel list. Press TITLE to turn closed captioning on or off . In digital TV mode, press to select the repeat mode on or off " on a DVD or CD. You can select Chapter, Title, or All for a DVD, or Track and All for connecting devices to your devices have HDMI) Component video (requires an audio connection) Better than composite, or coaxial Red Blue Green Composite video...
... sound. Press to open the Favorites channel list. Press TITLE to turn closed captioning on or off . In digital TV mode, press to select the repeat mode on or off " on a DVD or CD. You can select Chapter, Title, or All for a DVD, or Track and All for connecting devices to your devices have HDMI) Component video (requires an audio connection) Better than composite, or coaxial Red Blue Green Composite video...
User Manual (English)
Page 12
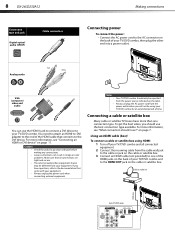
... jack to connect a DVI device to your TV/DVD combo, then plug the other end into a power outlet. 8 DX-24LD230A12 Connection type and jack Digital optical audio (SPDIF) Cable connectors Making connections Connecting power To connect the power: • Connect the AC power cord to the AC connector on the back of your TV/DVD combo. Analog audio Red White VGA (computer) video and audio You can result in jack on the cable or satellite box. 3 Connect an HDMI cable (not provided) to the DVI device. You need...
... jack to connect a DVI device to your TV/DVD combo, then plug the other end into a power outlet. 8 DX-24LD230A12 Connection type and jack Digital optical audio (SPDIF) Cable connectors Making connections Connecting power To connect the power: • Connect the AC power cord to the AC connector on the back of your TV/DVD combo. Analog audio Red White VGA (computer) video and audio You can result in jack on the cable or satellite box. 3 Connect an HDMI cable (not provided) to the DVI device. You need...
User Manual (English)
Page 20
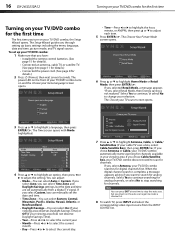
... the auto scan again to create a channel list. 8 To watch TV, press INPUT and select the corresponding video input source from a digital TV signal. The Setup Wizard guides you select Retail Mode, then Energy saving is complete, a message appears asking if you want to search for digital channels first. If you chose Antenna or Cable, your TV/DVD combo automatically starts scanning for channels. 16 DX-24LD230A12 Turning on your TV/DVD combo for the first time Turning...
... the auto scan again to create a channel list. 8 To watch TV, press INPUT and select the corresponding video input source from a digital TV signal. The Setup Wizard guides you select Retail Mode, then Energy saving is complete, a message appears asking if you want to search for digital channels first. If you chose Antenna or Cable, your TV/DVD combo automatically starts scanning for channels. 16 DX-24LD230A12 Turning on your TV/DVD combo for the first time Turning...
User Manual (English)
Page 22
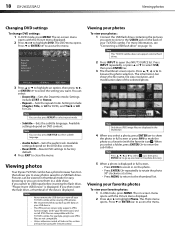
... format images (with ".jpg" file extensions) and not all tasks in full screen or press FAV to select subtitle language. • Audio Select-Sets the audio track. For more information, see "Connecting a USB flash drive" on the DVD disc content. • Reset DVD-Resets DVD settings to factory default. 4 Press EXIT to USB input before inserting the flash drive, "Please Insert USB Device" is displayed. Available settings depend on page 14. Pictures can be viewed in thumbnail mode for CDs. Viewing...
... format images (with ".jpg" file extensions) and not all tasks in full screen or press FAV to select subtitle language. • Audio Select-Sets the audio track. For more information, see "Connecting a USB flash drive" on the DVD disc content. • Reset DVD-Resets DVD settings to factory default. 4 Press EXIT to USB input before inserting the flash drive, "Please Insert USB Device" is displayed. Available settings depend on page 14. Pictures can be viewed in thumbnail mode for CDs. Viewing...
User Manual (English)
Page 25
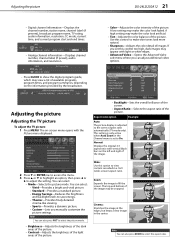
... Auto Zoom in the Channel menu is adjusted to the correct aspect ratio automatically (TV mode only). Normal: Displays the original 4:3 aspect ratio with light or white edges. • Advanced Video-Opens the Advanced Video sub-menu where you manually customize the picture settings. Adjusting the picture DX-24LD230A12 21 • Digital channel information-Displays the channel number, station name, channel label (if present), broadcast program name, TV rating, audio information, resolution, CC mode, current time, and current program start and end times. • Analog channel...
... Auto Zoom in the Channel menu is adjusted to the correct aspect ratio automatically (TV mode only). Normal: Displays the original 4:3 aspect ratio with light or white edges. • Advanced Video-Opens the Advanced Video sub-menu where you manually customize the picture settings. Adjusting the picture DX-24LD230A12 21 • Digital channel information-Displays the channel number, station name, channel label (if present), broadcast program name, TV rating, audio information, resolution, CC mode, current time, and current program start and end times. • Analog channel...
User Manual (English)
Page 27
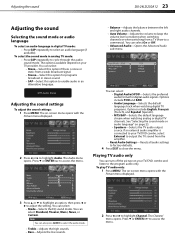
...). Adjusting the sound DX-24LD230A12 23 Adjusting the sound Selecting the sound mode or audio language To select an audio language in digital TV mode: • Press SAP repeatedly to access the menu. The Audio menu opens. To play TV audio only: 1 Press MENU. You can select: • Mode-Selects the EQ sound mode. The options available depend on page 23. • Speakers-Selects the TV audio output source. Note You can select: • Mono-Select this option to the program audio only. Resets all audio settings to factory defaults...
...). Adjusting the sound DX-24LD230A12 23 Adjusting the sound Selecting the sound mode or audio language To select an audio language in digital TV mode: • Press SAP repeatedly to access the menu. The Audio menu opens. To play TV audio only: 1 Press MENU. You can select: • Mode-Selects the EQ sound mode. The options available depend on page 23. • Speakers-Selects the TV audio output source. Note You can select: • Mono-Select this option to the program audio only. Resets all audio settings to factory defaults...

User Manual (English)
Page 31
... TV ratings. The Settings menu opens. Setting parental control levels You can set controls for the U.S. The following procedure shows how to Default 5 The Parental Controls sub-menu opens. You use the number buttons to close the menu. If you prevent your children from watching inappropriate material on TV. The on page 29. Open Source Notice Reset to set parental control levels for U.S. Press or to highlight Change Password, then press ENTER...
... TV ratings. The Settings menu opens. Setting parental control levels You can set controls for the U.S. The following procedure shows how to Default 5 The Parental Controls sub-menu opens. You use the number buttons to close the menu. If you prevent your children from watching inappropriate material on TV. The on page 29. Open Source Notice Reset to set parental control levels for U.S. Press or to highlight Change Password, then press ENTER...

User Manual (English)
Page 33
... TV/DVD combo. When the control buttons on -screen menu opens with the remote control. Setting parental controls DX-24LD230A12 29 For the MPAA rating, press or to highlight the rating you want to block, then press ENTER/ . Use the number buttons to all unrated programs from displaying on the left side of the following: • Change channels • Change the video input source • Turn off your TV/DVD combo. To lock control buttons: 1 Press MENU. Lock icons...
... TV/DVD combo. When the control buttons on -screen menu opens with the remote control. Setting parental controls DX-24LD230A12 29 For the MPAA rating, press or to highlight the rating you want to block, then press ENTER/ . Use the number buttons to all unrated programs from displaying on the left side of the following: • Change channels • Change the video input source • Turn off your TV/DVD combo. To lock control buttons: 1 Press MENU. Lock icons...
User Manual (English)
Page 41
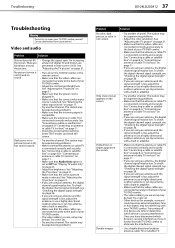
... are black bars around the picture. See "Connecting a cable or satellite box" on page 8 or "Connecting an antenna or cable TV (no box)" on page 17. • Try another channel. Video and audio Problem Solution Picture does not fill the screen. Dark, poor, or no box)" on the TV/DVD combo or the remote control. • Make sure that the correct video input source is good. • Change the aspect ratio. See "Adjusting the TV picture...
... are black bars around the picture. See "Connecting a cable or satellite box" on page 8 or "Connecting an antenna or cable TV (no box)" on page 17. • Try another channel. Video and audio Problem Solution Picture does not fill the screen. Dark, poor, or no box)" on the TV/DVD combo or the remote control. • Make sure that the correct video input source is good. • Change the aspect ratio. See "Adjusting the TV picture...
User Manual (English)
Page 42
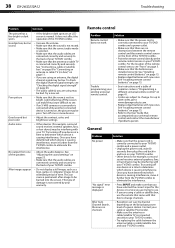
...; Replace dead batteries with new ones. It does not affect the operation of your warranty. Remote control Problem Solution Remote control does not work. Try a new set. After Auto Channel Search, there are no sound. • Increase the volume. • Make sure that the sound is not muted. • Make sure that the correct audio mode is selected. • Make sure that the batteries are using an antenna, the digital channel signal may...
...; Replace dead batteries with new ones. It does not affect the operation of your warranty. Remote control Problem Solution Remote control does not work. Try a new set. After Auto Channel Search, there are no sound. • Increase the volume. • Make sure that the sound is not muted. • Make sure that the correct audio mode is selected. • Make sure that the batteries are using an antenna, the digital channel signal may...

User Manual (English)
Page 43
... number buttons or you are using these troubleshooting instructions, turn on the back of compatible disc formats. Some settings cannot be accessed. • If a setting is grayed, the setting is not available in and turn off turned on page 27. See "Setting the sleep timer" on page 29. • Unplug the power cord, wait a few seconds, then plug the cord back in the current video input mode. Press INPUT and select USB as stopping, skipping, or repeat play...
... number buttons or you are using these troubleshooting instructions, turn on the back of compatible disc formats. Some settings cannot be accessed. • If a setting is grayed, the setting is not available in and turn off turned on page 27. See "Setting the sleep timer" on page 29. • Unplug the power cord, wait a few seconds, then plug the cord back in the current video input mode. Press INPUT and select USB as stopping, skipping, or repeat play...
User Manual (English)
Page 44
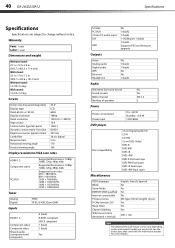
...video Composite video Shared audio (component and composite) 2 (back) E-EDID compliant HDCP compliant 1 (back) 1 (back) Yes S-Video PC/VGA 3.5mm PC audio input DVI USB No 1 (back) 1 (back) 1- 40 DX-24LD230A12 Specifications Specifications Specifications are subject to change without notice. HDMI port 1 (back) 1 (back) Support JPEG and firmware upgrade Outputs Video Analog audio Digital audio WiFi Ethernet Headphone No 1 (back) 1 (back) No No 1 (back) Audio Simulated Surround Sound Sound Leveler Watts/channel Number of speakers No Yes 3W x 2 2 Power Power consumption Power input...
...video Composite video Shared audio (component and composite) 2 (back) E-EDID compliant HDCP compliant 1 (back) 1 (back) Yes S-Video PC/VGA 3.5mm PC audio input DVI USB No 1 (back) 1 (back) 1- 40 DX-24LD230A12 Specifications Specifications Specifications are subject to change without notice. HDMI port 1 (back) 1 (back) Support JPEG and firmware upgrade Outputs Video Analog audio Digital audio WiFi Ethernet Headphone No 1 (back) 1 (back) No No 1 (back) Audio Simulated Surround Sound Sound Leveler Watts/channel Number of speakers No Yes 3W x 2 2 Power Power consumption Power input...
User Manual (English)
Page 45
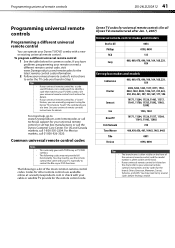
..., or Zenith. Codes for other remote controls are available online at a time. Programming universal remote controls DX-24LD230A12 41 Programming universal remote controls Programming a different universal remote control You can manually program it using the Dynex TV remote to "teach" the commands one at : www.Dynexproducts.com or check with your cable or satellite TV provide for the remote control code. See your universal remote control or set-top box manufacturer, or call technical support for your universal remote control's instructions for details. For more help, go to www...
..., or Zenith. Codes for other remote controls are available online at a time. Programming universal remote controls DX-24LD230A12 41 Programming universal remote controls Programming a different universal remote control You can manually program it using the Dynex TV remote to "teach" the commands one at : www.Dynexproducts.com or check with your cable or satellite TV provide for the remote control code. See your universal remote control or set-top box manufacturer, or call technical support for your universal remote control's instructions for details. For more help, go to www...
Quick Setup Guide (English)
Page 2
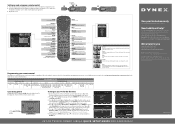
... Cable, your User Guide is not provided in the Channel menu is available online. SUBTITLE Selects the DVD subtitle language. Note: Auto is not an energy-saving mode. Channel Changes the TV channels. Programming your remote control To program your model number in DVD or CD playback. The Choose Your Picture Mode screen opens. 4 Press ▲ or ▼ to www.dynexproducts.com, click Support & Service, enter your universal remote control to a power outlet, then press (power). We're here for the first time 1 Connect the power cord...
... Cable, your User Guide is not provided in the Channel menu is available online. SUBTITLE Selects the DVD subtitle language. Note: Auto is not an energy-saving mode. Channel Changes the TV channels. Programming your remote control To program your model number in DVD or CD playback. The Choose Your Picture Mode screen opens. 4 Press ▲ or ▼ to www.dynexproducts.com, click Support & Service, enter your universal remote control to a power outlet, then press (power). We're here for the first time 1 Connect the power cord...
Information Brochure (English)
Page 1
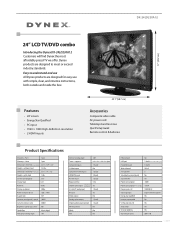
...) Accessories Composite video cable AC power cord Tabletop stand & screws Quick Setup Guide Remote control & batteries Product Specifications Warranty-Parts 1 year Warranty-Labor 1 year Dimensions (W×H×D)-w/o stand 23.1" × 15.9" × 2.8" Weight-without stand 12.3 lbs. Dimensions (W×H×D)-w/stand 23.1" × 17" × 7.2" Weight-with simple, clear, and intuitive instructions, both outside and inside the box. DX-24LD230A12 17" (43.2 cm) 24" LCD TV/DVD combo Introducing the Dynex DX-24LD230A12 Customers will find Dynex the most affordably priced TV we...
...) Accessories Composite video cable AC power cord Tabletop stand & screws Quick Setup Guide Remote control & batteries Product Specifications Warranty-Parts 1 year Warranty-Labor 1 year Dimensions (W×H×D)-w/o stand 23.1" × 15.9" × 2.8" Weight-without stand 12.3 lbs. Dimensions (W×H×D)-w/stand 23.1" × 17" × 7.2" Weight-with simple, clear, and intuitive instructions, both outside and inside the box. DX-24LD230A12 17" (43.2 cm) 24" LCD TV/DVD combo Introducing the Dynex DX-24LD230A12 Customers will find Dynex the most affordably priced TV we...


