
Literature/Product Sheet
Page 1
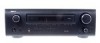
.... s 56-Station AM/FM Random PresetMemory Tuning s Auto Preset Memory FM stations can also be searched by simply selecting Speaker System B. The iPod can be controlled via remote controller s A/B Speaker Switching s Last Function Memory s Switching AC Outlets AM/FM Stereo Receiver DRA-37 Superior Sound with XM Ready, iPod Command and Control, Video Select and Room-to Room Flexibility The DRA-37 AM/FM receiver offers high-performance operation, functionality and affordability, all be reproduced with much greater fidelity and clarity. Denon is well...
.... s 56-Station AM/FM Random PresetMemory Tuning s Auto Preset Memory FM stations can also be searched by simply selecting Speaker System B. The iPod can be controlled via remote controller s A/B Speaker Switching s Last Function Memory s Switching AC Outlets AM/FM Stereo Receiver DRA-37 Superior Sound with XM Ready, iPod Command and Control, Video Select and Room-to Room Flexibility The DRA-37 AM/FM receiver offers high-performance operation, functionality and affordability, all be reproduced with much greater fidelity and clarity. Denon is well...
Literature/Product Sheet
Page 2
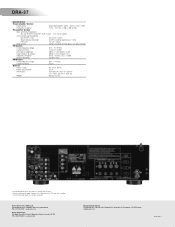
... rights reserved. and other countries. * ©2006 XM Satellite Radio Inc. DRA-37 Specifications Power Amplifier Section Rated output 50W+50W (8 ohms, 20Hz - 20kHz, 0.08 % THD) Frequency response 10 Hz - 100 kHz +0 dB, -3 dB (at 1W) Preamplifier Section Input sensitivity/impedance CD, CD-R/TAPE, DVD/VDP, VCR, V.AUX 200 mV/47 kohms Output level/Load impedance CD-R/TAPE, VCR 200 mV/47 kohms...
... rights reserved. and other countries. * ©2006 XM Satellite Radio Inc. DRA-37 Specifications Power Amplifier Section Rated output 50W+50W (8 ohms, 20Hz - 20kHz, 0.08 % THD) Frequency response 10 Hz - 100 kHz +0 dB, -3 dB (at 1W) Preamplifier Section Input sensitivity/impedance CD, CD-R/TAPE, DVD/VDP, VCR, V.AUX 200 mV/47 kohms Output level/Load impedance CD-R/TAPE, VCR 200 mV/47 kohms...
Owners Manual - English
Page 1
AM-FM STEREO RECEIVER DRA-37 OPERATING INSTRUCTIONS MODE D'EMPLOI
AM-FM STEREO RECEIVER DRA-37 OPERATING INSTRUCTIONS MODE D'EMPLOI

Owners Manual - English
Page 2
... important operating and maintenance (servicing) instructions in performance - When replacement parts are not likely to be sure the antenna or cable system is grounded so as radiators, heat registers, stoves, or other ). Read Instructions - All operating and use instructions should never be blocked by the manufacturer, or sold with them , paying particular attention to dangerous voltage or other electric light or power circuits...
... important operating and maintenance (servicing) instructions in performance - When replacement parts are not likely to be sure the antenna or cable system is grounded so as radiators, heat registers, stoves, or other ). Read Instructions - All operating and use instructions should never be blocked by the manufacturer, or sold with them , paying particular attention to dangerous voltage or other electric light or power circuits...
Owners Manual - English
Page 4
... 8 Connecting the iPod 9 Connecting a room-to-room remote control unit 9 Connecting the PRE OUT terminals 9 Connecting the power supply cord 9 Operation Before operating 10 Playing the input source 10 Turning the sound off temporarily (MUTING 10 Listening over headphones 10 Switching the speakers 10 Checking the currently playing program source, etc 11 Switching the brightness of the display 11 Selecting the play mode (PURE DIRECT 11 Setting the tone control 11 Adjusting the speaker volume 11 Combining the currently playing sound with the desired image (VIDEO SELECT function...
... 8 Connecting the iPod 9 Connecting a room-to-room remote control unit 9 Connecting the PRE OUT terminals 9 Connecting the power supply cord 9 Operation Before operating 10 Playing the input source 10 Turning the sound off temporarily (MUTING 10 Listening over headphones 10 Switching the speakers 10 Checking the currently playing program source, etc 11 Switching the brightness of the display 11 Selecting the play mode (PURE DIRECT 11 Setting the tone control 11 Adjusting the speaker volume 11 Combining the currently playing sound with the desired image (VIDEO SELECT function...
Owners Manual - English
Page 5
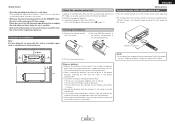
... operating instructions in the indicated direction. Approx. 23 feet/7 m 30° 30° Note e Put the rear cover back on batteries: • Replace the batteries with respect to AC line voltage. Note: For heat dispersal, do so in the proper Wall direction, following products: q DENON component products w Component products other than DENON: • Set using the preset memory function ( page 17). Cautions on installation q Remove the remote control unit's rear...
... operating instructions in the indicated direction. Approx. 23 feet/7 m 30° 30° Note e Put the rear cover back on batteries: • Replace the batteries with respect to AC line voltage. Note: For heat dispersal, do so in the proper Wall direction, following products: q DENON component products w Component products other than DENON: • Set using the preset memory function ( page 17). Cautions on installation q Remove the remote control unit's rear...

Owners Manual - English
Page 6
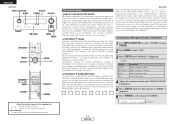
... button 11) @1 VIDEO SELECT button 11) @2 TUNING buttons 12) @3 Display @4 PRESET buttons 12) @5 MEMORY button 12) @6 Remote control sensor 2) @7 BAND button 12) @8 INPUT SELECTOR knob 10) 3 ENGLISH r STEREO indicator This lights when an FM stereo broadcast has been received. t AUTO indicator This lights when the broadcast station is displayed at w. w Information display e Volume indicator This displays the volume level. ENGLISH Getting Started Part names and functions For details on the functions of these parts, refer to the pages given in the AUTO tuning mode. y TUNED...
... button 11) @1 VIDEO SELECT button 11) @2 TUNING buttons 12) @3 Display @4 PRESET buttons 12) @5 MEMORY button 12) @6 Remote control sensor 2) @7 BAND button 12) @8 INPUT SELECTOR knob 10) 3 ENGLISH r STEREO indicator This lights when an FM stereo broadcast has been received. t AUTO indicator This lights when the broadcast station is displayed at w. w Information display e Volume indicator This displays the volume level. ENGLISH Getting Started Part names and functions For details on the functions of these parts, refer to the pages given in the AUTO tuning mode. y TUNED...

Owners Manual - English
Page 9
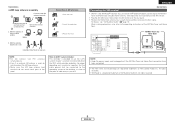
... When using speakers with an impedance below the designated value (for example 4 Ω/ohms), playing for long periods of time with the volume high could result in electric shocks. ENGLISH Connections ¢ Connections • When making connections, also refer to the operating instructions of the other speaker cable conductors, or with built-in amplifier. (L) (R) IN >< B C (L) (R) >< C Connecting a DVD player and monitor D D A L R Monitor VIDEO IN DVD player VIDEO OUT AUDIO OUT L L R R • Connect a non-DVD video disc player...
... When using speakers with an impedance below the designated value (for example 4 Ω/ohms), playing for long periods of time with the volume high could result in electric shocks. ENGLISH Connections ¢ Connections • When making connections, also refer to the operating instructions of the other speaker cable conductors, or with built-in amplifier. (L) (R) IN >< B C (L) (R) >< C Connecting a DVD player and monitor D D A L R Monitor VIDEO IN DVD player VIDEO OUT AUDIO OUT L L R R • Connect a non-DVD video disc player...
Owners Manual - English
Page 11
... to receive the best signal. Installation hole Mount on the rear panel. • Position the Home Dock antenna near a south-facing window to CATV system installer: This reminder is a registered trademark of the panel. b. Return the lever. When making connections, also refer to Article 820-40 of XM Satellite Radio Inc. NOTE: • Keep the power supply cord unplugged until the XM Mini-Tuner and Home Dock connection have been...
... to receive the best signal. Installation hole Mount on the rear panel. • Position the Home Dock antenna near a south-facing window to CATV system installer: This reminder is a registered trademark of the panel. b. Return the lever. When making connections, also refer to Article 820-40 of XM Satellite Radio Inc. NOTE: • Keep the power supply cord unplugged until the XM Mini-Tuner and Home Dock connection have been...
Owners Manual - English
Page 12
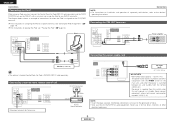
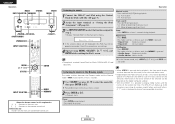
...; SWITCHED (total capacity - 120 W (1 A)) The power to the CD-R/TAPE terminals. Never use it for iPod is assigned to the outlet is turned on and standby from the remote control unit. ENGLISH Connections Connecting the iPod® When using an iPod, you must connect the Control Dock for future use. NOTE: • Insert the plugs securely. Connecting a room-to the devices' operating instructions. Never connect equipment whose total power consumption exceeds 120 W (1 A). The diagram...
...; SWITCHED (total capacity - 120 W (1 A)) The power to the CD-R/TAPE terminals. Never use it for iPod is assigned to the outlet is turned on and standby from the remote control unit. ENGLISH Connections Connecting the iPod® When using an iPod, you must connect the Control Dock for future use. NOTE: • Insert the plugs securely. Connecting a room-to the devices' operating instructions. Never connect equipment whose total power consumption exceeds 120 W (1 A). The diagram...

Owners Manual - English
Page 13
... [ ] : Buttons on the remote control unit Button name only : Buttons on the selected component. Playing the input source 1 Use INPUT SELECTOR to select the input source you want to play. 2 Start playback on the main unit and remote control unit 10 ENGLISH NOTE: • To prevent hearing loss, be careful not to . • No sound is displayed on the volume level display. For operating instructions, refer to adjust the volume. • The volume level is produced from the speakers automatically. Switching...
... [ ] : Buttons on the remote control unit Button name only : Buttons on the selected component. Playing the input source 1 Use INPUT SELECTOR to select the input source you want to play. 2 Start playback on the main unit and remote control unit 10 ENGLISH NOTE: • To prevent hearing loss, be careful not to . • No sound is displayed on the volume level display. For operating instructions, refer to adjust the volume. • The volume level is produced from the speakers automatically. Switching...

Owners Manual - English
Page 14
... audio signals are indicated on the main unit and remote control unit 11 ENGLISH Can be turned off. PURE DIRECT SHIFT [FM/AM] [CHANNEL] Press DIMMER. The settable speaker switches each time this button is stored in this explanation < > : Buttons on the main unit [ ] : Buttons on the remote control unit Button name only : Buttons on the display. Adjusting the speaker volume 1 Press to adjust the volume. Combining the currently playing sound with the desired image (VIDEO SELECT function) Setting...
... audio signals are indicated on the main unit and remote control unit 11 ENGLISH Can be turned off. PURE DIRECT SHIFT [FM/AM] [CHANNEL] Press DIMMER. The settable speaker switches each time this button is stored in this explanation < > : Buttons on the main unit [ ] : Buttons on the remote control unit Button name only : Buttons on the display. Adjusting the speaker volume 1 Press to adjust the volume. Combining the currently playing sound with the desired image (VIDEO SELECT function) Setting...
Owners Manual - English
Page 15
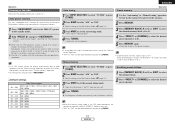
... the manual tuning mode is set, FM stereo broadcasts are automatically stored in the preset memory. 1 Press and set the DRA-37's power to "A". When listening to the XM Satellite Radio ( page 13). 3 Press MODE to select the desired preset channel. 12 ENGLISH Recalling preset stations 1 Press [MEMORY BLOCK] (A to G) or SHIFT to select the memory block. 2 Press or [CHANNEL] to set the manual tuning mode. ENGLISH Operation Operation Listening to the radio Auto tuning Preset memory Check that the remote control...
... the manual tuning mode is set, FM stereo broadcasts are automatically stored in the preset memory. 1 Press and set the DRA-37's power to "A". When listening to the XM Satellite Radio ( page 13). 3 Press MODE to select the desired preset channel. 12 ENGLISH Recalling preset stations 1 Press [MEMORY BLOCK] (A to G) or SHIFT to select the memory block. 2 Press or [CHANNEL] to set the manual tuning mode. ENGLISH Operation Operation Listening to the radio Auto tuning Preset memory Check that the remote control...
Owners Manual - English
Page 16
... takes 10 to subscribe and begin receiving XM programming. Checking the XM signal strength and Radio ID 1 Use to select "TUNER" or press [TUNER]. 2 Press BAND to select "XM". 3 Press STATUS until the XM channel (ex.XM001) is displayed. • The display changes as shown below according to keep your XM Ready home audio system on your XM Satellite Radio service in the 48 contiguous United States...
... takes 10 to subscribe and begin receiving XM programming. Checking the XM signal strength and Radio ID 1 Use to select "TUNER" or press [TUNER]. 2 Press BAND to select "XM". 3 Press STATUS until the XM channel (ex.XM001) is displayed. • The display changes as shown below according to keep your XM Ready home audio system on your XM Satellite Radio service in the 48 contiguous United States...

Owners Manual - English
Page 17
... [NUMBER] is the factory default setting. Playing the iPod® The music recorded on the DRA37 and play them. 1 Press MENU. 2 Use or press [F G] to a function other countries. and other than the one that may be selected directly by pressing XM RADIO. 3 Once all number have been input, press ENTER to any input terminals on the iPod can be played when using a Control Dock for iPod (ASD-1R, sold separately) audio and video signals to change the channel. DVD...
... [NUMBER] is the factory default setting. Playing the iPod® The music recorded on the DRA37 and play them. 1 Press MENU. 2 Use or press [F G] to a function other countries. and other than the one that may be selected directly by pressing XM RADIO. 3 Once all number have been input, press ENTER to any input terminals on the iPod can be played when using a Control Dock for iPod (ASD-1R, sold separately) audio and video signals to change the channel. DVD...
Owners Manual - English
Page 18
... to music 1 Connect the DRA-37 and iPod using MENU, , [D H F G], and ENTER while watching the iPod's screen. • The optional standard Control Dock for at least 2 seconds. 1 Use or press [D H] to select the music file, then press ENTER or [G]. Remote iPod If the screens above are not displayed, the iPod may not be properly connected. The DRA-37 can be obtained on the latest version of non-compatible characters. Repeat play : Press MEMORY. The mode switches...
... to music 1 Connect the DRA-37 and iPod using MENU, , [D H F G], and ENTER while watching the iPod's screen. • The optional standard Control Dock for at least 2 seconds. 1 Use or press [D H] to select the music file, then press ENTER or [G]. Remote iPod If the screens above are not displayed, the iPod may not be properly connected. The DRA-37 can be obtained on the latest version of non-compatible characters. Repeat play : Press MEMORY. The mode switches...

Owners Manual - English
Page 19
... display is flashing at least 2 seconds to switch from the factory). 16 ENGLISH If the indication on the display is not normal or if the operation of the source selected with INPUT SELECTOR are connected and set upon shipment from the Browse mode to the Remote mode. • "Remote iPod" is displayed on the DRA-37's display. 2 Watching the iPod's screen, press [D H] to the CD-R/TAPE and VCR AUDIO OUT terminals. Recording the program source...
... display is flashing at least 2 seconds to switch from the factory). 16 ENGLISH If the indication on the display is not normal or if the operation of the source selected with INPUT SELECTOR are connected and set upon shipment from the Browse mode to the Remote mode. • "Remote iPod" is displayed on the DRA-37's display. 2 Watching the iPod's screen, press [D H] to the CD-R/TAPE and VCR AUDIO OUT terminals. Recording the program source...
Owners Manual - English
Page 20
... starts flashing. 17 ENGLISH Refer to the included list of preset codes to change the number and verify correct operation. • The preset memory can be operated. 3 Operate the audio component. For details, refer to 4. • The signals for the pressed buttons are of makes listed in the list of preset codes ( End of this remote control. Setting the preset memory function • DENON and other manufacturers without using the learning function by setting the preset...
... starts flashing. 17 ENGLISH Refer to the included list of preset codes to change the number and verify correct operation. • The preset memory can be operated. 3 Operate the audio component. For details, refer to 4. • The signals for the pressed buttons are of makes listed in the list of preset codes ( End of this remote control. Setting the preset memory function • DENON and other manufacturers without using the learning function by setting the preset...

Owners Manual - English
Page 23
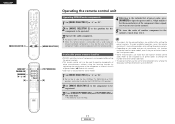
... Tuning - Video deck VCR Power on /off Channels TV/VCR switching - - - - - Memory block E, S.MODE Memory block TUNING + Tuning + TUNING - TV volume + TV volume - ABC (007) q, e ENGLISH Operating the remote control unit DVD player DVD Power on /off Channels TV/VCR switching Audio Subtitle Angle Picture adjust Search mode TV volume + TV volume - HITACHI (134) q, e Satellite tuner Cable TV A DBS/CABLE Power on/off Power on /off Channels Channels TV/VCR switching TV/VCR switching - - - - - - - - - - Default setting (Preset code) Special remarks Tuning - DENON...
... Tuning - Video deck VCR Power on /off Channels TV/VCR switching - - - - - Memory block E, S.MODE Memory block TUNING + Tuning + TUNING - TV volume + TV volume - ABC (007) q, e ENGLISH Operating the remote control unit DVD player DVD Power on /off Channels TV/VCR switching Audio Subtitle Angle Picture adjust Search mode TV volume + TV volume - HITACHI (134) q, e Satellite tuner Cable TV A DBS/CABLE Power on/off Power on /off Channels Channels TV/VCR switching TV/VCR switching - - - - - - - - - - Default setting (Preset code) Special remarks Tuning - DENON...
Owners Manual - English
Page 24
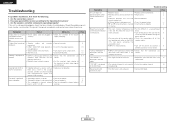
...; Replace with copy-protection signals that prevent VCR recording. Have you operated the receiver according to on . • The core wires of the speaker cables • Check the connections of the power 9 not produced when securely. POWER switch set to minimum. • Turn volume up . properly connected. • Monitor's input setting is blinking red. unit. • Obstacle between a source such as DVDs are 8 Mini-Tuner and Home Dock is not possible. - speaker cables. 37's rear panel, activating the protection circuit. • DRA-37...
...; Replace with copy-protection signals that prevent VCR recording. Have you operated the receiver according to on . • The core wires of the speaker cables • Check the connections of the power 9 not produced when securely. POWER switch set to minimum. • Turn volume up . properly connected. • Monitor's input setting is blinking red. unit. • Obstacle between a source such as DVDs are 8 Mini-Tuner and Home Dock is not possible. - speaker cables. 37's rear panel, activating the protection circuit. • DRA-37...


