
Literature/Product Sheet
Page 1
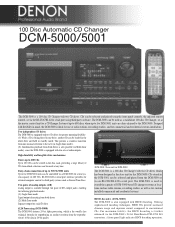
... residential systems. HDCD decoder (DCM-5000) The DCM-5000 is also equipped with flexibility in the DCM-5001 can be selected and played using the front panel controls, the infrared remote control, or via an RS-232C/RS-422A serial port. The DCM-5000 can be controlled via the DCM-5000's 24 bit Burr-Brown PCM...-1704 D/A converters. Daisy-chain connection of up to five DCM-5001 units are daisy-chained to extend the...
... residential systems. HDCD decoder (DCM-5000) The DCM-5000 is also equipped with flexibility in the DCM-5001 can be selected and played using the front panel controls, the infrared remote control, or via an RS-232C/RS-422A serial port. The DCM-5000 can be controlled via the DCM-5000's 24 bit Burr-Brown PCM...-1704 D/A converters. Daisy-chain connection of up to five DCM-5001 units are daisy-chained to extend the...
Literature/Product Sheet
Page 2
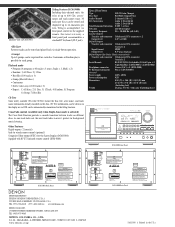
...) DCM-5000 Front Panel DCM-5001 Back Panel DENON ELECTRONICS DIVISION OF DENON CORPORATION (U.S.A.) 222 NEW ROAD, PARSIPPANY, NJ 07054-4200, U.S.A. Titling is automatically remembered in over it, perfect for Daisy Chain connection) Transfer and connector Unbalanced, RCA connector Coaxial x 2 Serial Remote RS-232C/422A (Switchable) D-Sub 9-pin x 2 5-pin Mini Din x 1 (DCM-5000), x 2 (DCM-5001) Headphone connector Stereo (1/4") x 1 (DCM-5000) PC...
...) DCM-5000 Front Panel DCM-5001 Back Panel DENON ELECTRONICS DIVISION OF DENON CORPORATION (U.S.A.) 222 NEW ROAD, PARSIPPANY, NJ 07054-4200, U.S.A. Titling is automatically remembered in over it, perfect for Daisy Chain connection) Transfer and connector Unbalanced, RCA connector Coaxial x 2 Serial Remote RS-232C/422A (Switchable) D-Sub 9-pin x 2 5-pin Mini Din x 1 (DCM-5000), x 2 (DCM-5001) Headphone connector Stereo (1/4") x 1 (DCM-5000) PC...

Owners Manual
Page 5
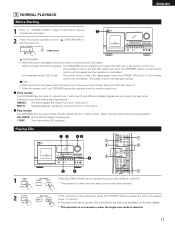
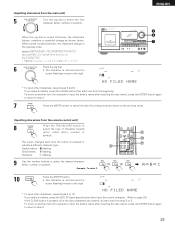
...)..........1 T R6P/AA batteries 2 Y Connection cords (audio).......2 E Service station list 1 U Connection cord (video 1 R Remote control unit (RC-272 1 I CD booklet file and label........1 R T Y U I 1 MAIN FEATURES (1) 100-...changer with the warranty in a safe place. Not applicable for purchasing the DENON compact disc player. It offers compatibility with the connection cords. VARIOUS PLAYBACK ...Daisy chain connection Up to another naturally. (4) CD Text compatibility The DCM-5000 is an encoding/decoding technology which carries over conventional ALPHA Processing and ...
...)..........1 T R6P/AA batteries 2 Y Connection cords (audio).......2 E Service station list 1 U Connection cord (video 1 R Remote control unit (RC-272 1 I CD booklet file and label........1 R T Y U I 1 MAIN FEATURES (1) 100-...changer with the warranty in a safe place. Not applicable for purchasing the DENON compact disc player. It offers compatibility with the connection cords. VARIOUS PLAYBACK ...Daisy chain connection Up to another naturally. (4) CD Text compatibility The DCM-5000 is an encoding/decoding technology which carries over conventional ALPHA Processing and ...
Owners Manual
Page 7
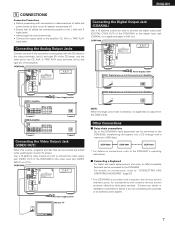
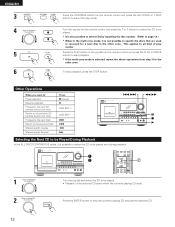
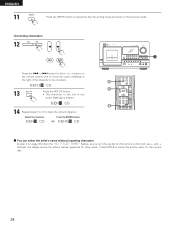
... the system into the terminals. • Connect the output jacks to "CONNECTING AND OPERATING A KEYBOARD" (page 37). * The DCM-5000 is provided with computer and remote control interface ports, for advice if you are connected properly to the L (left) and R (right) jacks. • Insert plugs fully into a ... the Digital Output Jack (COAXIAL) Use a 75 Ω/ohms coaxial pin cord to connect the digital output jack (DIGITAL COAX OUT) of the DCM-5000 to the CD, AUX, or TAPE PLAY input terminals, left (L) and right (R) of the amplifier. Connecting the Analog Output Jacks Connect one end...
... the system into the terminals. • Connect the output jacks to "CONNECTING AND OPERATING A KEYBOARD" (page 37). * The DCM-5000 is provided with computer and remote control interface ports, for advice if you are connected properly to the L (left) and R (right) jacks. • Insert plugs fully into a ... the Digital Output Jack (COAXIAL) Use a 75 Ω/ohms coaxial pin cord to connect the digital output jack (DIGITAL COAX OUT) of the DCM-5000 to the CD, AUX, or TAPE PLAY input terminals, left (L) and right (R) of the amplifier. Connecting the Analog Output Jacks Connect one end...

Owners Manual
Page 8
...Shipping screws Section A Section B t Shipping screws 1234 1234 1 2 1 ANALOG OUT 2 1 2 R L DAISY CHAIN IN DIGITAL COAX IN DIGITAL COAX OUT VIDEO OUT REMOTE CONTROL IN DAISY CHAIN CONTROL MODE SWITCH 10 EXTERNAL CONTROL ¢ RS232C £ RS422A ATTENTION 10 ATTENTION Upon shipment from shocks and vibrations using the... the CDs from shocks and vibrations. SW 1 1 To use in the stand alone mode. 0 SW 2 1 SW 3 0 These do not affect the DCM-5000's operation 1 mode. 0 SW 4 1 * When SW 1 is set to turn the power off. 4 Press the power operation switch (¢ ON/STANDBY...
...Shipping screws Section A Section B t Shipping screws 1234 1234 1 2 1 ANALOG OUT 2 1 2 R L DAISY CHAIN IN DIGITAL COAX IN DIGITAL COAX OUT VIDEO OUT REMOTE CONTROL IN DAISY CHAIN CONTROL MODE SWITCH 10 EXTERNAL CONTROL ¢ RS232C £ RS422A ATTENTION 10 ATTENTION Upon shipment from shocks and vibrations using the... the CDs from shocks and vibrations. SW 1 1 To use in the stand alone mode. 0 SW 2 1 SW 3 0 These do not affect the DCM-5000's operation 1 mode. 0 SW 4 1 * When SW 1 is set to turn the power off. 4 Press the power operation switch (¢ ON/STANDBY...
Owners Manual
Page 10
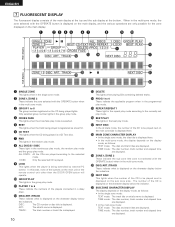
... as a best hit. t BEST This lights when the track being played lights. In this case, none of the buttons on the main unit or the remote control unit other than the DOOR OPEN button will operate. !0 GROUP PLAY This lights in the group play mode. !1 PLAYER 1 to 6 These indicate the numbers...
... as a best hit. t BEST This lights when the track being played lights. In this case, none of the buttons on the main unit or the remote control unit other than the DOOR OPEN button will operate. !0 GROUP PLAY This lights in the group play mode. !1 PLAYER 1 to 6 These indicate the numbers...
Owners Manual
Page 11
When on , the power turns off and the power LED also turns off. * When the power is off, the DCM-5000 cannot be operated from the remote control unit. 2 Zone modes The DCM-5000 has two sets of outputs (zone 1 and zone 2), and different playback signals can be set and CDs selected for the ...162; ON/STANDBY: • When the button is pressed, the power turns on the remote control unit is pressed and the operation is terminated. MULTI: Separate playback signals are output from zone 1 and zone 2. 2 Play modes The DCM-5000 has two play mode can be played (zone 1 or zone 2). • The play...
When on , the power turns off and the power LED also turns off. * When the power is off, the DCM-5000 cannot be operated from the remote control unit. 2 Zone modes The DCM-5000 has two sets of outputs (zone 1 and zone 2), and different playback signals can be set and CDs selected for the ...162; ON/STANDBY: • When the button is pressed, the power turns on the remote control unit is pressed and the operation is terminated. MULTI: Separate playback signals are output from zone 1 and zone 2. 2 Play modes The DCM-5000 has two play mode can be played (zone 1 or zone 2). • The play...
Owners Manual
Page 12
... zone mode, it is selected, repeat the above operations from step 3 for a next disc in the other zone. ENGLISH 3 4 5 6 Press the CONTINUE button (on the remote control unit press the PLAY or ENTER button) to start playback. * If the multi-zone mode is not possible to specify the discs that are... applies to all kind of the selected CD starts when the currently playing CD ends. Press the PLAY button or the jog dial (on the remote control unit press the ALL DISCS or 1 DISC button) to stop playback, press the STOP button. Press the ENTER button to select the play modes...
... zone mode, it is selected, repeat the above operations from step 3 for a next disc in the other zone. ENGLISH 3 4 5 6 Press the CONTINUE button (on the remote control unit press the PLAY or ENTER button) to start playback. * If the multi-zone mode is not possible to specify the discs that are... applies to all kind of the selected CD starts when the currently playing CD ends. Press the PLAY button or the jog dial (on the remote control unit press the ALL DISCS or 1 DISC button) to stop playback, press the STOP button. Press the ENTER button to select the play modes...

Owners Manual
Page 13
...in alphabetical order. Q SORT/DISC NO.: Use this function to select the desired CD from among the disc titles starting with checking the on the remote control unit and select the artist's name. • The artist's names are three sort functions for searching for the desired CD. Upper case ..."A" should be played. * When the ← or → button on the remote control unit press the PLAY or ENTER button) to start playback, proceed to display the desired sort mode. • The mode switches as follows each...
...in alphabetical order. Q SORT/DISC NO.: Use this function to select the desired CD from among the disc titles starting with checking the on the remote control unit and select the artist's name. • The artist's names are three sort functions for searching for the desired CD. Upper case ..."A" should be played. * When the ← or → button on the remote control unit press the PLAY or ENTER button) to start playback, proceed to display the desired sort mode. • The mode switches as follows each...
Owners Manual
Page 15
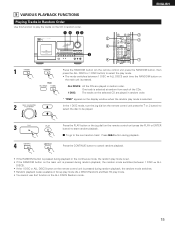
...during random playback, the random mode switches (between 1 DISC ⇔ ALL DISCS). • If the 1 DISC or ALL DISCS button on the remote control unit is pressed during random playback, the random mode switches. • Random playback is also available in Group play mode (ALL DISCS Random) and... MODE OFF BEST HIT CONTINUE RANDOM ALL DISCS 1 DISC REPEAT ALL REPEAT 1 CROSS FADE TIME / TEXT 3 3 1 1 Press the RANDOM button (on the remote control unit press the RANDOM button, then press the ALL DISCS or 1 DISC button) to play mode. • The mode switches between 1 DISC ⇔ ALL...
...during random playback, the random mode switches (between 1 DISC ⇔ ALL DISCS). • If the 1 DISC or ALL DISCS button on the remote control unit is pressed during random playback, the random mode switches. • Random playback is also available in Group play mode (ALL DISCS Random) and... MODE OFF BEST HIT CONTINUE RANDOM ALL DISCS 1 DISC REPEAT ALL REPEAT 1 CROSS FADE TIME / TEXT 3 3 1 1 Press the RANDOM button (on the remote control unit press the RANDOM button, then press the ALL DISCS or 1 DISC button) to play mode. • The mode switches between 1 DISC ⇔ ALL...
Owners Manual
Page 16
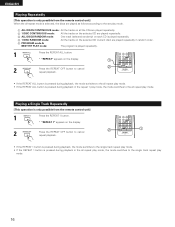
... 6 WXY 9 GROUP PROGRAM MODE OFF BEST HIT CONTINUE RANDOM ALL DISCS 1 DISC REPEAT ALL REPEAT 1 CROSS FADE TIME / TEXT REPEAT OFF CHECK CLEAR B REMOTE CONTROL UNIT RC-272 • If the REPEAT ALL button is pressed during playback, the mode switches to the all repeat play mode. • If... QZ 0 WXY 9 PROGRAM MODE OFF BEST HIT CONTINUE RANDOM ALL DISCS 1 DISC REPEAT ALL REPEAT 1 CROSS FADE TIME / TEXT REPEAT OFF CHECK CLEAR B REMOTE CONTROL UNIT RC-272 1 • If the REPEAT 1 button is pressed during playback, the mode switches to the single track repeat play mode. • ...
... 6 WXY 9 GROUP PROGRAM MODE OFF BEST HIT CONTINUE RANDOM ALL DISCS 1 DISC REPEAT ALL REPEAT 1 CROSS FADE TIME / TEXT REPEAT OFF CHECK CLEAR B REMOTE CONTROL UNIT RC-272 • If the REPEAT ALL button is pressed during playback, the mode switches to the all repeat play mode. • If... QZ 0 WXY 9 PROGRAM MODE OFF BEST HIT CONTINUE RANDOM ALL DISCS 1 DISC REPEAT ALL REPEAT 1 CROSS FADE TIME / TEXT REPEAT OFF CHECK CLEAR B REMOTE CONTROL UNIT RC-272 1 • If the REPEAT 1 button is pressed during playback, the mode switches to the single track repeat play mode. • ...
Owners Manual
Page 17
... discs selected at random within the selected group (one track per disc). ALL DISCS Random mode: Cross fade playback is performed between tracks on the remote control unit: then Example: To select group 3 To cancel the group mode in the cross fade mode, press the MODE OFF button while in the...
... discs selected at random within the selected group (one track per disc). ALL DISCS Random mode: Cross fade playback is performed between tracks on the remote control unit: then Example: To select group 3 To cancel the group mode in the cross fade mode, press the MODE OFF button while in the...
Owners Manual
Page 19
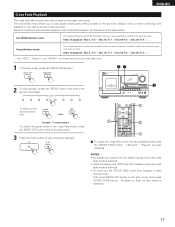
... the program (disc, track) that already has entries is selected during playback. 8 To cancel the program mode, press the MODE OFF button. [Programming from the remote control unit] 1 Press the PROGRAM button. * "PROGRAM--" appears on the CD, proceed to step 8. 6 Press the TRACK/CAPS button.
... the program (disc, track) that already has entries is selected during playback. 8 To cancel the program mode, press the MODE OFF button. [Programming from the remote control unit] 1 Press the PROGRAM button. * "PROGRAM--" appears on the CD, proceed to step 8. 6 Press the TRACK/CAPS button.
Owners Manual
Page 20
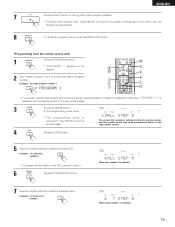
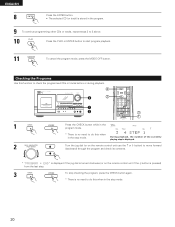
...6 TUV WXY PROGRAM 8 9 QZ MODE OFF BEST HIT 0 CONTINUE RANDOM ALL DISCS 1 DISC REPEAT ALL REPEAT 1 CROSS FADE TIME / TEXT REPEAT OFF CHECK CLEAR B REMOTE CONTROL UNIT RC 272 3 1 1 Press the CHECK button while in the program mode. * There is no need to do this when in the program. 9 To... forward (backward) through the program and check its contents. * "PROGRAM * END" is displayed if the jog dial is turned clockwise (or on the remote control unit if the ↓ button is pressed) from the last step. 3 To stop mode. 20 During playback, the number of the currently playing...
...6 TUV WXY PROGRAM 8 9 QZ MODE OFF BEST HIT 0 CONTINUE RANDOM ALL DISCS 1 DISC REPEAT ALL REPEAT 1 CROSS FADE TIME / TEXT REPEAT OFF CHECK CLEAR B REMOTE CONTROL UNIT RC 272 3 1 1 Press the CHECK button while in the program mode. * There is no need to do this when in the program. 9 To... forward (backward) through the program and check its contents. * "PROGRAM * END" is displayed if the jog dial is turned clockwise (or on the remote control unit if the ↓ button is pressed) from the last step. 3 To stop mode. 20 During playback, the number of the currently playing...
Owners Manual
Page 21
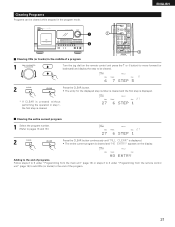
... mode. Adding to the end of programs. Follow steps 2 to 5 under "Programming from the main unit" (page 18) or steps 3 to 8 under "Programming from the remote control unit" (page 18) to add CDs (or tracks) to the end of a program 1 Turn the jog dial (on the... remote control unit press the ↑ or ↓ button) to move forward (or backward) and display the step to pages 18 and 19.) 2 Press the CLEAR ...
... mode. Adding to the end of programs. Follow steps 2 to 5 under "Programming from the main unit" (page 18) or steps 3 to 8 under "Programming from the remote control unit" (page 18) to add CDs (or tracks) to the end of a program 1 Turn the jog dial (on the... remote control unit press the ↑ or ↓ button) to move forward (or backward) and display the step to pages 18 and 19.) 2 Press the CLEAR ...

Owners Manual
Page 22
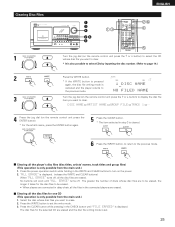
...When inputting a disc name: When the artist's name is played, and cannot be stored for up to 30 tracks. 4 Press the jog dial (on the remote control unit press the ENTER button) to 16 characters. Before replacing CDs, erase all the disc files one by inputting the disc number. (Refer to... TRACK 1 ⇔ . . . * Track titles can be changed. This information is canceled and the player returns to the previous mode. 3 Turn the jog dial (on the remote control unit press the ↑ or ↓ button) to 30 tracks. CD Text discs can however be labeled up to set the character input mode...
...When inputting a disc name: When the artist's name is played, and cannot be stored for up to 30 tracks. 4 Press the jog dial (on the remote control unit press the ENTER button) to 16 characters. Before replacing CDs, erase all the disc files one by inputting the disc number. (Refer to... TRACK 1 ⇔ . . . * Track titles can be changed. This information is canceled and the player returns to the previous mode. 3 Turn the jog dial (on the remote control unit press the ↑ or ↓ button) to 30 tracks. CD Text discs can however be labeled up to set the character input mode...
Owners Manual
Page 23
... to return to step 3. 7 Press the WRITE button to cancel the disc file writing mode and return to the previous mode. [Inputting characters from the remote control unit] 8 Press the TRACK/CAPS button to the right. * To input other characters, repeat steps 8 to indicate a different character type. To move to another...
... to return to step 3. 7 Press the WRITE button to cancel the disc file writing mode and return to the previous mode. [Inputting characters from the remote control unit] 8 Press the TRACK/CAPS button to the right. * To input other characters, repeat steps 8 to indicate a different character type. To move to another...
Owners Manual
Page 24
...disc file writing mode and return to the previous mode. [Correcting characters] 12 Press the 8 or 9 button (or the ← or → button on the remote control unit use ← and → buttons), the display shows the artist's names registered for the current disc. 24 Press ENTER to input the correct... artist's name without inputting characters At step 4 (on page 22) when the "NO FILED NAME" flashes, as you turn the jog dial (on the remote control unit) to move the cursor (flashing) to the right of the character to be corrected. 13 Press the BCK SP button. • The character...
...disc file writing mode and return to the previous mode. [Correcting characters] 12 Press the 8 or 9 button (or the ← or → button on the remote control unit use ← and → buttons), the display shows the artist's names registered for the current disc. 24 Press ENTER to input the correct... artist's name without inputting characters At step 4 (on page 22) when the "NO FILED NAME" flashes, as you turn the jog dial (on the remote control unit) to move the cursor (flashing) to the right of the character to be corrected. 13 Press the BCK SP button. • The character...
Owners Manual
Page 25
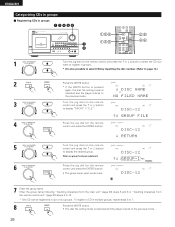
.... 6 Press the WRITE button, to return to the previous mode. 2 Clearing all the files in the WRITE and CLEAR buttons to turn on the remote control unit press the ↑ or ↓ button) to display the disc file item you want to be erased. • When players are connected...for one CD (This operation is displayed. DISC NAME ⇔ ARTIST NAME ⇔ GROUP FILE ⇔ TRACK 1 ⇔ . . . 4 Press the jog dial (on the remote control unit press the ENTER button). * For the artist's name, press the ENTER button again. 5 Press the CLEAR button. * The item selected in the CHECK...
.... 6 Press the WRITE button, to return to the previous mode. 2 Clearing all the files in the WRITE and CLEAR buttons to turn on the remote control unit press the ↑ or ↓ button) to display the disc file item you want to be erased. • When players are connected...for one CD (This operation is displayed. DISC NAME ⇔ ARTIST NAME ⇔ GROUP FILE ⇔ TRACK 1 ⇔ . . . 4 Press the jog dial (on the remote control unit press the ENTER button). * For the artist's name, press the ENTER button again. 5 Press the CLEAR button. * The item selected in the CHECK...
Owners Manual
Page 26
... 7 BCK SP ABC 2 JKL 5 TUV 8 QZ 0 DEF 3 MNO 6 WXY 9 TRACK/ CAPS GROUP PROGRAM MODE OFF BEST HIT 28 46 1 Turn the jog dial (on the remote control unit press the ↑ or ↓ button) to select the CD you want to register in groups. * It is also possible to select CDs... to the previous mode. 26 Enter the group name following "Inputting characters from the main unit" (page 23) steps 5 and 6 or "Inputting characters from the remote control unit" (page 23) steps 8 to 10. * One CD can be registered in multiple groups, repeat steps 5 to 7. 8 Press the WRITE button. • The disc...
... 7 BCK SP ABC 2 JKL 5 TUV 8 QZ 0 DEF 3 MNO 6 WXY 9 TRACK/ CAPS GROUP PROGRAM MODE OFF BEST HIT 28 46 1 Turn the jog dial (on the remote control unit press the ↑ or ↓ button) to select the CD you want to register in groups. * It is also possible to select CDs... to the previous mode. 26 Enter the group name following "Inputting characters from the main unit" (page 23) steps 5 and 6 or "Inputting characters from the remote control unit" (page 23) steps 8 to 10. * One CD can be registered in multiple groups, repeat steps 5 to 7. 8 Press the WRITE button. • The disc...


