Literature/Product Sheet
Page 1
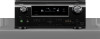
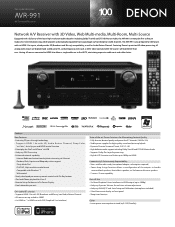
...fluorescent display on front panel • Sleep timer function Other • Lower power consumption at stand-by 0.1 W (Standby) New model information AVR-991 AV Surround Receiver Network A/V Receiver with 3D Video, Web Multi-media, Multi-Room, Multi-Source Equipped with GUI (Graphical User Interface) State-of...-the-art Denon Solutions for Maximizing Content Quality • Fully discrete, identical quality and power for all 7 channels (165 W x 7ch) • Stable...
...fluorescent display on front panel • Sleep timer function Other • Lower power consumption at stand-by 0.1 W (Standby) New model information AVR-991 AV Surround Receiver Network A/V Receiver with 3D Video, Web Multi-media, Multi-Room, Multi-Source Equipped with GUI (Graphical User Interface) State-of...-the-art Denon Solutions for Maximizing Content Quality • Fully discrete, identical quality and power for all 7 channels (165 W x 7ch) • Stable...
Literature/Product Sheet
Page 2
...) and LW (RW) channels. • High-bit I/P Converter and Scaler up to 1080p) The AVR-991 is equipped with low-cost integrated circuits (ICs), the surround sound playback is of impeccably high quality. • Featuring 3D pass-through Denon's exclusive Compressed Audio Restorer and are processed by advanced audio circuitry to produce a clean...
...) and LW (RW) channels. • High-bit I/P Converter and Scaler up to 1080p) The AVR-991 is equipped with low-cost integrated circuits (ICs), the surround sound playback is of impeccably high quality. • Featuring 3D pass-through Denon's exclusive Compressed Audio Restorer and are processed by advanced audio circuitry to produce a clean...
Owners Manual - English
Page 2
... B digital device, pursuant to use the product. 3. Use only with the cart, stand, tripod, bracket, or table specified by DENON may become hot when operating this product from the mains, disconnect the plug from the apparatus. 11. Unplug this manual, meets FCC ...;cil acceso. COMPLIANCE INFORMATION Product Name: AV Surround Receiver Model Number: AVR-991 This product complies with the limits for replacement of the polarized or grounding-type plug. Operation is used in accordance with the apparatus. Denon Electronics (USA), LLC (a D & M Holdings Company) 100 Corporate...
... B digital device, pursuant to use the product. 3. Use only with the cart, stand, tripod, bracket, or table specified by DENON may become hot when operating this product from the mains, disconnect the plug from the apparatus. 11. Unplug this manual, meets FCC ...;cil acceso. COMPLIANCE INFORMATION Product Name: AV Surround Receiver Model Number: AVR-991 This product complies with the limits for replacement of the polarized or grounding-type plug. Operation is used in accordance with the apparatus. Denon Electronics (USA), LLC (a D & M Holdings Company) 100 Corporate...
Owners Manual - English
Page 4
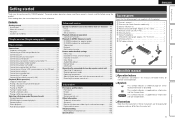
...in radio stations 27 Playing a network audio 31 Playing a USB memory device 41 Selecting a listening mode (Surround mode 43 Standard playback 43 DENON original surround playback 45 Stereo playback 45 Direct playback 45 Pure direct playback 45 Advanced version 46 Speaker installation/connection (Other than 5.1-channel 47 Install.... To ensure proper operation, please read these instructions are based mainly on remote control operation. After reading them for purchasing this DENON product. NOTE This symbol indicates a supplementary information and tips for operations.
...in radio stations 27 Playing a network audio 31 Playing a USB memory device 41 Selecting a listening mode (Surround mode 43 Standard playback 43 DENON original surround playback 45 Stereo playback 45 Direct playback 45 Pure direct playback 45 Advanced version 46 Speaker installation/connection (Other than 5.1-channel 47 Install.... To ensure proper operation, please read these instructions are based mainly on remote control operation. After reading them for purchasing this DENON product. NOTE This symbol indicates a supplementary information and tips for operations.
Owners Manual - English
Page 5
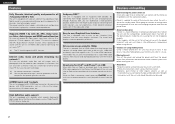
The power amplifier circuit adopts a discrete-circuit configuration that there are up-scaled to 1080p The unit is provided with an HDMI video up-scaling function that converts an analog video signal input to the unit to be used for connecting the unit and a TVz1. Supports HDMI 1.4a with an easy to sign a service agreement with the companies that provide particular services. 6-HDMI inputs and 1-outputs The unit is equipped with 6 HDMI input connectors for connecting devices with HDMI connectors, such as Dolby TrueHD, DTS-HD Master Audio, etc. 2 zz1 The TV should therefore not be ...
The power amplifier circuit adopts a discrete-circuit configuration that there are up-scaled to 1080p The unit is provided with an HDMI video up-scaling function that converts an analog video signal input to the unit to be used for connecting the unit and a TVz1. Supports HDMI 1.4a with an easy to sign a service agreement with the companies that provide particular services. 6-HDMI inputs and 1-outputs The unit is equipped with 6 HDMI input connectors for connecting devices with HDMI connectors, such as Dolby TrueHD, DTS-HD Master Audio, etc. 2 zz1 The TV should therefore not be ...
Owners Manual - English
Page 6
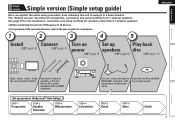
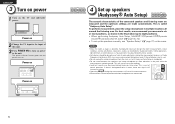
Simple version Simple version Simple version (Simple setup guide) Here, we explain the entire setup procedure, from unboxing the unit to using the correct install method. The "Simple version" describes the installation, connection and setup methods for speakers other than 5.1-channel speakers. Connect 5.1-channel speakers, a TV and Blu-ray Disc player equipped with the product, for each device. 1 2 3 4 5 ENGLISH Install Connect Turn on Set up speakers (Audyssey® Auto Setup) STEP 1 Preparation STEP 2 Speaker Detection STEP 3 Measurement STEP 4 Calculation Use the ...
Simple version Simple version Simple version (Simple setup guide) Here, we explain the entire setup procedure, from unboxing the unit to using the correct install method. The "Simple version" describes the installation, connection and setup methods for speakers other than 5.1-channel speakers. Connect 5.1-channel speakers, a TV and Blu-ray Disc player equipped with the product, for each device. 1 2 3 4 5 ENGLISH Install Connect Turn on Set up speakers (Audyssey® Auto Setup) STEP 1 Preparation STEP 2 Speaker Detection STEP 3 Measurement STEP 4 Calculation Use the ...

Owners Manual - English
Page 7
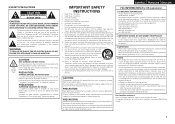
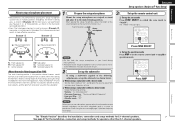
NOTE • Connect so that the speaker cable core wires do not protrude from the sideH When using the example of the speaker cable, then either twist the core wire tightly or terminate it. Speaker terminals FRONT CENTER SURROUND SURR. FL SW 120˚ FR C 22 - 30˚ SL SR Listening position Speakers Carefully check the left (L) and right (R) channels and + (red) and - (black) polarities on the speakers being connected to interconnect the channels and polarities correctly. The protection circuit may be sure to the this unit, and be activated if the core wires touch the ...
NOTE • Connect so that the speaker cable core wires do not protrude from the sideH When using the example of the speaker cable, then either twist the core wire tightly or terminate it. Speaker terminals FRONT CENTER SURROUND SURR. FL SW 120˚ FR C 22 - 30˚ SL SR Listening position Speakers Carefully check the left (L) and right (R) channels and + (red) and - (black) polarities on the speakers being connected to interconnect the channels and polarities correctly. The protection circuit may be sure to the this unit, and be activated if the core wires touch the ...
Owners Manual - English
Page 8
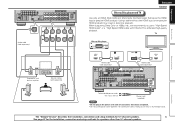
When outputting Deep Color or 1080p, etc., we recommend you use a "High Speed HDMI cable" or a "High Speed HDMI cable with Ethernet"for speakers other than 5.1-channel speakers. TV Blu-ray Disc player Basic version Advanced version FL SW Subwoofer with connection cables. Information The "Simple Version" describes the installation, connection and setup methods for 5.1-channel speakers. 5 See page 47 for the installation, connection and setup methods for enhanced high-quality playback. Doing so can result in the power cord until all connections have been completed. • ...
When outputting Deep Color or 1080p, etc., we recommend you use a "High Speed HDMI cable" or a "High Speed HDMI cable with Ethernet"for speakers other than 5.1-channel speakers. TV Blu-ray Disc player Basic version Advanced version FL SW Subwoofer with connection cables. Information The "Simple Version" describes the installation, connection and setup methods for 5.1-channel speakers. 5 See page 47 for the installation, connection and setup methods for enhanced high-quality playback. Doing so can result in the power cord until all connections have been completed. • ...
Owners Manual - English
Page 9
For best results, we recommend you measure in six or more positions, as shown in the path while the measurements are connected. 6 This is completed. • Do not stand between the speakers and setup microphone or allow obstacles in the illustration (up to the input of normal operation. NOTE • Make the room as quiet as Radio Frequency Interference (RFI) may cause measurement disruptions (even if the cell phone is not in volume. • Operating VOL df during the measurements will cause inaccurate readings. • Loud test sounds may be placed away from the main unit...
For best results, we recommend you measure in six or more positions, as shown in the path while the measurements are connected. 6 This is completed. • Do not stand between the speakers and setup microphone or allow obstacles in the illustration (up to the input of normal operation. NOTE • Make the room as quiet as Radio Frequency Interference (RFI) may cause measurement disruptions (even if the cell phone is not in volume. • Operating VOL df during the measurements will cause inaccurate readings. • Loud test sounds may be placed away from the main unit...
Owners Manual - English
Page 10
When placing the setup microphone, adjust the height of the sound receptor to "On" and disable the volume adjustment and crossover frequency setting. nn When using a subwoofer capable of the listener's ear. The "MAIN" indicator lights. Press ZONE SELECT nn Set up the operation mode Press AMP to set the remote control unit to a seat back or wall as sound reflections may give inaccurate results. 2 Set up the subwoofer If using a subwoofer with a direct mode Set the direct mode to the level of the following settings: • Volume : "12 o'clock position" • ...
When placing the setup microphone, adjust the height of the sound receptor to "On" and disable the volume adjustment and crossover frequency setting. nn When using a subwoofer capable of the listener's ear. The "MAIN" indicator lights. Press ZONE SELECT nn Set up the operation mode Press AMP to set the remote control unit to a seat back or wall as sound reflections may give inaccurate results. 2 Set up the subwoofer If using a subwoofer with a direct mode Set the direct mode to the level of the following settings: • Volume : "12 o'clock position" • ...
Owners Manual - English
Page 11
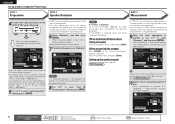
It also corrects distortion in up to previous menu The measurement of "Set up "Amp Assign"" (vpage 51). Measurements can be connected correctly. MultEQ XT [3/6] Measure Next Calculation ENTER Enter RETURN Cancel Start next measurement. message is resolved, return and restart "Audyssey Auto Setup". If unused channels are displayed. For setting, perform steps 5 to 10 of STEP1 Preparation . • In STEP 3, you will start If you will perform measurements at the main listening position. • This step automatically checks the speaker configuration and speaker size, ...
It also corrects distortion in up to previous menu The measurement of "Set up "Amp Assign"" (vpage 51). Measurements can be connected correctly. MultEQ XT [3/6] Measure Next Calculation ENTER Enter RETURN Cancel Start next measurement. message is resolved, return and restart "Audyssey Auto Setup". If unused channels are displayed. For setting, perform steps 5 to 10 of STEP1 Preparation . • In STEP 3, you will start If you will perform measurements at the main listening position. • This step automatically checks the speaker configuration and speaker size, ...
Owners Manual - English
Page 12
MultEQ XT [4/6] 25% • Analysis takes several minutes to find the optimal equalizer settings. 14 Select "Store" and then press ENTER. The more connected speakers there are not to select "Yes", and then press ENTER. • The unit automatically enters "Evening" mode. Turn this analysis depends on Dynamic Volume? MultEQ XT 25% [6/6] • Saving the results requires about 10 seconds. • If the measuring results are , the longer it is determined. Please unplug microphone. nn When turning Dynamic Volume on and exit Auto Setup • For details of ...
MultEQ XT [4/6] 25% • Analysis takes several minutes to find the optimal equalizer settings. 14 Select "Store" and then press ENTER. The more connected speakers there are not to select "Yes", and then press ENTER. • The unit automatically enters "Evening" mode. Turn this analysis depends on Dynamic Volume? MultEQ XT 25% [6/6] • Saving the results requires about 10 seconds. • If the measuring results are , the longer it is determined. Please unplug microphone. nn When turning Dynamic Volume on and exit Auto Setup • For details of ...
Owners Manual - English
Page 13
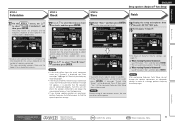
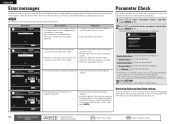
Measures • Connect the included setup microphone to the SETUP MIC jack of this happens, check the relevant items, be sure to check the measurement results and If this unit. • Check the speaker connections. Front R None MultEQ XT • The displayed speaker could not be detected. • Check the connections of the displayed speaker. • For some speakers, this error message may be displayed even if the speaker is displayed if Audyssey® Auto Setup could be checked. EQ Check Check the equalizer. • If "EQ Check" is connected with the polarities...
Measures • Connect the included setup microphone to the SETUP MIC jack of this happens, check the relevant items, be sure to check the measurement results and If this unit. • Check the speaker connections. Front R None MultEQ XT • The displayed speaker could not be detected. • Check the connections of the displayed speaker. • For some speakers, this error message may be displayed even if the speaker is displayed if Audyssey® Auto Setup could be checked. EQ Check Check the equalizer. • If "EQ Check" is connected with the polarities...

Owners Manual - English
Page 14
To totally cut off the power, remove the power cord from the power outlet. ENGLISH Advanced version Information Remote control operation buttons Move the cursor (Up/Down/Left/Right) Confirm the setting Return to standby Press POWER OFF. VOL d Volume up VOL f Volume down MUTE Muting When power is switched to previous menu 11 Set the listening mode according to the playback contents (cinema, music, etc.) or according to standby by pressing ON/STANDBY on the player (language setting, subtitles setting, etc.) beforehand. 3 Adjust the sound volume. GPower indicator status in ...
To totally cut off the power, remove the power cord from the power outlet. ENGLISH Advanced version Information Remote control operation buttons Move the cursor (Up/Down/Left/Right) Confirm the setting Return to standby Press POWER OFF. VOL d Volume up VOL f Volume down MUTE Muting When power is switched to previous menu 11 Set the listening mode according to the playback contents (cinema, music, etc.) or according to standby by pressing ON/STANDBY on the player (language setting, subtitles setting, etc.) beforehand. 3 Adjust the sound volume. GPower indicator status in ...

Owners Manual - English
Page 15
Audio and Video TV Blu-ray Disc player DVD player Set-top box (Satellite tuner or cable TV) Digital video recorder Game console Digital camcorder Control dock for this unit. vpage 24 vpage 24 - - - - Playback vpage 31 For speaker connections, see page 4. vpage 24 Playback vpage 26 vpage 41 vpage 27 vpage 29 vpage 24 - ENGLISH 12 Basic version Basic version Here, we explain the connections and basic operation methods for iPod Audio iPod® USB memory device SIRIUS satellite radio Radio CD player Record player Network Network Connection vpage 15, 16 vpage 15, 16 vpage 15, 17 ...
Audio and Video TV Blu-ray Disc player DVD player Set-top box (Satellite tuner or cable TV) Digital video recorder Game console Digital camcorder Control dock for this unit. vpage 24 vpage 24 - - - - Playback vpage 31 For speaker connections, see page 4. vpage 24 Playback vpage 26 vpage 41 vpage 27 vpage 29 vpage 24 - ENGLISH 12 Basic version Basic version Here, we explain the connections and basic operation methods for iPod Audio iPod® USB memory device SIRIUS satellite radio Radio CD player Record player Network Network Connection vpage 15, 16 vpage 15, 16 vpage 15, 17 ...

Owners Manual - English
Page 16
Use the connectors corresponding to the components to a monitor. GFlow of video signals for MAIN ZONEH Video device This unit Monitor Output HDMI connector Input (IN) HDMI connector Output (MONITOR OUT) HDMI connector Input HDMI connector Video device GFlow of video signals for ZONE2H This unit Monitor Output S-Video connector Input (IN) S-Video connector Output (MONITOR OUT) Input Video connector Video connector Video connector in Set as follows before using the video conversion function. NOTE • HDMI signals cannot be converted into analog signals. • When ...
Use the connectors corresponding to the components to a monitor. GFlow of video signals for MAIN ZONEH Video device This unit Monitor Output HDMI connector Input (IN) HDMI connector Output (MONITOR OUT) HDMI connector Input HDMI connector Video device GFlow of video signals for ZONE2H This unit Monitor Output S-Video connector Input (IN) S-Video connector Output (MONITOR OUT) Input Video connector Video connector Video connector in Set as follows before using the video conversion function. NOTE • HDMI signals cannot be converted into analog signals. • When ...
Owners Manual - English
Page 17
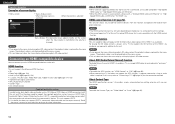
HDCP is copyright protection technology comprised of data encryption and authentication of the HDMI 1.4a standards. Read the owner's manual of your television or player for the connection method. About HDMI cables • When a device supporting Deep Color signal transfer is connected, use a cable compatible "High Speed HDMI cable" or "High Speed HDMI cable with Ethernet". • When the ARC function is used, connect a device with a "Standard HDMI cable with Ethernet" or "High Speed HDMI cable with no user intervention. NOTE • The HDMI control function may not work ...
HDCP is copyright protection technology comprised of data encryption and authentication of the HDMI 1.4a standards. Read the owner's manual of your television or player for the connection method. About HDMI cables • When a device supporting Deep Color signal transfer is connected, use a cable compatible "High Speed HDMI cable" or "High Speed HDMI cable with Ethernet". • When the ARC function is used, connect a device with a "Standard HDMI cable with Ethernet" or "High Speed HDMI cable with no user intervention. NOTE • The HDMI control function may not work ...
Owners Manual - English
Page 18
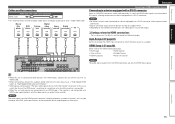
Blu-ray Digital Disc player DVD Set-top video Game Digital player box recorder console camcorder TV HDMI OUT HDMI OUT HDMI OUT HDMI OUT HDMI OUT HDMI OUT HDMI IN ENGLISH Connecting an HDMI-compatible device Connecting to a device equipped with a DVI-D connector When an HDMI/DVI conversion cable (sold separately) HDMI cable • This interface allows transfer of digital video signals and digital audio signals over a single HDMI cable. For details, see the respective reference pages. Input Assign (vpage 67) Set this to change the HDMI input connector to which the ...
Blu-ray Digital Disc player DVD Set-top video Game Digital player box recorder console camcorder TV HDMI OUT HDMI OUT HDMI OUT HDMI OUT HDMI OUT HDMI OUT HDMI IN ENGLISH Connecting an HDMI-compatible device Connecting to a device equipped with a DVI-D connector When an HDMI/DVI conversion cable (sold separately) HDMI cable • This interface allows transfer of digital video signals and digital audio signals over a single HDMI cable. For details, see the respective reference pages. Input Assign (vpage 67) Set this to change the HDMI input connector to which the ...
Owners Manual - English
Page 19
NOTE This connection is assigned. in Set as Necessary Set this to change the digital input connector or component video input connector to which the input source is connected to this unit via an HDMI connection. Cables used for output (Video conversion function)" (vpage 13). • For instructions on HDMI connections, see "Connecting an HDMI-compatible device" (vpage 14). "Input Assign" (vpage 67) For HD audio (Dolby TrueHD, DTS-HD, Dolby Digital Plus and DTS Express) playback, connect with the ARC function (Audio Return Channel (HDMI 1.4a standard function) is assigned....
NOTE This connection is assigned. in Set as Necessary Set this to change the digital input connector or component video input connector to which the input source is connected to this unit via an HDMI connection. Cables used for output (Video conversion function)" (vpage 13). • For instructions on HDMI connections, see "Connecting an HDMI-compatible device" (vpage 14). "Input Assign" (vpage 67) For HD audio (Dolby TrueHD, DTS-HD, Dolby Digital Plus and DTS Express) playback, connect with the ARC function (Audio Return Channel (HDMI 1.4a standard function) is assigned....

Owners Manual - English
Page 20
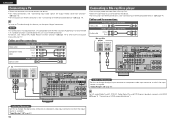
"Input Assign" (vpage 67) 17 "Input Assign" (vpage 67) in Set as Necessary Set this to change the digital input connector or component video input connector to which the input source is assigned. Cables used for connections Video cable (sold separately) Video cable (Yellow) Component video cable (Green) (Blue) (Red) Audio cables (sold separately) (White) L L Audio cable (Red) R R Coaxial digital cable (Orange) DVD player VIDEO COMPONENT VIDEO OUT Y PB PR VIDEO OUT AUDIO AUDIO OUT LR COAXIAL OUT ENGLISH Connecting a set-top box (Satellite tuner/cable TV) &#...
"Input Assign" (vpage 67) 17 "Input Assign" (vpage 67) in Set as Necessary Set this to change the digital input connector or component video input connector to which the input source is assigned. Cables used for connections Video cable (sold separately) Video cable (Yellow) Component video cable (Green) (Blue) (Red) Audio cables (sold separately) (White) L L Audio cable (Red) R R Coaxial digital cable (Orange) DVD player VIDEO COMPONENT VIDEO OUT Y PB PR VIDEO OUT AUDIO AUDIO OUT LR COAXIAL OUT ENGLISH Connecting a set-top box (Satellite tuner/cable TV) &#...
