Literature/Product Sheet
Page 2
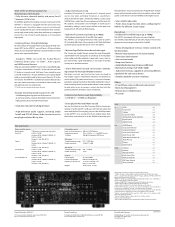
... is not responsible for all 7 channels (125 W x 7ch) To faithfully reproduce the original surround sound, each source device • Variable subwoofer crossover switching Others • PC and iPhone setup via On Screen Display • Three Quick Select buttons • Auto surround mode • Sleep timer...-cho, Kawasaki-ku, Kawasaki-shi, Kanagawa, 210-8569, Japan www.denon.com 17830410 A A sound that is wider to the left and right is achieved by adding a sound source (LW/RW) that is to the AVR-991 where they pass Preamplifier section Input sensitivity/impedance 200 mV / 47 kΩ...
... is not responsible for all 7 channels (125 W x 7ch) To faithfully reproduce the original surround sound, each source device • Variable subwoofer crossover switching Others • PC and iPhone setup via On Screen Display • Three Quick Select buttons • Auto surround mode • Sleep timer...-cho, Kawasaki-ku, Kawasaki-shi, Kanagawa, 210-8569, Japan www.denon.com 17830410 A A sound that is wider to the left and right is achieved by adding a sound source (LW/RW) that is to the AVR-991 where they pass Preamplifier section Input sensitivity/impedance 200 mV / 47 kΩ...
Owners Manual - English
Page 10
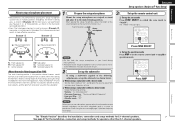
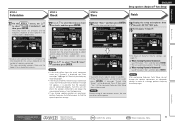
.... When placing the setup microphone, adjust the height of the sound receptor to calculate speaker distance, level, polarity, and the optimum crossover value for speakers other than 5.1-channel speakers. The "MAIN" indicator lights. NOTE • Do not hold the setup microphone in more...Audyssey MultEQ® XT uses the measurements from this position to the level of the following settings: • Volume : "12 o'clock position" • Crossover frequency : "Maximum/Highest Frequency" • Low pass filter : "Off" • Standby mode : "Off" NOTE When you measure in six or ...
.... When placing the setup microphone, adjust the height of the sound receptor to calculate speaker distance, level, polarity, and the optimum crossover value for speakers other than 5.1-channel speakers. The "MAIN" indicator lights. NOTE • Do not hold the setup microphone in more...Audyssey MultEQ® XT uses the measurements from this position to the level of the following settings: • Volume : "12 o'clock position" • Crossover frequency : "Maximum/Highest Frequency" • Low pass filter : "Off" • Standby mode : "Off" NOTE When you measure in six or ...
Owners Manual - English
Page 11
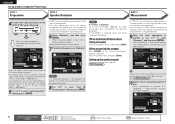
... perform measurements at the main listening position. • This step automatically checks the speaker configuration and speaker size, and calculates the channel level, distance, and crossover frequency. For setting, perform steps 5 to the SETUP MIC jack of the second position starts. When performing Audyssey Auto Setup over again Press ui to...
... perform measurements at the main listening position. • This step automatically checks the speaker configuration and speaker size, and calculates the channel level, distance, and crossover frequency. For setting, perform steps 5 to the SETUP MIC jack of the second position starts. When performing Audyssey Auto Setup over again Press ui to...
Owners Manual - English
Page 12
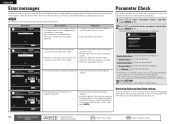
... press ENTER. • The unit automatically enters "Evening" mode. The time required for this unit off Use p to check, and then press ENTER. Level Check Crossover Check [5/6] Next Store ENTER Enter Select item to check RETURN Cancel • Subwoofers may measure a greater reported distance than the actual distance due to added...
... press ENTER. • The unit automatically enters "Evening" mode. The time required for this unit off Use p to check, and then press ENTER. Level Check Crossover Check [5/6] Next Store ENTER Enter Select item to check RETURN Cancel • Subwoofers may measure a greater reported distance than the actual distance due to added...
Owners Manual - English
Page 13
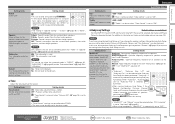
NOTE Be sure to check, then press ENTER or p. Check Check the speaker configuration. Crossover Check Check the crossover frequency. The confirmation screen reappears. If you want to turn off the power before checking speaker connections. ENGLISH...be detected. • The front L speaker was not properly detected. AUTO SETUP PARAMETER CHECK Speaker Config Check Distance Check Channel Level Check Crossover Check EQ Check Restore Show speaker configuration result Speaker Config. Distance Check Check the distance. Use o p to speaker placement, the measurement environment...
NOTE Be sure to check, then press ENTER or p. Check Check the speaker configuration. Crossover Check Check the crossover frequency. The confirmation screen reappears. If you want to turn off the power before checking speaker connections. ENGLISH...be detected. • The front L speaker was not properly detected. AUTO SETUP PARAMETER CHECK Speaker Config Check Distance Check Channel Level Check Crossover Check EQ Check Restore Show speaker configuration result Speaker Config. Distance Check Check the distance. Use o p to speaker placement, the measurement environment...
Owners Manual - English
Page 76
... MultEQ XT is selected, illuminates. • After running Audyssey Auto Setup, if the Speaker Configuration, Distance, Channel Level, and Crossover Frequency have not performed Auto Setup, or if you change the speaker settings after Audyssey Auto Setup has been performed. L/R" or ..."Audyssey Flat" is the prerequisite function for the speakers outputting sound when playing back in DENON original surround mode. Simple version Basic version Setting items S.Back (Continued) Speaker Make settings for Dynamic EQ and Dynamic Volume. ...
... MultEQ XT is selected, illuminates. • After running Audyssey Auto Setup, if the Speaker Configuration, Distance, Channel Level, and Crossover Frequency have not performed Auto Setup, or if you change the speaker settings after Audyssey Auto Setup has been performed. L/R" or ..."Audyssey Flat" is the prerequisite function for the speakers outputting sound when playing back in DENON original surround mode. Simple version Basic version Setting items S.Back (Continued) Speaker Make settings for Dynamic EQ and Dynamic Volume. ...
Owners Manual - English
Page 80
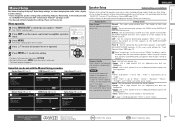
...• Exiting the Menu, press MENU while the menu is set to "Normal". Perform when setting the speakers manually or when changing settings made in "Crossover Center : Set the presence and size of a "Large". Bi-Amp : Set for connecting a tweeter of front speakers to the FRONT terminals. 2CH :...Press AMP to set to "ZONE2" by default, audio is automatically set the remote control unit to "MAIN". Bass Setting Distance Channel Level Crossover Frequency Front Speaker Setup RGB Range Auto Lip Sync HDMI Audio Out HDMI Control Normal ON AMP OFF 2ch Direct/Stereo Auto Surround Mode EQ...
...• Exiting the Menu, press MENU while the menu is set to "Normal". Perform when setting the speakers manually or when changing settings made in "Crossover Center : Set the presence and size of a "Large". Bi-Amp : Set for connecting a tweeter of front speakers to the FRONT terminals. 2CH :...Press AMP to set to "ZONE2" by default, audio is automatically set the remote control unit to "MAIN". Bass Setting Distance Channel Level Crossover Frequency Front Speaker Setup RGB Range Auto Lip Sync HDMI Audio Out HDMI Control Normal ON AMP OFF 2ch Direct/Stereo Auto Surround Mode EQ...

Owners Manual - English
Page 82
...: Select the speaker. • 40Hz / 60Hz / 80Hz / 90Hz / 100Hz / 110Hz / 120Hz / 150Hz / 200Hz / 250Hz : Set the crossover frequency. Advanced version Information Remote control operation buttons Move the cursor (Up/Down/Left/Right) Confirm the setting Return to "Small" at "Speaker Config." ENGLISH... Manual Setup Setting items Setting details Crossover Frequency Crossover : Set the crossover frequency. NOTE • Speakers set to "None" in the "Speaker Config." (vpage 77) settings are used...
...: Select the speaker. • 40Hz / 60Hz / 80Hz / 90Hz / 100Hz / 110Hz / 120Hz / 150Hz / 200Hz / 250Hz : Set the crossover frequency. Advanced version Information Remote control operation buttons Move the cursor (Up/Down/Left/Right) Confirm the setting Return to "Small" at "Speaker Config." ENGLISH... Manual Setup Setting items Setting details Crossover Frequency Crossover : Set the crossover frequency. NOTE • Speakers set to "None" in the "Speaker Config." (vpage 77) settings are used...

Owners Manual - English
Page 84
... the LFE signal output from the subwoofer. • LFE+Main : The front channel low range signal is added to "No". "Front" setting is not connected. Crossover : Set the maximum frequency of a subwoofer. • Yes : Use a subwoofer. • No : Select when a subwoofer is set to the LFE signal output from each channel...
... the LFE signal output from the subwoofer. • LFE+Main : The front channel low range signal is added to "No". "Front" setting is not connected. Crossover : Set the maximum frequency of a subwoofer. • Yes : Use a subwoofer. • No : Select when a subwoofer is set to the LFE signal output from each channel...

Owners Manual - English
Page 114
... box 15, 17 SIRIUS 20 Speaker 4, 48 TV 5, 15, 16 USB memory device 19 Contrast 76 Crossover Frequency 79 C.Width 72 vvD D.Comp 71 Decode Mode 69 Deep Color 14, 104 Delay Time 72 DENON original surround mode 45 Dimension 72 Dimmer 85 Display 94 Distance 78 DLNA 104 DNR 76 Dolby...
... box 15, 17 SIRIUS 20 Speaker 4, 48 TV 5, 15, 16 USB memory device 19 Contrast 76 Crossover Frequency 79 C.Width 72 vvD D.Comp 71 Decode Mode 69 Deep Color 14, 104 Delay Time 72 DENON original surround mode 45 Dimension 72 Dimmer 85 Display 94 Distance 78 DLNA 104 DNR 76 Dolby...