
Literature/Product Sheet
Page 2
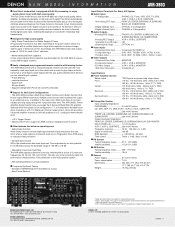
....... 200 mV/47 kohms Frequency response 10 Hz - 100 kHz; +0, -3 dB Signal-to +18 dB. • Adjustable Cross-Over Switching The AVR-3803 supports subwoofer cross-over frequencies: 40, 60, 80, 100, and 120 Hz. Preset Memory - Supports independent Power On and Off commands ■ Support for ...speaker system. • A/B switching between sound and picture that can have variable pre-amp output along with composite video feed. Furthermore, Denon's AL24 processor for high sound quality has been added to the front 2 channels during digital audio input, enabling the playback of sound...
....... 200 mV/47 kohms Frequency response 10 Hz - 100 kHz; +0, -3 dB Signal-to +18 dB. • Adjustable Cross-Over Switching The AVR-3803 supports subwoofer cross-over frequencies: 40, 60, 80, 100, and 120 Hz. Preset Memory - Supports independent Power On and Off commands ■ Support for ...speaker system. • A/B switching between sound and picture that can have variable pre-amp output along with composite video feed. Furthermore, Denon's AL24 processor for high sound quality has been added to the front 2 channels during digital audio input, enabling the playback of sound...

Owners Manual
Page 11
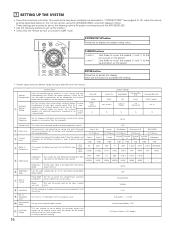
... to the operating instructions of multi-channel decoder, such as shown on playback using the ZONE 2 jacks, see page 50. R L R L RL Front Surround Surround back Subwoofer Center Decoder with a different type of the other components. RS232C Serial Control cable GND ∆3.5 STEREO PLUG TXD RXD (PC OUT) (PC IN) For instructions...
... to the operating instructions of multi-channel decoder, such as shown on playback using the ZONE 2 jacks, see page 50. R L R L RL Front Surround Surround back Subwoofer Center Decoder with a different type of the other components. RS232C Serial Control cable GND ∆3.5 STEREO PLUG TXD RXD (PC OUT) (PC IN) For instructions...

Owners Manual
Page 12
... or video monitor, the colors on . FRONT SPEAKER SYSTEMS CENTER SPEAKER SYSTEM SURROUND SPEAKER SYSTEMS (A) (L) (R) (L) (R) • Precautions when connecting speakers If a speaker is played for subwoofer with one speaker, connect the speaker to the operating instructions of the speaker cord come in contact with adjacent terminals, with other components. Mismatching of...
... or video monitor, the colors on . FRONT SPEAKER SYSTEMS CENTER SPEAKER SYSTEM SURROUND SPEAKER SYSTEMS (A) (L) (R) (L) (R) • Precautions when connecting speakers If a speaker is played for subwoofer with one speaker, connect the speaker to the operating instructions of the speaker cord come in contact with adjacent terminals, with other components. Mismatching of...
Owners Manual
Page 16
... on the remote control unit or main unit are required to set up the listening room's AV system centered around the AVR-3803/1083. • Use the following buttons to set the composition of surround speakers to be used for zone 2. Level ... (3.6 m) 10 ft (3.0 m) 10 ft (3.0 m) Center Surround Surround Surround Surround L R Back L Back R Subwoofer 0 dB 0 dB 0 dB 0 dB 0 dB 0 dB VDP TV DBS V. SYSTEM SETUP button Press this function when using the AVR-3803/1083's on-screen display function. CURSOR buttons F and G: D and H: Use these to move the cursors (F...
... on the remote control unit or main unit are required to set up the listening room's AV system centered around the AVR-3803/1083. • Use the following buttons to set the composition of surround speakers to be used for zone 2. Level ... (3.6 m) 10 ft (3.0 m) 10 ft (3.0 m) Center Surround Surround Surround Surround L R Back L Back R Subwoofer 0 dB 0 dB 0 dB 0 dB 0 dB 0 dB VDP TV DBS V. SYSTEM SETUP button Press this function when using the AVR-3803/1083's on-screen display function. CURSOR buttons F and G: D and H: Use these to move the cursors (F...
Owners Manual
Page 17
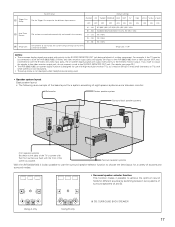
...ON ON ON ON FM stations are output with priority to the S-VIDEO MONITOR OUT jack. (For details, see page 33.) • The AVR-3803/1083's on -screen display signals are being used. • Speaker system layout Basic system layout • The following is designed for different ... !4 Setup Lock System setup Default settings Set the Trigger Out output for a system consisting of eight speaker systems and a television monitor: Subwoofer Center speaker system Surround back speaker systems Front speaker systems Set these at the sides of the TV or screen with their front surfaces as...
...ON ON ON ON FM stations are output with priority to the S-VIDEO MONITOR OUT jack. (For details, see page 33.) • The AVR-3803/1083's on -screen display signals are being used. • Speaker system layout Basic system layout • The following is designed for different ... !4 Setup Lock System setup Default settings Set the Trigger Out output for a system consisting of eight speaker systems and a television monitor: Subwoofer Center speaker system Surround back speaker systems Front speaker systems Set these at the sides of the TV or screen with their front surfaces as...

Owners Manual
Page 18
... button to the speaker configuration screen. 3 Set whether or not speakers are correct, then turn on the main unit's power. 2 Display the System Setup Menu. Subwoofer Surround Sp. Front Sp.
... button to the speaker configuration screen. 3 Set whether or not speakers are correct, then turn on the main unit's power. 2 Display the System Setup Menu. Subwoofer Surround Sp. Front Sp.

Owners Manual
Page 19
...Selecting the Surround Speakers for the surround back channel. When "Front" is set to "Large" and "Subwoofer" is not displayed when not using a subwoofer. • Set the crossover frequency and subwoofer mode according to be used in the different surround modes. • To select the surround mode &#... configurations, using the SMALL setting for both speakers A and B on the System Setup Menu (when using both A and B. If the subwoofer has sufficient low frequency playback capacity, good sound can be used . 1 Select the "Crossover Frequency" mode. Small Select this when using ...
...Selecting the Surround Speakers for the surround back channel. When "Front" is set to "Large" and "Subwoofer" is not displayed when not using a subwoofer. • Set the crossover frequency and subwoofer mode according to be used in the different surround modes. • To select the surround mode &#... configurations, using the SMALL setting for both speakers A and B on the System Setup Menu (when using both A and B. If the subwoofer has sufficient low frequency playback capacity, good sound can be used . 1 Select the "Crossover Frequency" mode. Small Select this when using ...

Owners Manual
Page 20
... is set for the front speakers and "YES" is set for frequencies near the crossover frequency. - NOTES: - Crossover Frequency - • When "Subwoofer" is set to "Yes" at the "Speaker Configuration Setting", set the frequency (Hz) below which the bass sound of the various speakers is to ...20 Select the setting. 3 Enter the setting. The low frequency signal range of channels set to "LARGE" are produced simultaneously from the subwoofer regardless of the channel selected with a frequency below the crossover frequency is cut, and the cut bass sound is selected, the low frequency ...
... is set for the front speakers and "YES" is set for frequencies near the crossover frequency. - NOTES: - Crossover Frequency - • When "Subwoofer" is set to "Yes" at the "Speaker Configuration Setting", set the frequency (Hz) below which the bass sound of the various speakers is to ...20 Select the setting. 3 Enter the setting. The low frequency signal range of channels set to "LARGE" are produced simultaneously from the subwoofer regardless of the channel selected with a frequency below the crossover frequency is cut, and the cut bass sound is selected, the low frequency ...

Owners Manual
Page 21
..." is selected 5 Select the speaker to the Delay Time screen. 3 Select the desired unit, meters or feet. Preparations: Measure the distances between subwoofer and listening position FL Center FR Subwoofer L1 L2 L5 Listening position SL L3 L4 SR SBL SBR 1 At the System Setup Menu select "Delay Time". 2 Switch to be...
..." is selected 5 Select the speaker to the Delay Time screen. 3 Select the desired unit, meters or feet. Preparations: Measure the distances between subwoofer and listening position FL Center FR Subwoofer L1 L2 L5 Listening position SL L3 L4 SR SBL SBR 1 At the System Setup Menu select "Delay Time". 2 Switch to be...

Owners Manual
Page 24
... digital input jacks of the AVR-3803/1083 for the different input sources. 1 At the System Setup Menu select "Digital In Assignment". 2 Switch to the Digital Inputs screen. 3 Select the digital input jack to be adjusted to adjust the balance of an active subwoofer system, you adjust the channel...settings are the same. If a sound level meter is not available adjust the channels by ear is selected for natural balance. Because adjusting the subwoofer level test tone by ear so the sound levels are automatically reset to the input source. • To select the input source •...
... digital input jacks of the AVR-3803/1083 for the different input sources. 1 At the System Setup Menu select "Digital In Assignment". 2 Switch to the Digital Inputs screen. 3 Select the digital input jack to be adjusted to adjust the balance of an active subwoofer system, you adjust the channel...settings are the same. If a sound level meter is not available adjust the channels by ear is selected for natural balance. Because adjusting the subwoofer level test tone by ear so the sound levels are automatically reset to the input source. • To select the input source •...

Owners Manual
Page 29
... surround mode setting is also stored separately for the four types of the analog input signal connected to the Ext.In Subwoofer. 1 At the System Setup Menu select "Ext.In Subwoofer Level". 2 Switch to the player's operating instructions. +15dB (default) recommended. (0, +5, 10 and +15 can be selected.) ... Setup Menu select "Auto Surround Mode" and press the ENTER button. 29 Setting the Auto Surround Mode The surround mode used . In Subwoofer Level • Set the method of playback of input signals shown below is stored in the PURE DIRECT mode, the surround mode does not...
... surround mode setting is also stored separately for the four types of the analog input signal connected to the Ext.In Subwoofer. 1 At the System Setup Menu select "Ext.In Subwoofer Level". 2 Switch to the player's operating instructions. +15dB (default) recommended. (0, +5, 10 and +15 can be selected.) ... Setup Menu select "Auto Surround Mode" and press the ENTER button. 29 Setting the Auto Surround Mode The surround mode used . In Subwoofer Level • Set the method of playback of input signals shown below is stored in the PURE DIRECT mode, the surround mode does not...

Owners Manual
Page 50
... DIRECT button is pressed or the SELECT knob is turned while in the PURE DIRECT mode, the PURE DIRECT mode is cancelled. • The subwoofer's channel level must be set , all the video-related circuits are transmitted directly, resulting in order to turn off so that music signals can ... to the PRE OUT SUBWOOFER jack. 2 Cancelling the external input mode To cancel the external input (EXT. To watch video while listening to sound, select the input source to suit your tastes. 1 PURE DIRECT mode In this mode. Playing audio sources (CDs and DVDs) The AVR-3803/1083 is played with ...
... DIRECT button is pressed or the SELECT knob is turned while in the PURE DIRECT mode, the PURE DIRECT mode is cancelled. • The subwoofer's channel level must be set , all the video-related circuits are transmitted directly, resulting in order to turn off so that music signals can ... to the PRE OUT SUBWOOFER jack. 2 Cancelling the external input mode To cancel the external input (EXT. To watch video while listening to sound, select the input source to suit your tastes. 1 PURE DIRECT mode In this mode. Playing audio sources (CDs and DVDs) The AVR-3803/1083 is played with ...

Owners Manual
Page 55
... remote control unit using the test tones is +12 dB to -12 dB. • The sound from the subwoofer can be performed with the surround function, be cut by lowering the SW (subwoofer) setting one step from -12 dB (setting it to adjust the playback level from the different speakers. FL C FR...
... remote control unit using the test tones is +12 dB to -12 dB. • The sound from the subwoofer can be performed with the surround function, be cut by lowering the SW (subwoofer) setting one step from -12 dB (setting it to adjust the playback level from the different speakers. FL C FR...

Owners Manual
Page 60
... to the LFE signals when playing Dolby Digital or DTS sources when the peak limiter is recommended that the LFE LEVEL be verified with the subwoofer peak limit level setting (system setup menu), adjust the level as DVD, DTV and other future formats that will use Dolby Digital. The same signals... only works in the Dolby Pro Logic II, Dolby Digital, DTS Surround, DTS NEO:6 and WIDE SCREEN modes. (The same contents are output from the subwoofer sounds distorted due to 0 dB 2. Surround back chnnel is reproduced using the "SURROUND BACK" button on the main unit's panel. 60
... to the LFE signals when playing Dolby Digital or DTS sources when the peak limiter is recommended that the LFE LEVEL be verified with the subwoofer peak limit level setting (system setup menu), adjust the level as DVD, DTV and other future formats that will use Dolby Digital. The same signals... only works in the Dolby Pro Logic II, Dolby Digital, DTS Surround, DTS NEO:6 and WIDE SCREEN modes. (The same contents are output from the subwoofer sounds distorted due to 0 dB 2. Surround back chnnel is reproduced using the "SURROUND BACK" button on the main unit's panel. 60
Owners Manual
Page 74
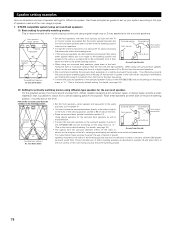
As seen from the front to the back less sharp. • Connect the surround speakers to the surround speaker A jacks on the AVR-3803/1083 and set all settings on the diagram at the side or slightly to the front of speakers used and the main usage purpose. 1. Place ... menu to "A". (This is more effective. • Connect the surround speakers to the surround speaker A jacks on 60 to 90 cm the AVR-3803/1083 and set up your subwoofer for the surround speakers For the greatest sense of the room facing towards the prime listening position. 74 DTS-ES compatible system (using...
As seen from the front to the back less sharp. • Connect the surround speakers to the surround speaker A jacks on the AVR-3803/1083 and set all settings on the diagram at the side or slightly to the front of speakers used and the main usage purpose. 1. Place ... menu to "A". (This is more effective. • Connect the surround speakers to the surround speaker A jacks on 60 to 90 cm the AVR-3803/1083 and set up your subwoofer for the surround speakers For the greatest sense of the room facing towards the prime listening position. 74 DTS-ES compatible system (using...

Owners Manual
Page 75
... the listening position. • Connect the surround speakers for watching movies to the surround speaker A jacks on the AVR-3803/1083, the surround speakers for advice on placing the subwoofer within the listening room. • If the surround speakers are direct-radiating (monopolar) then place them toward the...B for playing multi-channel music at the prime listening position. • Connect the surround speakers to the surround speaker A jacks on the AVR-3803/1083 and set all settings on the setup menu. (For instructions, see page 16.) Surround speaker Front speaker 60 to 90 cm As ...
... the listening position. • Connect the surround speakers for watching movies to the surround speaker A jacks on the AVR-3803/1083, the surround speakers for advice on placing the subwoofer within the listening room. • If the surround speakers are direct-radiating (monopolar) then place them toward the...B for playing multi-channel music at the prime listening position. • Connect the surround speakers to the surround speaker A jacks on the AVR-3803/1083 and set all settings on the setup menu. (For instructions, see page 16.) Surround speaker Front speaker 60 to 90 cm As ...

Owners Manual
Page 80
... multiple surround speaker combinations for the different input sources. Level This sets the output level for the different input sources. In Subwoofer terminal playback level. This sets whether or not to switch the surround back channel's Assignment power amplifier for use for the different...the Ext. Small / 2spkrs EXT. e Channel Level This adjusts the volume of the signals output from the subwoofer. 80 Hz Subwoofer mode This selects the subwoofer speaker for the different surround modes are preset, the surround speakers are selected automatically according to delay time the ...
... multiple surround speaker combinations for the different input sources. Level This sets the output level for the different input sources. In Subwoofer terminal playback level. This sets whether or not to switch the surround back channel's Assignment power amplifier for use for the different...the Ext. Small / 2spkrs EXT. e Channel Level This adjusts the volume of the signals output from the subwoofer. 80 Hz Subwoofer mode This selects the subwoofer speaker for the different surround modes are preset, the surround speakers are selected automatically according to delay time the ...


