

Literature/Product Sheet
Page 2
...-14, AKASAKA 4-CHOME, MINATO-KU, TOKYO 107-8011, JAPAN www.denon.co.jp 12460800 A Printed in the home theater room. NEW MODEL I N F O R M AT I O N AVR-3801 2. This construction reduces noise interference among the circuits and ensures a clean, transparent sound. s Easy Operation with Programmable Remote Controller • Dot Matrix LCD (10 characters) Since the LC display on...
...-14, AKASAKA 4-CHOME, MINATO-KU, TOKYO 107-8011, JAPAN www.denon.co.jp 12460800 A Printed in the home theater room. NEW MODEL I N F O R M AT I O N AVR-3801 2. This construction reduces noise interference among the circuits and ensures a clean, transparent sound. s Easy Operation with Programmable Remote Controller • Dot Matrix LCD (10 characters) Since the LC display on...

Owners Manual
Page 5
... model only 1 e Service station list...........1 t R6P/AA batteries 3 y AM loop antenna 1 u FM indoor antenna...1 i FM antenna adaptor........1 r Remote control unit (RC-883 1 1 BEFORE USING Pay attention to the standby position before connecting and disconnecting connection cords. • Store this instructions in a safe... again that all connections are included in addition to the main unit: q Operating instructions.....1 w Warranty ( for choosing the DENON AVR-3801 Digital Surround A / V receiver. 2 INTRODUCTION Thank you review the contents of this manual before proceeding.
... model only 1 e Service station list...........1 t R6P/AA batteries 3 y AM loop antenna 1 u FM indoor antenna...1 i FM antenna adaptor........1 r Remote control unit (RC-883 1 1 BEFORE USING Pay attention to the standby position before connecting and disconnecting connection cords. • Store this instructions in a safe... again that all connections are included in addition to the main unit: q Operating instructions.....1 w Warranty ( for choosing the DENON AVR-3801 Digital Surround A / V receiver. 2 INTRODUCTION Thank you review the contents of this manual before proceeding.

Owners Manual
Page 7
...AC OUTLETS • SWITCHED (total capacity - 120 W (1 A.)) The power to these outlets is turned on and off when the power is supplied from the remote control unit. BACK L CH. 5 CONNECTIONS • Do not plug in the AC cord until all connections have been completed. • Be sure to connect ...when the ground wire is at standby. Connecting the pre-out jacks Use these outlets when this happens, turn on and standby from the remote control unit or power switch. To use the AC OUTLETS for audio equipment only. Never connect equipment whose total capacity is generated by a tape ...
...AC OUTLETS • SWITCHED (total capacity - 120 W (1 A.)) The power to these outlets is turned on and off when the power is supplied from the remote control unit. BACK L CH. 5 CONNECTIONS • Do not plug in the AC cord until all connections have been completed. • Be sure to connect ...when the ground wire is at standby. Connecting the pre-out jacks Use these outlets when this happens, turn on and standby from the remote control unit or power switch. To use the AC OUTLETS for audio equipment only. Never connect equipment whose total capacity is generated by a tape ...

Owners Manual
Page 15
... button 42) y PCM button 43) u DTS button 43) i ANALOG button 42) o EXT. VOL button 49) !9 MASTER VOLUME control 43) @0 Master volume indicator (VOLUME LEVEL 43) @1 Display @2 INPUT indicators 43) @3 SIGNAL indicators 43) @4 Remote control sensor (REMOTE SENSOR 29) @5 Power indicator 41) @6 FUNCTION knob 42) @7 TUNING PRESET button 60) @8 SOURCE selector button 42) @9 REC selector...
... button 42) y PCM button 43) u DTS button 43) i ANALOG button 42) o EXT. VOL button 49) !9 MASTER VOLUME control 43) @0 Master volume indicator (VOLUME LEVEL 43) @1 Display @2 INPUT indicators 43) @3 SIGNAL indicators 43) @4 Remote control sensor (REMOTE SENSOR 29) @5 Power indicator 41) @6 FUNCTION knob 42) @7 TUNING PRESET button 60) @8 SOURCE selector button 42) @9 REC selector...

Owners Manual
Page 16
... OUTPUT SURROUND DSP SIMU. 5CH / 7CH STEREO 6.1 / 7.1 SURROUND DIRECT MODE INPUT ANALOG SYSTEM CALL CALL 1 CALL 2 STEREO EXT.IN BACKLIGHT Remote control signal transmitter 29) Power button 41) Mode selector buttons 32) MENU/OSD button 45) RETURN/MEMORY/system buttons 59) Master volume... TONE button 49) Surround mode buttons 54) Input mode selector buttons 42) SYSTEM CALL buttons 35) POWER OFF ON / SOURCE RC-883 REMOTE CONTROL UNIT TV CD CDR/MD/ TAPE RECEIVER VCR DBS/CABLE VDP DVD DISPLAY SURR. SETUP TUNING MENU OSD RETURN A/B MEMORY BAND CHANNEL MODE VOLUME...
... OUTPUT SURROUND DSP SIMU. 5CH / 7CH STEREO 6.1 / 7.1 SURROUND DIRECT MODE INPUT ANALOG SYSTEM CALL CALL 1 CALL 2 STEREO EXT.IN BACKLIGHT Remote control signal transmitter 29) Power button 41) Mode selector buttons 32) MENU/OSD button 45) RETURN/MEMORY/system buttons 59) Master volume... TONE button 49) Surround mode buttons 54) Input mode selector buttons 42) SYSTEM CALL buttons 35) POWER OFF ON / SOURCE RC-883 REMOTE CONTROL UNIT TV CD CDR/MD/ TAPE RECEIVER VCR DBS/CABLE VDP DVD DISPLAY SURR. SETUP TUNING MENU OSD RETURN A/B MEMORY BAND CHANNEL MODE VOLUME...

Owners Manual
Page 17
... automatically set upon shipment from the speakers and subwoofer for the different channels in "CONNECTIONS" (see page 28.) • The AVR-3801's on-screen display function is connected to both the S-Video and video input jacks, the on -screen display signals are received...(set the composition of speakers in the memory. A A A - - Front Sp. ENTER button Press this function when using the AVR-3801's on the remote control unit or main unit are selected automatically according to the surround mode. w (Surround Speaker Setting) Use this to switch the display....
... automatically set upon shipment from the speakers and subwoofer for the different channels in "CONNECTIONS" (see page 28.) • The AVR-3801's on-screen display function is connected to both the S-Video and video input jacks, the on -screen display signals are received...(set the composition of speakers in the memory. A A A - - Front Sp. ENTER button Press this function when using the AVR-3801's on the remote control unit or main unit are selected automatically according to the surround mode. w (Surround Speaker Setting) Use this to switch the display....
Owners Manual
Page 24
...Adjust the level while listening to the test tones produced automatically TUNING from the different speakers. • Manual: Select the speaker from the remote control unit. (For details, see page 16). Sp." can be selected when both surround speakers A and B have been set , the ...When using surround speakers A and B at the System Setup Menu (when both A and B have been selected at the same time. The AVR-3801 automatically sets the optimum surround delay time for the listening room. TUNING BAND MODE TUNING 4 Select the mode. Sp.", then select the surround ...
...Adjust the level while listening to the test tones produced automatically TUNING from the different speakers. • Manual: Select the speaker from the remote control unit. (For details, see page 16). Sp." can be selected when both surround speakers A and B have been set , the ...When using surround speakers A and B at the System Setup Menu (when both A and B have been selected at the same time. The AVR-3801 automatically sets the optimum surround delay time for the listening room. TUNING BAND MODE TUNING 4 Select the mode. Sp.", then select the surround ...

Owners Manual
Page 27
... TUNING 26 Multi Vol. TUNING BAND MODE TUNING 2 ENTER SHIFT Switch to turn the on-screen display (messages other than the menu screens) on the remote control unit. 3 ENTER SHIFT Enter the setting. The "System Setup Menu" reappears. TUNING BAND MODE 0 dB, -40 dB: The output level is fixed at the set...
... TUNING 26 Multi Vol. TUNING BAND MODE TUNING 2 ENTER SHIFT Switch to turn the on-screen display (messages other than the menu screens) on the remote control unit. 3 ENTER SHIFT Enter the setting. The "System Setup Menu" reappears. TUNING BAND MODE 0 dB, -40 dB: The output level is fixed at the set...

Owners Manual
Page 30
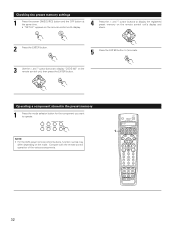
... distance of approximately 7 meters/22 feet from the main unit, but other remote control compatible DENON components as possible. 29 Using the remote control unit Approx. 7 m/22 feet 30° 30° • Point the remote control unit at a horizontal angle of up to 30 degrees with respect to the.... w Set three R6P/AA batteries in the battery compartment in the indicated direction. 8 REMOTE CONTROL UNIT • The included remote control unit (RC-883) can be used to operate not only the AVR-3801 but this distance will be shorter if there are obstacles in malfunction, so keep the set...
... distance of approximately 7 meters/22 feet from the main unit, but other remote control compatible DENON components as possible. 29 Using the remote control unit Approx. 7 m/22 feet 30° 30° • Point the remote control unit at a horizontal angle of up to 30 degrees with respect to the.... w Set three R6P/AA batteries in the battery compartment in the indicated direction. 8 REMOTE CONTROL UNIT • The included remote control unit (RC-883) can be used to operate not only the AVR-3801 but this distance will be shorter if there are obstacles in malfunction, so keep the set...

Owners Manual
Page 31
... CHANNEL VOLUME TUNING + + SKIP ENTER - SKIP SHIFT MUTING TUNER 1 PHONO 2 CDR/ TAPE VDP 4 5 VCR-1 7 VCR-2 / V.AUX 8 - Operating DENON audio components 1 Use the mode selector buttons to select the component you want to operate some models. 1. SKIP SHIFT MUTING TUNER 1 PHONO 2 CDR/ TAPE VDP...DVD" and "DVD SETUP" each time the DVD button is pressed, and between sides A and B POWER OFF ON / SOURCE RC-883 REMOTE CONTROL UNIT TV CD CDR/MD/ TAPE RECEIVER VCR DBS/CABLE VDP DVD DISPLAY SURR. CD player (CD) system buttons SETUP TUNING RETURN A/B ...
... CHANNEL VOLUME TUNING + + SKIP ENTER - SKIP SHIFT MUTING TUNER 1 PHONO 2 CDR/ TAPE VDP 4 5 VCR-1 7 VCR-2 / V.AUX 8 - Operating DENON audio components 1 Use the mode selector buttons to select the component you want to operate some models. 1. SKIP SHIFT MUTING TUNER 1 PHONO 2 CDR/ TAPE VDP...DVD" and "DVD SETUP" each time the DVD button is pressed, and between sides A and B POWER OFF ON / SOURCE RC-883 REMOTE CONTROL UNIT TV CD CDR/MD/ TAPE RECEIVER VCR DBS/CABLE VDP DVD DISPLAY SURR. CD player (CD) system buttons SETUP TUNING RETURN A/B ...

Owners Manual
Page 32
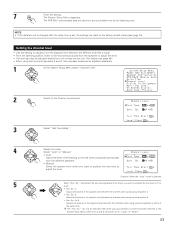
... RECEIVER VCR DBS/CABLE VDP DVD DISPLAY SURR. The remote control unit's display switches as follows upon shipment from the factory and after resetting: TV, VCR HITACHI CD, MD, TAPE, CDR, VDP, DVD, DVD SETUP............DENON DBS GENERAL INSTRUMENT CABLE JERROLD 31 Preset memory By using... the preset memory, the included remote control unit can be used to control other makes of video equipment. ENTER SHIFT 3 Use the D and H cursor buttons...
... RECEIVER VCR DBS/CABLE VDP DVD DISPLAY SURR. The remote control unit's display switches as follows upon shipment from the factory and after resetting: TV, VCR HITACHI CD, MD, TAPE, CDR, VDP, DVD, DVD SETUP............DENON DBS GENERAL INSTRUMENT CABLE JERROLD 31 Preset memory By using... the preset memory, the included remote control unit can be used to control other makes of video equipment. ENTER SHIFT 3 Use the D and H cursor buttons...
Owners Manual
Page 33
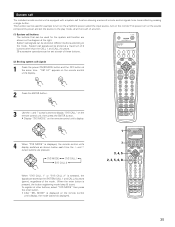
...of the various components. TV CD CDR/MD/ TAPE RECEIVER VCR DBS/CABLE VDP DVD NOTE: • For the DVD player remote control buttons, function names may differ depending on the remote control unit, then press the ENTER button. CD 3 DVD 6 TV/DBS 9 TV/ VCR 0 +10 TEST TONE DOLBY/DTS SURROUND...the preset memory settings 1 Press the power ON/SOURCE button and the OFF button at the same time. • "SET UP" appears on the remote control unit's display and check. TUNING BAND MODE TUNING 5 Press the ENTER button to operate. OFF ON / SOURCE 2 Press the ENTER button. SETUP ...
...of the various components. TV CD CDR/MD/ TAPE RECEIVER VCR DBS/CABLE VDP DVD NOTE: • For the DVD player remote control buttons, function names may differ depending on the remote control unit, then press the ENTER button. CD 3 DVD 6 TV/DBS 9 TV/ VCR 0 +10 TEST TONE DOLBY/DTS SURROUND...the preset memory settings 1 Press the power ON/SOURCE button and the OFF button at the same time. • "SET UP" appears on the remote control unit's display and check. TUNING BAND MODE TUNING 5 Press the ENTER button to operate. OFF ON / SOURCE 2 Press the ENTER button. SETUP ...

Owners Manual
Page 34
... 6.1 / 7.1 SURROUND DIRECT MODE INPUT ANALOG SYSTEM CALL CALL 1 CALL 2 STEREO EXT.IN BACKLIGHT POWER OFF ON / SOURCE RC-883 REMOTE CONTROL UNIT TV CD CDR/MD/ TAPE RECEIVER VCR DBS/CABLE VDP DVD DISPLAY SURR. SETUP TUNING MENU OSD RETURN A/B MEMORY BAND MODE CHANNEL VOLUME... /standby (ON/SOURCE) 6,7 : Manual search (forward and reverse) 2 : Stop 1 : Play 3 : Pause Channel +, - : Channels POWER OFF ON / SOURCE RC-883 REMOTE CONTROL UNIT TV CD CDR/MD/ TAPE RECEIVER VCR DBS/CABLE VDP DVD DISPLAY SURR. CD 3 DVD 6 TV/DBS 9 TV/ VCR 0 +10 TEST TONE DOLBY/DTS...
... 6.1 / 7.1 SURROUND DIRECT MODE INPUT ANALOG SYSTEM CALL CALL 1 CALL 2 STEREO EXT.IN BACKLIGHT POWER OFF ON / SOURCE RC-883 REMOTE CONTROL UNIT TV CD CDR/MD/ TAPE RECEIVER VCR DBS/CABLE VDP DVD DISPLAY SURR. SETUP TUNING MENU OSD RETURN A/B MEMORY BAND MODE CHANNEL VOLUME... /standby (ON/SOURCE) 6,7 : Manual search (forward and reverse) 2 : Stop 1 : Play 3 : Pause Channel +, - : Channels POWER OFF ON / SOURCE RC-883 REMOTE CONTROL UNIT TV CD CDR/MD/ TAPE RECEIVER VCR DBS/CABLE VDP DVD DISPLAY SURR. CD 3 DVD 6 TV/DBS 9 TV/ VCR 0 +10 TEST TONE DOLBY/DTS...

Owners Manual
Page 35
...VCR-2 / V.AUX 7 8 - TUNING ENTER BAND MODE TUNING SHIFT 5 Press the button to "learn". OFF ON / SOURCE 7 "COMPLETE" appears on the remote control unit's display and learning is completed. • "SELECT KEY" is pressed. • To cancel, press the power ON/SOURCE button and the OFF button ...ENTER button. PARA. Learning function If your AV component is not a Denon product or if it cannot be operated using the preset memory, it can be "learned" by storing its remote control signals in the remote control unit. 1 Press the power ON/SOURCE button and the OFF button ...
...VCR-2 / V.AUX 7 8 - TUNING ENTER BAND MODE TUNING SHIFT 5 Press the button to "learn". OFF ON / SOURCE 7 "COMPLETE" appears on the remote control unit's display and learning is completed. • "SELECT KEY" is pressed. • To cancel, press the power ON/SOURCE button and the OFF button ...ENTER button. PARA. Learning function If your AV component is not a Denon product or if it cannot be operated using the preset memory, it can be "learned" by storing its remote control signals in the remote control unit. 1 Press the power ON/SOURCE button and the OFF button ...
Owners Manual
Page 36
... MODE TUNING SYS MODE SYS CALL 1 SYS CALL 2 When "SYS CALL 1" or "SYS CALL 2" is set is displayed, the remote control unit's display switches as shown below each of these buttons. (2) Storing system call function allowing a series of the mode. SETUP TUNING MENU... 7.1 SURROUND DIRECT MODE INPUT ANALOG SYSTEM CALL CALL 1 CALL 2 STEREO EXT.IN BACKLIGHT TUNING BAND MODE TUNING ENTER SHIFT 1 POWER OFF ON / SOURCE RC-883 REMOTE CONTROL UNIT 4 When "SYS MODE" is displayed. 7 3, 4, 5 2, 3, 5, 6, 8 TV CD CDR/MD/ TAPE RECEIVER VCR DBS/CABLE VDP DVD DISPLAY...
... MODE TUNING SYS MODE SYS CALL 1 SYS CALL 2 When "SYS CALL 1" or "SYS CALL 2" is set is displayed, the remote control unit's display switches as shown below each of these buttons. (2) Storing system call function allowing a series of the mode. SETUP TUNING MENU... 7.1 SURROUND DIRECT MODE INPUT ANALOG SYSTEM CALL CALL 1 CALL 2 STEREO EXT.IN BACKLIGHT TUNING BAND MODE TUNING ENTER SHIFT 1 POWER OFF ON / SOURCE RC-883 REMOTE CONTROL UNIT 4 When "SYS MODE" is displayed. 7 3, 4, 5 2, 3, 5, 6, 8 TV CD CDR/MD/ TAPE RECEIVER VCR DBS/CABLE VDP DVD DISPLAY...

Owners Manual
Page 37
...cursor buttons to select the mode for example). • If you exceed the number of signals that can be registered, "FULL" appears on the remote control unit's display and only the number of signals that can be registered are registered (up to 29 operations). (3) Using the system call function 1...signals are to be registered, then press the ENTER button. ENTER SHIFT 3 Use the D and H cursor buttons to display "RESET" on the remote control unit, then press the ENTER button. TUNING BAND MODE TUNING ENTER SHIFT 6 "SELECT KEY" is displayed, then the mode display appears. SKIP SHIFT...
...cursor buttons to select the mode for example). • If you exceed the number of signals that can be registered, "FULL" appears on the remote control unit's display and only the number of signals that can be registered are registered (up to 29 operations). (3) Using the system call function 1...signals are to be registered, then press the ENTER button. ENTER SHIFT 3 Use the D and H cursor buttons to display "RESET" on the remote control unit, then press the ENTER button. TUNING BAND MODE TUNING ENTER SHIFT 6 "SELECT KEY" is displayed, then the mode display appears. SKIP SHIFT...

Owners Manual
Page 38
... is displayed. SETUP TUNING MENU OSD RETURN A/B MEMORY BAND CHANNEL MODE VOLUME TUNING + + SKIP ENTER - TUNING BAND MODE TUNING The remote control unit's display switches as shown below each time the D and H cursor buttons are pressed. SYS MODE SYS CALL 1 SYS CALL 2 ... 2 CDR/ TAPE VDP 4 5 VCR-1 VCR-2 / V.AUX 7 8 - ENTER SHIFT 3 Use the D and H cursor buttons to display "RESET" on the remote control unit's display. CD 3 DVD 6 TV/DBS 9 TV/ VCR 0 +10 TEST TONE DOLBY/DTS SURROUND SPEAKER OUTPUT SURROUND DSP SIMU. 5CH / 7CH STEREO 6.1 /...
... is displayed. SETUP TUNING MENU OSD RETURN A/B MEMORY BAND CHANNEL MODE VOLUME TUNING + + SKIP ENTER - TUNING BAND MODE TUNING The remote control unit's display switches as shown below each time the D and H cursor buttons are pressed. SYS MODE SYS CALL 1 SYS CALL 2 ... 2 CDR/ TAPE VDP 4 5 VCR-1 VCR-2 / V.AUX 7 8 - ENTER SHIFT 3 Use the D and H cursor buttons to display "RESET" on the remote control unit's display. CD 3 DVD 6 TV/DBS 9 TV/ VCR 0 +10 TEST TONE DOLBY/DTS SURROUND SPEAKER OUTPUT SURROUND DSP SIMU. 5CH / 7CH STEREO 6.1 /...

Owners Manual
Page 39
...4 5 VCR-1 7 VCR-2 / V.AUX 8 - ENTER SHIFT 38 BAND MODE TUNING 6 When the mode you want to reset is displayed on the remote control unit's display. SETUP TUNING MENU OSD RETURN A/B MEMORY BAND MODE CHANNEL VOLUME TUNING + + SKIP ENTER - 4 Use the D and H cursor buttons to...the preset memory, press the ENTER button while "CONFIRM" is displayed. ENTER SHIFT 7 "CONFIRM" is displayed. • "COMPLETE" appears on the remote control unit's display. CD 3 DVD 6 TV/DBS 9 TV/ VCR 0 +10 TEST TONE DOLBY/DTS SURROUND SPEAKER OUTPUT SURROUND DSP SIMU. 5CH /...
...4 5 VCR-1 7 VCR-2 / V.AUX 8 - ENTER SHIFT 38 BAND MODE TUNING 6 When the mode you want to reset is displayed on the remote control unit's display. SETUP TUNING MENU OSD RETURN A/B MEMORY BAND MODE CHANNEL VOLUME TUNING + + SKIP ENTER - 4 Use the D and H cursor buttons to...the preset memory, press the ENTER button while "CONFIRM" is displayed. ENTER SHIFT 7 "CONFIRM" is displayed. • "COMPLETE" appears on the remote control unit's display. CD 3 DVD 6 TV/DBS 9 TV/ VCR 0 +10 TEST TONE DOLBY/DTS SURROUND SPEAKER OUTPUT SURROUND DSP SIMU. 5CH /...

Owners Manual
Page 40
...SKIP SHIFT MUTING TUNER 1 PHONO 2 CDR/ TAPE VDP 4 5 VCR-1 VCR-2 / V.AUX 7 8 - ENTER SHIFT 1 POWER OFF ON / SOURCE RC-883 REMOTE CONTROL UNIT 3, 4 2, 3, 4, 5 TV CD CDR/MD/ TAPE RECEIVER VCR DBS/CABLE VDP DVD DISPLAY SURR. SETUP TUNING MENU OSD RETURN A/B MEMORY BAND MODE ...TUNING BAND MODE TUNING ENTER SHIFT 4 Use the D and H cursor buttons to display "RESET" on the remote control unit, then press the ENTER button. "SET UP" appears on the remote control unit, then press the ENTER button. ENTER SHIFT 3 Use the D and H cursor buttons to display "RESET...
...SKIP SHIFT MUTING TUNER 1 PHONO 2 CDR/ TAPE VDP 4 5 VCR-1 VCR-2 / V.AUX 7 8 - ENTER SHIFT 1 POWER OFF ON / SOURCE RC-883 REMOTE CONTROL UNIT 3, 4 2, 3, 4, 5 TV CD CDR/MD/ TAPE RECEIVER VCR DBS/CABLE VDP DVD DISPLAY SURR. SETUP TUNING MENU OSD RETURN A/B MEMORY BAND MODE ...TUNING BAND MODE TUNING ENTER SHIFT 4 Use the D and H cursor buttons to display "RESET" on the remote control unit, then press the ENTER button. "SET UP" appears on the remote control unit, then press the ENTER button. ENTER SHIFT 3 Use the D and H cursor buttons to display "RESET...

Owners Manual
Page 41
...• "SET UP" appears on the component's power. OFF 2 6 4, 5 3, 4, 5, 7 POWER OFF ON / SOURCE RC-883 REMOTE CONTROL UNIT TV CD CDR/MD/ TAPE RECEIVER VCR DBS/CABLE VDP DVD DISPLAY SURR. SETUP TUNING MENU OSD RETURN A/B MEMORY BAND MODE CHANNEL VOLUME TUNING...TUNING BAND MODE TUNING ENTER SHIFT 5 Use the D and H cursor buttons to display the mode of the component to display "AUTOSEARCH" on the remote control unit's display, then press the ENTER button. • The registration codes are transmitted in order. SKIP SHIFT MUTING TUNER 1 PHONO 2 CDR/ TAPE...
...• "SET UP" appears on the component's power. OFF 2 6 4, 5 3, 4, 5, 7 POWER OFF ON / SOURCE RC-883 REMOTE CONTROL UNIT TV CD CDR/MD/ TAPE RECEIVER VCR DBS/CABLE VDP DVD DISPLAY SURR. SETUP TUNING MENU OSD RETURN A/B MEMORY BAND MODE CHANNEL VOLUME TUNING...TUNING BAND MODE TUNING ENTER SHIFT 5 Use the D and H cursor buttons to display the mode of the component to display "AUTOSEARCH" on the remote control unit's display, then press the ENTER button. • The registration codes are transmitted in order. SKIP SHIFT MUTING TUNER 1 PHONO 2 CDR/ TAPE...


