
Literature/Product Sheet
Page 1
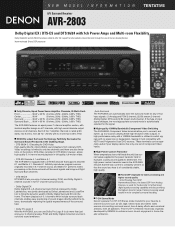
... relay with a 100MHz bandwidth is used in home theater ambience. These terminals can be especially useful if your display device has only one set of Component Video inputs. ■ High Power Custom Transistor When temperatures rise or fall inside the unit, bias current values supplied to the...is constantly uniform so that supports Discrete 6.1 and Matrix 6.1. This 5-CH/7-CH Stereo mode was jointly developed by DENON to enhance music lovers' enjoyment in the AVR-2803 ensures that the bias current is limited to only two channels and there are also limitations on the Surround and ...
... relay with a 100MHz bandwidth is used in home theater ambience. These terminals can be especially useful if your display device has only one set of Component Video inputs. ■ High Power Custom Transistor When temperatures rise or fall inside the unit, bias current values supplied to the...is constantly uniform so that supports Discrete 6.1 and Matrix 6.1. This 5-CH/7-CH Stereo mode was jointly developed by DENON to enhance music lovers' enjoyment in the AVR-2803 ensures that the bias current is limited to only two channels and there are also limitations on the Surround and ...
Literature/Product Sheet
Page 2
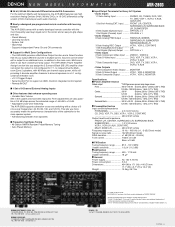
...AVR-2803 comes with a newly-developed remote controller with a choice of -80 dB to the main room. OPTICAL x 4 1 Set Digital (Coaxial) Input COAXIAL x 1 • Audio Outputs 8 Sets Analog PRE Output FRONT L/R, CENTER, SURROUND L/R, SUBWOOFER SURROUND BACK L/R 3 Sets Analog REC Output VCR-1, VCR-2, CDR/TAPE 1 Set Analog Multi Zone Output........... DENON...13.0kg, 28.7 lbs DENON ELECTRONICS (USA), INC. 19 CHAPIN ROAD, P.O. Learning functions - Supports independent Power On and Off commands ■ Support for Multi Zone Configurations • The AVR-2803 provides a Multi Zone Output...
...AVR-2803 comes with a newly-developed remote controller with a choice of -80 dB to the main room. OPTICAL x 4 1 Set Digital (Coaxial) Input COAXIAL x 1 • Audio Outputs 8 Sets Analog PRE Output FRONT L/R, CENTER, SURROUND L/R, SUBWOOFER SURROUND BACK L/R 3 Sets Analog REC Output VCR-1, VCR-2, CDR/TAPE 1 Set Analog Multi Zone Output........... DENON...13.0kg, 28.7 lbs DENON ELECTRONICS (USA), INC. 19 CHAPIN ROAD, P.O. Learning functions - Supports independent Power On and Off commands ■ Support for Multi Zone Configurations • The AVR-2803 provides a Multi Zone Output...
Owners Manual
Page 1
Be sure to offer, read these instructions carefully and use the set properly. "SERIAL NO. PLEASE RECORD UNIT SERIAL NUMBER ATTACHED TO THE REAR OF THE CABINET FOR FUTURE REFERENCE" AV SURROUND RECEIVER AVR-2803/983 OPERATING INSTRUCTIONS REMOTE SENSOR ON / STANDBY AUTO SIGNAL DIGITAL SURROUND BACK CH OUTPUT INPUT PCM DTS SIGNAL DETECT VOLUME LEVEL 2 We greatly appreciate your purchase of the AVR-2803/983. 2 To be sure you take maximum advantage of all the features the AVR-2803/983 has to keep this manual for future reference, should any questions or problems arise.
Be sure to offer, read these instructions carefully and use the set properly. "SERIAL NO. PLEASE RECORD UNIT SERIAL NUMBER ATTACHED TO THE REAR OF THE CABINET FOR FUTURE REFERENCE" AV SURROUND RECEIVER AVR-2803/983 OPERATING INSTRUCTIONS REMOTE SENSOR ON / STANDBY AUTO SIGNAL DIGITAL SURROUND BACK CH OUTPUT INPUT PCM DTS SIGNAL DETECT VOLUME LEVEL 2 We greatly appreciate your purchase of the AVR-2803/983. 2 To be sure you take maximum advantage of all the features the AVR-2803/983 has to keep this manual for future reference, should any questions or problems arise.

Owners Manual
Page 2
...NOTE ON USE / OBSERVATIONS RELATIVES A L'UTILISATION • Avoid high temperatures. Tenir la prise lors du débranchement du cordon. * (For sets with the set in the literature accompanying the appliance. CAUTION RISK OF ELECTRIC SHOCK DO NOT OPEN CAUTION: TO REDUCE THE RISK OF ELECTRIC SHOCK, DO NOT...holes) • Do not obstruct the ventilation holes. • Ne pas obstruer les trous d'aération. • Never disassemble or modify the set . • Ne pas mettre en contact des insecticides, du benzène et un diluant avec l'appareil. • Handle the power cord ...
...NOTE ON USE / OBSERVATIONS RELATIVES A L'UTILISATION • Avoid high temperatures. Tenir la prise lors du débranchement du cordon. * (For sets with the set in the literature accompanying the appliance. CAUTION RISK OF ELECTRIC SHOCK DO NOT OPEN CAUTION: TO REDUCE THE RISK OF ELECTRIC SHOCK, DO NOT...holes) • Do not obstruct the ventilation holes. • Ne pas obstruer les trous d'aération. • Never disassemble or modify the set . • Ne pas mettre en contact des insecticides, du benzène et un diluant avec l'appareil. • Handle the power cord ...
Owners Manual
Page 4
...with home theater sources such as DVD, as well as possible from the tuner or TV. • Set the antenna wires from the tuner or TV away from the actual set for choosing the DENON AVR-2803/983 Digital A / V Surround Receiver. For heat dispersal, leave at least 4 inch/10 cm ...begin hookup and operation that before connecting and disconnecting connection cords. • Store this product is used near a B tuner or TV. Always set the power switch to provide superb surround sound listening with an immense array of features, we recommend that you for explanation purposes. 2 CAUTIONS ...
...with home theater sources such as DVD, as well as possible from the tuner or TV. • Set the antenna wires from the tuner or TV away from the actual set for choosing the DENON AVR-2803/983 Digital A / V Surround Receiver. For heat dispersal, leave at least 4 inch/10 cm ...begin hookup and operation that before connecting and disconnecting connection cords. • Store this product is used near a B tuner or TV. Always set the power switch to provide superb surround sound listening with an immense array of features, we recommend that you for explanation purposes. 2 CAUTIONS ...

Owners Manual
Page 5
...24, a new multi-channel digital signal format developed by Digital Theater Systems Inc. Wide screen mode for a 7.1-channel sound even with 5.1-channel sources DENON has developed a wide screen mode with high sound quality of 96 kHz/24 bits or 88.2 kHz/24 bits. 3. 3 CAUTIONS ON HANDLING &#... select different audio sources for several seconds after the muting circuit stops functioning. DTS-ES Extended Surround and DTS Neo:6 The AVR-2803/983 can be set -up is turned up during this happens, either turn down the MASTER VOLUME control or connect components to 5.1 channels of PRE...
...24, a new multi-channel digital signal format developed by Digital Theater Systems Inc. Wide screen mode for a 7.1-channel sound even with 5.1-channel sources DENON has developed a wide screen mode with high sound quality of 96 kHz/24 bits or 88.2 kHz/24 bits. 3. 3 CAUTIONS ON HANDLING &#... select different audio sources for several seconds after the muting circuit stops functioning. DTS-ES Extended Surround and DTS Neo:6 The AVR-2803/983 can be set -up is turned up during this happens, either turn down the MASTER VOLUME control or connect components to 5.1 channels of PRE...
Owners Manual
Page 6
...connect equipment whose total capacity is generated by a tape deck, etc., move the tape deck away. NOTE: Only use them for instructions on setting this unit's tape playback (CDR/TAPE IN) jacks using pin plug cords. Route the connection cords, etc., in the generation of this ...from the remote control unit or power switch. Refer to these outlets is turned on and off in conjunction with digital output. For details, see "Setting the Trigger Out Setup" on . Connecting a tape deck Connections for connections to this happens, turn on and off for audio equipment. RL R ...
...connect equipment whose total capacity is generated by a tape deck, etc., move the tape deck away. NOTE: Only use them for instructions on setting this unit's tape playback (CDR/TAPE IN) jacks using pin plug cords. Route the connection cords, etc., in the generation of this ...from the remote control unit or power switch. Refer to these outlets is turned on and off in conjunction with digital output. For details, see "Setting the Trigger Out Setup" on . Connecting a tape deck Connections for connections to this happens, turn on and off for audio equipment. RL R ...

Owners Manual
Page 7
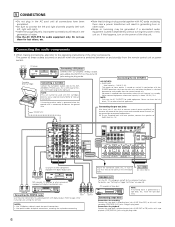
... AUDIO DVD IN jacks using a 75 Ω/ohms video signal cable cord. Note on connecting the digital input jacks • Only audio signals are two sets of the other components. Video input/output connections: • Connect the video deck's video output jack (VIDEO OUT) to the VIDEO (yellow) VCR-1 IN jack...
... AUDIO DVD IN jacks using a 75 Ω/ohms video signal cable cord. Note on connecting the digital input jacks • Only audio signals are two sets of the other components. Video input/output connections: • Connect the video deck's video output jack (VIDEO OUT) to the VIDEO (yellow) VCR-1 IN jack...
Owners Manual
Page 9
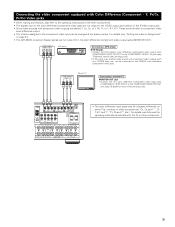
... the same way, another video source with component video outputs are labeled Y, CB, CR, or Y, Pb, Pr, or Y, R-Y, B-Y. For details, see "Setting the video In Assignment" on page 24. • The AVR-2803's on some TVs, monitors or video components ("CR, CB and Y", "RY, B-Y and Y", "Pr, Pb and Y", etc.). Connecting the video component...
... the same way, another video source with component video outputs are labeled Y, CB, CR, or Y, Pb, Pr, or Y, R-Y, B-Y. For details, see "Setting the video In Assignment" on page 24. • The AVR-2803's on some TVs, monitors or video components ("CR, CB and Y", "RY, B-Y and Y", "Pr, Pb and Y", etc.). Connecting the video component...

Owners Manual
Page 12
... or terminate the core wires. Connecting banana plugs banana plug Turn clockwise to SURR. Connection jack for ZONE 2. BACK L CH. • The settings must be activated if the set is played for use of speakers with an impedance of time at high volumes when speakers with an impedance lower than 8 Ω/ohms...
... or terminate the core wires. Connecting banana plugs banana plug Turn clockwise to SURR. Connection jack for ZONE 2. BACK L CH. • The settings must be activated if the set is played for use of speakers with an impedance of time at high volumes when speakers with an impedance lower than 8 Ω/ohms...

Owners Manual
Page 13
...the output of lower than the specified impedance (for example speakers with the wiring of the speaker cables or input cables, and wait for the set to cool down , improve the ventilation around the unit, switch off and the power supply indicator LED flashes. Protector circuit • This unit...period which results in an extreme temperature rise. When the protection circuit is activated, the speaker output is cut off the power and contact a DENON service center. The purpose of this circuit is to switch off . If the protection circuit is used at high volumes when speakers with an ...
...the output of lower than the specified impedance (for example speakers with the wiring of the speaker cables or input cables, and wait for the set to cool down , improve the ventilation around the unit, switch off and the power supply indicator LED flashes. Protector circuit • This unit...period which results in an extreme temperature rise. When the protection circuit is activated, the speaker output is cut off the power and contact a DENON service center. The purpose of this circuit is to switch off . If the protection circuit is used at high volumes when speakers with an ...
Owners Manual
Page 16
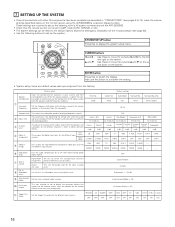
...AV components have been completed as described in "CONNECTIONS" (see page 63). • Use the following buttons to set up the listening room's AV system centered around the AVR-2803/983. • Check that the remote control unit is set up the system: SYSTEM SETUP button Press this to 13), make the various... TAPE DVD VDP TV OFF OFF OFF OFF ON ON ON DBS VCR-1 VCR-2 V. AUX ON ON ON ON 16 Set the frequency (Hz) below on the monitor screen using the AVR-2803/983's on the screen. Input source Digital Inputs Front L & R 12 ft (3.6 m) Front L Front R 0 dB 0 dB CD DVD COAX1 ...
...AV components have been completed as described in "CONNECTIONS" (see page 63). • Use the following buttons to set up the listening room's AV system centered around the AVR-2803/983. • Check that the remote control unit is set up the system: SYSTEM SETUP button Press this to 13), make the various... TAPE DVD VDP TV OFF OFF OFF OFF ON ON ON DBS VCR-1 VCR-2 V. AUX ON ON ON ON 16 Set the frequency (Hz) below on the monitor screen using the AVR-2803/983's on the screen. Input source Digital Inputs Front L & R 12 ft (3.6 m) Front L Front R 0 dB 0 dB CD DVD COAX1 ...

Owners Manual
Page 17
...D8 E1 ~ E8 Default settings 87.5/89.1/98.1/107.9/90.1/90.1/90.1/90.1 MHz 520/600/1000/1400/1500/1710 kHz, 90.1/90.1 MHz 90.1 MHz 90.1 MHz 90.1 MHz Setup Lock = OFF NOTES: • The on-screen display signals are output with priority to the AVR-2803/983's video input connectors... on connecting the monitor TV, see page 30.) • The AVR-2803/983's on the main unit's power. 2 Display the System Setup Menu. Surround speaker systems Before setting up the system • Before setting up to lock the system setup settings so that point are output with high resolution monitor TVs, so it...
...D8 E1 ~ E8 Default settings 87.5/89.1/98.1/107.9/90.1/90.1/90.1/90.1 MHz 520/600/1000/1400/1500/1710 kHz, 90.1/90.1 MHz 90.1 MHz 90.1 MHz 90.1 MHz Setup Lock = OFF NOTES: • The on-screen display signals are output with priority to the AVR-2803/983's video input connectors... on connecting the monitor TV, see page 30.) • The AVR-2803/983's on the main unit's power. 2 Display the System Setup Menu. Surround speaker systems Before setting up the system • Before setting up to lock the system setup settings so that point are output with high resolution monitor TVs, so it...
Owners Manual
Page 18
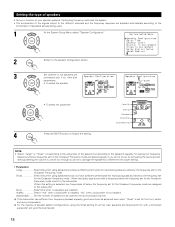
... to the subwoofer. For the majority of speaker system configurations, using speakers that have sufficient performance for reproducing bass sound below the frequency set , bass sound with a connected subwoofer will yield the best results. 18 Surround back Sp. 4 Press the ENTER button to be ... surround speakers. Yes/No Select "Yes" when a subwoofer is installed, "No" when a subwoofer is set for the Crossover Frequency mode. Setting the type of speakers • Set up in function of your speaker systems. Performing this setup optimizes the system. • The composition of ...
... to the subwoofer. For the majority of speaker system configurations, using speakers that have sufficient performance for reproducing bass sound below the frequency set , bass sound with a connected subwoofer will yield the best results. 18 Surround back Sp. 4 Press the ENTER button to be ... surround speakers. Yes/No Select "Yes" when a subwoofer is installed, "No" when a subwoofer is set for the Crossover Frequency mode. Setting the type of speakers • Set up in function of your speaker systems. Performing this setup optimizes the system. • The composition of ...
Owners Manual
Page 19
... The only signals produced from the subwoofer channel are produced from the subwoofer channel are only the low frequency signal range of channels set for frequencies near the crossover frequency. - In this playback mode, the low frequency range expand more uniformly through the room, but ...depending on page 60. 19 NOTE: For ordinary speaker systems, we recommend setting the crossover frequency to the speaker system being used. 1 Select the "Crossover Frequency" mode. NOTES: - Therefore, the low frequency signal ...
... The only signals produced from the subwoofer channel are produced from the subwoofer channel are only the low frequency signal range of channels set for frequencies near the crossover frequency. - In this playback mode, the low frequency range expand more uniformly through the room, but ...depending on page 60. 19 NOTE: For ordinary speaker systems, we recommend setting the crossover frequency to the speaker system being used. 1 Select the "Crossover Frequency" mode. NOTES: - Therefore, the low frequency signal ...

Owners Manual
Page 20
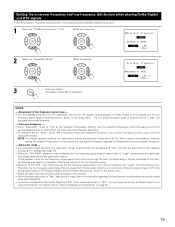
Preparations: Measure the distances between the listening position and the different speakers to set . 20 Setting the Delay Time • Input the distance between the listening position and the speakers (L1 to L5 on the diagram at the right). Example: When "... Center FR Subwoofer L1 L2 L5 Listening position SL L3 L4 SR SBL SBR 1 At the System Setup Menu select "Delay Time". 2 Switch to be set the delay time for the surround mode.
Preparations: Measure the distances between the listening position and the different speakers to set . 20 Setting the Delay Time • Input the distance between the listening position and the speakers (L1 to L5 on the diagram at the right). Example: When "... Center FR Subwoofer L1 L2 L5 Listening position SL L3 L4 SR SBL SBR 1 At the System Setup Menu select "Delay Time". 2 Switch to be set the delay time for the surround mode.

Owners Manual
Page 21
... (see page 49.) 1 At the System Setup Menu select "Channel Level". 2 Switch to the default values. The AVR-2803/983 automatically sets the optimum surround delay time for "Default", the settings are reset to the measured distance. Setting the Channel Level • Use this case, please relocate the blinking speaker(s) so that the difference of...
... (see page 49.) 1 At the System Setup Menu select "Channel Level". 2 Switch to the default values. The AVR-2803/983 automatically sets the optimum surround delay time for "Default", the settings are reset to the measured distance. Setting the Channel Level • Use this case, please relocate the blinking speaker(s) so that the difference of...
Owners Manual
Page 22
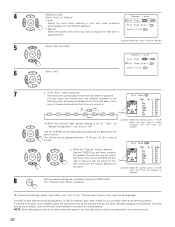
... at 4-second intervals the first time and second time around, 2-second intervals the third time around and on the "Channel Level" screen, then make the settings again. When the "Manual" mode is selected Use the CURSOR up and down to select the speaker for which you want to output test tones... "Level Clear" and "Yes" on : 1spkr SB FL C FR SR SBR SBL SL SW 2spkrs When the surround back speaker setting is set to adjust the subwoofer's own volume control. 22 NOTE: When adjusting the level of 0.5 dB. Select "Auto" or "Manual". • Auto: Adjust the level while ...
... at 4-second intervals the first time and second time around, 2-second intervals the third time around and on the "Channel Level" screen, then make the settings again. When the "Manual" mode is selected Use the CURSOR up and down to select the speaker for which you want to output test tones... "Level Clear" and "Yes" on : 1spkr SB FL C FR SR SBR SBL SL SW 2spkrs When the surround back speaker setting is set to adjust the subwoofer's own volume control. 22 NOTE: When adjusting the level of 0.5 dB. Select "Auto" or "Manual". • Auto: Adjust the level while ...
Owners Manual
Page 23
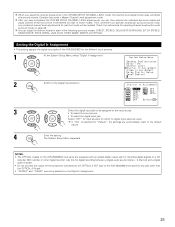
...Assignment • This setting assigns the digital input jacks of the AVR-2803/983 for the different input sources. 1 At the System Setup Menu select "Digital In Assignment". 2 Switch to the Digital Inputs screen. 3 Select the digital input jack to the default values. 4 Enter the setting. When you can ... to any jack other than the OPTICAL 4 IN jack. • "PHONO" and "TUNER" cannot be remembered for recording digital signals on the AVR-2803/983's rear panel to the input source. • To select the input source • To select the digital input jack Select "OFF" for...
...Assignment • This setting assigns the digital input jacks of the AVR-2803/983 for the different input sources. 1 At the System Setup Menu select "Digital In Assignment". 2 Switch to the Digital Inputs screen. 3 Select the digital input jack to the default values. 4 Enter the setting. When you can ... to any jack other than the OPTICAL 4 IN jack. • "PHONO" and "TUNER" cannot be remembered for recording digital signals on the AVR-2803/983's rear panel to the input source. • To select the input source • To select the digital input jack Select "OFF" for...

Owners Manual
Page 24
... using a center speaker or surround speakers, the sound is selected, the settings are reset to the input source. The System Setup Menu reappears. ON: The dynamic range is compressed automatically according to the combination of the AVR-2803/983 for the front speakers, set "Compression" to be assigned to the factory defaults. 4 ENTER the...
... using a center speaker or surround speakers, the sound is selected, the settings are reset to the input source. The System Setup Menu reappears. ON: The dynamic range is compressed automatically according to the combination of the AVR-2803/983 for the front speakers, set "Compression" to be assigned to the factory defaults. 4 ENTER the...


