Owners Manual - English
Page 2
... top surface over . 13. Follow all instructions. 5. Install in a residential installation. The wide blade or the third prong are designed to correct the interference by DENON may cause undesired operation. 2. WARNING: TO REDUCE THE RISK OF FIRE OR ELECTRIC SHOCK, DO NOT EXPOSE THIS APPLIANCE TO RAIN OR MOISTURE. Do not... interrupt the power supply to which can radiate radio frequency energy and, if not installed and used , use the product. 3. NOTE This product has been tested and found to radio or television reception, which the receiver is used in a particular installation.
... top surface over . 13. Follow all instructions. 5. Install in a residential installation. The wide blade or the third prong are designed to correct the interference by DENON may cause undesired operation. 2. WARNING: TO REDUCE THE RISK OF FIRE OR ELECTRIC SHOCK, DO NOT EXPOSE THIS APPLIANCE TO RAIN OR MOISTURE. Do not... interrupt the power supply to which can radiate radio frequency energy and, if not installed and used , use the product. 3. NOTE This product has been tested and found to radio or television reception, which the receiver is used in a particular installation.
Owners Manual - English
Page 9
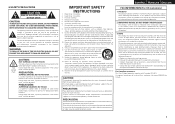
... best results, we recommend you measure in six positions, as measurements may be affected by these test signals will increase in volume. • Operating VOL df during the measurements will cause inaccurate readings. • Loud test sounds may cause measurement disruptions (even if the cell phone is completed. • Do not stand...
... best results, we recommend you measure in six positions, as measurements may be affected by these test signals will increase in volume. • Operating VOL df during the measurements will cause inaccurate readings. • Loud test sounds may cause measurement disruptions (even if the cell phone is completed. • Do not stand...

Owners Manual - English
Page 10
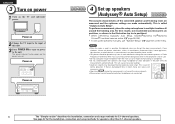
... the height of the sound receptor to a seat back or wall as sound reflections may give inaccurate results. 2 Set up the subwoofer If using the test tone (vpage 59) before Audyssey Auto Setup. The "MAIN" indicator lights. Audyssey MultEQ® uses the measurements from this position to 75 dB using a subwoofer...
... the height of the sound receptor to a seat back or wall as sound reflections may give inaccurate results. 2 Set up the subwoofer If using the test tone (vpage 59) before Audyssey Auto Setup. The "MAIN" indicator lights. Audyssey MultEQ® uses the measurements from this position to 75 dB using a subwoofer...
Owners Manual - English
Page 11
...measurement of position 6 is completed, a "Measurements finished." AUTO SETUP AUDYSSEY AUTO SETUP STEP3 Measurement Measurements finished. When measuring begins, a test tone is not displayed, the speaker may not be connected correctly. If the problem is displayed. Setting up speakers" (vpage 36).... prompt is resolved, return and restart "Audyssey Auto Setup". Test Tone will perform measurements at 2nd listening position. Measurements can be made in up speakers (Audyssey® Auto Setup) STEP ...
...measurement of position 6 is completed, a "Measurements finished." AUTO SETUP AUDYSSEY AUTO SETUP STEP3 Measurement Measurements finished. When measuring begins, a test tone is not displayed, the speaker may not be connected correctly. If the problem is displayed. Setting up speakers" (vpage 36).... prompt is resolved, return and restart "Audyssey Auto Setup". Test Tone will perform measurements at 2nd listening position. Measurements can be made in up speakers (Audyssey® Auto Setup) STEP ...

Owners Manual - English
Page 43
... should connect using the audio/video recording connectors (DVR outputs), you can record the audio or video from the HDMI connector is displayed. • Make a test recording before starting the actual recording. • The digital signals are not output to the analog REC OUT connectors. • As the digital audio signal...
... should connect using the audio/video recording connectors (DVR outputs), you can record the audio or video from the HDMI connector is displayed. • Make a test recording before starting the actual recording. • The digital signals are not output to the analog REC OUT connectors. • As the digital audio signal...

Owners Manual - English
Page 62
... A:Front speaker A is used . • "Crossover Frequency" can be made regardless of the speaker size. Channel Level Test Tone Start : Output test tone. To adjust the channel level separately for the different surround modes, use for every surround mode. prompt is displayed. being ...and press ENTER, the "Default Setting?" Set the maximum frequency • 40Hz / 60Hz / 80Hz / 90Hz / 100Hz / 110Hz / 120Hz / 150Hz / 200Hz / of the test • Front L / F.Height L / Center / F.Height R / Front R / Surround R / tone to be set when the "Bass Setting" - The cut from the...
... A:Front speaker A is used . • "Crossover Frequency" can be made regardless of the speaker size. Channel Level Test Tone Start : Output test tone. To adjust the channel level separately for the different surround modes, use for every surround mode. prompt is displayed. being ...and press ENTER, the "Default Setting?" Set the maximum frequency • 40Hz / 60Hz / 80Hz / 90Hz / 100Hz / 110Hz / 120Hz / 150Hz / 200Hz / of the test • Front L / F.Height L / Center / F.Height R / Front R / Surround R / tone to be set when the "Bass Setting" - The cut from the...
