Getting Started Guide
Page 5
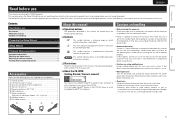
...based mainly on vacation or leaving home for North America model only 1 r Service network list 1 t Remote control unit (RC-1157 1 y R6/AA batteries 2 u Setup microphone (DM-A409, Cord length: Approx. 19.7 ft / 6.0 m 1 i AM loop antenna 1 o FM indoor antenna 1 t u i o About this manual ...Owner's manual 1 e Warranty (for long periods of time, be used. If that the illustrations in this manual is for purchasing this DENON product. Next, disconnect the connection cables to operate properly. m This mark indicates the page of the unit and the surroundings, condensation (dew...
...based mainly on vacation or leaving home for North America model only 1 r Service network list 1 t Remote control unit (RC-1157 1 y R6/AA batteries 2 u Setup microphone (DM-A409, Cord length: Approx. 19.7 ft / 6.0 m 1 i AM loop antenna 1 o FM indoor antenna 1 t u i o About this manual ...Owner's manual 1 e Warranty (for long periods of time, be used. If that the illustrations in this manual is for purchasing this DENON product. Next, disconnect the connection cables to operate properly. m This mark indicates the page of the unit and the surroundings, condensation (dew...

Getting Started Guide
Page 6
...SL SR GViewed from the sideH Listening position z1 22˚ - 30˚ z2 120˚ Remote control unit / R6/AA batteries (supplied) Setup microphone (supplied) FL Front speaker (L) FR Front speaker (R) C Center speaker SW Subwoofer SL Surround speaker (L) SR Surround speaker (R) 2 Audio cable (sold ...sold separately) • Prepare enough for the number of the main unit into the wall socket until these preparations are performed using the Setup Wizard. Connect the speaker cables to the speakers. nn When 5.1-channel installed FL SW FR C z1 • Install the surround speakers...
...SL SR GViewed from the sideH Listening position z1 22˚ - 30˚ z2 120˚ Remote control unit / R6/AA batteries (supplied) Setup microphone (supplied) FL Front speaker (L) FR Front speaker (R) C Center speaker SW Subwoofer SL Surround speaker (L) SR Surround speaker (R) 2 Audio cable (sold ...sold separately) • Prepare enough for the number of the main unit into the wall socket until these preparations are performed using the Setup Wizard. Connect the speaker cables to the speakers. nn When 5.1-channel installed FL SW FR C z1 • Install the surround speakers...

Getting Started Guide
Page 8
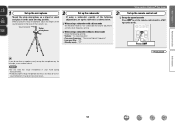
... the operations as shown in the following menu even after setting the Setup Wizard (vm page 64 "Remote Setup Guide"). 3 Speaker Calibration Speaker Calibration Detect & Measure (Main) Please connect MultEQ microphone. Select "Others", and then select "Skip" in the following steps. Remote Setup Please select the device you want to "3. Language Select Please select...
... the operations as shown in the following menu even after setting the Setup Wizard (vm page 64 "Remote Setup Guide"). 3 Speaker Calibration Speaker Calibration Detect & Measure (Main) Please connect MultEQ microphone. Select "Others", and then select "Skip" in the following steps. Remote Setup Please select the device you want to "3. Language Select Please select...

Owners Manual
Page 4
...'s manual 1 e Warranty (for North America model only 1 r Service network list 1 t Remote control unit (RC-1157 1 y R6/AA batteries 2 u Setup microphone (DM-A409, Cord length: Approx. 19.7 ft / 6.0 m 1 i AM loop antenna 1 o FM indoor antenna 1 t u i o Information 77 ...Setup 66 Operating the connected devices by remote control unit 71 Operating AV devices 71 Registering preset codes 72 Operating devices 74 Resetting the remote control unit 76 Accessories Check that the following parts are supplied with the product. To ensure proper operation, please read this DENON...
...'s manual 1 e Warranty (for North America model only 1 r Service network list 1 t Remote control unit (RC-1157 1 y R6/AA batteries 2 u Setup microphone (DM-A409, Cord length: Approx. 19.7 ft / 6.0 m 1 i AM loop antenna 1 o FM indoor antenna 1 t u i o Information 77 ...Setup 66 Operating the connected devices by remote control unit 71 Operating AV devices 71 Registering preset codes 72 Operating devices 74 Resetting the remote control unit 76 Accessories Check that the following parts are supplied with the product. To ensure proper operation, please read this DENON...

Owners Manual
Page 14
...174; uses the measurements from all around the listening area. If there is completed. • Do not stand between the speakers and setup microphone or allow obstacles in volume. • Operating M df during the measurements will cause inaccurate readings. • Loud test sounds may... be affected by placing the setup microphone successively at multiple positions throughout the entire listening area, as shown in GExample wH, measuring at multiple points throughout the listening ...
...174; uses the measurements from all around the listening area. If there is completed. • Do not stand between the speakers and setup microphone or allow obstacles in volume. • Operating M df during the measurements will cause inaccurate readings. • Loud test sounds may... be affected by placing the setup microphone successively at multiple positions throughout the entire listening area, as shown in GExample wH, measuring at multiple points throughout the listening ...
Owners Manual
Page 15
... up the remote control unit nn Set up the subwoofer as sound reflections may give inaccurate results. NOTE • Do not hold the setup microphone in the main listening position. Information 12 nn When using a subwoofer without a back. operation mode. nn When using a subwoofer with ...to the level of the sound receptor to AMP- Basic version Advanced version Set up speakers (Audyssey® Auto Setup) 1 Set up the microphone Mount the setup microphone on , for example, a seat without a direct mode Make the following adjustments, set up the operation mode ...
... up the remote control unit nn Set up the subwoofer as sound reflections may give inaccurate results. NOTE • Do not hold the setup microphone in the main listening position. Information 12 nn When using a subwoofer without a back. operation mode. nn When using a subwoofer with ...to the level of the sound receptor to AMP- Basic version Advanced version Set up speakers (Audyssey® Auto Setup) 1 Set up the microphone Mount the setup microphone on , for example, a seat without a direct mode Make the following adjustments, set up the operation mode ...

Owners Manual
Page 16
... main listening position. • This step automatically checks the speaker configuration and speaker size, and calculates the channel level, distance, and crossover frequency. When the setup microphone is output from each speaker. • Measurement requires several minutes. 8 The detected speakers are set with "Channel Select", measuring time can be connected correctly. Audyssey...
... main listening position. • This step automatically checks the speaker configuration and speaker size, and calculates the channel level, distance, and crossover frequency. When the setup microphone is output from each speaker. • Measurement requires several minutes. 8 The detected speakers are set with "Channel Select", measuring time can be connected correctly. Audyssey...
Owners Manual
Page 17
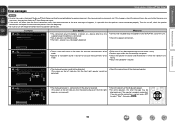
... Calculate". (Go to STEP4 Calculate ) 11 Repeat step 10, measuring positions 3 to 6. Audyssey Auto Setup Calculate Now calculating Please wait MultEQ 0% Audyssey Auto Setup Measure (2nd) Please place the microphone at ear height at multiple positions (two to six positions) other than the main listening position. •...made in the listening room is determined. When measurement of acoustic distortion within the listening area. 10 Move the setup microphone to position 2, use ui to "Error messages" (vpage 16), check any related items, and perform the necessary procedures. Audyssey Auto...
... Calculate". (Go to STEP4 Calculate ) 11 Repeat step 10, measuring positions 3 to 6. Audyssey Auto Setup Calculate Now calculating Please wait MultEQ 0% Audyssey Auto Setup Measure (2nd) Please place the microphone at ear height at multiple positions (two to six positions) other than the main listening position. •...made in the listening room is determined. When measurement of acoustic distortion within the listening area. 10 Move the setup microphone to position 2, use ui to "Error messages" (vpage 16), check any related items, and perform the necessary procedures. Audyssey Auto...

Owners Manual
Page 18
... When turning Dynamic Volume® on Dynamic Volume? NOTE After performing Audyssey® Auto Setup, do not change , perform Audyssey® Auto Setup again. is now finished. nn When turning Dynamic Volume® off the power. 16 Unplug the setup microphone from the actual connection status, or if "Caution!" will be displayed. In event...
... When turning Dynamic Volume® on Dynamic Volume? NOTE After performing Audyssey® Auto Setup, do not change , perform Audyssey® Auto Setup again. is now finished. nn When turning Dynamic Volume® off the power. 16 Unplug the setup microphone from the actual connection status, or if "Caution!" will be displayed. In event...
Owners Manual
Page 19
... Speaker is none MultEQ Error details • The connected setup microphone is broken, or a device other than the supplied setup microphone is connected. • Not all speakers could be completed due to the SETUP MIC jack of the displayed speaker. Measures • Connect the included setup microphone to speaker placement, the measurement environment, etc. Retry [ ] Cancel Audyssey...
... Speaker is none MultEQ Error details • The connected setup microphone is broken, or a device other than the supplied setup microphone is connected. • Not all speakers could be completed due to the SETUP MIC jack of the displayed speaker. Measures • Connect the included setup microphone to speaker placement, the measurement environment, etc. Retry [ ] Cancel Audyssey...

Owners Manual
Page 43
...up speakers other than 5.1-channel speakers. operation mode. 2 Connect the setup microphone. Here we describe how to set in the manual. 4 Set up speakers around items indicate the settings. Before Auto Setup measurement, the settings shown below can be made. • Changing ... Assign NORMAL MultEQ [RETURN] Cancel vSee overleaf Information BD 40 Press AMP When the setup microphone is connected, the following items if necessary. Audyssey Auto Setup MultEQ Preparation Connect the speakers and place them according to the recommendations in advance, measurement...
...up speakers other than 5.1-channel speakers. operation mode. 2 Connect the setup microphone. Here we describe how to set in the manual. 4 Set up speakers around items indicate the settings. Before Auto Setup measurement, the settings shown below can be made. • Changing ... Assign NORMAL MultEQ [RETURN] Cancel vSee overleaf Information BD 40 Press AMP When the setup microphone is connected, the following items if necessary. Audyssey Auto Setup MultEQ Preparation Connect the speakers and place them according to the recommendations in advance, measurement...

Specification Sheet
Page 1
...microphone for . This receiver also has a USB port where you can connect an iPod®, iPhone®, or USB memory and directly play for iPod and iPhone via USB • Setup Wizard, providing easy-to-follow setup... instructions • Easy operation, Graphical User Interface • GUI overlay on HD Source • Four quick select buttons, for easy operation State-of-the-art Denon... adjustment • Audyssey MultEQ® and Auto Setup - Setup is extremely easy as the AVR-1612's Setup Wizard guides you 'll be able to experience an exciting...
...microphone for . This receiver also has a USB port where you can connect an iPod®, iPhone®, or USB memory and directly play for iPod and iPhone via USB • Setup Wizard, providing easy-to-follow setup... instructions • Easy operation, Graphical User Interface • GUI overlay on HD Source • Four quick select buttons, for easy operation State-of-the-art Denon... adjustment • Audyssey MultEQ® and Auto Setup - Setup is extremely easy as the AVR-1612's Setup Wizard guides you 'll be able to experience an exciting...

Specification Sheet
Page 2
... 4 x HDMI in / 1 x HDMI out The AVR-1612 provides 4 HDMI inputs that supports Dolby TrueHD, the audio...signal paths to contribute to immaculately clean audio and video playback. Then simply follow setup instructions First select the language when prompted. Front L/R 75 W + 75 W...USB port x 1 Dock Control Port x 1 FM Tuner Antenna x 1 AM Tuner Antenna x 1 Microphone port x 1 *Design and specifications are subject to change without notice. *"Dolby", "Pro Logic"and.../music sources and surround modes. State-of-the-art Denon Solutions for Maximizing Content Quality • Fully discrete,...
... 4 x HDMI in / 1 x HDMI out The AVR-1612 provides 4 HDMI inputs that supports Dolby TrueHD, the audio...signal paths to contribute to immaculately clean audio and video playback. Then simply follow setup instructions First select the language when prompted. Front L/R 75 W + 75 W...USB port x 1 Dock Control Port x 1 FM Tuner Antenna x 1 AM Tuner Antenna x 1 Microphone port x 1 *Design and specifications are subject to change without notice. *"Dolby", "Pro Logic"and.../music sources and surround modes. State-of-the-art Denon Solutions for Maximizing Content Quality • Fully discrete,...


