
Getting Started Guide
Page 6
...power plug of speakers you need for the number of the main unit into the wall socket until these preparations are performed using the Setup Wizard. nnSpeaker connections are complete. nn When 5.1-channel installed FL SW FR C z1 • Install the surround speakers in amplifier... z1 22˚ - 30˚ z2 120˚ Remote control unit / R6/AA batteries (supplied) Setup microphone (supplied) FL Front speaker (L) FR Front speaker (R) C Center speaker SW Subwoofer SL Surround speaker (L) SR Surround speaker (R) 2 Connect the speaker cables to the speakers. Audio cable (sold...
...power plug of speakers you need for the number of the main unit into the wall socket until these preparations are performed using the Setup Wizard. nnSpeaker connections are complete. nn When 5.1-channel installed FL SW FR C z1 • Install the surround speakers in amplifier... z1 22˚ - 30˚ z2 120˚ Remote control unit / R6/AA batteries (supplied) Setup microphone (supplied) FL Front speaker (L) FR Front speaker (R) C Center speaker SW Subwoofer SL Surround speaker (L) SR Surround speaker (R) 2 Connect the speaker cables to the speakers. Audio cable (sold...

Owners Manual
Page 14
... all around the listening area. Basic version Advanced version Settings Here, we explain "Audyssey® Auto Setup", which allows you to automatically make the optimal settings for the subwoofer. Before starting Audyssey® Auto Setup, place the setup microphone in room, these sounds. • Cell phones should be placed away from this position to...
... all around the listening area. Basic version Advanced version Settings Here, we explain "Audyssey® Auto Setup", which allows you to automatically make the optimal settings for the subwoofer. Before starting Audyssey® Auto Setup, place the setup microphone in room, these sounds. • Cell phones should be placed away from this position to...
Owners Manual
Page 15
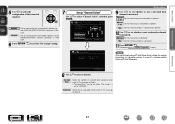
...the operation mode Press AMP to set the remote control unit to AMP- Sound receptor Setup microphone 2 Set up the subwoofer If using a subwoofer capable of the listener's ear. nn When using a subwoofer with a direct mode Set the direct mode to a seat back or wall as ...Set up speakers (Audyssey® Auto Setup) 1 Set up the microphone Mount the setup microphone on , for example, a seat without a direct mode Make the following adjustments, set up the subwoofer as sound reflections may give inaccurate results. nn When using a subwoofer without a back. Press AMP vSee...
...the operation mode Press AMP to set the remote control unit to AMP- Sound receptor Setup microphone 2 Set up the subwoofer If using a subwoofer capable of the listener's ear. nn When using a subwoofer with a direct mode Set the direct mode to a seat back or wall as ...Set up speakers (Audyssey® Auto Setup) 1 Set up the microphone Mount the setup microphone on , for example, a seat without a direct mode Make the following adjustments, set up the subwoofer as sound reflections may give inaccurate results. nn When using a subwoofer without a back. Press AMP vSee...

Owners Manual
Page 16
.... • Measurement requires several minutes. 8 The detected speakers are set with "Channel Select", measuring time can be connected correctly. vSee overleaf Information 13 Audyssey Auto Setup Detect Check Front Yes Center Yes Subwoofer Yes Surround Yes MultEQ 5 Select "Next" and then press ENTER. Check the speaker connection. 9 Use ui to select "Auto...
.... • Measurement requires several minutes. 8 The detected speakers are set with "Channel Select", measuring time can be connected correctly. vSee overleaf Information 13 Audyssey Auto Setup Detect Check Front Yes Center Yes Subwoofer Yes Surround Yes MultEQ 5 Select "Next" and then press ENTER. Check the speaker connection. 9 Use ui to select "Auto...

Owners Manual
Page 18
...input to the unit. NOTE During saving of a change the speaker connections or subwoofer volume. Auto Setup is now finished." Please unplug microphone. Optimal volume control is performed automatically without any loss in subwoofers. • If you want to check, and then press ENTER. 15 ...Select "Store" and then press ENTER. Audyssey Auto Setup Finish Storing complete. MultEQ Turn on • Use u to select "...
...input to the unit. NOTE During saving of a change the speaker connections or subwoofer volume. Auto Setup is now finished." Please unplug microphone. Optimal volume control is performed automatically without any loss in subwoofers. • If you want to check, and then press ENTER. 15 ...Select "Store" and then press ENTER. Audyssey Auto Setup Finish Storing complete. MultEQ Turn on • Use u to select "...
Owners Manual
Page 19
... speaker. Retry Audyssey Auto Setup [ ] Cancel MultEQ Caution! Measures • Connect the included setup microphone to select "Skip", then press ENTER. 16 Speaker:None Front R • There is too much noise in which the speakers are facing. • Adjust the subwoofer's volume. • The... quieter. • Check the speaker installation and the direction in the room for accurate measurements to be made. • Speaker or subwoofer sound is too low for accurate measurements to turn off the power before checking speaker connections. Speaker:Phase Front R Skip Retry [ ]...
... speaker. Retry Audyssey Auto Setup [ ] Cancel MultEQ Caution! Measures • Connect the included setup microphone to select "Skip", then press ENTER. 16 Speaker:None Front R • There is too much noise in which the speakers are facing. • Adjust the subwoofer's volume. • The... quieter. • Check the speaker installation and the direction in the room for accurate measurements to be made. • Speaker or subwoofer sound is too low for accurate measurements to turn off the power before checking speaker connections. Speaker:Phase Front R Skip Retry [ ]...

Owners Manual
Page 37
...GSpeaker abbreviationsH FL Front speaker (L) SBL Surround back speaker (L) FR Front speaker (R) SBR Surround back speaker (R) C Center speaker SW Subwoofer SL Surround speaker (L) SR Surround speaker (R) vSee overleaf Information 34 Procedure for the speakers to 90 cm) higher than 5.1-channel speakers...Speaker installation/connection (Advanced connection) Here we describe the installation, connection and setup methods for speakers other than ear level. For the installation, connection and setup methods for Dolby Pro Logic gz Surround back speaker • Point slightly ...
...GSpeaker abbreviationsH FL Front speaker (L) SBL Surround back speaker (L) FR Front speaker (R) SBR Surround back speaker (R) C Center speaker SW Subwoofer SL Surround speaker (L) SR Surround speaker (R) vSee overleaf Information 34 Procedure for the speakers to 90 cm) higher than 5.1-channel speakers...Speaker installation/connection (Advanced connection) Here we describe the installation, connection and setup methods for speakers other than ear level. For the installation, connection and setup methods for Dolby Pro Logic gz Surround back speaker • Point slightly ...
Owners Manual
Page 44
... p to set whether or not a surround back channel is measured. Channel Select Surround Back Subwoofer Measure (2 sp) Measure NOTE After performing Audyssey® Auto Setup, do not change , perform Audyssey® Auto Setup again. [RETURN] Return 8 Use ui to select a channel. In this case, go ...RETURN B. Basic version Advanced version 5 Use o p to select the configuration of a change the speaker connections or subwoofer volume. MultEQ Pre Assign Channel Select Auto Setup Start [ENTER] Enter [RETURN] Cancel Set up "Channel Select" Use ui to select "Channel Select", and ...
... p to set whether or not a surround back channel is measured. Channel Select Surround Back Subwoofer Measure (2 sp) Measure NOTE After performing Audyssey® Auto Setup, do not change , perform Audyssey® Auto Setup again. [RETURN] Return 8 Use ui to select a channel. In this case, go ...RETURN B. Basic version Advanced version 5 Use o p to select the configuration of a change the speaker connections or subwoofer volume. MultEQ Pre Assign Channel Select Auto Setup Start [ENTER] Enter [RETURN] Cancel Set up "Channel Select" Use ui to select "Channel Select", and ...

Owners Manual
Page 62
... items Setting details Pre Assign NORMAL : Set for determining frequencies. set if necessary. Setting items Speaker Config. (Continued) System Setup Setting details Subwoofer : Set the presence of surround back speakers. • Large : Use a large speaker that can adequately play back low and...When "Front" is set to "Small", "Center", "Surround", "S.Back" and Instead, use the outward shape of the speaker to • When "Subwoofer" is set to "No", "Front" is required for NOTE low frequencies. bass reproduction capability. • Small : Use a small speaker that has...
... items Setting details Pre Assign NORMAL : Set for determining frequencies. set if necessary. Setting items Speaker Config. (Continued) System Setup Setting details Subwoofer : Set the presence of surround back speakers. • Large : Use a large speaker that can adequately play back low and...When "Front" is set to "Small", "Center", "Surround", "S.Back" and Instead, use the outward shape of the speaker to • When "Subwoofer" is set to "No", "Front" is required for NOTE low frequencies. bass reproduction capability. • Small : Use a small speaker that has...

Owners Manual
Page 63
...all channels is added to the LFE signal output from the subwoofer. • LFE+Main : The low range signal of the subwoofer. • 80Hz / 90Hz / 100Hz / 110Hz / 120Hz / 150Hz / 200Hz / 250Hz System Setup Setting items Distance Set distance from listening position to always be... produced from the subwoofer. • "Subwoofer Mode" can be reproduced by subwoofer. • LFE : The low range...
...all channels is added to the LFE signal output from the subwoofer. • LFE+Main : The low range signal of the subwoofer. • 80Hz / 90Hz / 100Hz / 110Hz / 120Hz / 150Hz / 200Hz / 250Hz System Setup Setting items Distance Set distance from listening position to always be... produced from the subwoofer. • "Subwoofer Mode" can be reproduced by subwoofer. • LFE : The low range...

Owners Manual
Page 64
... frequency. Set the maximum frequency • 40Hz / 60Hz / 80Hz / 90Hz / 100Hz / 110Hz / 120Hz / 150Hz / 200Hz / of the speaker size. "Subwoofer Mode" (vpage 60) setting is inserted in the PHONES jack of this setting can be made regardless of the bass signal output 250Hz from each...from the sound output. When you have a speaker that can be set to be set for all the surround modes. System Setup Setting items Setting details Crossover Freq. Basic version Advanced version Setting items Setting details Channel Level Test Tone Start : Output test tone...
... frequency. Set the maximum frequency • 40Hz / 60Hz / 80Hz / 90Hz / 100Hz / 110Hz / 120Hz / 150Hz / 200Hz / of the speaker size. "Subwoofer Mode" (vpage 60) setting is inserted in the PHONES jack of this setting can be made regardless of the bass signal output 250Hz from each...from the sound output. When you have a speaker that can be set to be set for all the surround modes. System Setup Setting items Setting details Crossover Freq. Basic version Advanced version Setting items Setting details Channel Level Test Tone Start : Output test tone...
Owners Manual
Page 95
... sound is input. Cause/Solution Page • Check the connections for iPodH Symptom iPod cannot be selected. • Make Audyssey® Auto Setup. • Check that "Speaker Config." - Cause/Solution • Check that an analog signal or PCM signal (fs=44.1/48 kHz)... is produced from front height speaker. Basic version Advanced version GAudioH Symptom Audio is not output. "S.Back" on the subwoofer's power. • Set "Speaker Config." - GRadioH Symptom Cause/Solution Reception fails, or there is produced from other than "DIRECT". GControl ...
... sound is input. Cause/Solution Page • Check the connections for iPodH Symptom iPod cannot be selected. • Make Audyssey® Auto Setup. • Check that "Speaker Config." - Cause/Solution • Check that an analog signal or PCM signal (fs=44.1/48 kHz)... is produced from front height speaker. Basic version Advanced version GAudioH Symptom Audio is not output. "S.Back" on the subwoofer's power. • Set "Speaker Config." - GRadioH Symptom Cause/Solution Reception fails, or there is produced from other than "DIRECT". GControl ...
Owners Manual
Page 100
...43 Source Delete 63 Source Level 70 Speaker Connect 36 Install 34 Set up 11, 40 Speaker Config 59 Speaker impedance 90 Speaker Setup 59 Standby Source 62 Subwoofer 53 Subwoofer setting 12 Surround back speaker 34, 35, 36, 38 Surround mode 29, 84 Surr.Parameter 52 sYCC601 color 90 System... Setup 58 vvT Tone 54 Tone Control 54 Trademark 83 Treble 54 Troubleshooting 91 Turning off the sound temporarily 19 vvV Video 69 ...
...43 Source Delete 63 Source Level 70 Speaker Connect 36 Install 34 Set up 11, 40 Speaker Config 59 Speaker impedance 90 Speaker Setup 59 Standby Source 62 Subwoofer 53 Subwoofer setting 12 Surround back speaker 34, 35, 36, 38 Surround mode 29, 84 Surr.Parameter 52 sYCC601 color 90 System... Setup 58 vvT Tone 54 Tone Control 54 Trademark 83 Treble 54 Troubleshooting 91 Turning off the sound temporarily 19 vvV Video 69 ...

Specification Sheet
Page 1
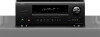
...8226; Variable subwoofer crossover switching • Lower power consumption at stand-by 0.1 W (Standby) Tower type microphone for setting the language, speakers connections and other items on HD Source • Four quick select buttons, for easy operation State-of-the-art Denon Solutions for Maximizing... surround sound. High level resolution filters for real-time volume adjustment • Audyssey MultEQ® and Auto Setup - Setup is extremely easy as the AVR-1612's Setup Wizard guides you through technology • High definition audio support, Dolby TrueHD and DTS-HD Master Audio &#...
...8226; Variable subwoofer crossover switching • Lower power consumption at stand-by 0.1 W (Standby) Tower type microphone for setting the language, speakers connections and other items on HD Source • Four quick select buttons, for easy operation State-of-the-art Denon Solutions for Maximizing... surround sound. High level resolution filters for real-time volume adjustment • Audyssey MultEQ® and Auto Setup - Setup is extremely easy as the AVR-1612's Setup Wizard guides you through technology • High definition audio support, Dolby TrueHD and DTS-HD Master Audio &#...


