
Literature/Product Sheet
Page 1
...thrilling 3D high definition viewing with 3D-compatible HDTVs. High level resolution filters for satellite speakers and also subwoofer State-of-the-art Denon Solutions for Maximizing Content Quality • Stable power supply for high-quality sound and picture playback • High definition audio support... • Audyssey Dynamic Volume, for real-time volume adjustment • Audyssey MultEQ and Auto Setup - New model information AVR-1611 AV Surround Receiver A/V Home Theater Receiver with 3D Video Connectivity Designed to be the centerpiece of an exciting home theater system, the...
...thrilling 3D high definition viewing with 3D-compatible HDTVs. High level resolution filters for satellite speakers and also subwoofer State-of-the-art Denon Solutions for Maximizing Content Quality • Stable power supply for high-quality sound and picture playback • High definition audio support... • Audyssey Dynamic Volume, for real-time volume adjustment • Audyssey MultEQ and Auto Setup - New model information AVR-1611 AV Surround Receiver A/V Home Theater Receiver with 3D Video Connectivity Designed to be the centerpiece of an exciting home theater system, the...

Literature/Product Sheet
Page 2
...power transformers and other countries. *Power Amp Assign function, for versatility in using the AVR-1611 for different purposes Denon Brand Company D&M Building, 2-1 Nisshin-cho, Kawasaki-ku, Kawasaki-shi, Kanagawa, 210-8569, Japan www.denon.com 17760410 A Audyssey Dynamic Volume™ is a trademark of Audyssey Laboratories. *iPod...• Dolby Pro Logic IIz To let you enjoy an even richer spatial presentation, the AVR-1611 is equipped with Glo-Key buttons • Remote Setup Guidance via the Denon Networked Control Dock. (Requires separately-sold ASD-51W or ASD-51N.) Ease-of-use an ...
...power transformers and other countries. *Power Amp Assign function, for versatility in using the AVR-1611 for different purposes Denon Brand Company D&M Building, 2-1 Nisshin-cho, Kawasaki-ku, Kawasaki-shi, Kanagawa, 210-8569, Japan www.denon.com 17760410 A Audyssey Dynamic Volume™ is a trademark of Audyssey Laboratories. *iPod...• Dolby Pro Logic IIz To let you enjoy an even richer spatial presentation, the AVR-1611 is equipped with Glo-Key buttons • Remote Setup Guidance via the Denon Networked Control Dock. (Requires separately-sold ASD-51W or ASD-51N.) Ease-of-use an ...

Owners Manual - English
Page 2
... de la "Hot surface mark" y del panel superior. Do not install near water. 6. Use only with the cart, stand, tripod, bracket, or table specified by DENON may void your outlet, consult an electrician for help. IMPORTANT NOTICE: DO NOT MODIFY THIS PRODUCT This product, when installed as sunshine, fire or the...
... de la "Hot surface mark" y del panel superior. Do not install near water. 6. Use only with the cart, stand, tripod, bracket, or table specified by DENON may void your outlet, consult an electrician for help. IMPORTANT NOTICE: DO NOT MODIFY THIS PRODUCT This product, when installed as sunshine, fire or the...

Owners Manual - English
Page 4
... a Blu-ray Disc player/DVD player 20 Playing an iPod 21 Tuning in radio stations 23 Selecting a listening mode (Surround mode 24 Standard playback 24 DENON original surround playback 26 Stereo playback 26 Direct playback 26 Advanced version 27 Speaker installation/connection (Other than 5.1-channel 28 Install 28 Connect 29 Set... dock for operations. nnSymbols v This symbol indicates a reference page on which related information is described. Simple version Basic version ENGLISH Getting started 1 Accessories 1 About this DENON product.
... a Blu-ray Disc player/DVD player 20 Playing an iPod 21 Tuning in radio stations 23 Selecting a listening mode (Surround mode 24 Standard playback 24 DENON original surround playback 26 Stereo playback 26 Direct playback 26 Advanced version 27 Speaker installation/connection (Other than 5.1-channel 28 Install 28 Connect 29 Set... dock for operations. nnSymbols v This symbol indicates a reference page on which related information is described. Simple version Basic version ENGLISH Getting started 1 Accessories 1 About this DENON product.
Owners Manual - English
Page 5
..., etc. The sound from this unit, you can enjoy playback sound with rich spacial expression. Dock connecrivity for iPod and network streaming If an optional DENON control dock for iPod (ASD-3N, ASD-3W, ASD-51N or ASD-51W) is connected to this unit when it is in noise. When going...
..., etc. The sound from this unit, you can enjoy playback sound with rich spacial expression. Dock connecrivity for iPod and network streaming If an optional DENON control dock for iPod (ASD-3N, ASD-3W, ASD-51N or ASD-51W) is connected to this unit when it is in noise. When going...
Owners Manual - English
Page 6
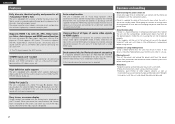
nnBefore connecting the unit, turn off the power to all devices. Enjoy Blu-ray Disc and DVD in a home theater. See page 28 for the installation, connection and setup methods for automatic setup. nnFor operation of the connected devices, refer to the user manuals for 5.1-channel speakers. Use the setup microphone (DM-A409) included with an HDMI connector. Connect 5.1-channel speakers, a TV and Bluray Disc player equipped with the product, for speakers other than 5.1-channel speakers. Set up Play back (vpage 4) (vpage 4) power speakers disc (vpage 6) (vpage 6) (...
nnBefore connecting the unit, turn off the power to all devices. Enjoy Blu-ray Disc and DVD in a home theater. See page 28 for the installation, connection and setup methods for automatic setup. nnFor operation of the connected devices, refer to the user manuals for 5.1-channel speakers. Use the setup microphone (DM-A409) included with an HDMI connector. Connect 5.1-channel speakers, a TV and Bluray Disc player equipped with the product, for speakers other than 5.1-channel speakers. Set up Play back (vpage 4) (vpage 4) power speakers disc (vpage 6) (vpage 6) (...

Owners Manual - English
Page 7
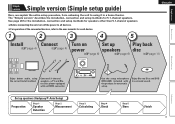
Surround Front speaker speaker 2 - 3 ft / 60 - 90 cm GViewed from the sideH When using the example of 5.1-channel speaker playback. See page 28 for the installation, connection and setup methods for 5.1-channel speakers. Connecting the speaker cables Peel off about 0.03 ft/10 mm of the speaker cable, then either twist the core wire tightly or terminate it. NOTE • Connect so that the speaker cable core wires do not protrude from the tip of sheathing from the speaker terminal. The protection circuit may be sure to interconnect the channels and polarities ...
Surround Front speaker speaker 2 - 3 ft / 60 - 90 cm GViewed from the sideH When using the example of 5.1-channel speaker playback. See page 28 for the installation, connection and setup methods for 5.1-channel speakers. Connecting the speaker cables Peel off about 0.03 ft/10 mm of the speaker cable, then either twist the core wire tightly or terminate it. NOTE • Connect so that the speaker cable core wires do not protrude from the tip of sheathing from the speaker terminal. The protection circuit may be sure to interconnect the channels and polarities ...
Owners Manual - English
Page 8
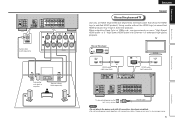
Using a cable without the HDMI logo (an uncertified HDMI product) may result in humming or noise. 5 Information Advanced version Basic version Simple version Doing so can result in abnormal playback. Audio cable (sold separately) FL SW Subwoofer with Ethernet" for enhanced high-quality playback. When outputting Deep Color or 1080p, etc., we recommend you use a "High Speed HDMI cable" or a "High Speed HDMI cable with built-in amplifier SL FR C Speaker cables (sold separately) To household power outlet (AC 120 V, 60 Hz) Power cord NOTE • Do not plug in the power cord ...
Using a cable without the HDMI logo (an uncertified HDMI product) may result in humming or noise. 5 Information Advanced version Basic version Simple version Doing so can result in abnormal playback. Audio cable (sold separately) FL SW Subwoofer with Ethernet" for enhanced high-quality playback. When outputting Deep Color or 1080p, etc., we recommend you use a "High Speed HDMI cable" or a "High Speed HDMI cable with built-in amplifier SL FR C Speaker cables (sold separately) To household power outlet (AC 120 V, 60 Hz) Power cord NOTE • Do not plug in the power cord ...

Owners Manual - English
Page 9
ENGLISH 3 Turn on power 1 Turn on . The power indicator flashes green and the power turns on the TV and subwoofer power. For best results, we recommend you measure in six positions, as shown in the illustration (up to six positions). •• When performing Audyssey Auto Setup, MultEQ®/Dynamic EQ®/Dynamic Volume® functions become active (vpage 46, 47). •• To set up speakers (Audyssey® Auto Setup) 1 2 3 4 5 The acoustic characteristics of normal operation. NOTE • Make the room as quiet as Radio Frequency Interference (RFI) may be ...
ENGLISH 3 Turn on power 1 Turn on . The power indicator flashes green and the power turns on the TV and subwoofer power. For best results, we recommend you measure in six positions, as shown in the illustration (up to six positions). •• When performing Audyssey Auto Setup, MultEQ®/Dynamic EQ®/Dynamic Volume® functions become active (vpage 46, 47). •• To set up speakers (Audyssey® Auto Setup) 1 2 3 4 5 The acoustic characteristics of normal operation. NOTE • Make the room as quiet as Radio Frequency Interference (RFI) may be ...

Owners Manual - English
Page 10
GExample qH FL SW C FR GExample wH FL SW C FR 1 Set up the microphone Mount the setup microphone on a tripod or stand and place it in the main listening position. When placing the setup microphone, adjust the height of the listener's ear. nn When using a subwoofer capable of the following settings: • Volume : "12 o'clock position" • Crossover frequency : "Maximum/Highest Frequency" • Low pass filter : "Off" • Standby mode : "Off" Press ZONE SELECT nn Set up the operation mode Press AMP to set up the subwoofer as shown below. NOTE • Do not ...
GExample qH FL SW C FR GExample wH FL SW C FR 1 Set up the microphone Mount the setup microphone on a tripod or stand and place it in the main listening position. When placing the setup microphone, adjust the height of the listener's ear. nn When using a subwoofer capable of the following settings: • Volume : "12 o'clock position" • Crossover frequency : "Maximum/Highest Frequency" • Low pass filter : "Off" • Standby mode : "Off" Press ZONE SELECT nn Set up the operation mode Press AMP to set up the subwoofer as shown below. NOTE • Do not ...

Owners Manual - English
Page 11
If "Cancel" is resolved, return and restart "Audyssey Auto Setup". It also corrects distortion in up to select "Cancel", then press ENTER. If the problem is selected "Cancel Auto Setup?" When performing Audyssey Auto Setup over again Press ui to "Error messages" (vpage 10), check any related items, and perform the necessary procedures. The measurement of 5.1-channel speaker playback. message is displayed on the TV screen. Step2:Measurement MultEQ All the measurements were finished. Amp Assign: ZONE2 Start Cancel [ENT]:Select [RTN]:Back Here, we explain setup using the example ...
If "Cancel" is resolved, return and restart "Audyssey Auto Setup". It also corrects distortion in up to select "Cancel", then press ENTER. If the problem is selected "Cancel Auto Setup?" When performing Audyssey Auto Setup over again Press ui to "Error messages" (vpage 10), check any related items, and perform the necessary procedures. The measurement of 5.1-channel speaker playback. message is displayed on the TV screen. Step2:Measurement MultEQ All the measurements were finished. Amp Assign: ZONE2 Start Cancel [ENT]:Select [RTN]:Back Here, we explain setup using the example ...

Owners Manual - English
Page 12
Measuring results are analyzed, and the frequency response of measurement results, be erased. Step5:Store MultEQ Please select "Store" to select "No", and then press ENTER. NOTE During saving of each speaker in subwoofers. • If you want to check, and then press ENTER. nn When turning Dynamic Volume off • Use p to store measurement values. Advanced version Information Remote control operation buttons Move the cursor (Up/Down/Left/Right) Confirm the setting Return to complete. Speaker Config.Check Distance Check Channel Level Check Crossover Freq.Check ...
Measuring results are analyzed, and the frequency response of measurement results, be erased. Step5:Store MultEQ Please select "Store" to select "No", and then press ENTER. NOTE During saving of each speaker in subwoofers. • If you want to check, and then press ENTER. nn When turning Dynamic Volume off • Use p to store measurement values. Advanced version Information Remote control operation buttons Move the cursor (Up/Down/Left/Right) Confirm the setting Return to complete. Speaker Config.Check Distance Check Channel Level Check Crossover Freq.Check ...

Owners Manual - English
Page 13
Examples Caution MultEQ FMicrophone:None or Speaker :None Retry Cancel [ENT]:Retry Error details Measures • The connected setup microphone is broken, or a • Connect the included setup microphone to the device other than the supplied setup microphone SETUP MIC jack of this error message may be displayed even if the speaker is properly connected. move it away. • Perform again when the surroundings are sure the connection is correct, press ui to select "Skip", then press ENTER. Check Check the crossover frequency. Retrieving Audyssey Auto Setup settings If you set...
Examples Caution MultEQ FMicrophone:None or Speaker :None Retry Cancel [ENT]:Retry Error details Measures • The connected setup microphone is broken, or a • Connect the included setup microphone to the device other than the supplied setup microphone SETUP MIC jack of this error message may be displayed even if the speaker is properly connected. move it away. • Perform again when the surroundings are sure the connection is correct, press ui to select "Skip", then press ENTER. Check Check the crossover frequency. Retrieving Audyssey Auto Setup settings If you set...

Owners Manual - English
Page 14
NOTE During power standby, a minimal amount of power is set to "ON" : Red You can also switch the power to standby by pressing ON/STANDBY on the player (language setting, subtitles setting, etc.) beforehand. 3 Adjust the sound volume. Set the listening mode according to the playback contents (cinema, music, etc.) or according to standby Press POWER OFF. When power is switched to your liking (vpage 24 "Selecting a listening mode (Surround mode)"). To totally cut off the power, remove the power cord from the power outlet. Simple version Basic version 5 Play back disc 1 2345 1 ...
NOTE During power standby, a minimal amount of power is set to "ON" : Red You can also switch the power to standby by pressing ON/STANDBY on the player (language setting, subtitles setting, etc.) beforehand. 3 Adjust the sound volume. Set the listening mode according to the playback contents (cinema, music, etc.) or according to standby Press POWER OFF. When power is switched to your liking (vpage 24 "Selecting a listening mode (Surround mode)"). To totally cut off the power, remove the power cord from the power outlet. Simple version Basic version 5 Play back disc 1 2345 1 ...

Owners Manual - English
Page 15
Audio and video TV Blu-ray Disc player DVD player Set-top box (Satellite tuner or cable TV) Game console Digital camcorder Control dock for this unit. ENGLISH 12 Basic version Basic version Here, we explain the connections and basic operation methods for iPod Connection vpage 14, 16 vpage 14, 16 vpage 14, 16 vpage 14, 17 vpage 14 vpage 17 vpage 18 Playback - vpage 20 vpage 20 - - - vpage 21 Radio Audio Connection vpage 18 Playback vpage 23 For speaker connections, see page 4. F Connections vpage 13 F Playback (Basic operation) vpage 19 F Selecting a listening mode (Surround ...
Audio and video TV Blu-ray Disc player DVD player Set-top box (Satellite tuner or cable TV) Game console Digital camcorder Control dock for this unit. ENGLISH 12 Basic version Basic version Here, we explain the connections and basic operation methods for iPod Connection vpage 14, 16 vpage 14, 16 vpage 14, 16 vpage 14, 17 vpage 14 vpage 17 vpage 18 Playback - vpage 20 vpage 20 - - - vpage 21 Radio Audio Connection vpage 18 Playback vpage 23 For speaker connections, see page 4. F Connections vpage 13 F Playback (Basic operation) vpage 19 F Selecting a listening mode (Surround ...

Owners Manual - English
Page 16
Output Input (IN) Output (MONITOR OUT) Input HDMI connector HDMI connector HDMI connector HDMI connector Component video connectors Component video connectors S-Video connector S-Video connector Video connector Video connector Video connector Video connector Advanced version Information 13 Simple version Basic version ENGLISH Connections Important information • Make connections as follows before using this unit depending on this unit. Refer to output the video signals from a game machine or some settings on the connection method. NOTE • ...
Output Input (IN) Output (MONITOR OUT) Input HDMI connector HDMI connector HDMI connector HDMI connector Component video connectors Component video connectors S-Video connector S-Video connector Video connector Video connector Video connector Video connector Advanced version Information 13 Simple version Basic version ENGLISH Connections Important information • Make connections as follows before using this unit depending on this unit. Refer to output the video signals from a game machine or some settings on the connection method. NOTE • ...

Owners Manual - English
Page 17
zz If you to the video connectors. This unit supports HDCP. • If a device that does not support HDCP is used, connect a device with a "Standard HDMI cable with Ethernet" or "High Speed HDMI cable with Ethernet" for more information. About HDMI cables • When a device supporting Deep Color signal transfer is connected, use a cable compatible "High Speed HDMI cable" or "High Speed HDMI cable with Ethernet" • When the ARC function is connected, video and audio are input from the video connectors and the menu is superimposedz. • Status display: Not displayed. ...
zz If you to the video connectors. This unit supports HDCP. • If a device that does not support HDCP is used, connect a device with a "Standard HDMI cable with Ethernet" or "High Speed HDMI cable with Ethernet" for more information. About HDMI cables • When a device supporting Deep Color signal transfer is connected, use a cable compatible "High Speed HDMI cable" or "High Speed HDMI cable with Ethernet" • When the ARC function is connected, video and audio are input from the video connectors and the menu is superimposedz. • Status display: Not displayed. ...

Owners Manual - English
Page 18
In this unit and TV also with an HDMI cable. • When connecting a device that do not match the monitor's resolution. HDMI Setup (vpage 51) Make settings for HDMI video/audio output. • Auto Lip Sync • HDMI Audio Out • HDMI Control • Standby Source • Power Off Control NOTE The audio signals output from the HDMI output connector (sampling frequency, number of digital video signals and digital audio signals over a single HDMI cable. NOTE To enable the Content type, set "HDMI Control" to "ON" (vpage 51). • When connecting a TV that does not ...
In this unit and TV also with an HDMI cable. • When connecting a device that do not match the monitor's resolution. HDMI Setup (vpage 51) Make settings for HDMI video/audio output. • Auto Lip Sync • HDMI Audio Out • HDMI Control • Standby Source • Power Off Control NOTE The audio signals output from the HDMI output connector (sampling frequency, number of digital video signals and digital audio signals over a single HDMI cable. NOTE To enable the Content type, set "HDMI Control" to "ON" (vpage 51). • When connecting a TV that does not ...

Owners Manual - English
Page 19
NOTE This connection is not required when a TV compatible with HDMI (vpage 14 "Connecting an HDMI-compatible device"). ENGLISH Connecting a TV • Select the connector to use and connect the device. • For video connections, see "Converting input video signals for output (Video conversion function)" (vpage 13). • For instructions on HDMI connections, see "Connecting an HDMI-compatible device" (vpage 14). Cables used for connections Video cable Video cable (sold separately) (Yellow) Audio cable (sold separately) TV VIDEO VIDEO IN AUDIO OPTICAL OUT Connecting a Blu-...
NOTE This connection is not required when a TV compatible with HDMI (vpage 14 "Connecting an HDMI-compatible device"). ENGLISH Connecting a TV • Select the connector to use and connect the device. • For video connections, see "Converting input video signals for output (Video conversion function)" (vpage 13). • For instructions on HDMI connections, see "Connecting an HDMI-compatible device" (vpage 14). Cables used for connections Video cable Video cable (sold separately) (Yellow) Audio cable (sold separately) TV VIDEO VIDEO IN AUDIO OPTICAL OUT Connecting a Blu-...

Owners Manual - English
Page 20
Simple version Basic version Connecting a set the input source to "V.AUX". Cables used for connections Video cable Video cable (sold separately) (Yellow) Audio cable (sold separately) Audio cable (White) L L (Red) R R Coaxial digital cable (Orange) Satellite Tuner/Cable TV VIDEO COMPONENT VIDEO OUT Y PB PR VIDEO OUT AUDIO COAXIAL OUT AUDIO OUT LR ENGLISH Connecting a digital camcorder • You can enjoy games by connecting a game machine via the V.AUX input connector. Advanced version Information 17 "Input Assign" (vpage 41) You can enjoy video and audio from...
Simple version Basic version Connecting a set the input source to "V.AUX". Cables used for connections Video cable Video cable (sold separately) (Yellow) Audio cable (sold separately) Audio cable (White) L L (Red) R R Coaxial digital cable (Orange) Satellite Tuner/Cable TV VIDEO COMPONENT VIDEO OUT Y PB PR VIDEO OUT AUDIO COAXIAL OUT AUDIO OUT LR ENGLISH Connecting a digital camcorder • You can enjoy games by connecting a game machine via the V.AUX input connector. Advanced version Information 17 "Input Assign" (vpage 41) You can enjoy video and audio from...
