
Owners Manual - English
Page 2
... NE PAS TOUCHER. ESPAÑOL FRANCAIS ENGLISH IMPORTANT SAFETY INSTRUCTIONS 1. Read these instructions. 3. Keep these instructions. 2. Do not use this manual, meets FCC requirements. Install in accordance with dry cloth. 7. Only use attachments/accessories specified by the FCC, to the presence of electric shock...a la unidad y debe de encontrarse en un lugar al que el usuario tenga fácil acceso. Modification not expressly approved by DENON may be determined by turning the product OFF and ON, the user is required when the apparatus has been damaged in accordance with...
... NE PAS TOUCHER. ESPAÑOL FRANCAIS ENGLISH IMPORTANT SAFETY INSTRUCTIONS 1. Read these instructions. 3. Keep these instructions. 2. Do not use this manual, meets FCC requirements. Install in accordance with dry cloth. 7. Only use attachments/accessories specified by the FCC, to the presence of electric shock...a la unidad y debe de encontrarse en un lugar al que el usuario tenga fácil acceso. Modification not expressly approved by DENON may be determined by turning the product OFF and ON, the user is required when the apparatus has been damaged in accordance with...

Owners Manual - English
Page 4
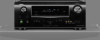
Contents Getting started Thank you for purchasing this DENON product. This symbol indicates a supplementary information and tips for operations. After reading them for future reference. q Owner's manual 1 w Warranty (for North America model only 1 e Service network list 1 r Remote control unit (...reference page on which related information is described. Simple version Basic version ENGLISH Getting started 1 Accessories 1 About this manual 1 Features 2 Cautions on handling 2 Simple version (Simple setup guide 3 Basic version 12 Connections 13 Important information ...
Contents Getting started Thank you for purchasing this DENON product. This symbol indicates a supplementary information and tips for operations. After reading them for future reference. q Owner's manual 1 w Warranty (for North America model only 1 e Service network list 1 r Remote control unit (...reference page on which related information is described. Simple version Basic version ENGLISH Getting started 1 Accessories 1 About this manual 1 Features 2 Cautions on handling 2 Simple version (Simple setup guide 3 Basic version 12 Connections 13 Important information ...
Owners Manual - English
Page 6
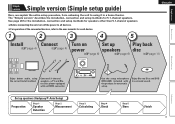
... and Bluray Disc player equipped with the product, for speakers other than 5.1-channel speakers. nnBefore connecting the unit, turn off the power to the user manuals for 5.1-channel speakers. Enjoy Blu-ray Disc and DVD in a home theater. nnFor operation of the connected devices, refer to all devices. Simple version Simple...
... and Bluray Disc player equipped with the product, for speakers other than 5.1-channel speakers. nnBefore connecting the unit, turn off the power to the user manuals for 5.1-channel speakers. Enjoy Blu-ray Disc and DVD in a home theater. nnFor operation of the connected devices, refer to all devices. Simple version Simple...

Owners Manual - English
Page 9
..." (vpage 49) on 2 Change the TV input to the unit. Background noise can disrupt the room measurements. Power on Power on 1 2 3 4 5 4 Set up the speakers manually, use ). • Do not unplug the setup microphone from all around the listening area. ENGLISH 3 Turn on power 1 Turn on . This will cause inaccurate readings...
..." (vpage 49) on 2 Change the TV input to the unit. Background noise can disrupt the room measurements. Power on Power on 1 2 3 4 5 4 Set up the speakers manually, use ). • Do not unplug the setup microphone from all around the listening area. ENGLISH 3 Turn on power 1 Turn on . This will cause inaccurate readings...

Owners Manual - English
Page 13
... Setup measurement result (value calculated at the start by MultEQ®) even when you to be made . This function enables you have changed each setting manually. 10 Remote control operation buttons Move the cursor (Up/Down/Left/Right) Confirm the setting Return to switch the display between the different speakers. 3 Press...
... Setup measurement result (value calculated at the start by MultEQ®) even when you to be made . This function enables you have changed each setting manually. 10 Remote control operation buttons Move the cursor (Up/Down/Left/Right) Confirm the setting Return to switch the display between the different speakers. 3 Press...

Owners Manual - English
Page 17
...copyright protection technology comprised of data encryption and authentication of on-screen display • Menu screen MENU 1.Audio Adjust 2.Information 3.Auto Setup 4.Manual Setup 5.Input Setup [ENT]:Select • Status display screen When the input source is switched • When the volume is adjusted [...the video connectors and the menu is displayed superimposed over the background image. • Status display: Displayed. Read the owner's manual of your television or player for HDMI 1.4a. ENGLISH Important information How the on-screen display appears in accordance with the ...
...copyright protection technology comprised of data encryption and authentication of on-screen display • Menu screen MENU 1.Audio Adjust 2.Information 3.Auto Setup 4.Manual Setup 5.Input Setup [ENT]:Select • Status display screen When the input source is switched • When the volume is adjusted [...the video connectors and the menu is displayed superimposed over the background image. • Status display: Displayed. Read the owner's manual of your television or player for HDMI 1.4a. ENGLISH Important information How the on-screen display appears in accordance with the ...

Owners Manual - English
Page 19
..., use and connect the device. • For instructions on HDMI connections, see "About ARC (Audio return channel) function" (vpage 15) or refer to the instruction manual for connections Video cable Video cable (sold separately) (Yellow) Audio cable (sold separately) TV VIDEO VIDEO IN AUDIO OPTICAL OUT Connecting a Blu-ray Disc player...
..., use and connect the device. • For instructions on HDMI connections, see "About ARC (Audio return channel) function" (vpage 15) or refer to the instruction manual for connections Video cable Video cable (sold separately) (Yellow) Audio cable (sold separately) TV VIDEO VIDEO IN AUDIO OPTICAL OUT Connecting a Blu-ray Disc player...

Owners Manual - English
Page 25
... view is not connected. 22 "TV Out" at the iPod's "Slide show or video function. 1 Press and hold ) 1 8 9 3 2 RESTORER MEMORY TV POWER TV INPUT Return Manual search (fast-reverse/fast-forward) Playback / Pause Auto search (cue) Pause Stop RESTORER Store memoryz2 TV power on/standby (Default : SONY) Switch TV input (Default...
... view is not connected. 22 "TV Out" at the iPod's "Slide show or video function. 1 Press and hold ) 1 8 9 3 2 RESTORER MEMORY TV POWER TV INPUT Return Manual search (fast-reverse/fast-forward) Playback / Pause Auto search (cue) Pause Stop RESTORER Store memoryz2 TV power on/standby (Default : SONY) Switch TV input (Default...

Owners Manual - English
Page 26
... Switch search modes Tuning (up/down) Preset channel selection (1 - 8) / Direct frequency tuning (0 - 9) nnPresetting radio stations (Manual preset) Your favorite broadcast stations can tune them in the broadcast station you want to hear. In this case, perform the following ...frequencies using the 0 - 9. • If o is pressed, the immediately preceding input is cancelled. 3 When setting is performed after performing "Manual Preset", the "Manual Preset" settings will be preset so that you can be overwritten. 1 Tune in easily. SHIFT Preset channel block selection E1 - G8 90.1 ...
... Switch search modes Tuning (up/down) Preset channel selection (1 - 8) / Direct frequency tuning (0 - 9) nnPresetting radio stations (Manual preset) Your favorite broadcast stations can tune them in the broadcast station you want to hear. In this case, perform the following ...frequencies using the 0 - 9. • If o is pressed, the immediately preceding input is cancelled. 3 When setting is performed after performing "Manual Preset", the "Manual Preset" settings will be preset so that you can be overwritten. 1 Tune in easily. SHIFT Preset channel block selection E1 - G8 90.1 ...

Owners Manual - English
Page 35
..." or "Video"? • Are the HDMI control function settings of all equipment connected by setting the HDMI control function of each device. Check the owner's manual of each device for details beforehand. • When "Power Off Control" on the menu is set to "OFF" (vpage 51), this unit is set to...
..." or "Video"? • Are the HDMI control function settings of all equipment connected by setting the HDMI control function of each device. Check the owner's manual of each device for details beforehand. • When "Power Off Control" on the menu is set to "OFF" (vpage 51), this unit is set to...

Owners Manual - English
Page 39
...menu on the selected input source. 36 [ENT]:Select [RTN]:Back Number 1-1 1-2 1-3 1-4 1-5 Detailed items Surround Parameter Tone Audyssey Settings Manual EQ RESTORER 1-6 Audio Delay 2-1 Status 2-2 Audio Input Signal 2-3 HDMI Information 2-4 Auto Surround Mode 2-5 Quick Select 2-6 Preset Channel 3-1 ...boost for iPod playback. 43 Audio Adjust 1.Audio Adjust 1.Surround Parameter 2.Tone 3.Audyssey Settings 4.Manual EQ 5.RESTORER 6.Audio Delay MENU 1.Audio Adjust 2.Information 3.Auto Setup 4.Manual Setup 5.Input Setup [ENT]:Select [RTN]:Back 2. Auto Setup 3.Auto Setup 1.Audyssey Auto...
...menu on the selected input source. 36 [ENT]:Select [RTN]:Back Number 1-1 1-2 1-3 1-4 1-5 Detailed items Surround Parameter Tone Audyssey Settings Manual EQ RESTORER 1-6 Audio Delay 2-1 Status 2-2 Audio Input Signal 2-3 HDMI Information 2-4 Auto Surround Mode 2-5 Quick Select 2-6 Preset Channel 3-1 ...boost for iPod playback. 43 Audio Adjust 1.Audio Adjust 1.Surround Parameter 2.Tone 3.Audyssey Settings 4.Manual EQ 5.RESTORER 6.Audio Delay MENU 1.Audio Adjust 2.Information 3.Auto Setup 4.Manual Setup 5.Input Setup [ENT]:Select [RTN]:Back 2. Auto Setup 3.Auto Setup 1.Audyssey Auto...

Owners Manual - English
Page 40
... the current selected setting menu is displayed. Press ENTER. Top menu display Display when changing settings On-screen Display w q MENU 1.Audio Adjust 2.Information 3.Auto Setup 4.Manual Setup 5.Input Setup e [ENT]:Select q 5-1.Input Assign Default HDMI Digi Comp BD 1 DVD TV w2 - 01 SAT/CBL 3 C1 1 GAME 4 V.AUX e [ENT]:Select [RTN]:Back...
... the current selected setting menu is displayed. Press ENTER. Top menu display Display when changing settings On-screen Display w q MENU 1.Audio Adjust 2.Information 3.Auto Setup 4.Manual Setup 5.Input Setup e [ENT]:Select q 5-1.Input Assign Default HDMI Digi Comp BD 1 DVD TV w2 - 01 SAT/CBL 3 C1 1 GAME 4 V.AUX e [ENT]:Select [RTN]:Back...

Owners Manual - English
Page 43
... Start the auto preset process. Setting details If an FM station cannot be preset automatically, select the desired station by individual preset channels in manually, then preset it manually. TUNER 1 - 8 : Set by tuning it in the currently selected preset memory block. • ON : Display the selected preset channel. • Skip : Do not...
... Start the auto preset process. Setting details If an FM station cannot be preset automatically, select the desired station by individual preset channels in manually, then preset it manually. TUNER 1 - 8 : Set by tuning it in the currently selected preset memory block. • ON : Display the selected preset channel. • Skip : Do not...

Owners Manual - English
Page 46
... playback mode is connected Songs : All files are underlined. • This function corrects the playback level of the selected input source. nn When DENON control dock for iPod ASD-1R or ASD-11R is enabled. Yes : Reset to the default setting. Menu operation 1 Press ZONE SELECT to ... menu to eight characters can be set with the Audio Adjust procedure Surround Parameter (vpage 44) Tone (vpage 45) Audyssey Settings (vpage 46) Manual EQ (vpage 47) RESTORER (vpage 48) Audio Delay (vpage 48) Advanced version Information Remote control operation buttons Move the cursor (Up/Down/Left...
... playback mode is connected Songs : All files are underlined. • This function corrects the playback level of the selected input source. nn When DENON control dock for iPod ASD-1R or ASD-11R is enabled. Yes : Reset to the default setting. Menu operation 1 Press ZONE SELECT to ... menu to eight characters can be set with the Audio Adjust procedure Surround Parameter (vpage 44) Tone (vpage 45) Audyssey Settings (vpage 46) Manual EQ (vpage 47) RESTORER (vpage 48) Audio Delay (vpage 48) Advanced version Information Remote control operation buttons Move the cursor (Up/Down/Left...

Owners Manual - English
Page 49
... and room acoustics. Setting items MultEQ Select one equalizer from 0 dB. NOTE • "MultEQ" and "Manual" cannot be displayed. Each time DYN EQ/VOL is pressed, the setting is automatically set with "Manual EQ" (vpage 47). Dynamic EQ : ON / Dynamic Volume : Midnight Dynamic EQ : ON / Dynamic... may not be able to select Dynamic EQ/Dynamic Volume, and "Run Audyssey" may be selected when "EQ Customize" is set to "OFF". Manual : Apply frequency response set to "Not Used" (vpage 52). • When using headphones, "MultEQ" is changed without increasing the number of...
... and room acoustics. Setting items MultEQ Select one equalizer from 0 dB. NOTE • "MultEQ" and "Manual" cannot be displayed. Each time DYN EQ/VOL is pressed, the setting is automatically set with "Manual EQ" (vpage 47). Dynamic EQ : ON / Dynamic Volume : Midnight Dynamic EQ : ON / Dynamic... may not be able to select Dynamic EQ/Dynamic Volume, and "Run Audyssey" may be selected when "EQ Customize" is set to "OFF". Manual : Apply frequency response set to "Not Used" (vpage 52). • When using headphones, "MultEQ" is changed without increasing the number of...

Owners Manual - English
Page 50
...ON". • If "Dynamic Volume" is set when "MultEQ®" setting (vpage 46) is changed as shown below . ENGLISH Audio Adjust Manual EQ Default settings are returned to "Evening". • Buttons on the remote control unit or main unit can be used for operations. "Base ...: Reset to loudest and softest sounds. GOperations with the main unitH Press DYNAMIC VOLUME. Each time DYNAMIC VOLUME is pressed, the setting is "Manual". Setting items Setting details Adjust CH Correct the tone of each speaker. Copy "Audyssey Flat" curve No : Do not copy. Day : ...
...ON". • If "Dynamic Volume" is set when "MultEQ®" setting (vpage 46) is changed as shown below . ENGLISH Audio Adjust Manual EQ Default settings are returned to "Evening". • Buttons on the remote control unit or main unit can be used for operations. "Base ...: Reset to loudest and softest sounds. GOperations with the main unitH Press DYNAMIC VOLUME. Each time DYNAMIC VOLUME is pressed, the setting is "Manual". Setting items Setting details Adjust CH Correct the tone of each speaker. Copy "Audyssey Flat" curve No : Do not copy. Day : ...

Owners Manual - English
Page 51
...(vpage 42) is input. • This cannot be used without changing the settings. While viewing video, manually adjust the time to delay audio output. 0ms - 200ms Setting details Manual Setup Set when changing Audyssey® Auto Setup settings, or when changing the audio, video, display or other...as MP3, WMA (Windows Media Audio) and MPEG-4 AAC reduce the amount of data by eliminating signal components that can be set with the Manual Setup procedure Speaker Setup (vpage 49) HDMI Setup (vpage 51) Audio Setup (vpage 52) 4-1.Speaker Setup 4-2.HDMI Setup 4-3.Audio Setup 1.Amp ...
...(vpage 42) is input. • This cannot be used without changing the settings. While viewing video, manually adjust the time to delay audio output. 0ms - 200ms Setting details Manual Setup Set when changing Audyssey® Auto Setup settings, or when changing the audio, video, display or other...as MP3, WMA (Windows Media Audio) and MPEG-4 AAC reduce the amount of data by eliminating signal components that can be set with the Manual Setup procedure Speaker Setup (vpage 49) HDMI Setup (vpage 51) Audio Setup (vpage 52) 4-1.Speaker Setup 4-2.HDMI Setup 4-3.Audio Setup 1.Amp ...
Owners Manual - English
Page 52
..." can automatically set in Audyssey Auto Setup. • If you cannot make the "Front Height" setting. Perform when setting the speakers manually or when changing settings made in "Crossover Center : Set the presence and size of the center speaker. Since "Amp Assign" of this...51). BACK/AMP ASSIGN terminals and a woofer of the speaker to • When "Subwoofer" is not connected. Setting items Speaker Config. (Continued) ENGLISH Manual Setup Setting details Surround : Set the presence and size of a subwoofer. • Yes : Use a subwoofer. • No : Select when a ...
..." can automatically set in Audyssey Auto Setup. • If you cannot make the "Front Height" setting. Perform when setting the speakers manually or when changing settings made in "Crossover Center : Set the presence and size of the center speaker. Since "Amp Assign" of this...51). BACK/AMP ASSIGN terminals and a woofer of the speaker to • When "Subwoofer" is not connected. Setting items Speaker Config. (Continued) ENGLISH Manual Setup Setting details Surround : Set the presence and size of a subwoofer. • Yes : Use a subwoofer. • No : Select when a ...

Owners Manual - English
Page 53
ENGLISH Manual Setup Setting items Bass Setting Set subwoofer and LFE signal range playback. Measure beforehand the distance from the sound output. LPF for LFE : Set LFE ...
ENGLISH Manual Setup Setting items Bass Setting Set subwoofer and LFE signal range playback. Measure beforehand the distance from the sound output. LPF for LFE : Set LFE ...

Owners Manual - English
Page 54
ENGLISH Manual Setup HDMI Setup Default settings are set to standby. HDMI Audio Out Select HDMI audio output device. Amp : Play back through TV connected to standby. &#...
ENGLISH Manual Setup HDMI Setup Default settings are set to standby. HDMI Audio Out Select HDMI audio output device. Amp : Play back through TV connected to standby. &#...


