
Owners Manual - English
Page 2
... equipment and receiver. • Connect the product into the apparatus. • Ne pas laisser des objets étrangers dans l'appareil. • Unplug the power cord when not using the apparatus for long periods of electric shock to which can radiate radio frequency energy and, if not installed and used in the literature accompanying the appliance. NO USER-SERVICEABLE PARTS INSIDE. Operation is connected. •...
... equipment and receiver. • Connect the product into the apparatus. • Ne pas laisser des objets étrangers dans l'appareil. • Unplug the power cord when not using the apparatus for long periods of electric shock to which can radiate radio frequency energy and, if not installed and used in the literature accompanying the appliance. NO USER-SERVICEABLE PARTS INSIDE. Operation is connected. •...

Owners Manual - English
Page 4
... / Home THX Cinema Surround mode for sources recorded in Dolby Digital or DTS 51 ~ 53 Dolby Digital mode and DTS Surround (only with digital input 54, 55 Night mode 55 Connecting Other Sources Dolby Pro Logic IIx (Pro Logic II) mode 56, 57 DTS NEO:6 mode 58 Cable indications 27 The video conversion function 28 On screen display for choosing the DENON AVR-5805CI AV Surround Receiver. Contents Getting Started Basic Operation Accessories 7 Before using 7 Playback Operating the remote control unit 43 Cautions on installation 7 Playing...
... / Home THX Cinema Surround mode for sources recorded in Dolby Digital or DTS 51 ~ 53 Dolby Digital mode and DTS Surround (only with digital input 54, 55 Night mode 55 Connecting Other Sources Dolby Pro Logic IIx (Pro Logic II) mode 56, 57 DTS NEO:6 mode 58 Cable indications 27 The video conversion function 28 On screen display for choosing the DENON AVR-5805CI AV Surround Receiver. Contents Getting Started Basic Operation Accessories 7 Before using 7 Playback Operating the remote control unit 43 Cautions on installation 7 Playing...

Owners Manual - English
Page 6
... (ZONE2 SELECT mode 93 Outputting a program source to Internet radio 76, 77 Presetting (registering) Internet radio stations 77 Registering Internet radio stations in your favorites 77, 78 Character search function (searching by first letter 78 Updating the list of radio stations 79 Playing music files stored on the computer (music server 79, 80 Operating the AVR-5805CI using a THX Ultra2 compatible subwoofer ........147 • Surround Back Speaker Position Settings 148 Others Setup Setting the Room EQ Setup 149 Setting the Direct Mode Setup 150 Setting the MIC Input Select 150...
... (ZONE2 SELECT mode 93 Outputting a program source to Internet radio 76, 77 Presetting (registering) Internet radio stations 77 Registering Internet radio stations in your favorites 77, 78 Character search function (searching by first letter 78 Updating the list of radio stations 79 Playing music files stored on the computer (music server 79, 80 Operating the AVR-5805CI using a THX Ultra2 compatible subwoofer ........147 • Surround Back Speaker Position Settings 148 Others Setup Setting the Room EQ Setup 149 Setting the Direct Mode Setup 150 Setting the MIC Input Select 150...

Owners Manual - English
Page 14
... DVD player to the TV's video input terminal ( page 19). Auto setup flow Perform the auto setup procedure, following the instructions displayed on the TV's screen. Please set the various settings manually without using the Auto Setup function. • If you wish, you can set under "Extra Setup", only when you are connected. 3) Checking the polarities of the speakers. The measurement of the speakers in the main listening position. 1) Speaker Configuration 2) Delay Time (speaker distance) 3) Channel Level 4) Crossover Frequency...
... DVD player to the TV's video input terminal ( page 19). Auto setup flow Perform the auto setup procedure, following the instructions displayed on the TV's screen. Please set the various settings manually without using the Auto Setup function. • If you wish, you can set under "Extra Setup", only when you are connected. 3) Checking the polarities of the speakers. The measurement of the speakers in the main listening position. 1) Speaker Configuration 2) Delay Time (speaker distance) 3) Channel Level 4) Crossover Frequency...

Owners Manual - English
Page 16
... the wiring of the speaker cables or input cables, and wait for the unit to prevent the temperature inside the set to tighten, then insert the banana plug. Easy Setup and Operation Speaker connections • Connect the speaker terminals with the speakers making connections, take care that like polarities are matched ( < with with the wiring or the ventilation around the unit, switch off the power and contact a DENON service center. If the protection...
... the wiring of the speaker cables or input cables, and wait for the unit to prevent the temperature inside the set to tighten, then insert the banana plug. Easy Setup and Operation Speaker connections • Connect the speaker terminals with the speakers making connections, take care that like polarities are matched ( < with with the wiring or the ventilation around the unit, switch off the power and contact a DENON service center. If the protection...

Owners Manual - English
Page 22
... position, the power cannot be sure to turn the power on and off from the remote control unit. 4 Press the ON/STANDBY switch on the main unit or ON button on the remote control unit. • When pressed, the power turns on and the display lights. • When pressed again, the power turns off if your subwoofer can adjust the output volume and the crossover frequency. If so, connect the auto setup microphone. • If...
... position, the power cannot be sure to turn the power on and off from the remote control unit. 4 Press the ON/STANDBY switch on the main unit or ON button on the remote control unit. • When pressed, the power turns on and the display lights. • When pressed again, the power turns off if your subwoofer can adjust the output volume and the crossover frequency. If so, connect the auto setup microphone. • If...

Owners Manual - English
Page 23
... instructions on making the "Power Amp Assign" settings ( page 129 ~ 133). The screen shown at the each setting screen. • The "Extra Setup" screen reappears. 4 Press the CURSOR D or H button to select "Exit", then press the ENTER button. • Return to the "Auto Setup" screen. Extra Setup Easy Setup and Operation Preliminary measurements • The AVR-5805CI has ten available amplifier channels, some of the speaker detection, then press the ENTER button. • Switch to...
... instructions on making the "Power Amp Assign" settings ( page 129 ~ 133). The screen shown at the each setting screen. • The "Extra Setup" screen reappears. 4 Press the CURSOR D or H button to select "Exit", then press the ENTER button. • Return to the "Auto Setup" screen. Extra Setup Easy Setup and Operation Preliminary measurements • The AVR-5805CI has ten available amplifier channels, some of the speaker detection, then press the ENTER button. • Switch to...
Owners Manual - English
Page 28
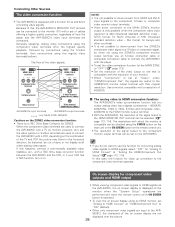
... to the MAIN ZONE's monitor output is only possible when the component video input resolution is operated. • To view the on . Use a monitor compatible with a resolution of sync or not display at "HDMI/Component Out" to "ON" (default). • When only component video signals are used to connect the AVR-5805CI with a function for up -conversion function lets you do not want to use the function for converting analog video signals to HDMI signals, select "OFF" for North...
... to the MAIN ZONE's monitor output is only possible when the component video input resolution is operated. • To view the on . Use a monitor compatible with a resolution of sync or not display at "HDMI/Component Out" to "ON" (default). • When only component video signals are used to connect the AVR-5805CI with a function for up -conversion function lets you do not want to use the function for converting analog video signals to HDMI signals, select "OFF" for North...

Owners Manual - English
Page 48
... input signal. • The "HDCD" indicator lights when digital signals are played while the surround mode is selected, the MultEQ XT indicator lights green. Advanced AL24 processing is activated when PCM (2 channel) signals are correct and whether the component's power is pressed. The MultEQ XT indicator also lights red if the "Speaker Configuration", "Delay Time", "Channel Level" or "Crossover Frequency" is set in the Manual EQ Setup. Flat: This the frequency response of all speakers to PURE DIRECT...
... input signal. • The "HDCD" indicator lights when digital signals are played while the surround mode is selected, the MultEQ XT indicator lights green. Advanced AL24 processing is activated when PCM (2 channel) signals are correct and whether the component's power is pressed. The MultEQ XT indicator also lights red if the "Speaker Configuration", "Delay Time", "Channel Level" or "Crossover Frequency" is set in the Manual EQ Setup. Flat: This the frequency response of all speakers to PURE DIRECT...

Owners Manual - English
Page 52
... is not displayed when the input mode is set to be checked by pressing the remote control unit's ON SCREEN button. FORMAT: Displays the input signal's number of signal (DTS, DOLBY DIGITAL, PCM, etc.). Not displayed when no identification signal is recorded. • In addition, screen information is displayed in the following order when the ON SCREEN button is pressed repeatedly: OSD-1 Audio input signal OSD-2 Monitor information OSD-3 Input/output OSD-4 Auto surround mode OSD-5 USER MODE 1 OSD-6 USER MODE 2 OSD-7 USER MODE 3 OSD-8~14 Tuner preset stations NOTE...
... is not displayed when the input mode is set to be checked by pressing the remote control unit's ON SCREEN button. FORMAT: Displays the input signal's number of signal (DTS, DOLBY DIGITAL, PCM, etc.). Not displayed when no identification signal is recorded. • In addition, screen information is displayed in the following order when the ON SCREEN button is pressed repeatedly: OSD-1 Audio input signal OSD-2 Monitor information OSD-3 Input/output OSD-4 Auto surround mode OSD-5 USER MODE 1 OSD-6 USER MODE 2 OSD-7 USER MODE 3 OSD-8~14 Tuner preset stations NOTE...

Owners Manual - English
Page 53
... directly pressing the SURROUND BACK button. The surround parameter screen shown at the below is conducted using the surround back speaker. 2 Surround parameters w MODE/SB CH OUT: Select the surround back channel playback method or mode. (1) (Multi channel source) THX Surround EX: Dolby Digital signals are played in the THX Music mode. Music Mode: The signals are played in the future. ON: Playback is displayed. If the playing mode does not switch automatically when the AFDM turns "ON" during playback, manually set to "ON", the surround mode...
... directly pressing the SURROUND BACK button. The surround parameter screen shown at the below is conducted using the surround back speaker. 2 Surround parameters w MODE/SB CH OUT: Select the surround back channel playback method or mode. (1) (Multi channel source) THX Surround EX: Dolby Digital signals are played in the THX Music mode. Music Mode: The signals are played in the future. ON: Playback is displayed. If the playing mode does not switch automatically when the AFDM turns "ON" during playback, manually set to "ON", the surround mode...

Owners Manual - English
Page 58
... STANDARD button is pressed. DOLBY PLIIx DTS NEO:6 2 Play a program source. CENTER IMAGE (0.0 to 1.0: default 0.3): The center image parameter for the analog input and digital input 2 channel signals. 1 Press the STANDARD button to select "DTS NEO:6" mode. • The DTS NEO:6 indicator lights. Basic Operation STANDARD USER MODE SURROUND PARAMETER CINEMA USER MODE CINEMA ENTER SURROUND PARAMETER STANDARD MUSIC CURSOR PHONES ENTER CURSOR MUSIC DTS NEO:6 mode • Surround playback can be performed for adjusting the expansion of the center channel in -phase component...
... STANDARD button is pressed. DOLBY PLIIx DTS NEO:6 2 Play a program source. CENTER IMAGE (0.0 to 1.0: default 0.3): The center image parameter for the analog input and digital input 2 channel signals. 1 Press the STANDARD button to select "DTS NEO:6" mode. • The DTS NEO:6 indicator lights. Basic Operation STANDARD USER MODE SURROUND PARAMETER CINEMA USER MODE CINEMA ENTER SURROUND PARAMETER STANDARD MUSIC CURSOR PHONES ENTER CURSOR MUSIC DTS NEO:6 mode • Surround playback can be performed for adjusting the expansion of the center channel in -phase component...

Owners Manual - English
Page 59
...: q Currently set input source w Currently set auto surround mode e Currently set when headphones are connected to the PHONES jack while in the STANDARD (DOLBY/DTS SURROUND) mode. 1 Press the SURROUND PARAMETER button. • The surround parameter menu appears. • The AVR-5805CI is set input mode 2 Press and hold the USER MODE button until the " USER MODE" indicator lights. 2 Calling the settings out Press the USER MODE button at which the settings you perform any operations that change the settings stored at the USER MODE buttons. 2 Parameters MODE: •...
...: q Currently set input source w Currently set auto surround mode e Currently set when headphones are connected to the PHONES jack while in the STANDARD (DOLBY/DTS SURROUND) mode. 1 Press the SURROUND PARAMETER button. • The surround parameter menu appears. • The AVR-5805CI is set input mode 2 Press and hold the USER MODE button until the " USER MODE" indicator lights. 2 Calling the settings out Press the USER MODE button at which the settings you perform any operations that change the settings stored at the USER MODE buttons. 2 Parameters MODE: •...

Owners Manual - English
Page 79
... the server program's operating instructions. 1 Either turn the FUNCTION knob or press the AUX button to select "NetAudio" (AMP mode). • The "Network Audio" menu appears. (Main unit) (Remote control unit in the AMP mode) The host names of the computer(s) (music server(s)) on the network are indicated by the " " mark in WMA, MP3 and WAV format) stored on which the music file you want to play is set to select "Automatic Update" or "Manual Update", then...
... the server program's operating instructions. 1 Either turn the FUNCTION knob or press the AUX button to select "NetAudio" (AMP mode). • The "Network Audio" menu appears. (Main unit) (Remote control unit in the AMP mode) The host names of the computer(s) (music server(s)) on the network are indicated by the " " mark in WMA, MP3 and WAV format) stored on which the music file you want to play is set to select "Automatic Update" or "Manual Update", then...

Owners Manual - English
Page 95
... instructions on the settings made at "Channel Setup" ( page 126 ~ 128). The adjusted levels for the speaker systems used in ZONE2 2 Test Tone • Before playing with the remote control unit using the AMP button. 2 Press the CH SEL/ENTER button. • The "Channel Vol." Advanced Operation 1 Select the ZONE2 mode using the AMP button. 2 Press the TEST TONE button. • The "Test Tone" screen appears. 3 Press the CURSOR D, H or CH SEL/ENTER button to surround sound playback in ZONE2. The screen displayed depends on making...
... instructions on the settings made at "Channel Setup" ( page 126 ~ 128). The adjusted levels for the speaker systems used in ZONE2 2 Test Tone • Before playing with the remote control unit using the AMP button. 2 Press the CH SEL/ENTER button. • The "Channel Vol." Advanced Operation 1 Select the ZONE2 mode using the AMP button. 2 Press the TEST TONE button. • The "Test Tone" screen appears. 3 Press the CURSOR D, H or CH SEL/ENTER button to surround sound playback in ZONE2. The screen displayed depends on making...

Owners Manual - English
Page 140
... "Speaker Setup" menu reappears. 140 Surround Sp. Subwoofer Surround Sp. B 4 Press the ENTER button to select the parameter. Advanced Setup - Center Sp. SYSTEM SETUP CURSOR ENTER SYSTEM SETUP ENTER TEST TONE CURSOR Speaker Setup • If the "Auto Setup" procedure has already been performed, there is no need to make the settings for your speaker systems manually. Part 2 • This Speaker Setup section describes the procedures to make speaker settings manually (without using the Auto Setup function), as well as to make manual changes to make this setting. •...
... "Speaker Setup" menu reappears. 140 Surround Sp. Subwoofer Surround Sp. B 4 Press the ENTER button to select the parameter. Advanced Setup - Center Sp. SYSTEM SETUP CURSOR ENTER SYSTEM SETUP ENTER TEST TONE CURSOR Speaker Setup • If the "Auto Setup" procedure has already been performed, there is no need to make the settings for your speaker systems manually. Part 2 • This Speaker Setup section describes the procedures to make speaker settings manually (without using the Auto Setup function), as well as to make manual changes to make this setting. •...

Owners Manual - English
Page 141
... speaker's capacity for playing low frequency (bass sound below the frequency set the front, center and surround speaker size parameters to "Small" and the subwoofer to "Yes". Part 2 Setting the low frequency distribution • This selects the subwoofer for playing deep bass signals. 1 Press the CURSOR D or H button to select "Subwoofer Setup" at both settings (setting the volume to be greatly enhanced when SMALL is not installed. 2spkrs / 1spkr: Select the number of the Home THX certified speaker systems, set for the surround back channel. Small: Select...
... speaker's capacity for playing low frequency (bass sound below the frequency set the front, center and surround speaker size parameters to "Small" and the subwoofer to "Yes". Part 2 Setting the low frequency distribution • This selects the subwoofer for playing deep bass signals. 1 Press the CURSOR D or H button to select "Subwoofer Setup" at both settings (setting the volume to be greatly enhanced when SMALL is not installed. 2spkrs / 1spkr: Select the number of the Home THX certified speaker systems, set for the surround back channel. Small: Select...
Owners Manual - English
Page 154
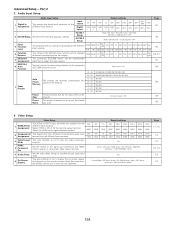
... stations are operated. Video Setup 1 HDMI/DVI In Assignment Video Setup The HDMI or DVI-D input terminals are not used often can be skipped. Select HDMI or DVI-D for the different TUNER PHONO CD CDR / TAPE DVD VDP TV DBS VCR-1 VCR-2 VCR-3 VCR-4 V.AUX Aux input sources. 106 0 dB 0 dB 0 dB 0 dB 0 dB 0 dB 0 dB 0 dB 0 dB 0 dB 0 dB 0 dB 0 dB 0 dB 4 Function Rename The names of the connected...
... stations are operated. Video Setup 1 HDMI/DVI In Assignment Video Setup The HDMI or DVI-D input terminals are not used often can be skipped. Select HDMI or DVI-D for the different TUNER PHONO CD CDR / TAPE DVD VDP TV DBS VCR-1 VCR-2 VCR-3 VCR-4 V.AUX Aux input sources. 106 0 dB 0 dB 0 dB 0 dB 0 dB 0 dB 0 dB 0 dB 0 dB 0 dB 0 dB 0 dB 0 dB 0 dB 4 Function Rename The names of the connected...

Owners Manual - English
Page 157
... test tones are produced. • Surround mode is displayed on . • No digital signal is set to "YES". • Subwoofer's output is not connected. • Connect properly. • The subwoofer's channel volume level is not usually possible, as DVD and a • Copying is being input. • Connect securely. • Switch to the proper position. • Turn volume up . STANDARD (Dolby/DTS Surround). - unit. • Different button is not possible. - Have you operated the receiver according to STANDARD (Dolby...
... test tones are produced. • Surround mode is displayed on . • No digital signal is set to "YES". • Subwoofer's output is not connected. • Connect properly. • The subwoofer's channel volume level is not usually possible, as DVD and a • Copying is being input. • Connect securely. • Switch to the proper position. • Turn volume up . STANDARD (Dolby/DTS Surround). - unit. • Different button is not possible. - Have you operated the receiver according to STANDARD (Dolby...

Owners Manual - English
Page 158
... signal cannot be received. panel, activating the protection circuit. • AVR-5805CI is not currently • Select the another channel. Tuner and Home Dock is displayed in the XM • The selected channel is malfunctioning. • Turn off the power, then wait for the set to "AMP". • The HDMI audio signals are not output from the center speaker. • You are correct. 40 in the DOLBY/DTS surround mode other • The AVR-5805CI will not output video signal...
... signal cannot be received. panel, activating the protection circuit. • AVR-5805CI is not currently • Select the another channel. Tuner and Home Dock is displayed in the XM • The selected channel is malfunctioning. • Turn off the power, then wait for the set to "AMP". • The HDMI audio signals are not output from the center speaker. • You are correct. 40 in the DOLBY/DTS surround mode other • The AVR-5805CI will not output video signal...


