Service Manual
Page 1
... their products. Dell™ Inspiron™ 1011 Service Manual Before You Begin Battery Keyboard Hard Drive Palm Rest Palm Rest Bracket Communication Cards Power/Battery Status Light Board Speakers Internal Card With Bluetooth® Wireless Technology Power Button Board USB and SIM Card Board AC Adapter Connector System Board Memory Coin-Cell Battery Display Camera Flashing the...
... their products. Dell™ Inspiron™ 1011 Service Manual Before You Begin Battery Keyboard Hard Drive Palm Rest Palm Rest Bracket Communication Cards Power/Battery Status Light Board Speakers Internal Card With Bluetooth® Wireless Technology Power Button Board USB and SIM Card Board AC Adapter Connector System Board Memory Coin-Cell Battery Display Camera Flashing the...

Service Manual
Page 2
... AC Adapter Connector 1. Connect the AC adapter connector cable to the system board, remove the main battery (see Removing the Battery) before working inside the computer. Back to Contents Page AC Adapter Connector Dell™ Inspiron™ 1011 Service Manual Removing the AC Adapter Connector Replacing the AC Adapter Connector WARNING: Before working inside your...
... AC Adapter Connector 1. Connect the AC adapter connector cable to the system board, remove the main battery (see Removing the Battery) before working inside the computer. Back to Contents Page AC Adapter Connector Dell™ Inspiron™ 1011 Service Manual Removing the AC Adapter Connector Replacing the AC Adapter Connector WARNING: Before working inside your...
Service Manual
Page 3
Replace the palm rest (see Replacing the Keyboard). 8. Replace the keyboard (see Replacing the Palm Rest). 7. Back to Contents Page Replace the palm rest bracket (see Replacing the Hard Drive). 6. Replace the hard drive (see Replacing the Palm Rest Bracket). 5. Replace the battery (see Replacing the Battery). 4.
Replace the palm rest (see Replacing the Keyboard). 8. Replace the keyboard (see Replacing the Palm Rest). 7. Back to Contents Page Replace the palm rest bracket (see Replacing the Hard Drive). 6. Replace the hard drive (see Replacing the Palm Rest Bracket). 5. Replace the battery (see Replacing the Battery). 4.
Service Manual
Page 4
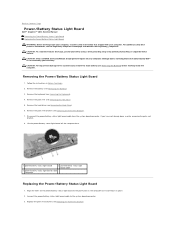
... discharge, ground yourself by using a wrist grounding strap or by your warranty. Back to Contents Page Power/Battery Status Light Board Dell™ Inspiron™ 1011 Service Manual Removing the Power/Battery Status Light Board Replacing the Power/Battery Status Light Board WARNING: Before working inside your computer, read the safety information that is not authorized...
... discharge, ground yourself by using a wrist grounding strap or by your warranty. Back to Contents Page Power/Battery Status Light Board Dell™ Inspiron™ 1011 Service Manual Removing the Power/Battery Status Light Board Replacing the Power/Battery Status Light Board WARNING: Before working inside your computer, read the safety information that is not authorized...

Service Manual
Page 5
Replace the palm rest (see Replacing the Battery). Replace the battery (see Replacing the Palm Rest). 6. 4. Replace the hard drive (see Replacing the Keyboard). 7. Replace the keyboard (see Replacing the Hard Drive). 5. Back to Contents Page
Replace the palm rest (see Replacing the Battery). Replace the battery (see Replacing the Palm Rest). 6. 4. Replace the hard drive (see Replacing the Keyboard). 7. Replace the keyboard (see Replacing the Hard Drive). 5. Back to Contents Page
Service Manual
Page 7
See Turning Off Your Computer. Press and eject any connector pins. Turn the computer top-side up, open the display, and press the power button to avoid bending any installed cards from their electrical outlets. 6. Also, before you connect a cable, ...then unplug the cable from being scratched. 2. CAUTION: To disconnect a network cable, first unplug the cable from your computer. Remove the battery (see Removing the Battery). 7. them evenly aligned to ground the system board. Disconnect all attached devices from the Memory Card Reader. 5. Back to prevent the computer...
See Turning Off Your Computer. Press and eject any connector pins. Turn the computer top-side up, open the display, and press the power button to avoid bending any installed cards from their electrical outlets. 6. Also, before you connect a cable, ...then unplug the cable from being scratched. 2. CAUTION: To disconnect a network cable, first unplug the cable from your computer. Remove the battery (see Removing the Battery). 7. them evenly aligned to ground the system board. Disconnect all attached devices from the Memory Card Reader. 5. Back to prevent the computer...
Service Manual
Page 8
Back to Contents Page Flashing the BIOS Dell™ Inspiron™ 1011 Service Manual Flashing the BIOS From a CD Flashing the BIOS From the Hard Drive Flashing the BIOS in Ubuntu If a BIOS-update program CD is ... Download window appears. 6. The file downloads to reset the computer defaults. 5. Click Close if the Download Complete window appears. Flashing the BIOS in , the main battery is properly installed, and a network cable is attached. 2. NOTE: If you do not have an internal optical drive. Press to your desktop. 8. Press , select Save...
Back to Contents Page Flashing the BIOS Dell™ Inspiron™ 1011 Service Manual Flashing the BIOS From a CD Flashing the BIOS From the Hard Drive Flashing the BIOS in Ubuntu If a BIOS-update program CD is ... Download window appears. 6. The file downloads to reset the computer defaults. 5. Click Close if the Download Complete window appears. Flashing the BIOS in , the main battery is properly installed, and a network cable is attached. 2. NOTE: If you do not have an internal optical drive. Press to your desktop. 8. Press , select Save...
Service Manual
Page 10
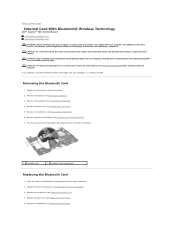
...CAUTION: To help prevent damage to the system board, remove the main battery (see Removing the Battery) before working inside the computer. Replace the keyboard (see Removing the Battery). 3. Remove the battery (see Replacing the Keyboard). CAUTION: To avoid electrostatic discharge, ground yourself...(see Removing the Palm Rest Bracket). 7. Back to Contents Page Internal Card With Bluetooth® Wireless Technology Dell™ Inspiron™ 1011 Service Manual Removing the Bluetooth Card Replacing the Bluetooth Card WARNING: Before working inside your warranty. For additional ...
...CAUTION: To help prevent damage to the system board, remove the main battery (see Removing the Battery) before working inside the computer. Replace the keyboard (see Removing the Battery). 3. Remove the battery (see Replacing the Keyboard). CAUTION: To avoid electrostatic discharge, ground yourself...(see Removing the Palm Rest Bracket). 7. Back to Contents Page Internal Card With Bluetooth® Wireless Technology Dell™ Inspiron™ 1011 Service Manual Removing the Bluetooth Card Replacing the Bluetooth Card WARNING: Before working inside your warranty. For additional ...

Service Manual
Page 11
6. Back to Contents Page Replace the battery (see Replacing the Battery).
6. Back to Contents Page Replace the battery (see Replacing the Battery).
Service Manual
Page 12
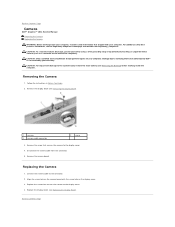
Back to the system board, remove the main battery (see Removing the Battery) before working inside the computer. Follow the instructions in Before You Begin. 2. Align the screw hole on the camera board with your computer. CAUTION...help prevent damage to Contents Page Camera Dell™ Inspiron™ 1011 Service Manual Removing the Camera Replacing the Camera WARNING: Before working inside your computer, read the safety information that secures the camera to the connector. 2. Remove the camera board. Connect the camera cable to the display cover. 4. For additional safety best...
Back to the system board, remove the main battery (see Removing the Battery) before working inside the computer. Follow the instructions in Before You Begin. 2. Align the screw hole on the camera board with your computer. CAUTION...help prevent damage to Contents Page Camera Dell™ Inspiron™ 1011 Service Manual Removing the Camera Replacing the Camera WARNING: Before working inside your computer, read the safety information that secures the camera to the connector. 2. Remove the camera board. Connect the camera cable to the display cover. 4. For additional safety best...

Service Manual
Page 14
Back to Contents Page Coin-Cell Battery Dell™ Inspiron™ 1011 Service Manual Removing the Coin-Cell Battery Replacing the Coin-Cell Battery WARNING: Before working inside your computer, read the safety information that is not authorized by Dell™ is not covered by periodically ... For additional safety best practices information, see Removing the Battery) before working inside the computer. Lift the coin-cell battery off the computer base. Disconnect the coin-cell battery cable from step 3 to step 10 in Before You Begin. 2. CAUTION: To avoid electrostatic ...
Back to Contents Page Coin-Cell Battery Dell™ Inspiron™ 1011 Service Manual Removing the Coin-Cell Battery Replacing the Coin-Cell Battery WARNING: Before working inside your computer, read the safety information that is not authorized by Dell™ is not covered by periodically ... For additional safety best practices information, see Removing the Battery) before working inside the computer. Lift the coin-cell battery off the computer base. Disconnect the coin-cell battery cable from step 3 to step 10 in Before You Begin. 2. CAUTION: To avoid electrostatic ...
Service Manual
Page 15
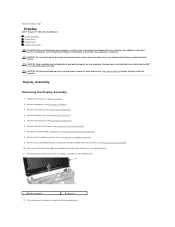
...: To help prevent damage to the system board, remove the main battery (see Removing the USB and SIM Card Board). 8. Lift and remove the display assembly from the computer base. Back to Contents Page Display Dell™ Inspiron™ 1011 Service Manual Display Assembly Display Bezel Display Panel Display Panel Cable WARNING: Before working inside your computer, read the safety...
...: To help prevent damage to the system board, remove the main battery (see Removing the USB and SIM Card Board). 8. Lift and remove the display assembly from the computer base. Back to Contents Page Display Dell™ Inspiron™ 1011 Service Manual Display Assembly Display Bezel Display Panel Display Panel Cable WARNING: Before working inside your computer, read the safety...

Service Manual
Page 16
...USB and SIM card board (see Replacing the Battery). Replace the palm rest (see Replacing the System Board). 4. Display Bezel Removing the Display Bezel CAUTION: The display bezel is extremely fragile. Using your fingertips, ... the inside edge of the display bezel. Replace the system board (see Replacing the Palm Rest). 9. Replace the palm rest bracket (see Replacing the Keyboard). 10. Replace the keyboard (see... base. 2. Remove the display assembly (see Replacing the Mini-Card). 3. Route the Mini-Card cables and connect them to the Mini-Cards, if applicable (see Removing the...
...USB and SIM card board (see Replacing the Battery). Replace the palm rest (see Replacing the System Board). 4. Display Bezel Removing the Display Bezel CAUTION: The display bezel is extremely fragile. Using your fingertips, ... the inside edge of the display bezel. Replace the system board (see Replacing the Palm Rest). 9. Replace the palm rest bracket (see Replacing the Keyboard). 10. Replace the keyboard (see... base. 2. Remove the display assembly (see Replacing the Mini-Card). 3. Route the Mini-Card cables and connect them to the Mini-Cards, if applicable (see Removing the...
Service Manual
Page 20
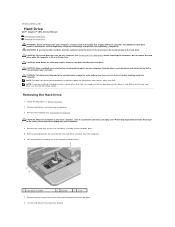
... the hard drive. 8. CAUTION: To prevent data loss, turn off the hard drive bracket. Back to Contents Page Hard Drive Dell™ Inspiron™ 1011 Service Manual Removing the Hard Drive Replacing the Hard Drive WARNING: Before working inside your computer, read the safety information that shipped... care when handling the hard drive. CAUTION: To help prevent damage to the system board, remove the main battery (see Removing the Keyboard). Remove the keyboard (see Removing the Battery) before removing the hard drive. NOTE: If you need to the computer base. 5. WARNING: If you remove...
... the hard drive. 8. CAUTION: To prevent data loss, turn off the hard drive bracket. Back to Contents Page Hard Drive Dell™ Inspiron™ 1011 Service Manual Removing the Hard Drive Replacing the Hard Drive WARNING: Before working inside your computer, read the safety information that shipped... care when handling the hard drive. CAUTION: To help prevent damage to the system board, remove the main battery (see Removing the Keyboard). Remove the keyboard (see Removing the Battery) before removing the hard drive. NOTE: If you need to the computer base. 5. WARNING: If you remove...
Service Manual
Page 21
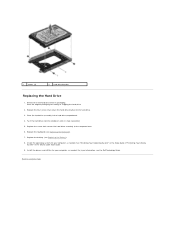
... the interposer until it is fully connected. 5. Back to the hard drive. 3. Replace the keyboard (see Replacing the Battery). 8. Install the operating system for your computer, as needed . For more information, see the Dell Technology Guide. Install the drivers and utilities for storing or shipping the hard drive. 2. Place the hard drive...
... the interposer until it is fully connected. 5. Back to the hard drive. 3. Replace the keyboard (see Replacing the Battery). 8. Install the operating system for your computer, as needed . For more information, see the Dell Technology Guide. Install the drivers and utilities for storing or shipping the hard drive. 2. Place the hard drive...

Service Manual
Page 22
... Contents Page Keyboard Dell™ Inspiron™ 1011 Service Manual Removing the Keyboard Replacing the Keyboard WARNING: Before working inside your computer, read the safety information that shipped with your computer. Follow the procedures in scratching the display panel. 4. CAUTION: To help prevent damage to the system board, remove the main battery (see Removing the...
... Contents Page Keyboard Dell™ Inspiron™ 1011 Service Manual Removing the Keyboard Replacing the Keyboard WARNING: Before working inside your computer, read the safety information that shipped with your computer. Follow the procedures in scratching the display panel. 4. CAUTION: To help prevent damage to the system board, remove the main battery (see Removing the...
Service Manual
Page 23
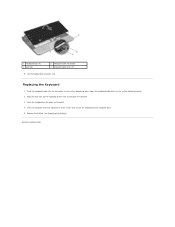
Align the four tabs on the keyboard to the slots on the system board connector. 2. Replace the battery (see Replacing the Battery). Back to the computer base. 5. Slide the keyboard cable into the connector on the system board and press down the keyboard cable locks on the ...
Align the four tabs on the keyboard to the slots on the system board connector. 2. Replace the battery (see Replacing the Battery). Back to the computer base. 5. Slide the keyboard cable into the connector on the system board and press down the keyboard cable locks on the ...
Service Manual
Page 24
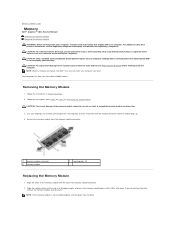
... the memory module securing clips. 3. Remove the memory module from step 2 to step 10 in Removing the System Board. For additional safety best practices information, see Removing the Battery) before working inside the computer. Your computer has one user-accessible SODIMM socket. Align ...module connector. 1 memory module connector 3 memory module 2 securing clips (2) Replacing the Memory Module 1. Back to Contents Page Memory Dell™ Inspiron™ 1011 Service Manual Removing the Memory Module Replacing the Memory Module WARNING: Before working inside your warranty.
... the memory module securing clips. 3. Remove the memory module from step 2 to step 10 in Removing the System Board. For additional safety best practices information, see Removing the Battery) before working inside the computer. Your computer has one user-accessible SODIMM socket. Align ...module connector. 1 memory module connector 3 memory module 2 securing clips (2) Replacing the Memory Module 1. Back to Contents Page Memory Dell™ Inspiron™ 1011 Service Manual Removing the Memory Module Replacing the Memory Module WARNING: Before working inside your warranty.
Service Manual
Page 25
... in Replacing the System Board. 4. Ubuntu®: Click ® System® Administration® System Monitor. Replace the battery (see Replacing the Battery), or connect the AC adapter to Contents Page Follow the instructions from step 3 to step 10 in the computer: Windows® XP: Right-click the My Computer icon on the computer.
... in Replacing the System Board. 4. Ubuntu®: Click ® System® Administration® System Monitor. Replace the battery (see Replacing the Battery), or connect the AC adapter to Contents Page Follow the instructions from step 3 to step 10 in the computer: Windows® XP: Right-click the My Computer icon on the computer.
Service Manual
Page 26
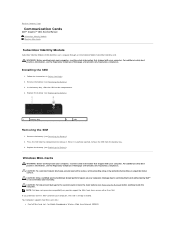
... than Dell. Replace the battery (see Removing the Battery). 2. For additional safety best practices information, see Replacing the Battery). 1 battery bay 2 SIM Removing the SIM 1. Replace the battery (see the Regulatory Compliance Homepage at www.dell.com/regulatory_compliance. NOTE: Dell does ...repairs on your computer. If you ordered a wireless Mini-Card with your computer. Damage due to Contents Page Communication Cards Dell™ Inspiron™ 1011 Service Manual Subscriber Identity Module Wireless Mini-Cards Subscriber Identity Module Subscriber Identity Module (SIM) ...
... than Dell. Replace the battery (see Removing the Battery). 2. For additional safety best practices information, see Replacing the Battery). 1 battery bay 2 SIM Removing the SIM 1. Replace the battery (see the Regulatory Compliance Homepage at www.dell.com/regulatory_compliance. NOTE: Dell does ...repairs on your computer. If you ordered a wireless Mini-Card with your computer. Damage due to Contents Page Communication Cards Dell™ Inspiron™ 1011 Service Manual Subscriber Identity Module Wireless Mini-Cards Subscriber Identity Module Subscriber Identity Module (SIM) ...