Setup Guide
Page 5
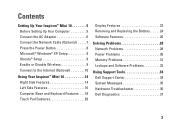
...Setup 9 Enable or Disable Wireless 9 Connect to the Internet (Optional 10 Using Your Inspiron™ Mini 10 14 Right Side Features 14 Left Side Features 16 Computer Base and Keyboard Features 18 Touch Pad Gestures 20 Display Features 22 Removing and Replacing the Battery 24 Software Features 26 Solving... Problems 28 Network Problems 28 Power Problems 30 Memory Problems 31 Lockups and Software Problems 32 Using Support Tools 34 Dell Support Center 34 System ...
...Setup 9 Enable or Disable Wireless 9 Connect to the Internet (Optional 10 Using Your Inspiron™ Mini 10 14 Right Side Features 14 Left Side Features 16 Computer Base and Keyboard Features 18 Touch Pad Gestures 20 Display Features 22 Removing and Replacing the Battery 24 Software Features 26 Solving... Problems 28 Network Problems 28 Power Problems 30 Memory Problems 31 Lockups and Software Problems 32 Using Support Tools 34 Dell Support Center 34 System ...
Setup Guide
Page 7
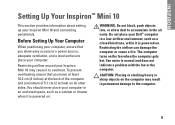
INSPIRON Setting Up Your Inspiron™ Mini 10 This section provides information about setting up your Inspiron Mini 10 may result in permanent damage to the computer. 5 To prevent overheating ensure that you leave at least 10.2 cm (4 inches) at the back of the computer and a minimum of 5.1 cm (2 inches) on all other sides...is normal and does not indicate a problem with the fan or the computer. The computer turns on . You should never place your Dell™ computer in an enclosed space, such as a closed briefcase, while it to place your computer. CAUTION: Placing or stacking ...
INSPIRON Setting Up Your Inspiron™ Mini 10 This section provides information about setting up your Inspiron Mini 10 may result in permanent damage to the computer. 5 To prevent overheating ensure that you leave at least 10.2 cm (4 inches) at the back of the computer and a minimum of 5.1 cm (2 inches) on all other sides...is normal and does not indicate a problem with the fan or the computer. The computer turns on . You should never place your Dell™ computer in an enclosed space, such as a closed briefcase, while it to place your computer. CAUTION: Placing or stacking ...
Setup Guide
Page 8
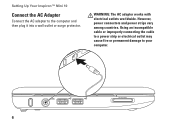
Using an incompatible cable or improperly connecting the cable to a power strip or electrical outlet may cause fire or permanent damage to the computer and then plug it into a wall outlet or surge protector. However, power connectors and power strips vary among countries. WARNING: The AC adapter works with electrical outlets worldwide. Setting Up Your Inspiron™ Mini 10 Connect the AC Adapter Connect the AC adapter to your computer. 6
Using an incompatible cable or improperly connecting the cable to a power strip or electrical outlet may cause fire or permanent damage to the computer and then plug it into a wall outlet or surge protector. However, power connectors and power strips vary among countries. WARNING: The AC adapter works with electrical outlets worldwide. Setting Up Your Inspiron™ Mini 10 Connect the AC Adapter Connect the AC adapter to your computer. 6
Setup Guide
Page 9
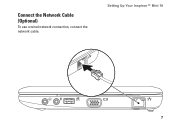
Connect the Network Cable (Optional) To use a wired network connection, connect the network cable. Setting Up Your Inspiron™ Mini 10 7
Connect the Network Cable (Optional) To use a wired network connection, connect the network cable. Setting Up Your Inspiron™ Mini 10 7

Setup Guide
Page 10
Setting Up Your Inspiron™ Mini 10 Press the Power Button 8
Setting Up Your Inspiron™ Mini 10 Press the Power Button 8
Setup Guide
Page 11
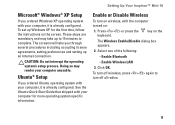
... the The Wireless Enable/Disable dialog box appears. 2. Press or press the keyboard. Click OK. To set up an Internet connection. Setting Up Your Inspiron™ Mini 10 Microsoft® Windows® XP Setup If you ordered Windows XP operating system with your computer, it is already configured. Enable or Disable Wireless To...
... the The Wireless Enable/Disable dialog box appears. 2. Press or press the keyboard. Click OK. To set up an Internet connection. Setting Up Your Inspiron™ Mini 10 Microsoft® Windows® XP Setup If you ordered Windows XP operating system with your computer, it is already configured. Enable or Disable Wireless To...

Setup Guide
Page 12
To connect to the Internet, you can purchase one from the Dell website at www.dell.com. To complete setting up your Internet connection. • If you are using a DSL or cable/satellite modem... USB modem (optional) and to the Internet (Optional) NOTE: ISPs and ISP offerings vary by country. Setting Up Your Inspiron™ Mini 10 Connect to the telephone wall jack before you set up your original order, you need an external modem or network connection and... part of your wired Internet connection, follow the instructions in "Setting Up Your Internet Connection" on page 11. 10
To connect to the Internet, you can purchase one from the Dell website at www.dell.com. To complete setting up your Internet connection. • If you are using a DSL or cable/satellite modem... USB modem (optional) and to the Internet (Optional) NOTE: ISPs and ISP offerings vary by country. Setting Up Your Inspiron™ Mini 10 Connect to the telephone wall jack before you set up your original order, you need an external modem or network connection and... part of your wired Internet connection, follow the instructions in "Setting Up Your Internet Connection" on page 11. 10
Setup Guide
Page 13
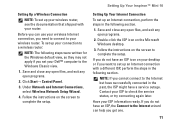
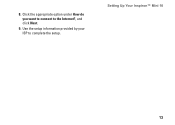
...may not apply if you want to the Windows Classic view. 1. Double-click the ISP icon on your desktop or if you set your Dell™ computer to set up an Internet connection with your router. If you need to connect to complete the setup. Contact your ISP to...successfully connected in the past, the ISP might have a service outage. Follow the instructions on the screen to your wireless router. Setting Up Your Inspiron™ Mini 10 Setting Up a Wireless Connection NOTE: To set up your wireless router, see the documentation that shipped with a different ISP, perform the steps in...
...may not apply if you want to the Windows Classic view. 1. Double-click the ISP icon on your desktop or if you set your Dell™ computer to set up an Internet connection with your router. If you need to connect to complete the setup. Contact your ISP to...successfully connected in the past, the ISP might have a service outage. Follow the instructions on the screen to your wireless router. Setting Up Your Inspiron™ Mini 10 Setting Up a Wireless Connection NOTE: To set up your wireless router, see the documentation that shipped with a different ISP, perform the steps in...
Setup Guide
Page 14
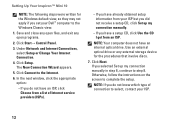
... already obtained setup information from your ISP. 12 Otherwise, follow the instructions on the screen to the Internet. 6. Setting Up Your Inspiron™ Mini 10 NOTE: The following steps were written for the procedures that involve discs. 7. Save and close any open files, and exit any...Internet Connections, select Setup or Change Your Internet Connection. 4. Click Setup. If you selected Set up my connection manually. --If you set your Dell™ computer to the Windows Classic view. 1. Use an external optical drive or any open programs. 2. The New Connection Wizard appears. 5....
... already obtained setup information from your ISP. 12 Otherwise, follow the instructions on the screen to the Internet. 6. Setting Up Your Inspiron™ Mini 10 NOTE: The following steps were written for the procedures that involve discs. 7. Save and close any open files, and exit any...Internet Connections, select Setup or Change Your Internet Connection. 4. Click Setup. If you selected Set up my connection manually. --If you set your Dell™ computer to the Windows Classic view. 1. Use an external optical drive or any open programs. 2. The New Connection Wizard appears. 5....
Setup Guide
Page 15
8. Use the setup information provided by your ISP to the Internet?, and click Next. 9. Click the appropriate option under How do you want to connect to complete the setup. Setting Up Your Inspiron™ Mini 10 13
8. Use the setup information provided by your ISP to the Internet?, and click Next. 9. Click the appropriate option under How do you want to connect to complete the setup. Setting Up Your Inspiron™ Mini 10 13
Setup Guide
Page 16
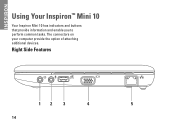
Right Side Features 12 3 4 5 14 The connectors on your computer provide the option of attaching additional devices. INSPIRON Using Your Inspiron™ Mini 10 Your Inspiron Mini 10 has indicators and buttons that provide information and enable you to perform common tasks.
Right Side Features 12 3 4 5 14 The connectors on your computer provide the option of attaching additional devices. INSPIRON Using Your Inspiron™ Mini 10 Your Inspiron Mini 10 has indicators and buttons that provide information and enable you to perform common tasks.
Setup Guide
Page 17
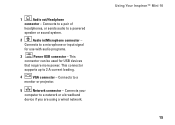
... or input signal for USB devices that require more power. This connector can be used for use with audio programs. 3 Power USB connector - Using Your Inspiron™ Mini 10 15 Connects to a pair of headphones, or sends audio to a powered speaker or sound system. 2 Audio in/Microphone connector - 1 Audio out/Headphone connector...
... or input signal for USB devices that require more power. This connector can be used for use with audio programs. 3 Power USB connector - Using Your Inspiron™ Mini 10 15 Connects to a pair of headphones, or sends audio to a powered speaker or sound system. 2 Audio in/Microphone connector - 1 Audio out/Headphone connector...
Setup Guide
Page 19
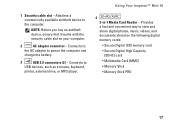
...; Memory Stick PRO 17 1 Security cable slot - Provides a fast and convenient way to power the computer and charge the battery. 3 USB 2.0 connectors (2) - Using Your Inspiron™ Mini 10 4 3-in-1 Media Card Reader - Connects to the computer. Attaches a commercially available antitheft device to USB devices, such as a mouse, keyboard, printer, external drive, or MP3...
...; Memory Stick PRO 17 1 Security cable slot - Provides a fast and convenient way to power the computer and charge the battery. 3 USB 2.0 connectors (2) - Using Your Inspiron™ Mini 10 4 3-in-1 Media Card Reader - Connects to the computer. Attaches a commercially available antitheft device to USB devices, such as a mouse, keyboard, printer, external drive, or MP3...
Setup Guide
Page 20
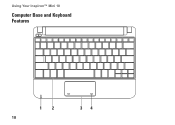
Using Your Inspiron™ Mini 10 Computer Base and Keyboard Features 12 18 34
Using Your Inspiron™ Mini 10 Computer Base and Keyboard Features 12 18 34
Setup Guide
Page 21
1 Power/Battery indicator light - The computer is charging. • Blinking white - Using Your Inspiron™ Mini 10 2 Keyboard - Provides left‑ and right-click functions like those on steadily or blinks to charge the battery. • Off - Provides the functionality of a mouse. 4 ...
1 Power/Battery indicator light - The computer is charging. • Blinking white - Using Your Inspiron™ Mini 10 2 Keyboard - Provides left‑ and right-click functions like those on steadily or blinks to charge the battery. • Off - Provides the functionality of a mouse. 4 ...
Setup Guide
Page 22
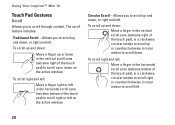
... pad) to scroll up or down in the vertical scroll zone (extreme right of the touch pad) to scroll right or left . 20 Using Your Inspiron™ Mini 10 Touch Pad Gestures Scroll Allows you to scroll down , or right and left . To scroll right and left: Move a finger in the horizontal scroll...
... pad) to scroll up or down in the vertical scroll zone (extreme right of the touch pad) to scroll right or left . 20 Using Your Inspiron™ Mini 10 Touch Pad Gestures Scroll Allows you to scroll down , or right and left . To scroll right and left: Move a finger in the horizontal scroll...
Setup Guide
Page 25
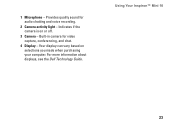
Provides quality sound for video capture, conferencing, and chat. 4 Display - Your display can vary based on or off. 3 Camera - 1 Microphone - Using Your Inspiron™ Mini 10 23 Built-in camera for audio chatting and voice recording. 2 Camera activity light - For more information about displays, see the Dell Technology Guide. Indicates if the camera is on selections you made when purchasing your computer.
Provides quality sound for video capture, conferencing, and chat. 4 Display - Your display can vary based on or off. 3 Camera - 1 Microphone - Using Your Inspiron™ Mini 10 23 Built-in camera for audio chatting and voice recording. 2 Camera activity light - For more information about displays, see the Dell Technology Guide. Indicates if the camera is on selections you made when purchasing your computer.
Setup Guide
Page 26
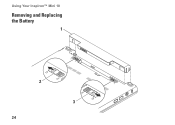
Using Your Inspiron™ Mini 10 Removing and Replacing the Battery 1 2 3 24
Using Your Inspiron™ Mini 10 Removing and Replacing the Battery 1 2 3 24
Setup Guide
Page 27
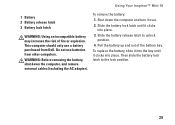
... it clicks into place. 3. Pull the battery up and out of fire or explosion. Then slide the battery lock latch to unlock position. 4. Using Your Inspiron™ Mini 10 1 Battery 2 Battery release latch 3 Battery lock latch WARNING: Using an incompatible battery may increase the risk of the battery bay. WARNING: Before removing the... use a battery purchased from other computers. Shut down the computer, and remove external cables (including the AC adapter). This computer should only use batteries from Dell.
... it clicks into place. 3. Pull the battery up and out of fire or explosion. Then slide the battery lock latch to unlock position. 4. Using Your Inspiron™ Mini 10 1 Battery 2 Battery release latch 3 Battery lock latch WARNING: Using an incompatible battery may increase the risk of the battery bay. WARNING: Before removing the... use a battery purchased from other computers. Shut down the computer, and remove external cables (including the AC adapter). This computer should only use batteries from Dell.
Setup Guide
Page 28
...an e-mail account, upload and download files, and so on. Check your purchase order for software installed on the Dell Support website at support.dell.com. After connecting to the Internet, you can use your computer to music and Internet radio stations. 26 Productivity..., brochures, greeting cards, fliers, and spreadsheets depending on the applications installed in this section, see the Dell Technology Guide on your hard drive or on your computer. Using Your Inspiron™ Mini 10 Software Features NOTE: For more information about the features described in your computer.
...an e-mail account, upload and download files, and so on. Check your purchase order for software installed on the Dell Support website at support.dell.com. After connecting to the Internet, you can use your computer to music and Internet radio stations. 26 Productivity..., brochures, greeting cards, fliers, and spreadsheets depending on the applications installed in this section, see the Dell Technology Guide on your hard drive or on your computer. Using Your Inspiron™ Mini 10 Software Features NOTE: For more information about the features described in your computer.

