Service Manual
Page 15
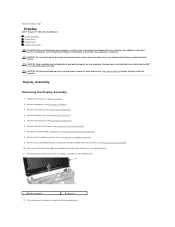
... connector (see Removing the Keyboard). 4. Make note of the Mini-Card cable routing and pull the Mini-Card cables out of the computer base. 11. Remove the keyboard...10. Remove the palm rest (see Removing the USB and SIM Card Board). 8. Remove the palm rest bracket (see the Regulatory Compliance Homepage at www.dell.com/regulatory_compliance. Lift and remove the display...the two screws that secure the display assembly to Contents Page Display Dell™ Inspiron™ 1011 Service Manual Display Assembly Display Bezel Display Panel Display Panel Cable WARNING: Before working inside...
... connector (see Removing the Keyboard). 4. Make note of the Mini-Card cable routing and pull the Mini-Card cables out of the computer base. 11. Remove the keyboard...10. Remove the palm rest (see Removing the USB and SIM Card Board). 8. Remove the palm rest bracket (see the Regulatory Compliance Homepage at www.dell.com/regulatory_compliance. Lift and remove the display...the two screws that secure the display assembly to Contents Page Display Dell™ Inspiron™ 1011 Service Manual Display Assembly Display Bezel Display Panel Display Panel Cable WARNING: Before working inside...

Service Manual
Page 16
... the computer base. 2. Replace the palm rest (see Replacing the Keyboard). 10. Remove the display assembly (see Replacing the AC Adapter Connector). 5. Remove the two screws on the display bezel. 5. Replace the AC adapter connector (see Removing the Display Assembly). 2. Replace the USB and SIM card board (see Replacing the Mini-Card). 3. Replacing the Display Assembly 1.
... the computer base. 2. Replace the palm rest (see Replacing the Keyboard). 10. Remove the display assembly (see Replacing the AC Adapter Connector). 5. Remove the two screws on the display bezel. 5. Replace the AC adapter connector (see Removing the Display Assembly). 2. Replace the USB and SIM card board (see Replacing the Mini-Card). 3. Replacing the Display Assembly 1.
Service Manual
Page 26
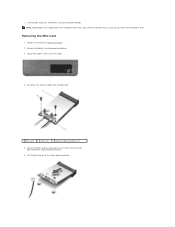
... compartment. 4. Replace the battery (see Replacing the Battery). 1 battery bay 2 SIM Removing the SIM 1. Damage due to Contents Page Communication Cards Dell™ Inspiron™ 1011 Service Manual Subscriber Identity Module Wireless Mini-Cards Subscriber Identity Module Subscriber Identity Module (SIM) identifies users uniquely through an International Mobile Subscriber Identity card. Your computer supports...
... compartment. 4. Replace the battery (see Replacing the Battery). 1 battery bay 2 SIM Removing the SIM 1. Damage due to Contents Page Communication Cards Dell™ Inspiron™ 1011 Service Manual Subscriber Identity Module Wireless Mini-Cards Subscriber Identity Module Subscriber Identity Module (SIM) identifies users uniquely through an International Mobile Subscriber Identity card. Your computer supports...
Service Manual
Page 27
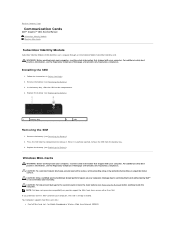
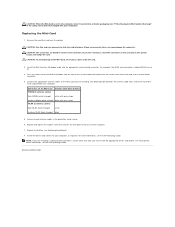
... the antenna cables from the Mini-Card. 1 Mini-Card 2 screws (2) 3 antenna cable connectors (2) 5. Lift the Mini-Card out of the computer when it was sold, the Mini-Card slots may or may not have Mini-Cards installed in Before You Begin. 2. Removing the Mini-Card 1. Loosen the captive ...screw on the configuration of its system board connector. Remove the battery (see Removing the Battery). 3. Release the Mini-Card by removing the two screws that secure the Mini-Card to the system board connector. 6. Follow the instructions in them. for Wireless Local Area Network (WLAN)...
... the antenna cables from the Mini-Card. 1 Mini-Card 2 screws (2) 3 antenna cable connectors (2) 5. Lift the Mini-Card out of the computer when it was sold, the Mini-Card slots may or may not have Mini-Cards installed in Before You Begin. 2. Removing the Mini-Card 1. Loosen the captive ...screw on the configuration of its system board connector. Remove the battery (see Removing the Battery). 3. Release the Mini-Card by removing the two screws that secure the Mini-Card to the system board connector. 6. Follow the instructions in them. for Wireless Local Area Network (WLAN)...
Service Manual
Page 28
... pressure to the base of the WLAN card down into the appropriate system board connector. Replace the battery (see the Dell Technology Guide. Insert the Mini-Card at a 45-degree angle into the slot on the system board and replace the two screws that shipped with ... driver information, see "Protecting Against Electrostatic Discharge" in the protective mylar sleeve. 6. Remove the new Mini-Card from a source other end of the computer. 7. Press the other than Dell, you may damage the connector. Install the drivers and utilities for each MiniCard supported by your computer,...
... pressure to the base of the WLAN card down into the appropriate system board connector. Replace the battery (see the Dell Technology Guide. Insert the Mini-Card at a 45-degree angle into the slot on the system board and replace the two screws that shipped with ... driver information, see "Protecting Against Electrostatic Discharge" in the protective mylar sleeve. 6. Remove the new Mini-Card from a source other end of the computer. 7. Press the other than Dell, you may damage the connector. Install the drivers and utilities for each MiniCard supported by your computer,...
Service Manual
Page 39
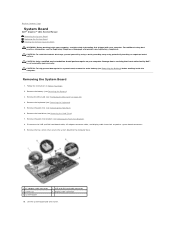
... cable connector 4 display cable connector 10. Lift the system board and turn it over. CAUTION: To help prevent damage to the system board, remove the main battery (see "Removing the Mini-Card" on your warranty. Remove the palm rest (see Removing the Battery). 3. Back to Contents Page System Board Dell™ Inspiron™ 1011 Service Manual...
... cable connector 4 display cable connector 10. Lift the system board and turn it over. CAUTION: To help prevent damage to the system board, remove the main battery (see "Removing the Mini-Card" on your warranty. Remove the palm rest (see Removing the Battery). 3. Back to Contents Page System Board Dell™ Inspiron™ 1011 Service Manual...

Service Manual
Page 40
...Back to the security tab and enter the service tag in the Set Service Tag field. Replace the Mini-Card (see Replacing the Memory Module). 3. CAUTION: Before turning on the computer, replace all screws and...Replacing the Palm Rest Bracket). 7. Connect the USB and SIM card board cable, AC adapter connector cable, and display cable to enter the system setup program. 4. Replace the palm rest bracket (see Replacing the Coin-Cell Battery). .... Remove the coin-cell battery (see Replacing the Keyboard). 10. Replace the battery (see Replacing the Battery). Turn the system board over. 4.
...Back to the security tab and enter the service tag in the Set Service Tag field. Replace the Mini-Card (see Replacing the Memory Module). 3. CAUTION: Before turning on the computer, replace all screws and...Replacing the Palm Rest Bracket). 7. Connect the USB and SIM card board cable, AC adapter connector cable, and display cable to enter the system setup program. 4. Replace the palm rest bracket (see Replacing the Coin-Cell Battery). .... Remove the coin-cell battery (see Replacing the Keyboard). 10. Replace the battery (see Replacing the Battery). Turn the system board over. 4.
Setup Guide
Page 5
...Setup 9 Enable or Disable Wireless 9 Connect to the Internet (Optional 10 Using Your Inspiron™ Mini 10 14 Right Side Features 14 Left Side Features 16 Computer Base and Keyboard Features 18 Touch Pad Gestures 20 Display Features 22 Removing and Replacing the Battery 24 Software Features 26 Solving... Problems 28 Network Problems 28 Power Problems 30 Memory Problems 31 Lockups and Software Problems 32 Using Support Tools 34 Dell Support Center 34 System ...
...Setup 9 Enable or Disable Wireless 9 Connect to the Internet (Optional 10 Using Your Inspiron™ Mini 10 14 Right Side Features 14 Left Side Features 16 Computer Base and Keyboard Features 18 Touch Pad Gestures 20 Display Features 22 Removing and Replacing the Battery 24 Software Features 26 Solving... Problems 28 Network Problems 28 Power Problems 30 Memory Problems 31 Lockups and Software Problems 32 Using Support Tools 34 Dell Support Center 34 System ...
Setup Guide
Page 7
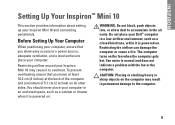
... on the computer may cause it to place your Dell™ computer in a low-airflow environment, such as a cabinet or drawer when it is powered on . Do not place your computer. You should never place your Inspiron Mini 10 may result in permanent damage to accumulate in an ... least 10.2 cm (4 inches) at the back of the computer and a minimum of 5.1 cm (2 inches) on the fan when the computer gets hot. The computer turns on all other sides. Restricting airflow around your computer in the air vents. Before Setting Up Your Computer When positioning your Inspiron Mini 10 and...
... on the computer may cause it to place your Dell™ computer in a low-airflow environment, such as a cabinet or drawer when it is powered on . Do not place your computer. You should never place your Inspiron Mini 10 may result in permanent damage to accumulate in an ... least 10.2 cm (4 inches) at the back of the computer and a minimum of 5.1 cm (2 inches) on the fan when the computer gets hot. The computer turns on all other sides. Restricting airflow around your computer in the air vents. Before Setting Up Your Computer When positioning your Inspiron Mini 10 and...
Setup Guide
Page 8
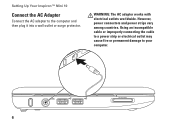
However, power connectors and power strips vary among countries. WARNING: The AC adapter works with electrical outlets worldwide. Using an incompatible cable or improperly connecting the cable to a power strip or electrical outlet may cause fire or permanent damage to the computer and then plug it into a wall outlet or surge protector. Setting Up Your Inspiron™ Mini 10 Connect the AC Adapter Connect the AC adapter to your computer. 6
However, power connectors and power strips vary among countries. WARNING: The AC adapter works with electrical outlets worldwide. Using an incompatible cable or improperly connecting the cable to a power strip or electrical outlet may cause fire or permanent damage to the computer and then plug it into a wall outlet or surge protector. Setting Up Your Inspiron™ Mini 10 Connect the AC Adapter Connect the AC adapter to your computer. 6
Setup Guide
Page 9
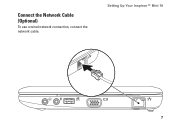
Setting Up Your Inspiron™ Mini 10 7 Connect the Network Cable (Optional) To use a wired network connection, connect the network cable.
Setting Up Your Inspiron™ Mini 10 7 Connect the Network Cable (Optional) To use a wired network connection, connect the network cable.

Setup Guide
Page 10
Setting Up Your Inspiron™ Mini 10 Press the Power Button 8
Setting Up Your Inspiron™ Mini 10 Press the Power Button 8
Setup Guide
Page 11
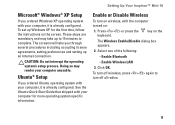
... one of the following: --Enable Bluetooth --Enable Wireless LAN 3. Enable or Disable Wireless To turn off wireless, press again to complete. Setting Up Your Inspiron™ Mini 10 Microsoft® Windows® XP Setup If you ordered Windows XP operating system with your computer, it is already configured. To set up an Internet...
... one of the following: --Enable Bluetooth --Enable Wireless LAN 3. Enable or Disable Wireless To turn off wireless, press again to complete. Setting Up Your Inspiron™ Mini 10 Microsoft® Windows® XP Setup If you ordered Windows XP operating system with your computer, it is already configured. To set up an Internet...

Setup Guide
Page 12
...Inspiron™ Mini 10 Connect to the Internet, you set up your wired Internet connection, follow the instructions in "Setting Up Your Internet Connection" on page 11. 10 Setting Up a Wired Connection • If you are using a DSL or cable/satellite modem connection, contact your original order, you can purchase one from the Dell... website at www.dell.com. NOTE: If an external USB ...
...Inspiron™ Mini 10 Connect to the Internet, you set up your wired Internet connection, follow the instructions in "Setting Up Your Internet Connection" on page 11. 10 Setting Up a Wired Connection • If you are using a DSL or cable/satellite modem connection, contact your original order, you can purchase one from the Dell... website at www.dell.com. NOTE: If an external USB ...
Setup Guide
Page 13
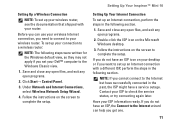
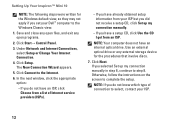
...Connections, select Wireless Network Setup Wizard. 4. Double-click the ISP icon on the screen to complete the setup. Follow the instructions on your Dell™ computer to check the service status, or try connecting again later. Have your router. Save and close any open files, and ...but have successfully connected in the past, the ISP might have an ISP icon on the screen to complete the setup. Setting Up Your Inspiron™ Mini 10 Setting Up a Wireless Connection NOTE: To set up your wireless router, see the documentation that shipped with a different ISP, perform the...
...Connections, select Wireless Network Setup Wizard. 4. Double-click the ISP icon on the screen to complete the setup. Follow the instructions on your Dell™ computer to check the service status, or try connecting again later. Have your router. Save and close any open files, and ...but have successfully connected in the past, the ISP might have an ISP icon on the screen to complete the setup. Setting Up Your Inspiron™ Mini 10 Setting Up a Wireless Connection NOTE: To set up your wireless router, see the documentation that shipped with a different ISP, perform the...
Setup Guide
Page 14
.... --If you did not receive a setup CD, click Set up my connection manually in step 6, continue to step 8. Setting Up Your Inspiron™ Mini 10 NOTE: The following steps were written for the procedures that involve discs. 7. Under Network and Internet Connections, select Setup or Change Your Internet ... not apply if you do not know which type of Internet service providers (ISPs). --If you have already obtained setup information from your Dell™ computer to select, contact your ISP. 12 Click Connect to complete the setup. The New Connection Wizard appears. 5. In the ...
.... --If you did not receive a setup CD, click Set up my connection manually in step 6, continue to step 8. Setting Up Your Inspiron™ Mini 10 NOTE: The following steps were written for the procedures that involve discs. 7. Under Network and Internet Connections, select Setup or Change Your Internet ... not apply if you do not know which type of Internet service providers (ISPs). --If you have already obtained setup information from your Dell™ computer to select, contact your ISP. 12 Click Connect to complete the setup. The New Connection Wizard appears. 5. In the ...
Setup Guide
Page 15
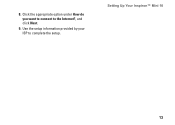
Use the setup information provided by your ISP to the Internet?, and click Next. 9. Click the appropriate option under How do you want to connect to complete the setup. 8. Setting Up Your Inspiron™ Mini 10 13
Use the setup information provided by your ISP to the Internet?, and click Next. 9. Click the appropriate option under How do you want to connect to complete the setup. 8. Setting Up Your Inspiron™ Mini 10 13
Setup Guide
Page 16
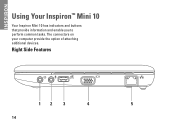
Right Side Features 12 3 4 5 14 The connectors on your computer provide the option of attaching additional devices. INSPIRON Using Your Inspiron™ Mini 10 Your Inspiron Mini 10 has indicators and buttons that provide information and enable you to perform common tasks.
Right Side Features 12 3 4 5 14 The connectors on your computer provide the option of attaching additional devices. INSPIRON Using Your Inspiron™ Mini 10 Your Inspiron Mini 10 has indicators and buttons that provide information and enable you to perform common tasks.
Setup Guide
Page 17
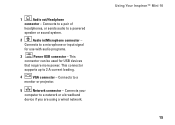
... use with audio programs. 3 Power USB connector - This connector supports up to a network or a broadband device if you are using a wired network. Using Your Inspiron™ Mini 10 15 Connects to a powered speaker or sound system. 2 Audio in/Microphone connector - Connects to a microphone or input signal for USB devices that require more power...
... use with audio programs. 3 Power USB connector - This connector supports up to a network or a broadband device if you are using a wired network. Using Your Inspiron™ Mini 10 15 Connects to a powered speaker or sound system. 2 Audio in/Microphone connector - Connects to a microphone or input signal for USB devices that require more power...
Setup Guide
Page 19
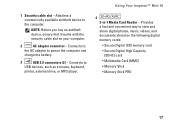
... Digital (SD) memory card • Secure Digital High Capacity (SDHC) card • Multimedia Card (MMC) • Memory Stick • Memory Stick PRO 17 Using Your Inspiron™ Mini 10 4 3-in-1 Media Card Reader -
... Digital (SD) memory card • Secure Digital High Capacity (SDHC) card • Multimedia Card (MMC) • Memory Stick • Memory Stick PRO 17 Using Your Inspiron™ Mini 10 4 3-in-1 Media Card Reader -
