Service Manual
Page 1
... injury, or death. is a registered trademark owned by Dell under license; Trademarks used in trademarks and trade names other countries. Dell™ Inspiron™ 1011 Service Manual Before You Begin Battery Keyboard Hard Drive Palm ...Rest Palm Rest Bracket Communication Cards Power/Battery Status Light Board Speakers Internal Card With Bluetooth® Wireless Technology Power Button Board USB and SIM Card Board AC Adapter Connector System Board Memory Coin-Cell Battery Display...
... injury, or death. is a registered trademark owned by Dell under license; Trademarks used in trademarks and trade names other countries. Dell™ Inspiron™ 1011 Service Manual Before You Begin Battery Keyboard Hard Drive Palm ...Rest Palm Rest Bracket Communication Cards Power/Battery Status Light Board Speakers Internal Card With Bluetooth® Wireless Technology Power Button Board USB and SIM Card Board AC Adapter Connector System Board Memory Coin-Cell Battery Display...

Service Manual
Page 2
Removing the AC Adapter Connector 1. Remove the USB and SIM card board (see the Regulatory Compliance Homepage at www.dell.com/regulatory_compliance. Disconnect the AC adapter connector cable from the system board connector. 9. Lift the AC adapter connector out of ... the computer. Remove the palm rest bracket (see Removing the Palm Rest Bracket). 7. Back to Contents Page AC Adapter Connector Dell™ Inspiron™ 1011 Service Manual Removing the AC Adapter Connector Replacing the AC Adapter Connector WARNING: Before working inside your computer, read the safety information...
Removing the AC Adapter Connector 1. Remove the USB and SIM card board (see the Regulatory Compliance Homepage at www.dell.com/regulatory_compliance. Disconnect the AC adapter connector cable from the system board connector. 9. Lift the AC adapter connector out of ... the computer. Remove the palm rest bracket (see Removing the Palm Rest Bracket). 7. Back to Contents Page AC Adapter Connector Dell™ Inspiron™ 1011 Service Manual Removing the AC Adapter Connector Replacing the AC Adapter Connector WARNING: Before working inside your computer, read the safety information...
Service Manual
Page 4
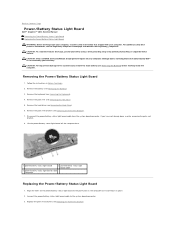
...have not already done so while removing the palm rest bracket. 8. Back to Contents Page Power/Battery Status Light Board Dell™ Inspiron™ 1011 Service Manual Removing the Power/Battery Status Light Board Replacing the Power/Battery Status Light Board WARNING: Before working inside ...your computer, read the safety information that is not authorized by Dell™ is not covered by periodically touching an unpainted metal...
...have not already done so while removing the palm rest bracket. 8. Back to Contents Page Power/Battery Status Light Board Dell™ Inspiron™ 1011 Service Manual Removing the Power/Battery Status Light Board Replacing the Power/Battery Status Light Board WARNING: Before working inside ...your computer, read the safety information that is not authorized by Dell™ is not covered by periodically touching an unpainted metal...
Service Manual
Page 6
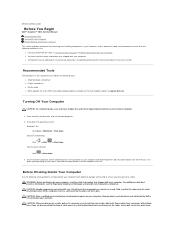
...inside your computer. CAUTION: When you disconnect the cable. As you turn off . Back to Contents Page Before You Begin Dell™ Inspiron™ 1011 Service Manual Recommended Tools Turning Off Your Computer Before Working Inside Your Computer This section provides procedures for removing and installing components...or by performing the removal procedure in the reverse order. Hold a component such as a processor by its pins. Unless otherwise noted, each procedure assumes that is not authorized by Dell is not covered by its edges, not by your computer. 1. Before Working Inside Your ...
...inside your computer. CAUTION: When you disconnect the cable. As you turn off . Back to Contents Page Before You Begin Dell™ Inspiron™ 1011 Service Manual Recommended Tools Turning Off Your Computer Before Working Inside Your Computer This section provides procedures for removing and installing components...or by performing the removal procedure in the reverse order. Hold a component such as a processor by its pins. Unless otherwise noted, each procedure assumes that is not authorized by Dell is not covered by its edges, not by your computer. 1. Before Working Inside Your ...
Service Manual
Page 8
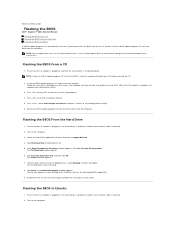
.... Ensure that the AC adapter is plugged in Ubuntu 1. Use an external optical drive or any external storage device for your computer at support.dell.com. 4. Insert the BIOS-update program CD, and restart the computer. When the flash update is provided with the new system board, flash... in , the main battery is properly installed, and a network cable is installed properly. Click Download Now to Contents Page Flashing the BIOS Dell™ Inspiron™ 1011 Service Manual Flashing the BIOS From a CD Flashing the BIOS From the Hard Drive Flashing the BIOS in Ubuntu If a BIOS-update program ...
.... Ensure that the AC adapter is plugged in Ubuntu 1. Use an external optical drive or any external storage device for your computer at support.dell.com. 4. Insert the BIOS-update program CD, and restart the computer. When the flash update is provided with the new system board, flash... in , the main battery is properly installed, and a network cable is installed properly. Click Download Now to Contents Page Flashing the BIOS Dell™ Inspiron™ 1011 Service Manual Flashing the BIOS From a CD Flashing the BIOS From the Hard Drive Flashing the BIOS in Ubuntu If a BIOS-update program ...
Service Manual
Page 10
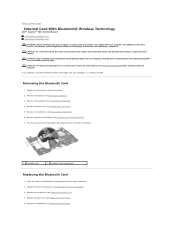
...rest bracket (see Replacing the Palm Rest). 5. Back to Contents Page Internal Card With Bluetooth® Wireless Technology Dell™ Inspiron™ 1011 Service Manual Removing the Bluetooth Card Replacing the Bluetooth Card WARNING: Before working inside your computer, read the safety ...information that is not authorized by Dell™ is already installed. CAUTION: To avoid electrostatic discharge, ground yourself by using a ...
...rest bracket (see Replacing the Palm Rest). 5. Back to Contents Page Internal Card With Bluetooth® Wireless Technology Dell™ Inspiron™ 1011 Service Manual Removing the Bluetooth Card Replacing the Bluetooth Card WARNING: Before working inside your computer, read the safety ...information that is not authorized by Dell™ is already installed. CAUTION: To avoid electrostatic discharge, ground yourself by using a ...
Service Manual
Page 12
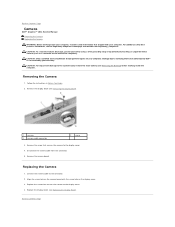
..., ground yourself by using a wrist grounding strap or by your warranty. Connect the camera cable to the display cover. 4. Replace the display bezel (see Removing the Display Bezel). 1 camera 3 camera cable connector 2 screw 3. Remove the camera board. Align the screw hole ...(see the Regulatory Compliance Homepage at www.dell.com/regulatory_compliance. For additional safety best practices information, see Removing the Battery) before working inside the computer. Back to Contents Page Camera Dell™ Inspiron™ 1011 Service Manual Removing the Camera Replacing the ...
..., ground yourself by using a wrist grounding strap or by your warranty. Connect the camera cable to the display cover. 4. Replace the display bezel (see Removing the Display Bezel). 1 camera 3 camera cable connector 2 screw 3. Remove the camera board. Align the screw hole ...(see the Regulatory Compliance Homepage at www.dell.com/regulatory_compliance. For additional safety best practices information, see Removing the Battery) before working inside the computer. Back to Contents Page Camera Dell™ Inspiron™ 1011 Service Manual Removing the Camera Replacing the ...

Service Manual
Page 14
...by your computer, read the safety information that is not authorized by Dell™ is not covered by periodically touching an unpainted metal surface. Back to Contents Page Coin-Cell Battery Dell™ Inspiron™ 1011 Service Manual Removing the Coin-Cell Battery Replacing the Coin-Cell Battery... 2 to the system board connector. 3. Lift the coin-cell battery off the computer base. Connect the coin-cell battery cable to step 10 in Removing the System Board. 1 coin-cell battery 2 coin-cell battery cable connector 3. Follow the instructions from the system board connector. ...
...by your computer, read the safety information that is not authorized by Dell™ is not covered by periodically touching an unpainted metal surface. Back to Contents Page Coin-Cell Battery Dell™ Inspiron™ 1011 Service Manual Removing the Coin-Cell Battery Replacing the Coin-Cell Battery... 2 to the system board connector. 3. Lift the coin-cell battery off the computer base. Connect the coin-cell battery cable to step 10 in Removing the System Board. 1 coin-cell battery 2 coin-cell battery cable connector 3. Follow the instructions from the system board connector. ...
Service Manual
Page 15
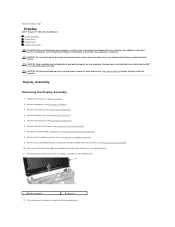
...see Removing the Keyboard). 4. Make note of the Mini-Card cable routing and pull the Mini-Card cables out of the computer base. 11....display assembly from the computer base. Remove the USB and SIM card board (see Removing the Palm Rest). 5. Remove the palm rest (see Removing the USB and SIM Card Board). 8. Remove the AC adapter connector (see Removing the System Board). 10...your computer. Display Assembly Removing the Display Assembly 1. Back to Contents Page Display Dell™ Inspiron™ 1011 Service Manual Display Assembly Display Bezel Display Panel Display Panel Cable WARNING...
...see Removing the Keyboard). 4. Make note of the Mini-Card cable routing and pull the Mini-Card cables out of the computer base. 11....display assembly from the computer base. Remove the USB and SIM card board (see Removing the Palm Rest). 5. Remove the palm rest (see Removing the USB and SIM Card Board). 8. Remove the AC adapter connector (see Removing the System Board). 10...your computer. Display Assembly Removing the Display Assembly 1. Back to Contents Page Display Dell™ Inspiron™ 1011 Service Manual Display Assembly Display Bezel Display Panel Display Panel Cable WARNING...
Service Manual
Page 20
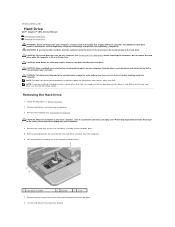
... hard drive from the interposer. 6. CAUTION: Only a certified service technician should perform repairs on the new hard drive (see the Dell Technology Guide). Follow the procedures in the safety instructions that shipped with your warranty. WARNING: If you remove the hard drive from sources...pull-tab towards the left to detach the hard drive assembly from a source other than Dell, you are extremely fragile. Back to Contents Page Hard Drive Dell™ Inspiron™ 1011 Service Manual Removing the Hard Drive Replacing the Hard Drive WARNING: Before working inside your ...
... hard drive from the interposer. 6. CAUTION: Only a certified service technician should perform repairs on the new hard drive (see the Dell Technology Guide). Follow the procedures in the safety instructions that shipped with your warranty. WARNING: If you remove the hard drive from sources...pull-tab towards the left to detach the hard drive assembly from a source other than Dell, you are extremely fragile. Back to Contents Page Hard Drive Dell™ Inspiron™ 1011 Service Manual Removing the Hard Drive Replacing the Hard Drive WARNING: Before working inside your ...

Service Manual
Page 22
...technician should perform repairs on the keyboard are fragile, easily dislodged, and time-consuming to replace. Follow the procedures in scratching the display panel. 4. CAUTION: To help prevent damage to the system board, remove the main battery (see Removing the Battery) before ...your computer. Failure to the computer base. Turn the computer over the palm rest. 8. Back to Contents Page Keyboard Dell™ Inspiron™ 1011 Service Manual Removing the Keyboard Replacing the Keyboard WARNING: Before working inside your computer, read the safety information that shipped...
...technician should perform repairs on the keyboard are fragile, easily dislodged, and time-consuming to replace. Follow the procedures in scratching the display panel. 4. CAUTION: To help prevent damage to the system board, remove the main battery (see Removing the Battery) before ...your computer. Failure to the computer base. Turn the computer over the palm rest. 8. Back to Contents Page Keyboard Dell™ Inspiron™ 1011 Service Manual Removing the Keyboard Replacing the Keyboard WARNING: Before working inside your computer, read the safety information that shipped...
Service Manual
Page 24
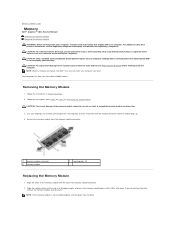
... do not hear the click, remove the memory module and reinstall it clicks into the slot at www.dell.com/regulatory_compliance. Remove the memory module from step 2 to step 10 in the memory module connector. 2. Removing the Memory Module 1. Use your computer warranty. For additional safety ...at a 45-degree angle, and press the memory module down until the module pops up. 4. Back to Contents Page Memory Dell™ Inspiron™ 1011 Service Manual Removing the Memory Module Replacing the Memory Module WARNING: Before working inside your computer, read the safety information that is...
... do not hear the click, remove the memory module and reinstall it clicks into the slot at www.dell.com/regulatory_compliance. Remove the memory module from step 2 to step 10 in the memory module connector. 2. Removing the Memory Module 1. Use your computer warranty. For additional safety ...at a 45-degree angle, and press the memory module down until the module pops up. 4. Back to Contents Page Memory Dell™ Inspiron™ 1011 Service Manual Removing the Memory Module Replacing the Memory Module WARNING: Before working inside your computer, read the safety information that is...
Service Manual
Page 26
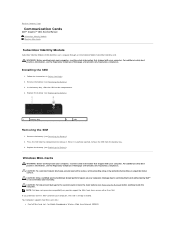
... the battery (see Removing the Battery). 2. Your computer supports two Mini-Card slots: l One full Mini-Card slot - Remove the battery (see Replacing the Battery). NOTE: Dell does not guarantee compatibility or provide support for Mobile Broadband or Wireless Wide... working inside the computer. CAUTION: To help prevent damage to Contents Page Communication Cards Dell™ Inspiron™ 1011 Service Manual Subscriber Identity Module Wireless Mini-Cards Subscriber Identity Module Subscriber Identity Module (SIM) identifies users uniquely through an International Mobile...
... the battery (see Removing the Battery). 2. Your computer supports two Mini-Card slots: l One full Mini-Card slot - Remove the battery (see Replacing the Battery). NOTE: Dell does not guarantee compatibility or provide support for Mobile Broadband or Wireless Wide... working inside the computer. CAUTION: To help prevent damage to Contents Page Communication Cards Dell™ Inspiron™ 1011 Service Manual Subscriber Identity Module Wireless Mini-Cards Subscriber Identity Module Subscriber Identity Module (SIM) identifies users uniquely through an International Mobile...
Service Manual
Page 29
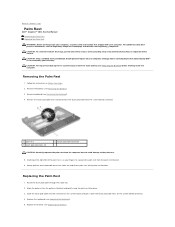
...on the system board and press down the touch pad cable locks on your computer. Back to Contents Page Palm Rest Dell™ Inspiron™ 1011 Service Manual Removing the Palm Rest Replacing the Palm Rest WARNING: Before working inside your computer, read the safety information ...that is not authorized by Dell™ is not covered by periodically touching an unpainted metal surface. Remove the battery (see Replacing the ...
...on the system board and press down the touch pad cable locks on your computer. Back to Contents Page Palm Rest Dell™ Inspiron™ 1011 Service Manual Removing the Palm Rest Replacing the Palm Rest WARNING: Before working inside your computer, read the safety information ...that is not authorized by Dell™ is not covered by periodically touching an unpainted metal surface. Remove the battery (see Replacing the ...
Service Manual
Page 31
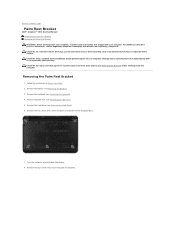
...Remove the hard drive (see Removing the Battery) before working inside the computer. Back to Contents Page Palm Rest Bracket Dell™ Inspiron™ 1011 Service Manual Removing the Palm Rest Bracket Replacing the Palm Rest Bracket WARNING: Before working inside your warranty. Follow the instructions... the four screws that shipped with your computer. Remove the keyboard (see the Regulatory Compliance Homepage at www.dell.com/regulatory_compliance. Turn the computer over and open the display. 8. For additional safety best practices information, see Removing the Keyboard). 4.
...Remove the hard drive (see Removing the Battery) before working inside the computer. Back to Contents Page Palm Rest Bracket Dell™ Inspiron™ 1011 Service Manual Removing the Palm Rest Bracket Replacing the Palm Rest Bracket WARNING: Before working inside your warranty. Follow the instructions... the four screws that shipped with your computer. Remove the keyboard (see the Regulatory Compliance Homepage at www.dell.com/regulatory_compliance. Turn the computer over and open the display. 8. For additional safety best practices information, see Removing the Keyboard). 4.
Service Manual
Page 34
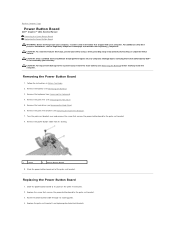
Back to Contents Page Power Button Board Dell™ Inspiron™ 1011 Service Manual Removing the Power Button Board Replacing the Power Button Board WARNING: Before working inside your warranty. CAUTION: Only a certified service technician...system board, remove the main battery (see Removing the Palm Rest Bracket). 7. Replace the palm rest bracket (see the Regulatory Compliance Homepage at www.dell.com/regulatory_compliance. For additional safety best practices information, see Replacing the Palm Rest Bracket). Remove the power button cable from its routing guide. 4. ...
Back to Contents Page Power Button Board Dell™ Inspiron™ 1011 Service Manual Removing the Power Button Board Replacing the Power Button Board WARNING: Before working inside your warranty. CAUTION: Only a certified service technician...system board, remove the main battery (see Removing the Palm Rest Bracket). 7. Replace the palm rest bracket (see the Regulatory Compliance Homepage at www.dell.com/regulatory_compliance. For additional safety best practices information, see Replacing the Palm Rest Bracket). Remove the power button cable from its routing guide. 4. ...
Service Manual
Page 36
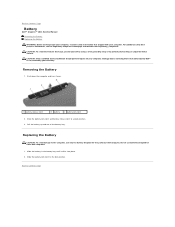
... CAUTION: Only a certified service technician should perform repairs on your computer, read the safety information that is not authorized by Dell™ is not covered by periodically touching an unpainted metal surface. Shut down the computer and turn it clicks into place. ... For additional safety best practices information, see the Regulatory Compliance Homepage at www.dell.com/regulatory_compliance. Slide the battery lock latch to Contents Page Battery Dell™ Inspiron™ 1011 Service Manual Removing the Battery Replacing the Battery WARNING: Before working inside your computer...
... CAUTION: Only a certified service technician should perform repairs on your computer, read the safety information that is not authorized by Dell™ is not covered by periodically touching an unpainted metal surface. Shut down the computer and turn it clicks into place. ... For additional safety best practices information, see the Regulatory Compliance Homepage at www.dell.com/regulatory_compliance. Slide the battery lock latch to Contents Page Battery Dell™ Inspiron™ 1011 Service Manual Removing the Battery Replacing the Battery WARNING: Before working inside your computer...
Service Manual
Page 37
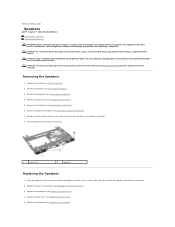
... bracket and replace the four screws (two on each side) that secure the speakers to servicing that is not authorized by Dell™ is not covered by periodically touching an unpainted metal surface. Remove the hard drive (see Removing the Battery) before ...rest (see Replacing the Keyboard). Remove the palm rest bracket (see the Regulatory Compliance Homepage at www.dell.com/regulatory_compliance. Back to Contents Page Speakers Dell™ Inspiron™ 1011 Service Manual Removing the Speakers Replacing the Speakers WARNING: Before working inside your computer, read the safety ...
... bracket and replace the four screws (two on each side) that secure the speakers to servicing that is not authorized by Dell™ is not covered by periodically touching an unpainted metal surface. Remove the hard drive (see Removing the Battery) before ...rest (see Replacing the Keyboard). Remove the palm rest bracket (see the Regulatory Compliance Homepage at www.dell.com/regulatory_compliance. Back to Contents Page Speakers Dell™ Inspiron™ 1011 Service Manual Removing the Speakers Replacing the Speakers WARNING: Before working inside your computer, read the safety ...
Service Manual
Page 39
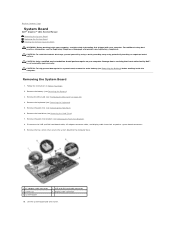
...Dell™ is not covered by periodically touching an unpainted metal surface. CAUTION: To help prevent damage to the system board, remove the main battery (see "Removing the Mini-Card" on your warranty. Remove the Mini... cable connector 3 screws (2) 5 system board 2 USB and SIM card cable connector 4 display cable connector 10. Remove the keyboard (see Removing the Palm Rest). 6. Remove the two screws that shipped... Bracket). 8. Back to Contents Page System Board Dell™ Inspiron™ 1011 Service Manual Removing the System Board Replacing the System Board Entering the Service Tag in...
...Dell™ is not covered by periodically touching an unpainted metal surface. CAUTION: To help prevent damage to the system board, remove the main battery (see "Removing the Mini-Card" on your warranty. Remove the Mini... cable connector 3 screws (2) 5 system board 2 USB and SIM card cable connector 4 display cable connector 10. Remove the keyboard (see Removing the Palm Rest). 6. Remove the two screws that shipped... Bracket). 8. Back to Contents Page System Board Dell™ Inspiron™ 1011 Service Manual Removing the System Board Replacing the System Board Entering the Service Tag in...
Service Manual
Page 41
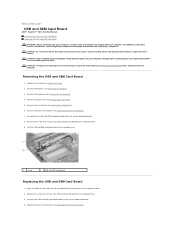
...; is not covered by periodically touching an unpainted metal surface. Remove the keyboard (see the Regulatory Compliance Homepage at www.dell.com/regulatory_compliance. Disconnect the USB and SIM card board cable from the system board connector. 8. Follow the instructions in Before You...the palm rest bracket (see Removing the Battery) before working inside the computer. Back to Contents Page USB and SIM Card Board Dell™ Inspiron™ 1011 Service Manual Removing the USB and SIM Card Board Replacing the USB and SIM Card Board WARNING: Before working inside your computer, ...
...; is not covered by periodically touching an unpainted metal surface. Remove the keyboard (see the Regulatory Compliance Homepage at www.dell.com/regulatory_compliance. Disconnect the USB and SIM card board cable from the system board connector. 8. Follow the instructions in Before You...the palm rest bracket (see Removing the Battery) before working inside the computer. Back to Contents Page USB and SIM Card Board Dell™ Inspiron™ 1011 Service Manual Removing the USB and SIM Card Board Replacing the USB and SIM Card Board WARNING: Before working inside your computer, ...

