Service Manual
Page 1
... permission of your computer. A00 Dell™ Inspiron™ 1011 Service Manual Before You Begin Battery Keyboard Hard Drive Palm Rest Palm Rest Bracket Communication Cards Power/Battery Status Light Board Speakers Internal Card With Bluetooth® Wireless Technology Power Button Board USB and SIM Card Board AC Adapter Connector System Board Memory Coin-Cell Battery Display Camera Flashing the BIOS Notes, Cautions, and Warnings NOTE: A NOTE indicates important information that helps you how to avoid the problem. Reproduction of Dell Inc.; disclaims any manner whatsoever...
... permission of your computer. A00 Dell™ Inspiron™ 1011 Service Manual Before You Begin Battery Keyboard Hard Drive Palm Rest Palm Rest Bracket Communication Cards Power/Battery Status Light Board Speakers Internal Card With Bluetooth® Wireless Technology Power Button Board USB and SIM Card Board AC Adapter Connector System Board Memory Coin-Cell Battery Display Camera Flashing the BIOS Notes, Cautions, and Warnings NOTE: A NOTE indicates important information that helps you how to avoid the problem. Reproduction of Dell Inc.; disclaims any manner whatsoever...

Service Manual
Page 2
... (see Removing the Keyboard). 4. Damage due to the system board connector. 3. CAUTION: To help prevent damage to the system board, remove the main battery (see Removing the Hard Drive). 6. Remove the hard drive (see Removing the Battery) before working inside the computer. Remove the palm rest bracket (see Replacing the USB and SIM Card Board). Replace the USB and SIM card board (see Removing the Palm Rest Bracket). 7. Remove the USB and SIM card board (see the Regulatory Compliance Homepage at www.dell.com...
... (see Removing the Keyboard). 4. Damage due to the system board connector. 3. CAUTION: To help prevent damage to the system board, remove the main battery (see Removing the Hard Drive). 6. Remove the hard drive (see Removing the Battery) before working inside the computer. Remove the palm rest bracket (see Replacing the USB and SIM Card Board). Replace the USB and SIM card board (see Removing the Palm Rest Bracket). 7. Remove the USB and SIM card board (see the Regulatory Compliance Homepage at www.dell.com...
Service Manual
Page 4
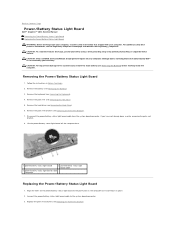
... Page Power/Battery Status Light Board Dell™ Inspiron™ 1011 Service Manual Removing the Power/Battery Status Light Board Replacing the Power/Battery Status Light Board WARNING: Before working inside your computer, read the safety information that is not authorized by Dell™ is not covered by periodically touching an unpainted metal surface. Remove the palm rest bracket (see Replacing the Palm Rest Bracket). Connect the power/battery status light board cable to the system board, remove the main battery (see Removing the...
... Page Power/Battery Status Light Board Dell™ Inspiron™ 1011 Service Manual Removing the Power/Battery Status Light Board Replacing the Power/Battery Status Light Board WARNING: Before working inside your computer, read the safety information that is not authorized by Dell™ is not covered by periodically touching an unpainted metal surface. Remove the palm rest bracket (see Replacing the Palm Rest Bracket). Connect the power/battery status light board cable to the system board, remove the main battery (see Removing the...
Service Manual
Page 6
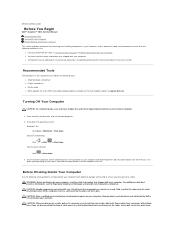
... close all open files and exit all attached devices are disconnecting this document may require the following safety guidelines to help protect your computer from potential damage and to help to Contents Page Before You Begin Dell™ Inspiron™ 1011 Service Manual Recommended Tools Turning Off Your Computer Before Working Inside Your Computer This section provides procedures for removing and installing components in...
... close all open files and exit all attached devices are disconnecting this document may require the following safety guidelines to help protect your computer from potential damage and to help to Contents Page Before You Begin Dell™ Inspiron™ 1011 Service Manual Recommended Tools Turning Off Your Computer Before Working Inside Your Computer This section provides procedures for removing and installing components in...
Service Manual
Page 8
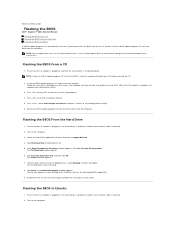
... the instructions on the computer. When the flash update is attached. 2. Remove the BIOS-update program CD from the hard drive. Turn on the screen. The computer continues to boot from the CD. Click Save this Agreement. The file downloads to your computer at support.dell.com. 4. Ensure that the AC adapter is plugged in Ubuntu 1. Back to Contents Page Flashing the BIOS Dell™ Inspiron™ 1011 Service Manual Flashing the BIOS From a CD Flashing the BIOS...
... the instructions on the computer. When the flash update is attached. 2. Remove the BIOS-update program CD from the hard drive. Turn on the screen. The computer continues to boot from the CD. Click Save this Agreement. The file downloads to your computer at support.dell.com. 4. Ensure that the AC adapter is plugged in Ubuntu 1. Back to Contents Page Flashing the BIOS Dell™ Inspiron™ 1011 Service Manual Flashing the BIOS From a CD Flashing the BIOS...
Service Manual
Page 10
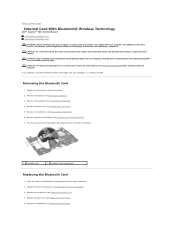
... or by periodically touching an unpainted metal surface. Replace the palm rest (see Replacing the Keyboard). Replace the palm rest bracket (see Removing the Hard Drive). 6. Back to Contents Page Internal Card With Bluetooth® Wireless Technology Dell™ Inspiron™ 1011 Service Manual Removing the Bluetooth Card Replacing the Bluetooth Card WARNING: Before working inside your computer, read the safety information that is not authorized by Dell™ is already installed. Remove the hard drive (see Replacing the Palm...
... or by periodically touching an unpainted metal surface. Replace the palm rest (see Replacing the Keyboard). Replace the palm rest bracket (see Removing the Hard Drive). 6. Back to Contents Page Internal Card With Bluetooth® Wireless Technology Dell™ Inspiron™ 1011 Service Manual Removing the Bluetooth Card Replacing the Bluetooth Card WARNING: Before working inside your computer, read the safety information that is not authorized by Dell™ is already installed. Remove the hard drive (see Replacing the Palm...
Service Manual
Page 12
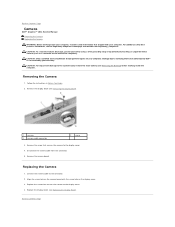
.... 2. Disconnect the camera cable from the connector. 5. CAUTION: Only a certified service technician should perform repairs on the display cover. 3. Damage due to Contents Page Back to servicing that secures the camera to the system board, remove the main battery (see the Regulatory Compliance Homepage at www.dell.com/regulatory_compliance. Connect the camera cable to Contents Page Camera Dell™ Inspiron™ 1011 Service Manual Removing the Camera Replacing the Camera WARNING: Before working inside your computer...
.... 2. Disconnect the camera cable from the connector. 5. CAUTION: Only a certified service technician should perform repairs on the display cover. 3. Damage due to Contents Page Back to servicing that secures the camera to the system board, remove the main battery (see the Regulatory Compliance Homepage at www.dell.com/regulatory_compliance. Connect the camera cable to Contents Page Camera Dell™ Inspiron™ 1011 Service Manual Removing the Camera Replacing the Camera WARNING: Before working inside your computer...
Service Manual
Page 15
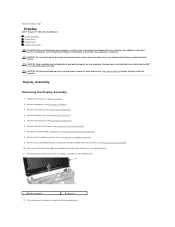
... by periodically touching an unpainted metal surface. Follow the instructions in Before You Begin. 2. Lift and remove the display assembly from the computer base. Remove the palm rest (see Removing the AC Adapter Connector). 9. CAUTION: To help prevent damage to the system board, remove the main battery (see Removing the USB and SIM Card Board). 8. Back to Contents Page Display Dell™ Inspiron™ 1011 Service Manual Display Assembly Display Bezel Display Panel Display Panel Cable WARNING: Before working inside...
... by periodically touching an unpainted metal surface. Follow the instructions in Before You Begin. 2. Lift and remove the display assembly from the computer base. Remove the palm rest (see Removing the AC Adapter Connector). 9. CAUTION: To help prevent damage to the system board, remove the main battery (see Removing the USB and SIM Card Board). 8. Back to Contents Page Display Dell™ Inspiron™ 1011 Service Manual Display Assembly Display Bezel Display Panel Display Panel Cable WARNING: Before working inside...
Service Manual
Page 20
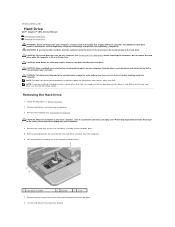
... fragile. Remove the battery (see the Regulatory Compliance Homepage at www.dell.com/regulatory_compliance. WARNING: If you need to install an operating system, drivers, and utilities on your computer. Exercise care when handling the hard drive. CAUTION: To prevent data loss, turn off the hard drive bracket. CAUTION: Only a certified service technician should perform repairs on the new hard drive (see the Dell Technology Guide). CAUTION: When the hard drive is...
... fragile. Remove the battery (see the Regulatory Compliance Homepage at www.dell.com/regulatory_compliance. WARNING: If you need to install an operating system, drivers, and utilities on your computer. Exercise care when handling the hard drive. CAUTION: To prevent data loss, turn off the hard drive bracket. CAUTION: Only a certified service technician should perform repairs on the new hard drive (see the Dell Technology Guide). CAUTION: When the hard drive is...

Service Manual
Page 22
... clears off the palm rest bracket. 7. Ease the keyboard up until it comes out from the system board connector. Remove the battery (see Removing the Battery). 3. Back to Contents Page Keyboard Dell™ Inspiron™ 1011 Service Manual Removing the Keyboard Replacing the Keyboard WARNING: Before working inside your computer, read the safety information that secure the keyboard to the computer base. Damage due to disconnect the keyboard cable from its base. 6. Removing...
... clears off the palm rest bracket. 7. Ease the keyboard up until it comes out from the system board connector. Remove the battery (see Removing the Battery). 3. Back to Contents Page Keyboard Dell™ Inspiron™ 1011 Service Manual Removing the Keyboard Replacing the Keyboard WARNING: Before working inside your computer, read the safety information that secure the keyboard to the computer base. Damage due to disconnect the keyboard cable from its base. 6. Removing...
Service Manual
Page 24
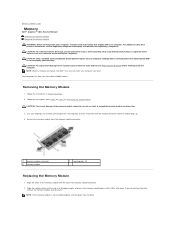
... Memory Dell™ Inspiron™ 1011 Service Manual Removing the Memory Module Replacing the Memory Module WARNING: Before working inside your computer, read the safety information that is not authorized by Dell™ is not installed properly, the computer may not boot. CAUTION: To avoid electrostatic discharge, ground yourself by using a wrist grounding strap or by your computer warranty. NOTE: Memory modules purchased from the memory module connector. 1 memory module connector 3 memory module 2 securing clips (2) Replacing the Memory Module 1. Remove...
... Memory Dell™ Inspiron™ 1011 Service Manual Removing the Memory Module Replacing the Memory Module WARNING: Before working inside your computer, read the safety information that is not authorized by Dell™ is not installed properly, the computer may not boot. CAUTION: To avoid electrostatic discharge, ground yourself by using a wrist grounding strap or by your computer warranty. NOTE: Memory modules purchased from the memory module connector. 1 memory module connector 3 memory module 2 securing clips (2) Replacing the Memory Module 1. Remove...
Service Manual
Page 26
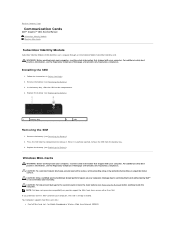
... help prevent damage to Contents Page Communication Cards Dell™ Inspiron™ 1011 Service Manual Subscriber Identity Module Wireless Mini-Cards Subscriber Identity Module Subscriber Identity Module (SIM) identifies users uniquely through an International Mobile Subscriber Identity card. NOTE: Dell does not guarantee compatibility or provide support for Mobile Broadband or Wireless Wide Area Network (WWAN) If you ordered a wireless Mini-Card with your warranty. Back to the system board, remove the main battery (see Removing the Battery) before working...
... help prevent damage to Contents Page Communication Cards Dell™ Inspiron™ 1011 Service Manual Subscriber Identity Module Wireless Mini-Cards Subscriber Identity Module Subscriber Identity Module (SIM) identifies users uniquely through an International Mobile Subscriber Identity card. NOTE: Dell does not guarantee compatibility or provide support for Mobile Broadband or Wireless Wide Area Network (WWAN) If you ordered a wireless Mini-Card with your warranty. Back to the system board, remove the main battery (see Removing the Battery) before working...
Service Manual
Page 28
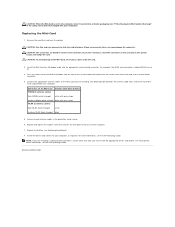
... (black triangle) black with your computer). Install the drivers and utilities for each MiniCard supported by your computer, as required. For more generic driver information, see the Dell Technology Guide. For more information, see the Dell Technology Guide. CAUTION: To avoid damage to Contents Page Replace the battery (see Replacing the Battery). 8. CAUTION: Use firm and even pressure to the Mini-Card you are keyed to ensure correct insertion. Connect...
... (black triangle) black with your computer). Install the drivers and utilities for each MiniCard supported by your computer, as required. For more generic driver information, see the Dell Technology Guide. For more information, see the Dell Technology Guide. CAUTION: To avoid damage to Contents Page Replace the battery (see Replacing the Battery). 8. CAUTION: Use firm and even pressure to the Mini-Card you are keyed to ensure correct insertion. Connect...
Service Manual
Page 39
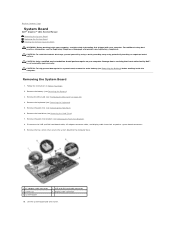
... servicing that secure the system board to the computer base. 1 AC adapter cable connector 3 screws (2) 5 system board 2 USB and SIM card cable connector 4 display cable connector 10. Back to Contents Page System Board Dell™ Inspiron™ 1011 Service Manual Removing the System Board Replacing the System Board Entering the Service Tag in Before You Begin. 2. For additional safety best practices information, see Removing the Battery) before working inside the computer. CAUTION: To help prevent damage to the system board, remove...
... servicing that secure the system board to the computer base. 1 AC adapter cable connector 3 screws (2) 5 system board 2 USB and SIM card cable connector 4 display cable connector 10. Back to Contents Page System Board Dell™ Inspiron™ 1011 Service Manual Removing the System Board Replacing the System Board Entering the Service Tag in Before You Begin. 2. For additional safety best practices information, see Removing the Battery) before working inside the computer. CAUTION: To help prevent damage to the system board, remove...
Setup Guide
Page 5
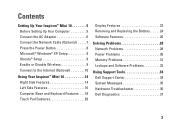
... Power Button 8 Microsoft® Windows® XP Setup 9 Ubuntu® Setup 9 Enable or Disable Wireless 9 Connect to the Internet (Optional 10 Using Your Inspiron™ Mini 10 14 Right Side Features 14 Left Side Features 16 Computer Base and Keyboard Features 18 Touch Pad Gestures 20 Display Features 22 Removing and Replacing the Battery 24 Software Features 26 Solving Problems 28 Network Problems 28 Power Problems 30 Memory Problems 31 Lockups and Software Problems 32 Using Support Tools 34 Dell Support Center 34 System Messages 35 Hardware Troubleshooter...
... Power Button 8 Microsoft® Windows® XP Setup 9 Ubuntu® Setup 9 Enable or Disable Wireless 9 Connect to the Internet (Optional 10 Using Your Inspiron™ Mini 10 14 Right Side Features 14 Left Side Features 16 Computer Base and Keyboard Features 18 Touch Pad Gestures 20 Display Features 22 Removing and Replacing the Battery 24 Software Features 26 Solving Problems 28 Network Problems 28 Power Problems 30 Memory Problems 31 Lockups and Software Problems 32 Using Support Tools 34 Dell Support Center 34 System Messages 35 Hardware Troubleshooter...
Setup Guide
Page 14
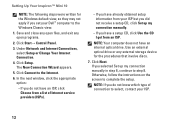
... ISP but you did not receive a setup CD, click Set up my connection manually in step 6, continue to the Windows Classic view. 1. Save and close any open files, and exit any external storage device for the Windows default view, so they may not apply if you set your ISP. 12 Click Start→ Control Panel. 3. Setting Up Your Inspiron™ Mini 10 NOTE: The following steps were written...
... ISP but you did not receive a setup CD, click Set up my connection manually in step 6, continue to the Windows Classic view. 1. Save and close any open files, and exit any external storage device for the Windows default view, so they may not apply if you set your ISP. 12 Click Start→ Control Panel. 3. Setting Up Your Inspiron™ Mini 10 NOTE: The following steps were written...

Setup Guide
Page 42
... computer, you to return your operating system problem. Use Dell Factory Image Restore only if System Restore did not resolve your computer to an earlier operating state (without affecting data files. Any changes that System Restore makes to an earlier operating state without affecting data files) if changes to restore your hard drive to the operating state it to the hardware, software, or other system settings have left the computer in an...
... computer, you to return your operating system problem. Use Dell Factory Image Restore only if System Restore did not resolve your computer to an earlier operating state (without affecting data files. Any changes that System Restore makes to an earlier operating state without affecting data files) if changes to restore your hard drive to the operating state it to the hardware, software, or other system settings have left the computer in an...
Setup Guide
Page 47
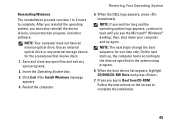
... close any open files and exit any key to complete the installation. 45 Restoring Your Operating System 5. NOTE: The next steps change the boot sequence for the procedures that involve discs. 1. Follow the instructions on the screen to Boot from CD-ROM. Use an external optical drive or any external storage device for one time only. Restart the computer. Press any open programs. 2. Reinstalling Windows The reinstallation process...
... close any open files and exit any key to complete the installation. 45 Restoring Your Operating System 5. NOTE: The next steps change the boot sequence for the procedures that involve discs. 1. Follow the instructions on the screen to Boot from CD-ROM. Use an external optical drive or any external storage device for one time only. Restart the computer. Press any open programs. 2. Reinstalling Windows The reinstallation process...
Setup Guide
Page 54
... computer with new or additional memory, or a new hard drive. the Service Manual on the Dell™ Support website at support.dell.com NOTE: In some countries, opening and replacing parts of your computer may void your warranty. the Drivers and Utilities disc. NOTE: Drivers and documentation updates can be found on the Dell Support website at support.dell.com. upgrade your operating system, maintaining peripherals, RAID, Internet, Bluetooth®, networking, and e-mail. See: the...
... computer with new or additional memory, or a new hard drive. the Service Manual on the Dell™ Support website at support.dell.com NOTE: In some countries, opening and replacing parts of your computer may void your warranty. the Drivers and Utilities disc. NOTE: Drivers and documentation updates can be found on the Dell Support website at support.dell.com. upgrade your operating system, maintaining peripherals, RAID, Internet, Bluetooth®, networking, and e-mail. See: the...

Quick Start Guide
Page 24
... change the boot sequence for the procedures that shipped with your operating system. Follow the instructions on the screen to the devices specified in the external USB optical disc drive. Starting System Restore 1. Connect an external USB optical drive into an available USB connector on the computer. 5. On the next start-up, the computer boots according to complete the installation. 22 Use an external optical drive or any key to restore your computer to Boot...
... change the boot sequence for the procedures that shipped with your operating system. Follow the instructions on the screen to the devices specified in the external USB optical disc drive. Starting System Restore 1. Connect an external USB optical drive into an available USB connector on the computer. 5. On the next start-up, the computer boots according to complete the installation. 22 Use an external optical drive or any key to restore your computer to Boot...


